3D Viewer and Tools
Overview of the 3D Viewer
The 3D Viewer is accessible for:
- Compositions in 3D Mode
- Scenes created in Autograph
- Imported 3D Assets (.usd, .usda, etc...)
To access the 3D Viewer, click twice on one of the above-listed items in the Project Panel. For Compositions, you also need to switch to 3D mode.
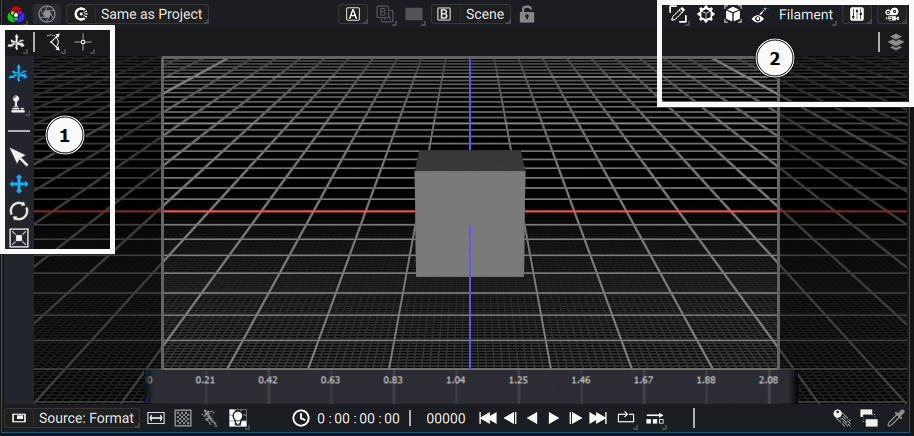
The Viewer will automatically switch to 3D Mode, and new tools and options will be available. In this following example, we chose to use a Scene, with a cube. First, we'll see the Transform 3D tool (1), then the 3D Options (2).
Viewing an imported 3D asset directly is only for display purposes and offers little to no room for modification. The Transform 3D tool for example is not usable in this mode. Moreover, you can't create or override cameras in the 3D Options
The Transform 3D Tool
The 3D tools are accessible from the left side of the Viewer, just like in 2D mode. For now, only the Transform 3D tool is available.
When the Transform 3D tool is activated, 4 options are available:
- Select (Shortcut alt+d)
- Translation (Shortcut alt+s)
- Rotation (Shortcut alt+r)
- Scale (Shortcut alt+s)
You can select a 3D element in the scene with any of the 4 options, by clicking on it. An object becomes highlighted when selected. To perform a multi-selection, hold shift. To deselect an element, hold ctrl+shift.
If any option but the default Select is activated, a corresponding gizmo will appear on selection
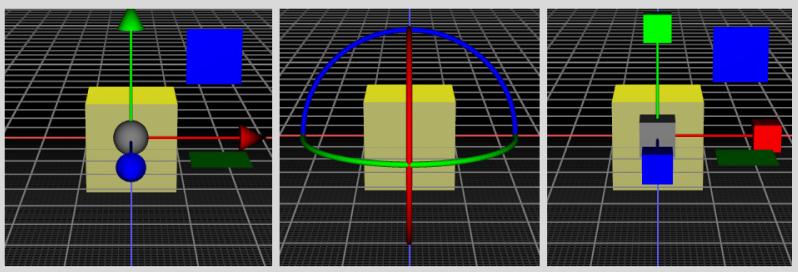
The Gizmo is here to help transform the selected object(s).
- Red means a transformation on the X axis/plane
- Green means a transformation on the Y axis/plane
- Blue means a transformation on the Z axis/plane
- Grey means a transformation on all axes
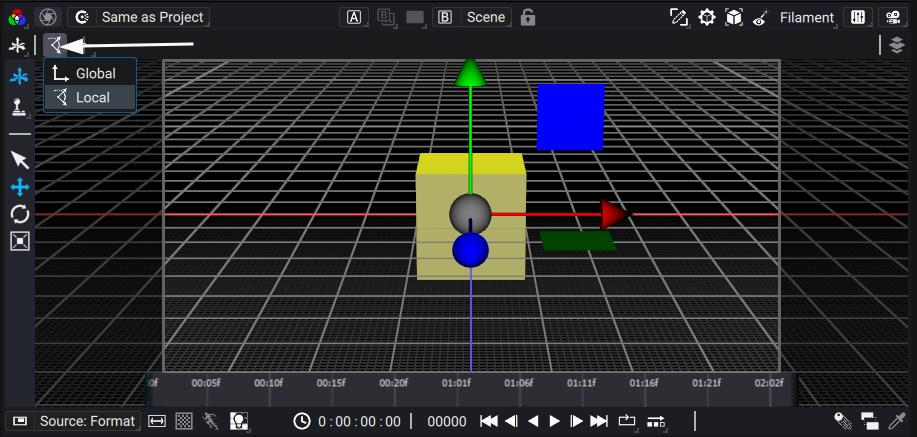
By default, the axes are shown in local mode. This means that the object's transformation matrix will also apply to the Gizmo. You can switch to Global, (often called World) mode for locking the Gizmo axis to the world axis. You can switch modes here:
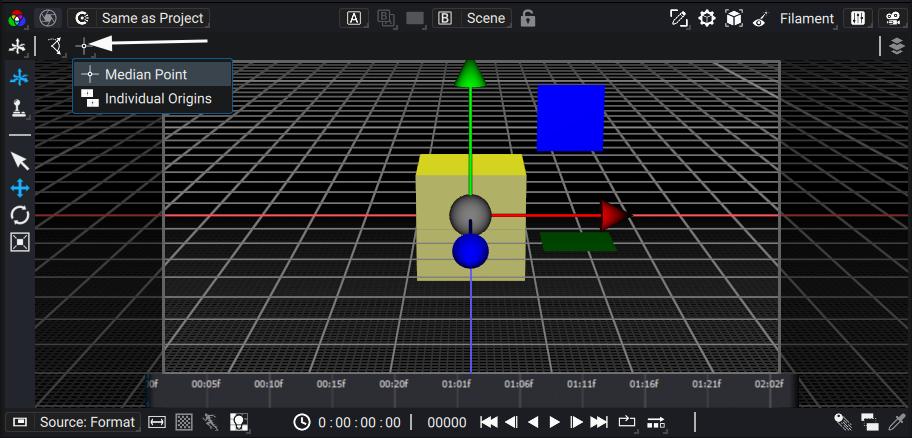
When selecting multiple objects, the default mode for the transformation origin is Median Point, which identically to 2D, means that the objects will be transformed relatives to the barycenter point of the selected objects.
You can also choose Individual Origins, which means that the objects will be transformed relative to their own transformation origin, without taking into account the other objects. You can switch modes here:
Transform 3D Tool without the Gizmo
You can also manipulate objects without using the Gizmo. With an object selected:
-
Press t to enter Translate Mode.
- Default Translation is constrained to the camera plane
- While in Translate Mode, press x, y or z to constrain the translation along those axes.
- While in Translate Mode, press shift+x, shift+y or shift+z to constrain on the YZ, XZ or XY plane respectively
-
Press r to enter Rotation Mode.
- Default Rotation is around the direction axis of the camera
- While in Rotation Mode, press x, y or z to rotate around those axes
-
Press s to enter Scale Mode
- Default Scale is a uniform scale
- While in Scale Mode, press x, y or z to scale along those axes
- While in Scale Mode, press shift+x, shift+y or shift+z to constrain on the YZ, XZ or XY plane respectively
Pressing any constraint a second time will cycle back to Default (i.e. no constraint) mode.
You can validate the transform with the mouse left-button, or cancel it with esc or the mouse right-button
3D Options
The 3D Options allow you to manipulate the render in the Viewer, and to perform actions such as hiding overlays or creating a new camera.

-
The Overlay menu allows you to hide elements that can help you set up the scene but are not visible during final render. This includes the 3D Grid or all the guides for non renderable objects such as cameras or lights.
-
The Post-process button allows you to disable the 3D Post-process to speed up the render in the Viewport
-
The Frame button allows you to frame the selected objects, or the entire scene if no objects are selected. More specifically, it means that the camera will move so that the entire bounding box of the objects (or scene) will be in the viewport. The focus/orbit point of the Camera becomes the center of the bounding box.
-
The Look At button keeps the camera in place but makes it look at the selected objects, or the entire scene, if no objects are selected. More specifically, the camera's direction vector is set at the center of the entire bounding box of the objects (or scene), while the camera's up vector is set to the Y axis. The focus/orbit point of the camera becomes the center of the bounding box.
-
The list of available renderers
-
The Settings menu for the chosen renderer
-
The Camera menu
The Camera Menu
The Camera menu lets you change the viewport camera parameters, create a new camera, look through an existing camera in the scene, and even directly change the parameters of existing cameras:
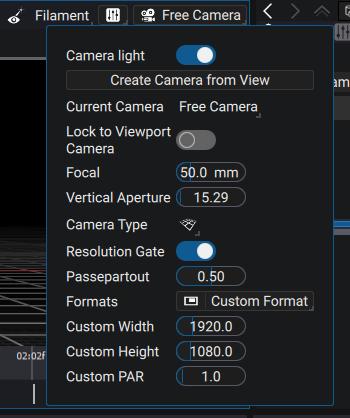
-
Camera Light checkbox enables/disables a default light coming from your camera. This lets you visualize objects in your scene without creating a dedicated light.
-
Create Camera From View button creates a new camera in the scene, based on the actual viewport camera.
-
Current Camera drop-down list allows you to look through the Free Camera (i.e. the viewport camera), or a camera in the scene. For a scene created in Autograph, this means any camera available, and for Compositions, this means any Camera Layer.
A camera with a lock icon on the list means that this camera is not editable.
- Lock to Viewport Camera checkbox is only available when looking from a camera that is editable. It locks the camera to the viewport camera.
This means that any change to the camera will be fully transferred to the locked camera and author those changes.
-
Focal and Vertical Aperture change those parameters on the current camera
-
Camera Type drop-down list lets you choose between Perspective and Orthographic types
-
Resolution Gate checkbox lets you display or hide the Resolution Gate (i.e. the colored rectangle that shows the camera's output format).
The Resolution Gate color changes depending of the current camera and options:
- If looking through a non-editable camera, the gate is orange/red
- If looking through the Free Camera or any editable camera, the gate is gray
- If looking through an editable camera, and the Lock To Camera button is on, the logo is blue.
-
Passepartout leys you show or hide the overscan (i.e. what is outside of the camera's output format). Everything in the overscan is black if the Passepartout is set to 1
-
Formats drop-down list lets you change the camera's output format. If a Custom Format is chosen, the Custom Width, Height, and PAR (Pixel Aspect Ratio) are available
The Camera menu displays the name of the current camera and its logo color follows the same color pattern as the Resolution Gate.

Moving the camera
The Current Camera can be manipulated directly from the Viewport. The three motions are Tumble, Zoom and Pan
-
Tumble:
- ctrl/cmd + left-button
- Tumble rotates the camera around the current focus/orbit point
-
Zoom:
- "Mouse wheel"
- Zoom moves the camera closer to or further from the focus/orbit point
Zoom actually moves the camera and doesn't change the focal parameter.
- Pan:
- middle-button
- alt + left-button
- Pan moves the focus/orbit point according to the Camera view plane.