Materials
Materials control the appearance of 3D objects in a Scene. Within Autograph, you can:
- Create new materials to use with 3D objects
- Assign materials to 3D objects
- Override an existing material
Creating a Material
To create a new Material, go to the Outliner panel, and select Material in the Add menu.
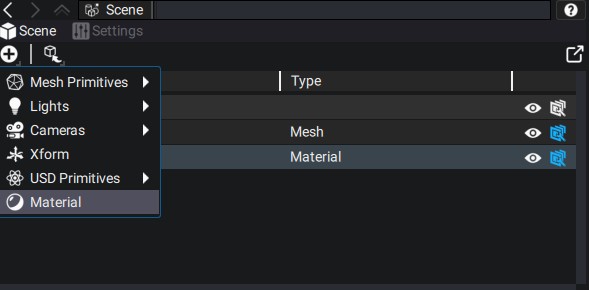
A new Material type primitive will be created. Select it to display its properties in the Properties panel.
Assigning a Material to an Object
After creating a Material, you need to assign it to one or more objects in your Scene. To assign a Material to an Object, (1) select the Object in the Outliner and (2) go to the Materials panel. (3) Using the drop-down menu, pick a Material from the list of available Materials in the Scene. Your Material is now assigned to an Object and should be visible in the Viewport.
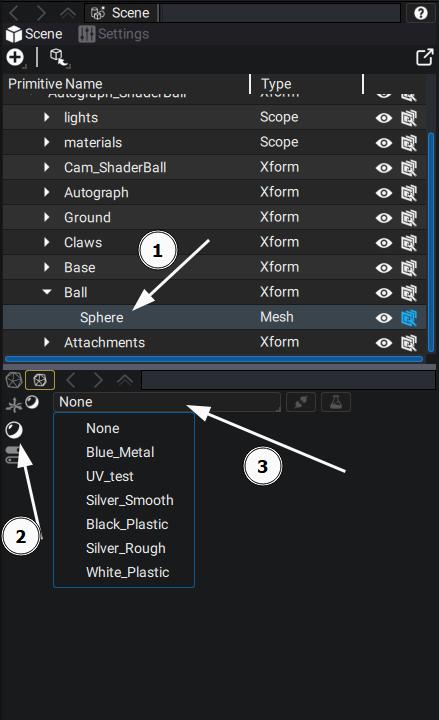
Do not forget to add a Light to your Scene, otherwise non-emissive materials will appear black.
Overriding a Material
Currently, when overriding a material loaded from an existing USD asset, Autograph will automatically load the texture maps and plug them in the right in the Material Property. However, this only works if the Material is defined by a UsdPreviewSurface shader. All material textures are loaded inside a folder named after the Material (Name_Material), and all Material folders are put inside a folder named after the Scene (Name_Textures).
To override an existing Material primitive, (1) navigate to the Material in the Outliner and (2) click on the Edit primitive button on the panel below.
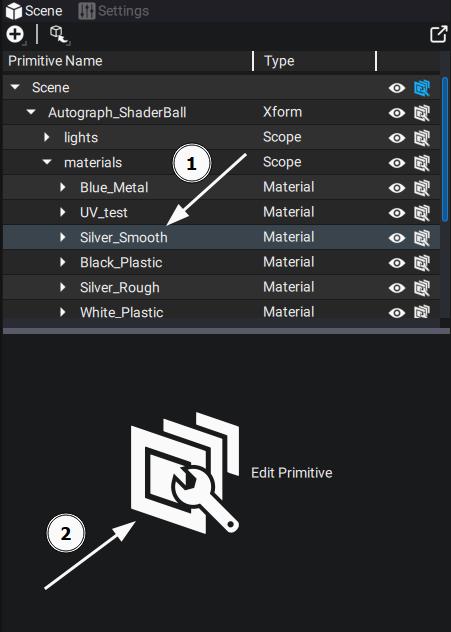
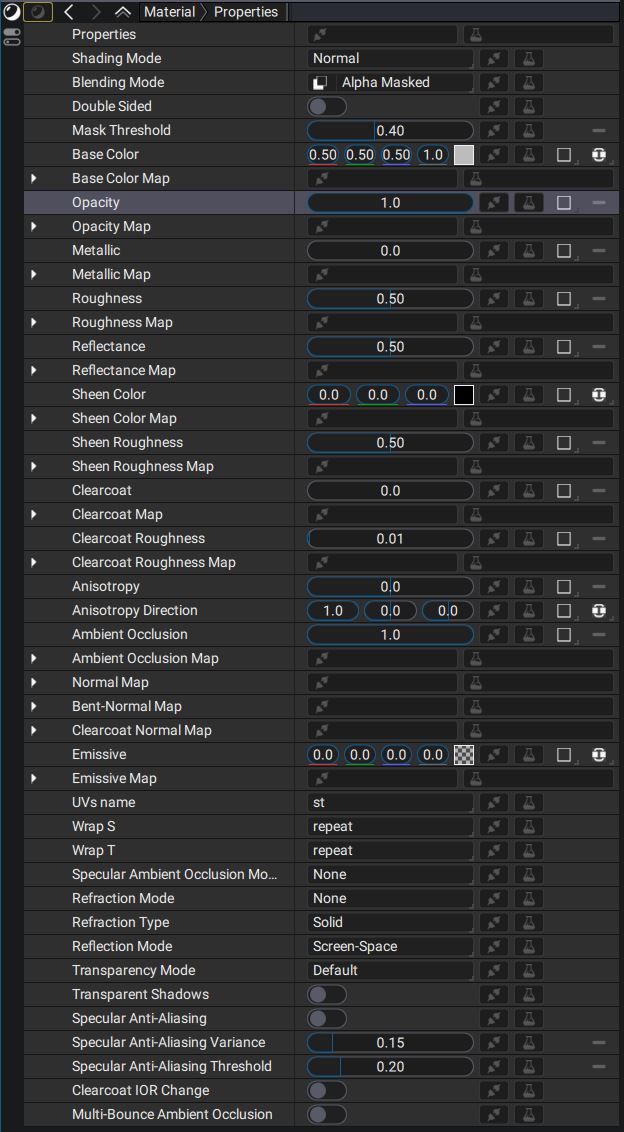
The properties of the overridden material are now displayed.
Material properties
Autograph has two rendering backends (render delegates): Storm, part of the USD/Hydra project, and Filament, a real-time physically based rendering engine. Each has different rendering capabilities and material models. Autograph offers a unified material model, which lets you specify your material once and have it work with both renderers.
Under the hood, the parameters of this unified model are translated to delegate-specific material models:
- for Storm, Material properties are translated to the corresponding
UsdPreviewSurfaceinput, when such an input exists. - for Filament, Material properties are translated to the Lit and Unlit models provided by Filament.
Texture Maps
Some Material properties have an associated Map parameter, which can be connected to a texture map in order to make the value vary over the surface of the Object. Map parameters are regular image parameters, meaning that anything you use as layer Source could also be used as an animated texture map on a 3D object. This includes:
- Video sources
- Generators
- Entire sub-compositions
Modifiers are also supported on texture maps.
When binding a Generator to a texture map parameter, make sure that the Generator's Output Format is not Unbounded, otherwise rendering will fail.
"Tangent-space normal maps" Normal maps should be specified in tangent space. We use MikkTSpace internally to generate a standard tangent space when tangents are not explicitly specified on a USD primitive.
List of Material Properties
Some parameters are only supported by a specific render delegate, this is indicated below in the "Supported Delegates" column.
Some Material properties have both a numeric input and a texture map input (e.g. Base Color and Base Color Map). The texture map input, if it is connected, takes precedence over the numeric input.
| Parameter | Description | Supported Delegates |
|---|---|---|
| Shading Mode |
Selects the overall shading model of the material.
|
Filament only
(on Storm, only Normal is supported) |
| Blending Mode | Defines how the material blends with the rest of the scene. See the dedicated section below. | Filament only |
| Mask Threshold | Alpha threshold used by the Alpha Masked blending mode. | All |
| Base Color
Base Color Map |
Base color of the material (diffuse albedo, or specular color for Metallic materials).
|
All |
| Opacity
Opacity Map |
Controls the opacity of the material. | Filament only |
| Metallic
Metallic Map |
Binary value that specifies whether the material is metallic. | Filament only |
| Roughness
Roughness Map |
Controls the perceived smoothness of the surface. See Roughness. | Filament only |
| Reflectance
Reflectance Map |
For non-metallic materials, controls the specular intensity and index of refraction. See Reflectance. | Filament only |
| Sheen Color
Sheen Color Map |
Controls the appearance of the sheen layer above the base layer and below the clear coat. See Sheen color. | Filament only |
| Sheen Roughness
Sheen Roughness Map |
Controls the roughness of the sheen layer. See Sheen roughness. | Filament only |
| Clearcoat
Clearcoat Map |
Controls the strength of the clear coat layer. See Clear coat. | Filament only |
| Clearcoat Roughness
Clearcoat Roughness Map |
Controls the roughness of the clear coat layer. See Clear coat roughness. | Filament only |
| Normal Map | Defines the normal at a point on the surface. See Normal. | All |
| Bent-Normal Map | Defines the average unoccluded direction at a point on the surface. See Bent normal. | Filament only |
| Clearcoat Normal Map | Defines the normal used for the clear coat layer at a point on the surface. See Clear coat normal. | Filament only |
| Anisotropy | Enables anisotropic highlights. See Anisotropy. | Filament only |
| Anisotropy Direction | Controls the direction of anisotropic highlights. See Anisotropy direction. | Filament only |
| Ambient Occlusion
Ambient Occlusion Map |
Defines how much ambient light is accessible to a point on the surface. See Ambient occlusion. | All |
| Emissive
Emissive Map |
Controls the emissive component of the material. | All |
| UVs name | Name of the texcoord primvar used on the primitive. | All |
| Wrap S | Wrapping mode for the S texture coordinate. | All |
| Wrap T | Wrapping mode for the T texture coordinate. | All |
| Specular Ambient Occlusion Mode | See Lighting: specularAmbientOcclusion. | Filament |
| Refraction Mode |
Controls the refraction effect.
|
Filament |
| Refraction Type | Defines the refraction model used. See Blending and transparency: refractionType. | Filament |
| Reflection Mode |
Controls the source of specular reflections.
|
Filament |
| Transparency Mode | Controls how transparent objects are rendered. See Blending and transparency: transparency. | Filament |
| Transparent Shadows | Enables shadows on transparent objects. See Lighting: transparentShadow. | Filament |
| Specular Anti-Aliasing | Enables aliasing reduction on specular highlights. See Anti-aliasing: specularAntiAliasing. | Filament |
| Specular Anti-Aliasing Variance | See Anti-aliasing: specularAntiAliasingVariance. | Filament |
| Specular Anti-Aliasing Threshold | See Anti-aliasing: specularAntiAliasingThreshold. | Filament |
| Clearcoat IOR Change | Enables attenuation of the base layer due to the change in index of refraction in the clear coat layer. See Lighting: clearCoatIorChange. | Filament |
| Multi-Bounce Ambient Occlusion | See Lighting: multiBounceAmbientOcclusion. | Filament |
Blending Mode
With the Filament render delegate, the Blending mode options control how the Material blends with the rest of the Scene:
| Blending mode | Description |
|---|---|
| Opaque | Blending is disabled. The alpha channel of the material's output is ignored. |
| Transparent |
Blending is enabled. The material's output is alpha-composited with the background.
This is useful for materials with smooth, semi-transparent alpha, such as keyer results. Note that transparent materials cannot intersect correctly with each other; they only intersect properly with non-transparent materials. Their Z order can still be controlled by ordering the centroid of the object's bounding box along the Z axis. |
| Alpha masked |
Blending is disabled. This mode enables alpha masking.
The alpha channel of the material's output determines whether a fragment is discarded, using the Mask Threshold parameter. This is useful for materials with fully opaque or fully transparent regions that need to intersect properly. Semi-transparent areas are clipped according to Mask Threshold and may appear jagged; use Transparent instead in that case. |
| Multiply | Blending is enabled. The material's output is multiplied with the render target content, which darkens the result. |
| Screen | Blending is enabled. This is effectively the opposite of Multiply: the render target content is brightened. |
| Fade |
Acts like Transparent, but transparency is also applied to specular lighting.
In Transparent mode, the material's alpha values affect only diffuse lighting. This mode is useful for fading lit objects in and out. |
The blending mode is ignored when using the Storm render delegate.
When requesting the Depth AOV under Composition > 3D Settings, what is written in the depth buffer depends on the blending mode of the material:
- Opaque: the Alpha channel is ignored when writing the depth.
- All other modes are equivalent to selecting Alpha Masking: the depth target is written only for pixels with an Alpha value greater than the Mask Threshold specified on the material.