Sub-Compositions
In the previous sections of the documentation, we described a composition as a box containing layers and used the visual example of a hamburger with its layered ingredients inside of a container/box. Just like you can put a box inside of another box, you can put a composition into another composition.
Remember that a layer is a line in the stack, and its appearance depends on the source used. The purpose of a composition is to render an image according to the stack of layers that it houses. So you can use this resulting image as the source of a layer in other compositions. This layer is then called a sub-composition (or sub-comp for short). It's in fact a layer like the others, but this denomination allows us to indicate that a composition is used as a source by a layer.
In After Effects, this same concept is known as a Precomposition; however, Autograph offers additional options.
Creating Sub-Comps:
Using a sub-composition is done in exactly the same way as any layer. It is possible to:
- Drag and drop a composition from the Project panel into another one in the Timeline
- Define a composition as the source of an existing layer by clicking on its Generator slot
In both cases, your layer will reference an existing composition, visible in the Project panel. The term reference is really important here, because the source uses the result of this composition as an input image. If a change is made to this referenced composition, the source of the layer/sub-comp will automatically be updated.
If you drag and drop the same composition twice to generate two layers/sub-comps, these two layers will reference the same source. In the same way, any change made to the source composition will update the source of both layers.
The same behavior applies if you drag a composition only once, then duplicate this sub-comp to generate a second layer.
Beware of dependency loops:
Any composition can be dropped into another one, but there one restriction. You cannot create any dependency loop. To get a better understanding of this issue, imagine you have two empty comps in the Project panel, "Comp1" and "Comp2":
- You start to double-click on "Comp1" to open it in the Timeline, and you drag and drop "Comp2" as a new layer/sub-comp
- Now you double-click on "Comp2" to open it in the Timeline, and you try drag and drop "Comp1" into it!
It's like putting the hamburger container into a bag, then trying to put the bag in the container. It is completely paradoxical.
That's why Autograph won't allow you to do this second drag and drop. The cursor of your mouse will be replaced by a "no-entry sign to indicate that this action is not allowed.
Subcomp and Group
Now you know that it's possible to place one composition inside of another, using it as a Source for a new layer; but, this requires anticipating that some layers must be grouped into a composition, before dragging this composition into another one.
The need to group layers in a sub-comp can often become apparent during the stacking process. Let's imagine that our layer stack looks like:
- Logo_Part003
- Logo_Part002
- Logo_Part001
- Background_Part002
- Background_Part001
It could be convenient to group the "Background" layers into a sub-comp to apply some Modifiers onto it for example, and do the same in another sub-comp for all "Logo" layers.
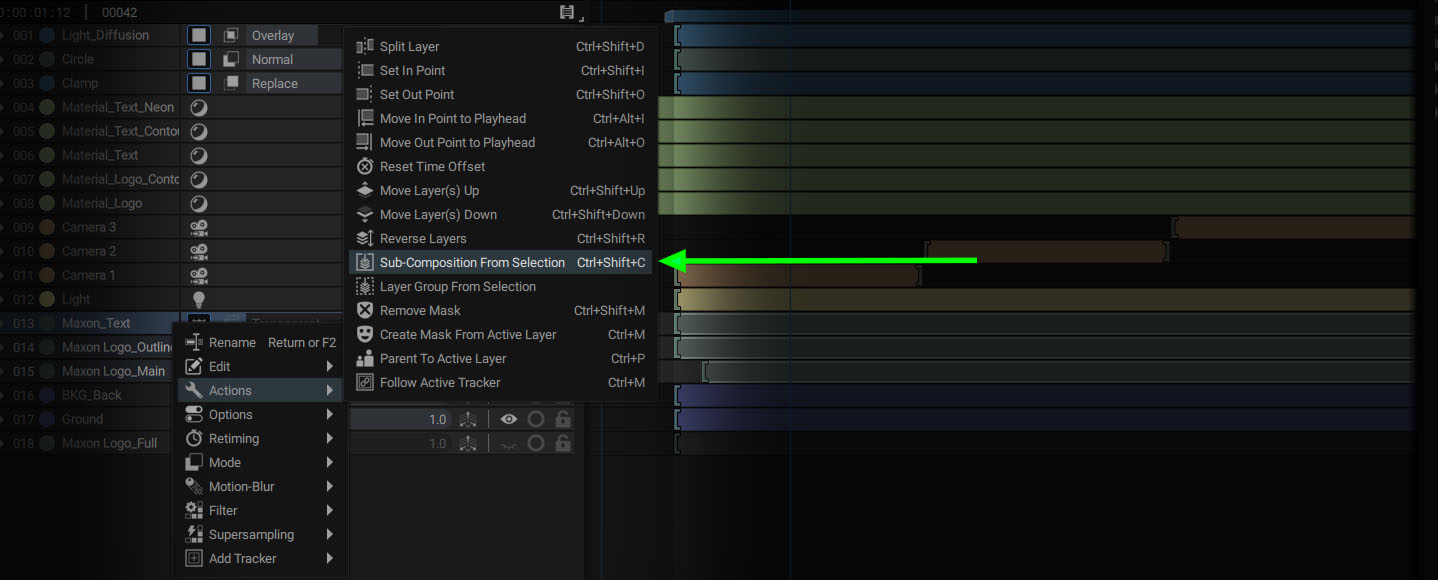
This can be done by selecting a group of layers, then right-clicking and entering the Actions section and selecting Sub-composition from Selection. A pop-up will appear asking you to name this new composition. After validating, the new composition will appear in the Project panel, and the selected layers will be replaced by this sub-comp.
After creating these two sub-comps, there will only be two layers visible in the stack:
- Logo_SubComp
- Background_Subcomp

Using a Sub-Comp as a Simple Group
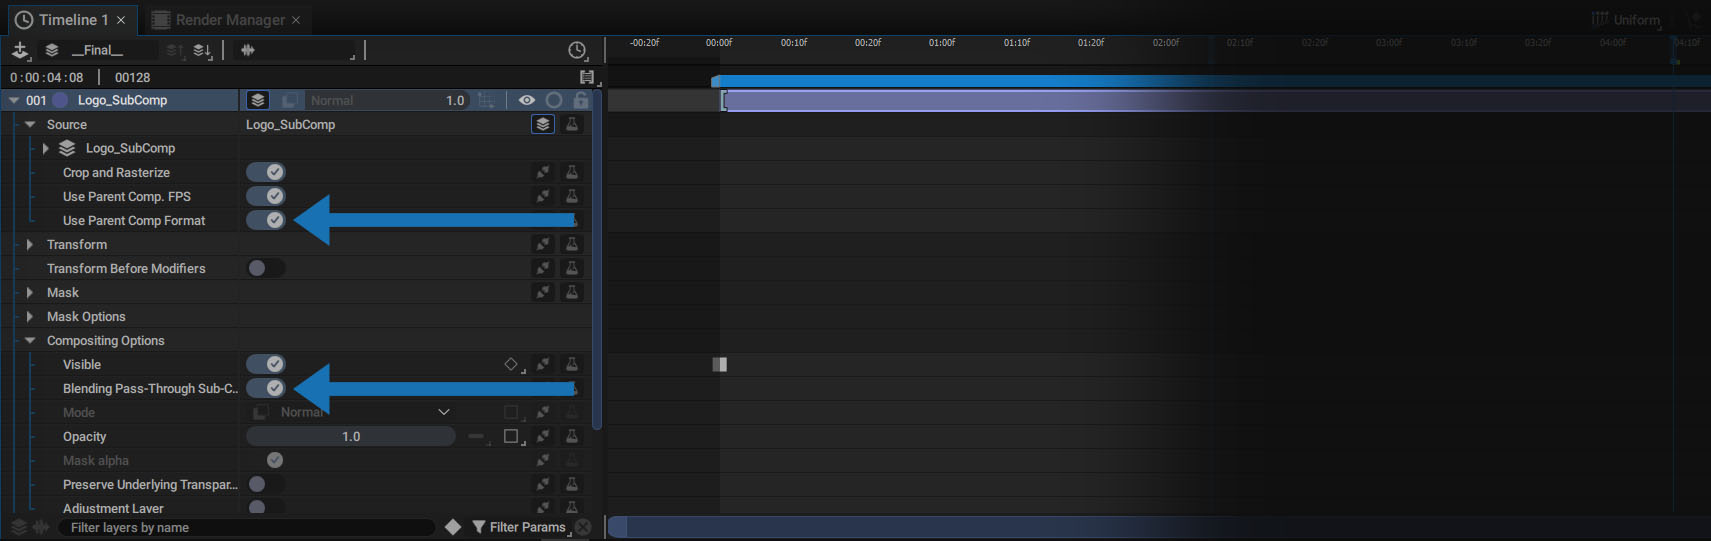
The Actions menu offers another way to gather layers in a sub-comp, called Layer Group From Selection. The process is exactly the same, but two composition options are automatically turned ON:
- Blending Pass Through Sub-Comp: the blending modes of all inner layers will be preserved as if they still were in the main composition.
- Use Parent Comp Format: if some layers are positioned according to the composition format (using Composition info or Anchor to comp for instance) to create a responsive design template. This behavior will still be evaluated according to the parent comp format.
The sub-comp then behaves as a simple group, with the dual purpose of better organizing its layers and defining a group of graphic elements to replicate by using a Layer ImageGenerator for example.
Sub-Comp specific Parameters
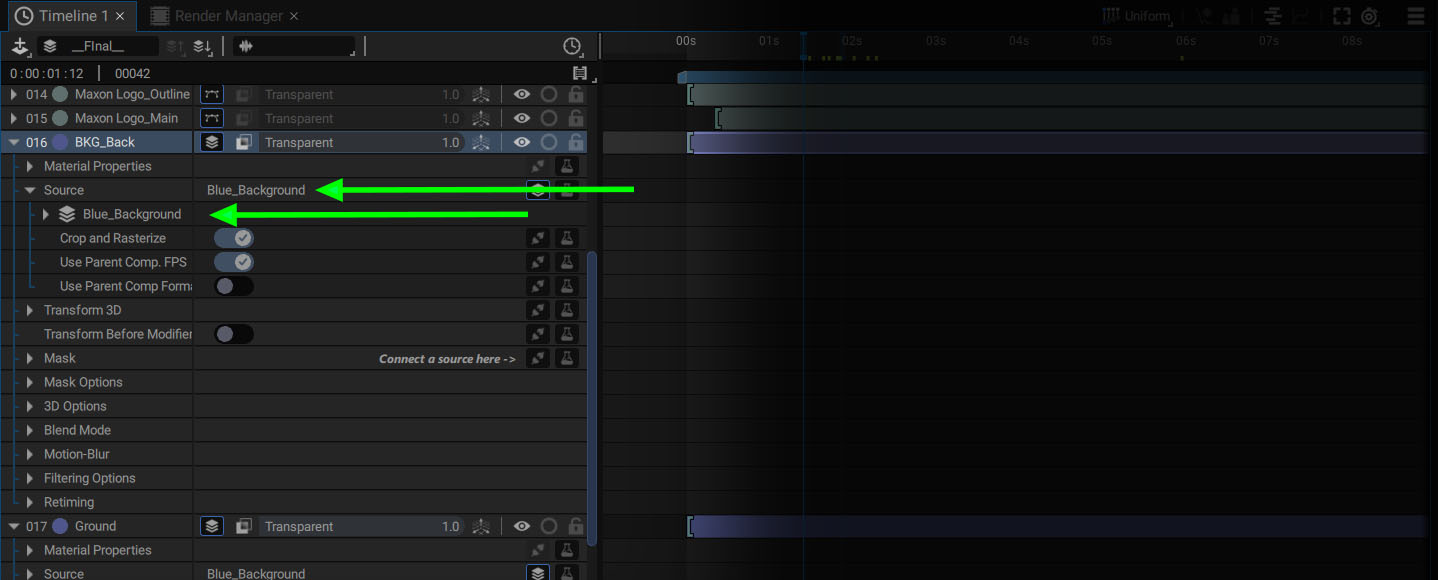
If a composition is used as a layer source, additional parameters will appear. Let's unfold the main line of this sub-comp to see what happens:

As for each source, it is possible to click on the triangle to the left of its name to access its parameters. There are also three checkbox params, just below:
- Crop and Rasterize
- Use Parent Comp. FPS
- Use Parent Comp. Format
Crop and Rasterize (ON by default)
Let's assume the following case which is mostly similar with some minors differences:
We create two compositions in the Project panel:
- "Comp1", with a 640×480 format (Preset: "PC VIDEO")
- "Comp2", with a 1920×1080 format (Preset: "HD")
In "Comp1":
- We add a simple CircleGenerator, creating a new layer
- We move this circle outside of the composition format. If Viewer clipping is ON, the circle should be partially cropped.
Now let's drop Comp1 into Comp2 as a new sub-comp. By default, we can see that the circle is cropped.
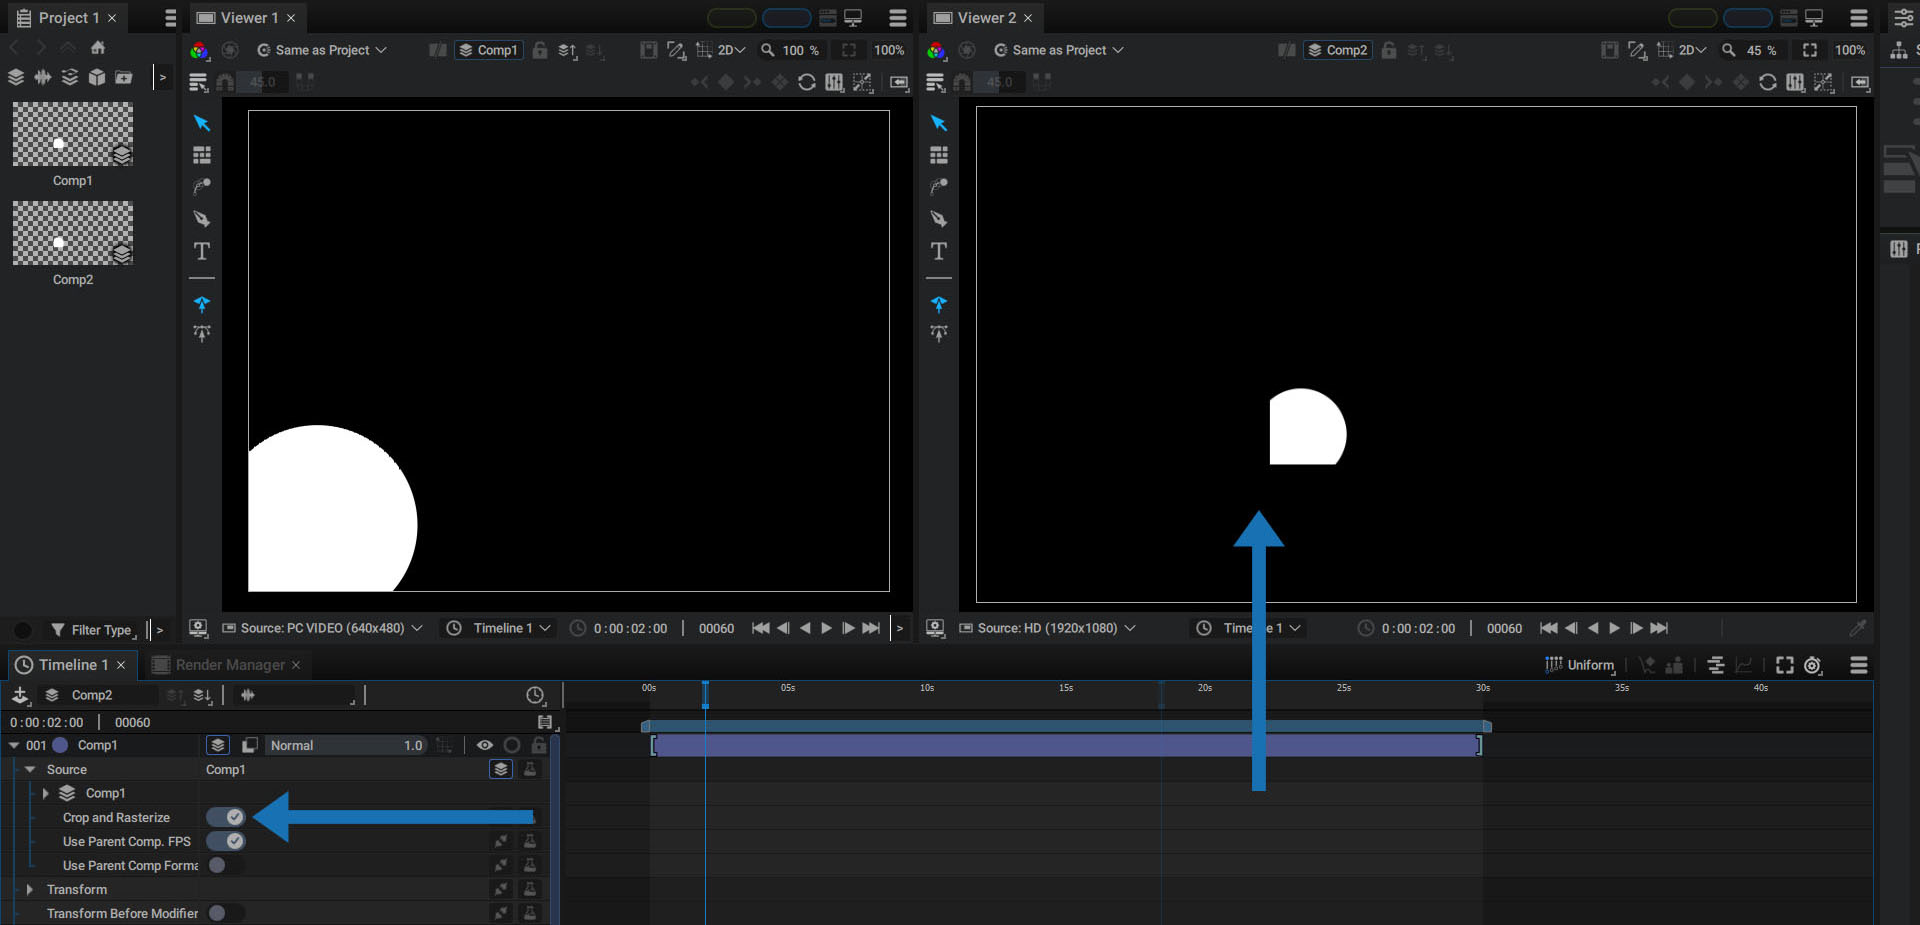
In the composition section, we mentioned that a comp embeds a format, but that it is also infinite in size. By default, when using a sub-comp, Autograph crops its content according its format; but, if Crop and Rasterize is turned OFF, the source format ("Comp1" here), will be used to crop the content.

Use Parent Comp. FPS (ON by default)
Each comp embeds a frame rate, defining the number of Frames Per Second, or FPS for short.
Let's assume the following case:
We create two compositions in the Project panel:
- "Comp1": HD Format at 8 FPS
- "Comp2": HD Format at 30 FPS
In "Comp1", a simple circle is animated, moving in loop from left to right.
If we drop "Comp1" into "Comp2" as a sub-comp:
- The Parent Comp. FPS will replace the source FPS by default. So, Comp1 will inherit the FPS from Comp2 and will be played at 30 FPS.
- If Parent Comp. FPS is turned OFF, this sub-comp will be played using its original FPS, by using the same images several times.
Keep in mind that now, 30 frames per second are computed for this sub-comp; but, by showing the same image several times, we visually see a jerky animation. The duration will be the same, because Autograph uses seconds and not frames as its timebase, but the number of different intermediate positions will be lower than the one created by the parent comp.
Use Parent Comp. Format (OFF by default)
Let's take a look at the following case in which we create two compositions in the Project panel:
- "Comp1", with a 640x480 format (Preset: "PC VIDEO")
- "Comp2", with a 1920x1080 format (Preset: "HD")
In "Comp1":
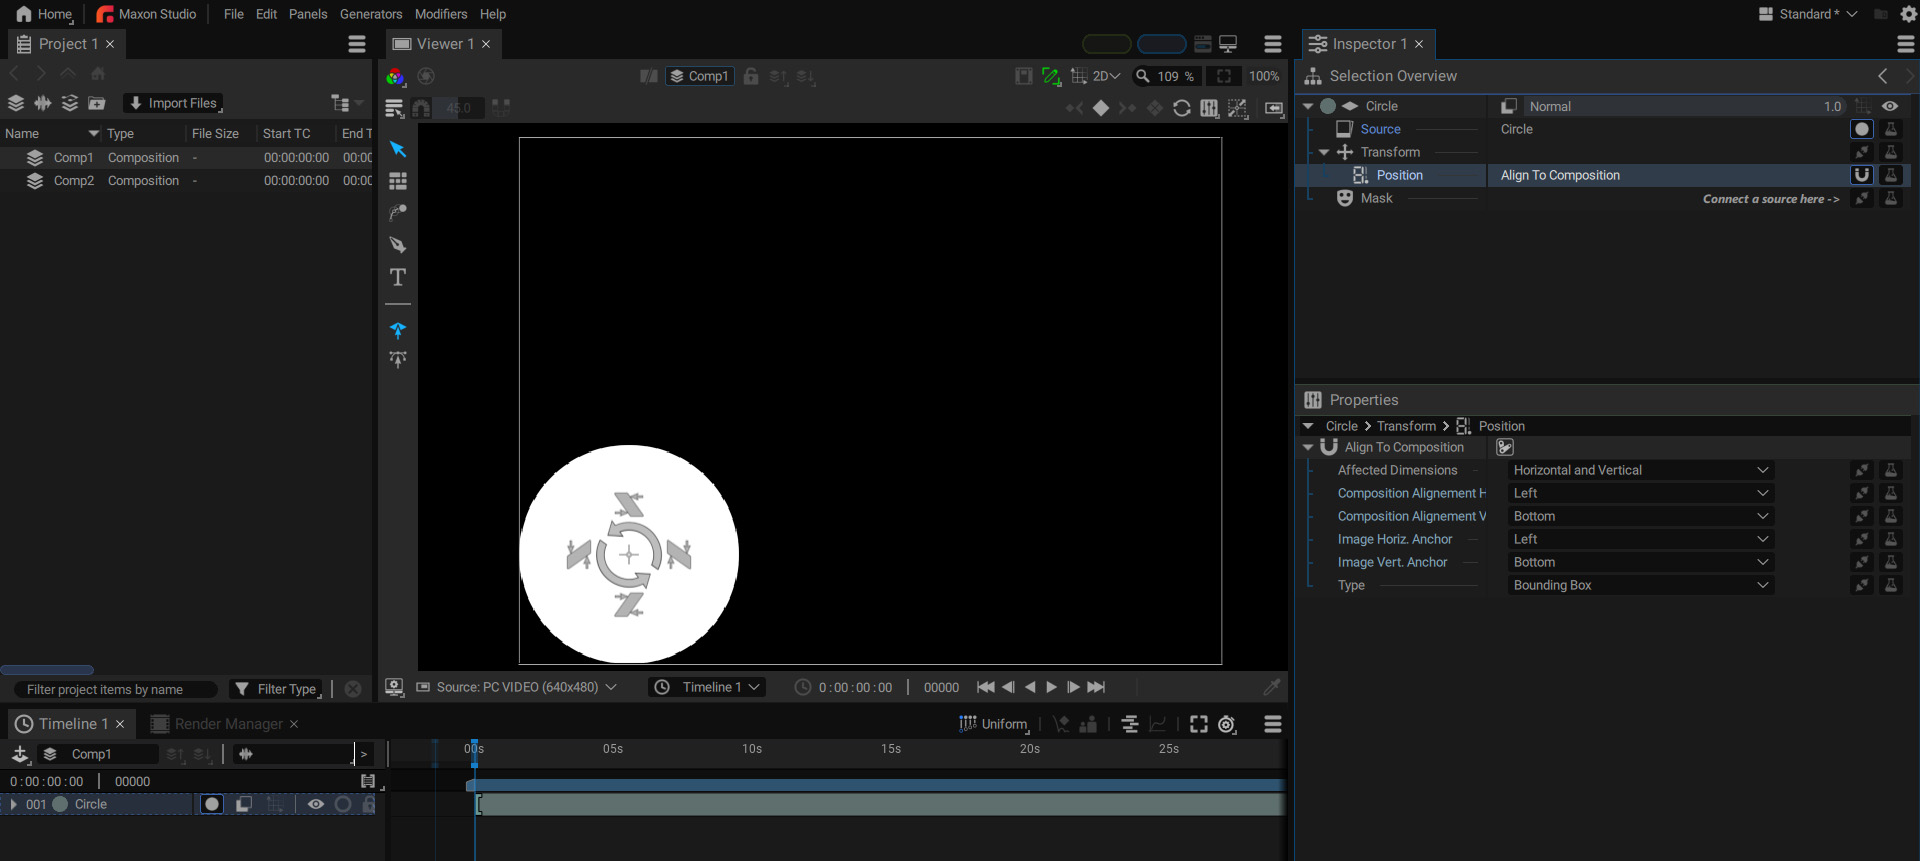
- We add a simple Circle Generator, creating a new layer
- On the layer’s Transform > Position param, we add Anchor To Composition to stick to the left edge of the composition, no matter the format.
In "Comp2":
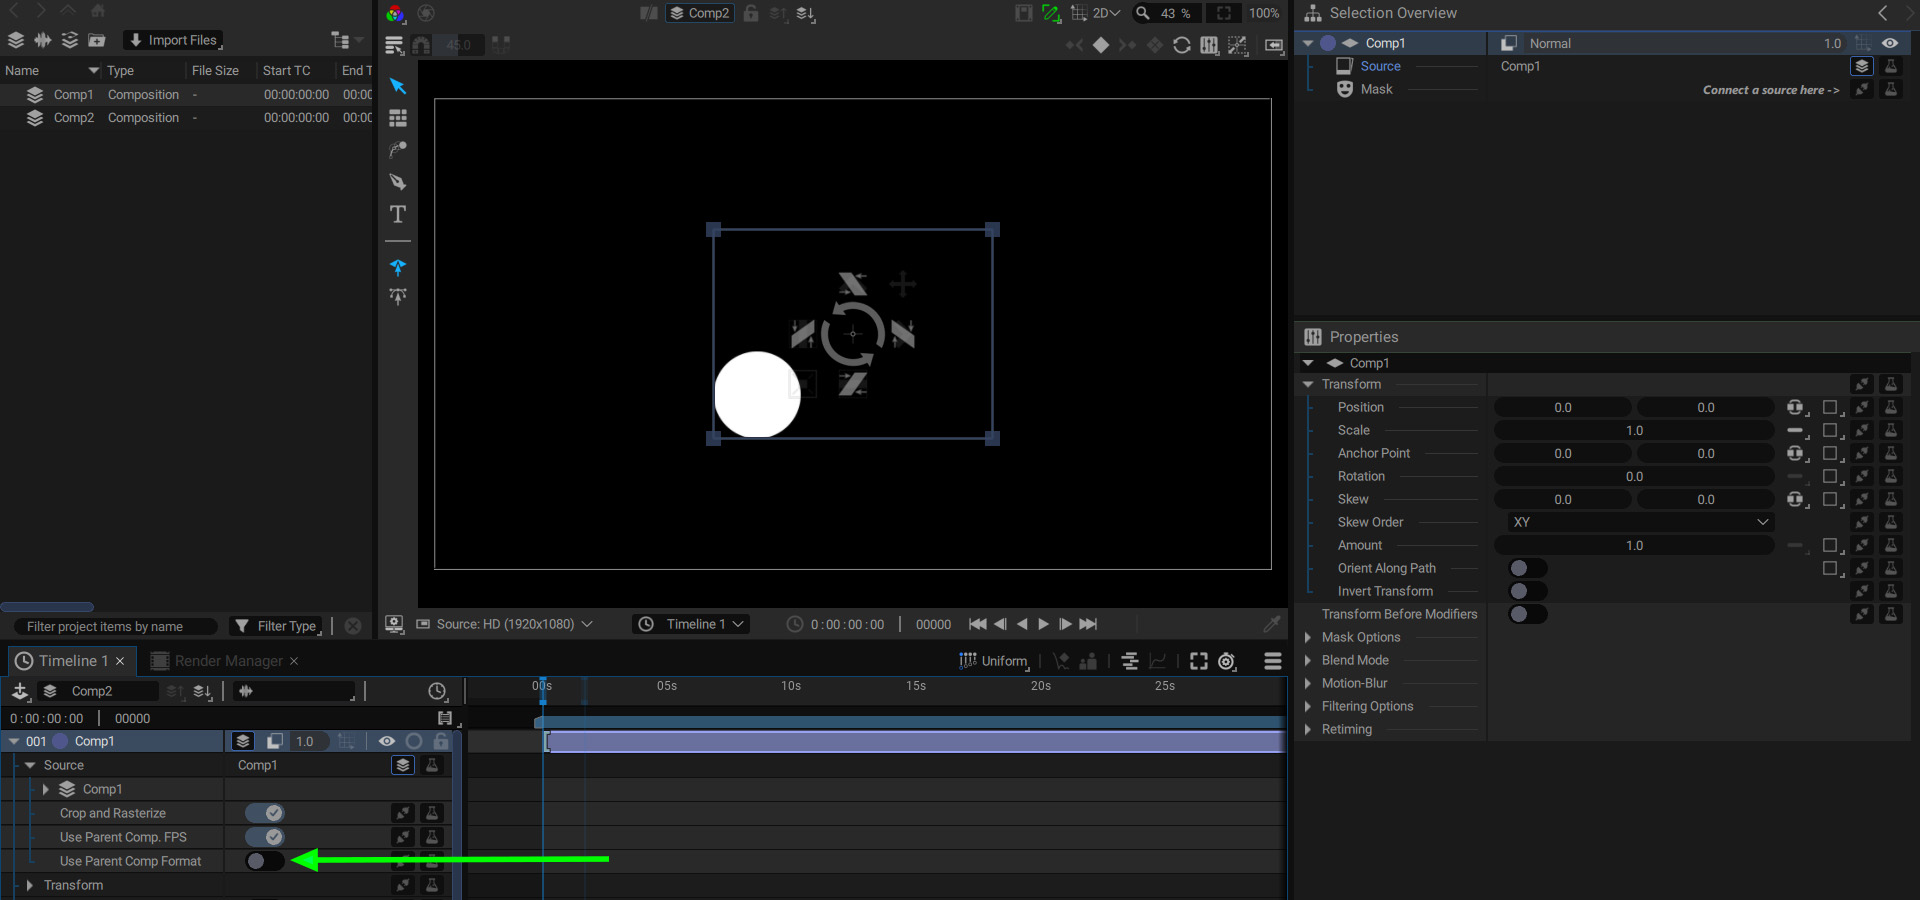
- We drag and drop "Comp1" as a new layer to use it as a sub-comp.
- We click on the triangle in the main line to unfold the parameters
The Anchor To Composition Generator moves the circle to stick it to the left edge of Comp1, according to its format.
Just a note about terminology:
- Because "Comp1" is a layer of "Comp2", we can say that "Comp1" is a child of "Comp2
- On the other hand, we could also say that "Comp2" is a "parent" of Comp1.
If Use Parent Comp. Format is turned ON, this format will be replaced by the one of its parents instead. Now, the Circle will stick to the left edge of Comp2

This option is particularly useful when creating a responsive design composition, which can adapt its content to a change in format. If the format of the main composition is changed, the sub-compositions inside can then pick up on these changes and adapt as well.
Overriding Sub-Comp Format
Sub-compositions have been described as layers that reference a composition as a Source. Therefore, if two layers refer to the same composition, any changes made in this comp will affect both of them.
But Autograph allows you to locally modify a reference to create a variation of this composition without any loss in quality.
If you modify the transformation parameters of a sub-composition while disabling the Crop and Rasterize option, the layers contained in this composition will be scaled without pixelation artifacts.
Overriding sub-comp format to create variations based on one unique composition:
Let's take a look at the following example:
We create two compositions in the Project panel:
- “Comp1”, with a 640×480 format (Preset: "PC VIDEO")
- “Comp2”, with a 1920×1080 format (Preset: "HD")
In “Comp1”:
- We add a Noise generator, creating a new layer.
- We define its Output Format to "Composition Format". That size this Noise to 640×480 pixels (similar to “Comp1” format)
In “Comp2”:
- We drag and drop “Comp1” as a new layer twice, to use it as a sub-comps (Comp1 A and Comp1 B)
- We click on the triangle in the main line to unfold parameters
- Then unfold Source > “Comp1”

All parameter Generator slots contain a purple Share icon. We single-click on “Comp1” in the Project Panel to select it and inspect its parameters in the Properties panel.
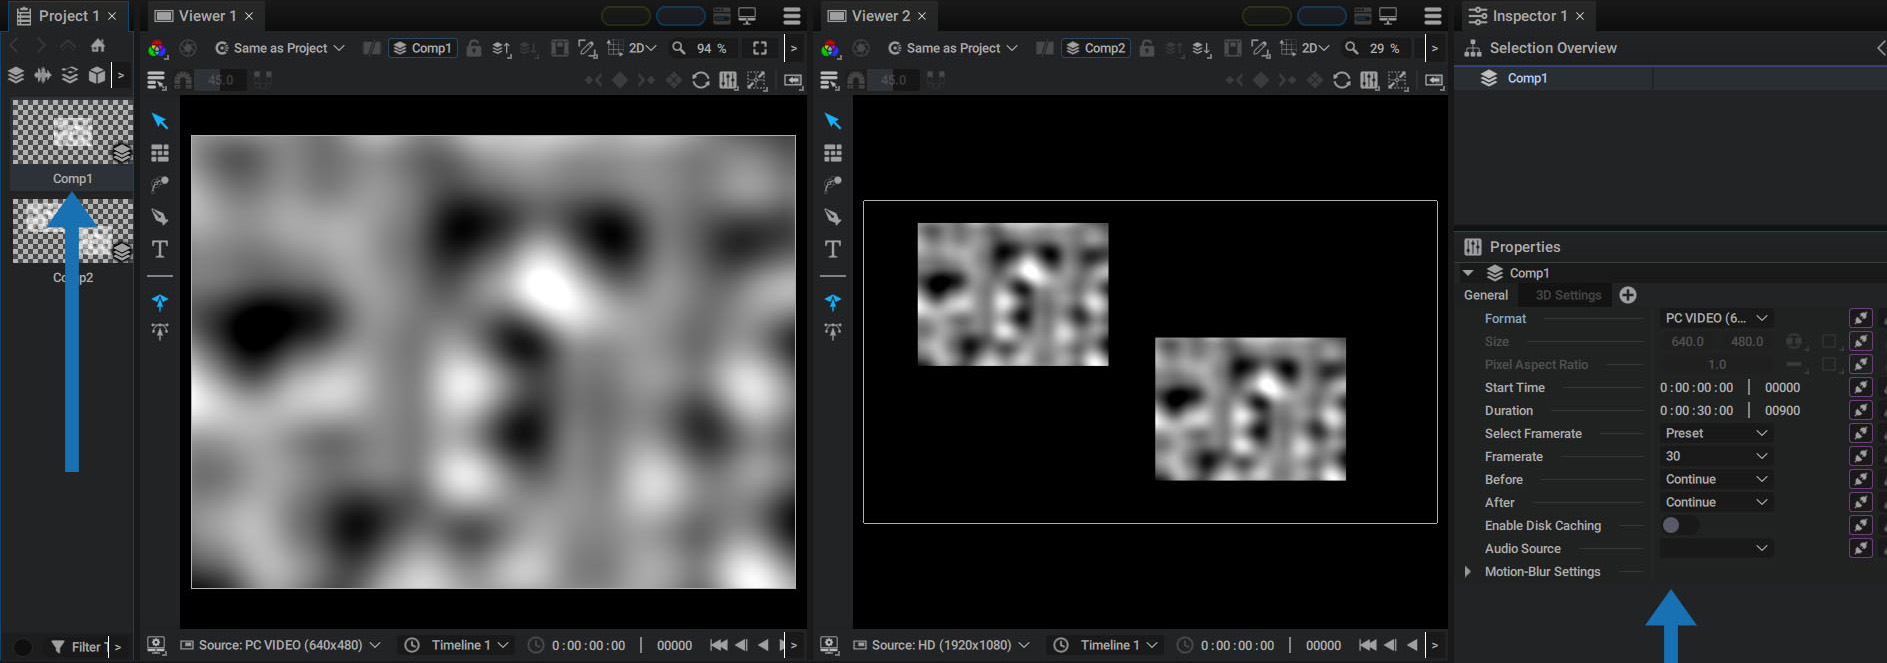
All parameters also contain this Share icon. That means that the original “Comp2” and its reference as a sub-comp share the same parameters and therefore the same values or states. Any change made to a parameter in the Properties panel will also appear in the Timeline, since all these parameters are shared.
Keep this subtle difference in mind. The parameters of the original composition, visible here in the Properties panel, and those of the layer that refers to it, here in the Timeline, are NOT the same, but they share the same values or states.
Local Unsharing
So you can locally unshare any parameter, in order to give it another value or state.
Let's unshare the Format, Size, and Pixel Aspect Ratio parameters, by selecting them then right-clicking and selecting Unshare.
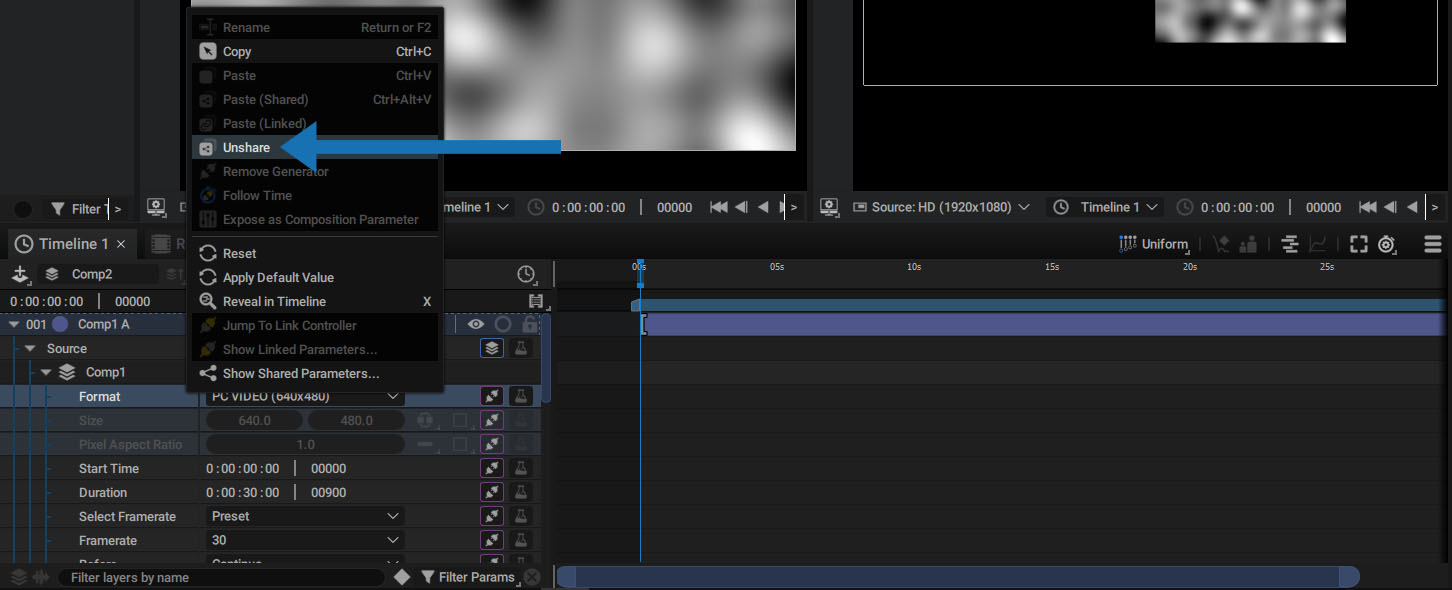
The Share icon is gone, and now you can locally change this parameter without affecting the Format param of the original “Comp2”.
When you want to override the format, keep these two important things in mind:
- If you don't unshare this parameter before modifying it, the original composition, as well as all other sub-comps referring to it, will be modified, too.
- After unsharing the format, if you decide to switch to Custom mode, Autograph will also display the Size parameter, which will also be shared by default.
When a composition uses a preset for its format, the Size parameter is not displayed, but it does exist. Before changing it, you MUST also unshare it, otherwise this parameter, even hidden in the original composition, will be changed as well. This has no real implications if the original composition keeps using a preset as its format, but if you switch the original composition to Custom mode while it is used as a sub-comp in several places in your project, this could be problematic.
For more information about sharing parameters, please refer to the dedicated section in the documentation.
Other Ways of Overriding Composition Format
Two other panels can override composition format:
- The Viewer: to preview the behavior of the layers according to a format change; in particular for those calculating their position according to it.
- The Render Manager: in order to render several variants of the same composition, specifically designed to be responsive. You can thus produce, with a single main composition, 4:3, 16:9, square, and 9:16 versions of the same project.
Accessing Sub-Layers
By unfolding the layer's main line, then the source of a sub-composition, a new sub-section "Layers" appears just after the composition properties.
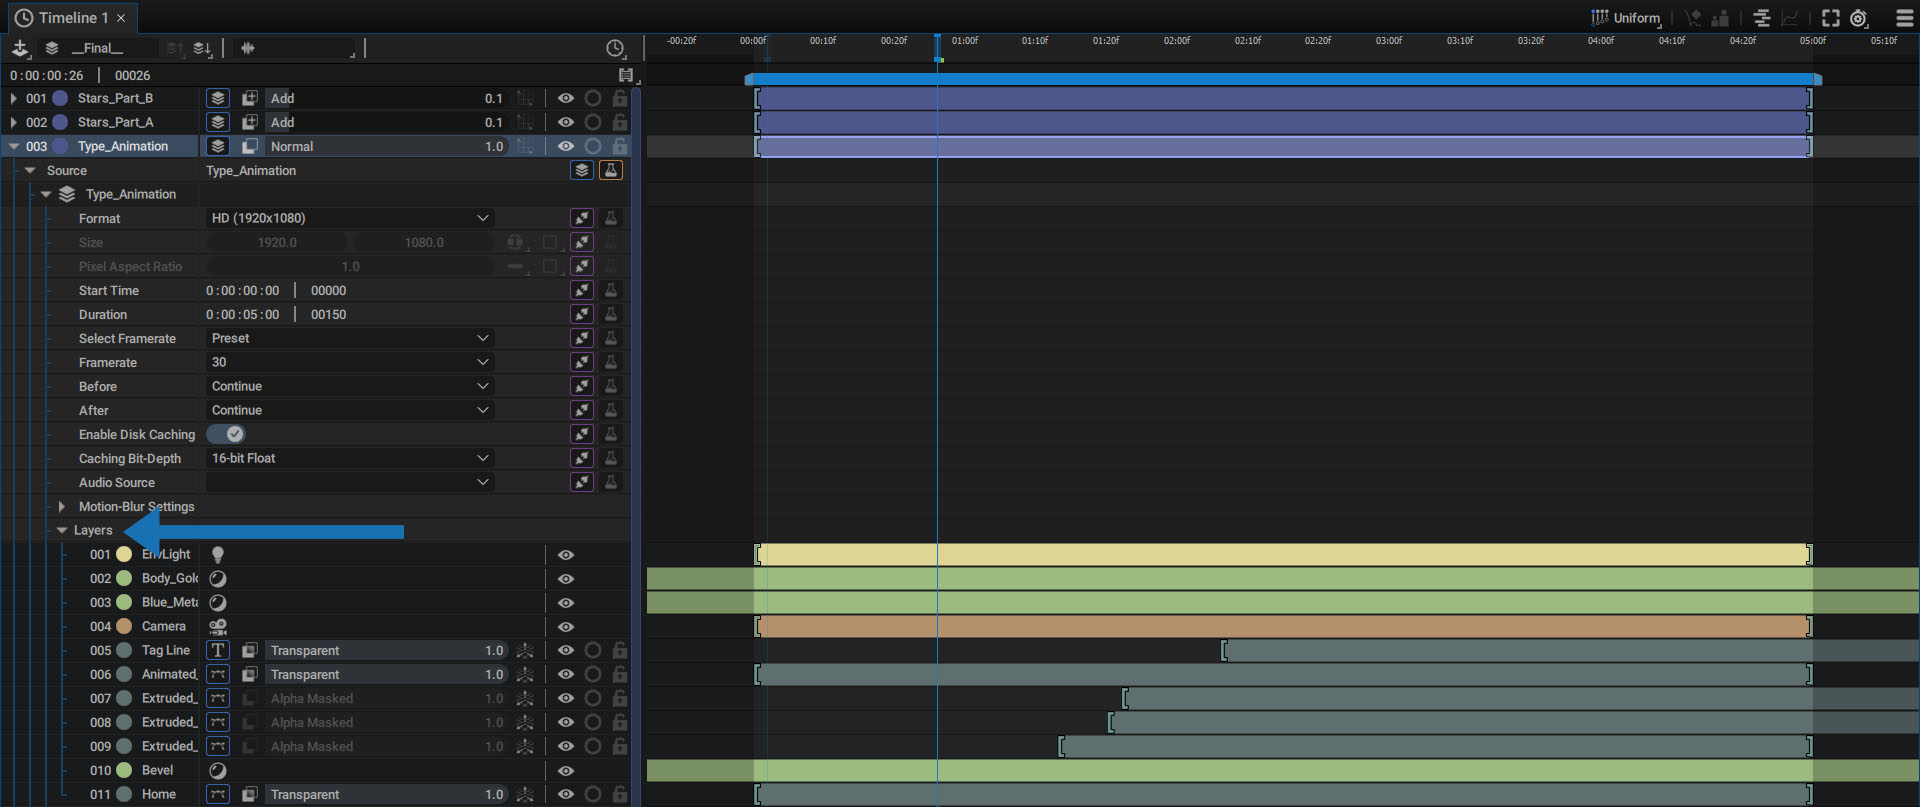
It is possible to make any modification on these layers, add Modifiers and Generators, or move them temporally, as if you were in this composition.