Table Of Contents
Overview

|
The Redshift Volume shader is a physically based shader designed to render heterogeneous volume objects like clouds, smoke, fire, and explosions. The shading components of a volume shader are driven by grids of voxel data contained inside a volume object, like an OpenVDB file. Volume grids may also be referred to as channels, particularly in a shading context, and Redshift uses the channel terminology when referencing a VDB grid in a volume shader.
For more information on OpenVDB files, example VDBs, and loading them into your scene please see the Volume Object page.
The volume shader is divided into three shading components: Scatter, Absorption and Emission. For a loose approximation of volume shading as compared to object shading you might think of Scatter as similar to "diffuse" shading, Absorption like volume "transparency," and Emission as "incandescence" or "self-illumination." Therefore, if you want to make your volume brighter or darker, you should adjust the Scatter parameters. If you want to make your volume appear more solid or dense, you should adjust the Absorption parameters. Finally, if your volume represents a self-illuminating effect like fire and want to make it brighter or dimmer, you should adjust the Emission parameters.
The VDB file used to generate the examples on this page can be downloaded here: Redshift demo volume VDB (242 MB)
In order to match the look of the example images the Advanced parameters Density Old Max must be set to 3 and Emission Old Max must be set to 1.6. All example images were rendered with a volume trace depth of 1 unless noted otherwise.
Shader Graph Setup and Scene Requirements

|
The volume shader requires more careful consideration than your average material. Before any volume rendering can even occur the following prerequisites must be met:
-
At least one channel must be set from the volume object to drive a volume's scattering or emission.
-
At least one light must be present in the scene with volume contribution set to a value greater than 0 (by default lights have a volume contribution of 1).
-
The RS Volume node must be connected to the 'Volume' input of an Output node.
-
This should occur automatically with the creation of a new volume shader but it's an important distinction to be aware of if you are setting up a volume shader from scratch or troubleshooting a volume that is not rendering.
-
Volume objects have to be stored on the GPU's memory in their entirety and are not handled by Redshift's out-of-core system. Therefore, if a scene uses too many different volume objects or if these volume objects are of a particularly high resolution and do not fit on the GPU's memory, rendering will be aborted with an out-of-VRAM error message.
Pyro Rendering
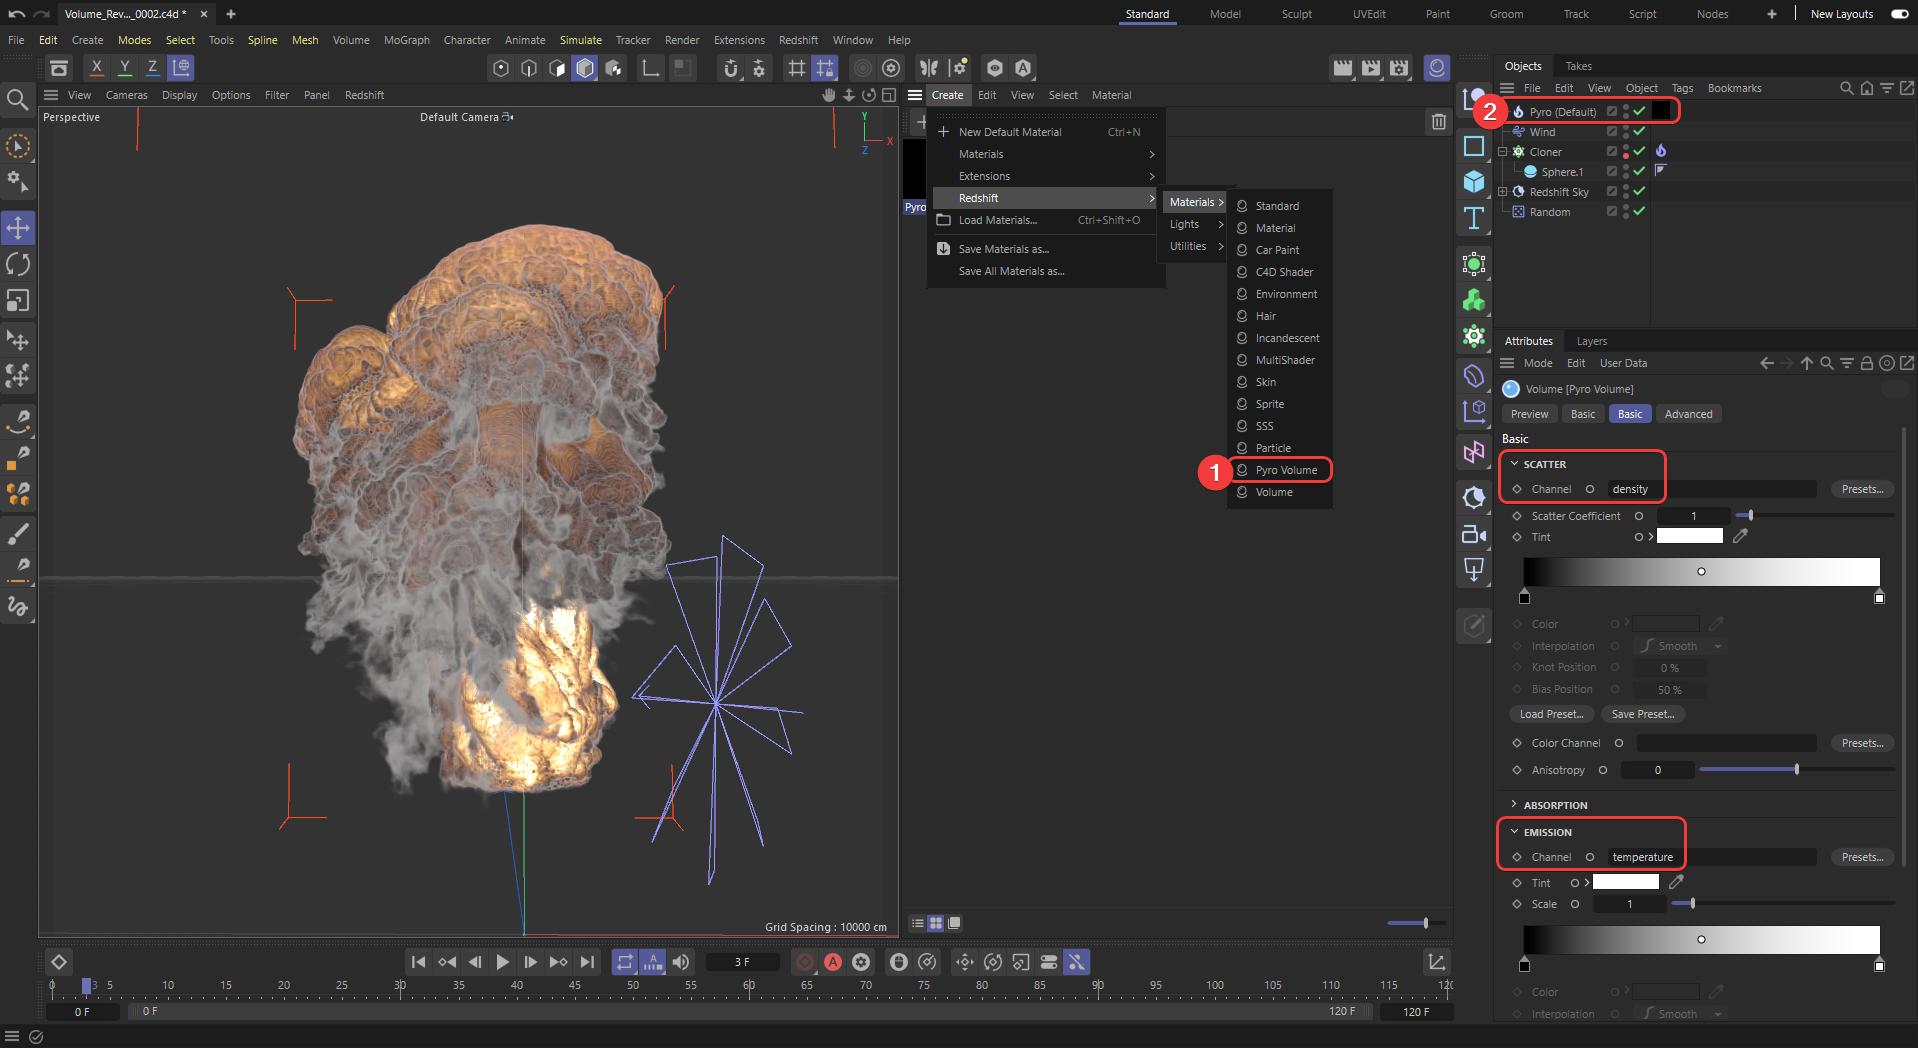
Cinema 4D 2023.1 includes a Pyro Volume material preset that creates a volume shader with the default pyro 'density' and 'temperature' grids predefined for the scatter and emissive channels. This allows you to quickly get up and rendering with Cinema 4D pyro simulations and Redshift.
Simply create a new Redshift 'Pyro Volume' material (1) and apply it to the Pyro object in your scene (2) and it is now ready for rendering in Redshift.
|
| Assigning a Pyro Volume preset to a Cinema 4D Pyro object |
Volumetric Multiple Scattering
The look and shape of a volume is heavily dependent on how it interacts with light. When a light photon enters a cloud it makes contact with the different molecules that make up its composition and then scatter around inside the medium. Clouds are mostly made up of water and ice molecules which results in a lot of scattered light, thick cumulus clouds can even reflect up to 90% of incoming light.
Volumetric multiple scattering simulates this phenomenon to create much more realistic volume renders. In Redshift, this is controlled by the Volume Trace Depth parameter which is found in the Render Settings. Increasing the volume trace depth allows a light ray to scatter and bounce around more often inside a volume, this leads to brighter and more realistic volume renders at the expense of longer render times. The impact multiple scattering has on the look of a volume depends on the volume shader parameters
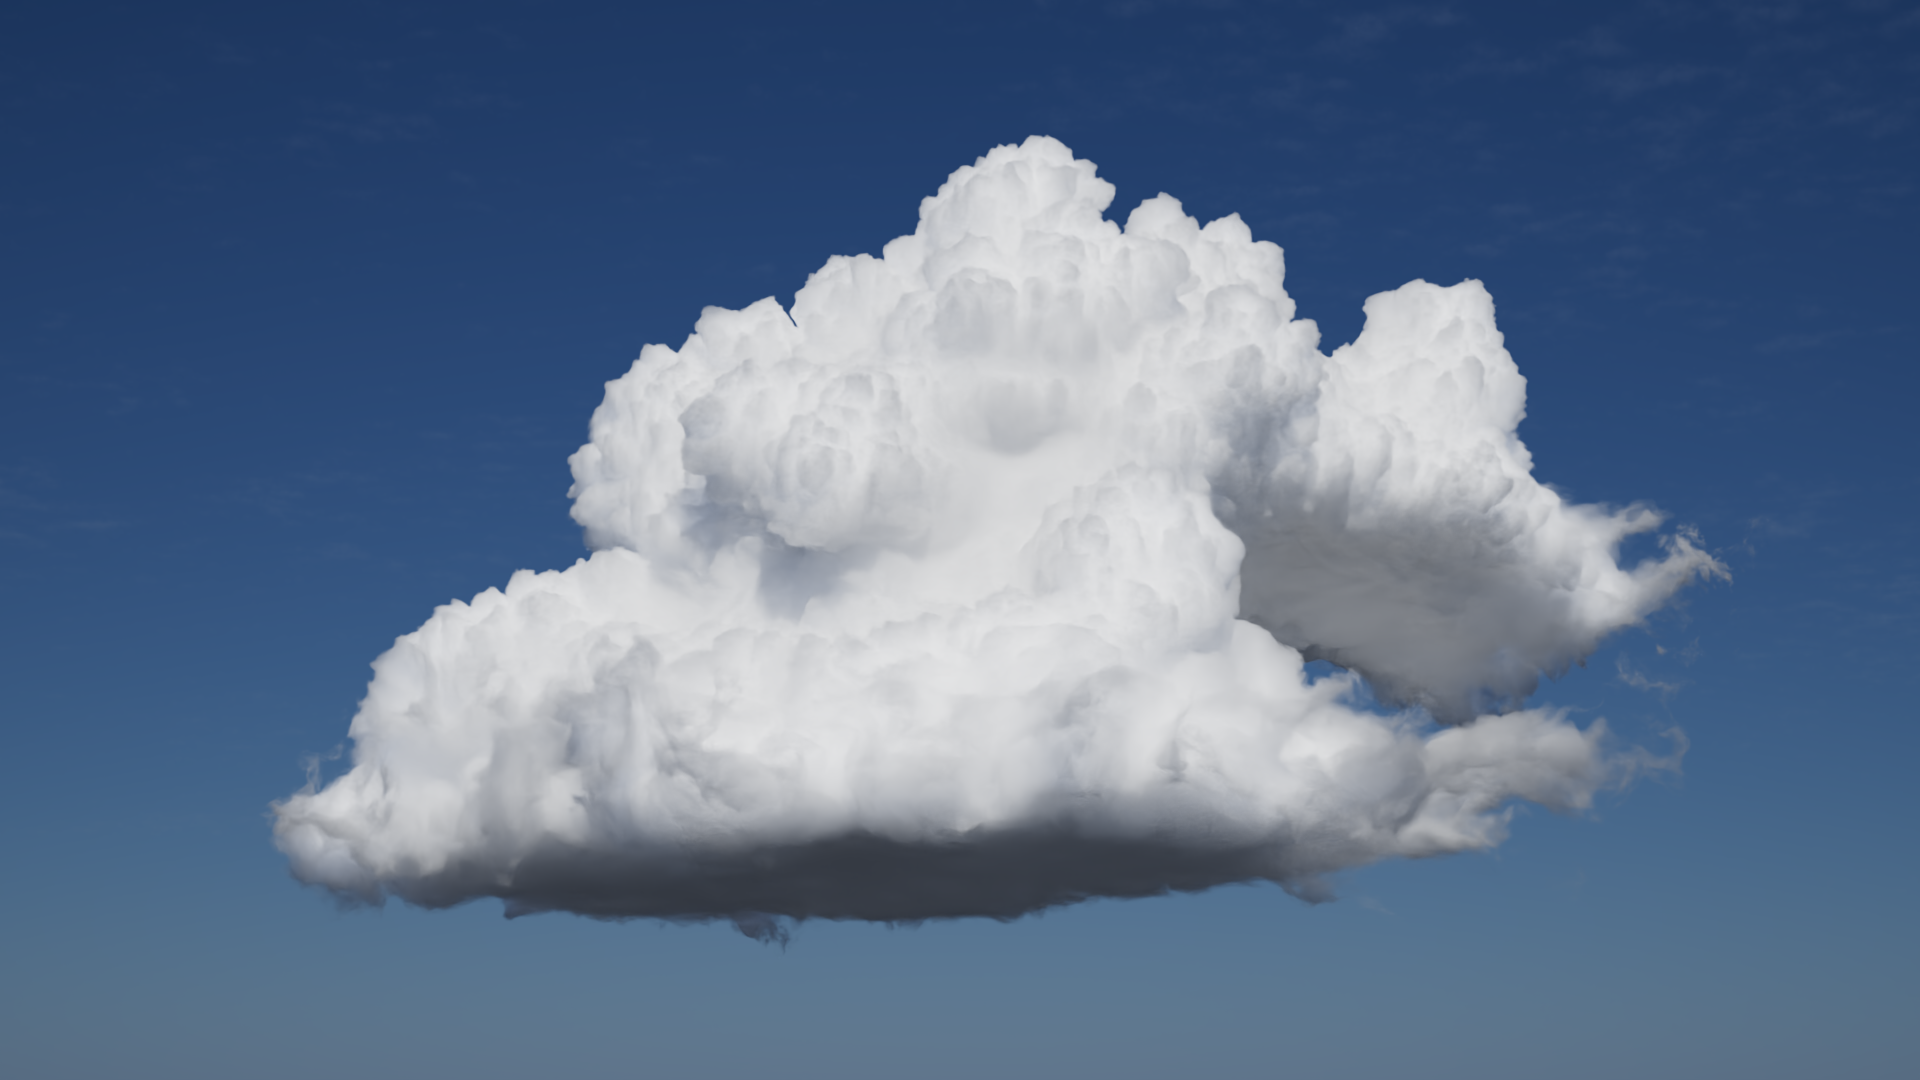
In the example images below, you can see how increasing the volume depth significantly changes the look of a cloud. Clouds have a heavily forward scattering (positive anisotropy) nature which results in more light being driven deeper into the volume rather than reflecting back out, because of this, each successive volume bounce carries more light energy than a volume that is more isotropic which scatters light more evenly in all directions.

|

|

|
|
| Volume Trace Depth: 1 | 3 | 11 | 31 |
| Asset Courtesy of Walt Disney Animation CC BY-SA 3.0 License |
|||
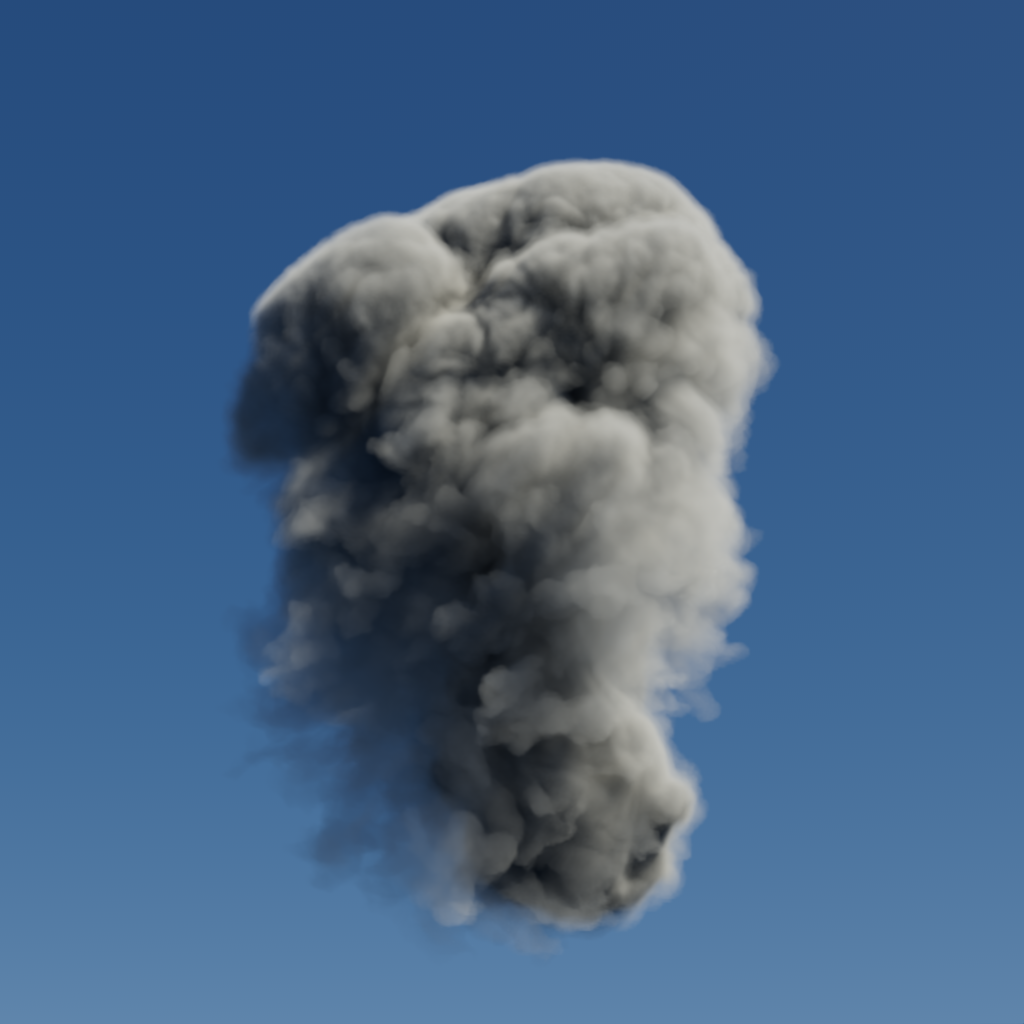
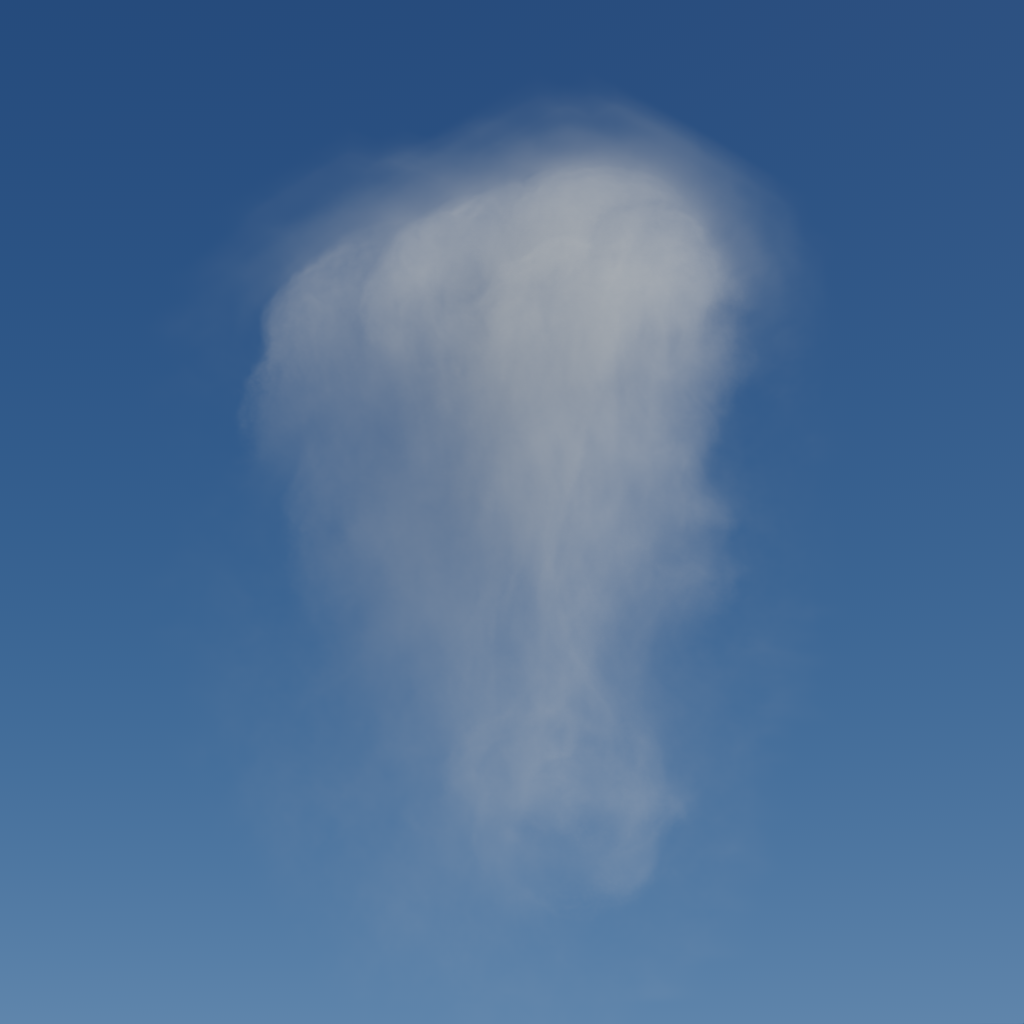
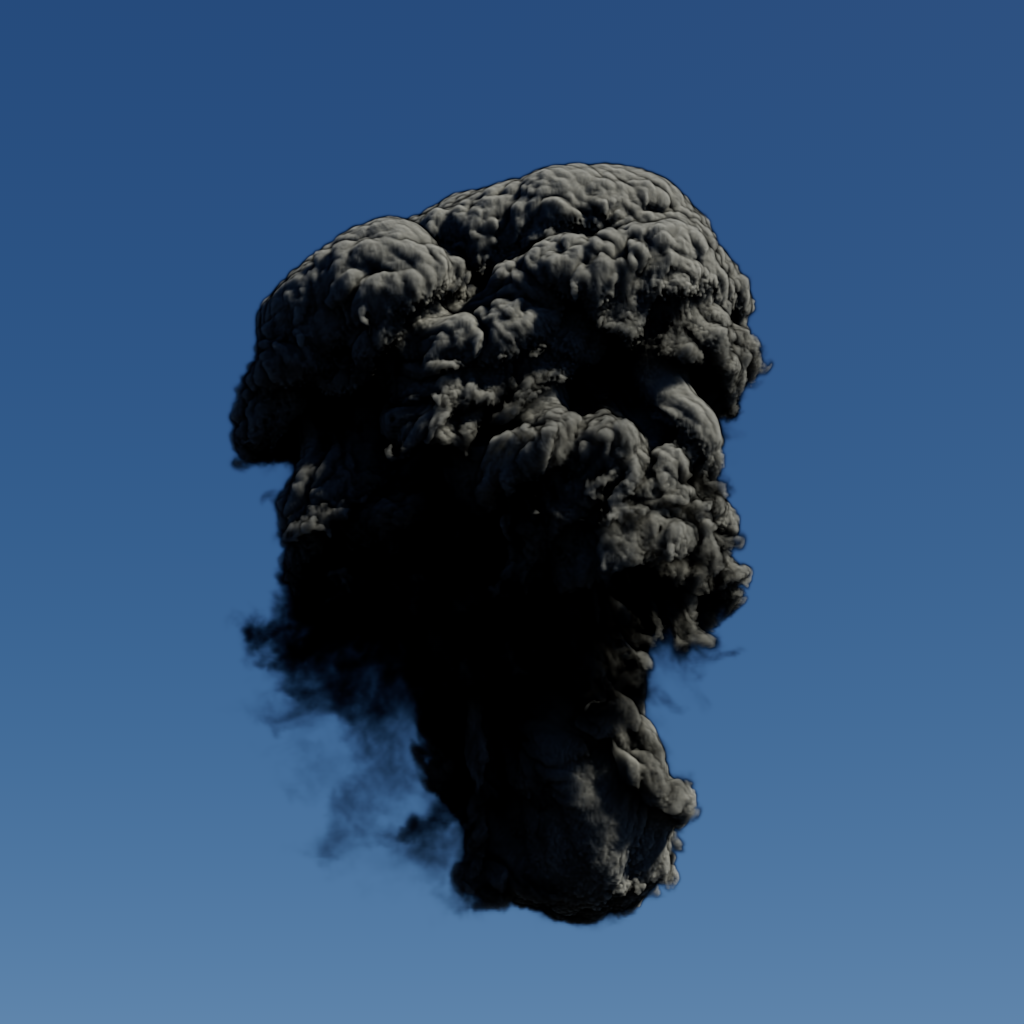
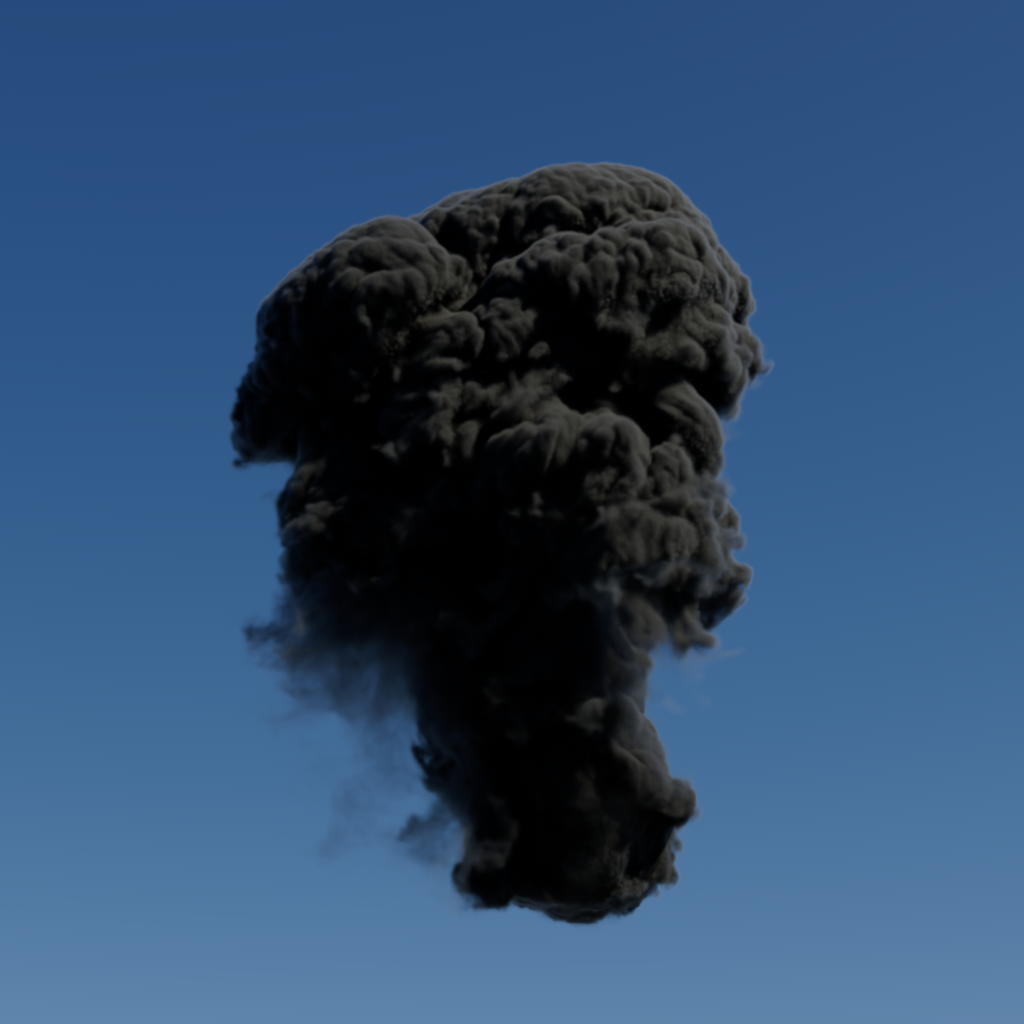
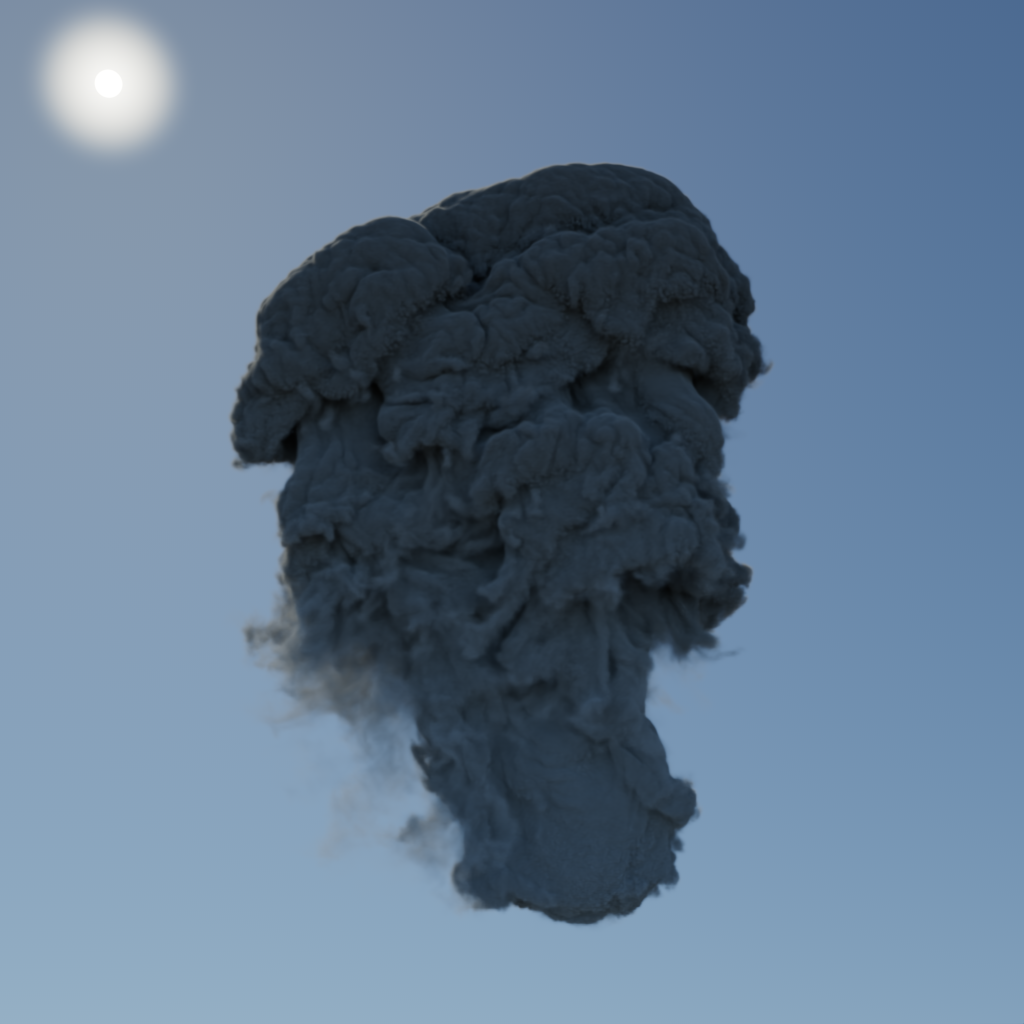
Smoke, by comparison, tends to scatter far fewer times as it is more isotropic (anisotropy closer to 0) and therefore sees diminishing returns as volume trace depth is increased. The difference between a trace depth of 11 and 31 is minimal with the demo example compared to the cloud images above.

|
|

|
| Volume Trace Depth: 1 | 11 | 31 |
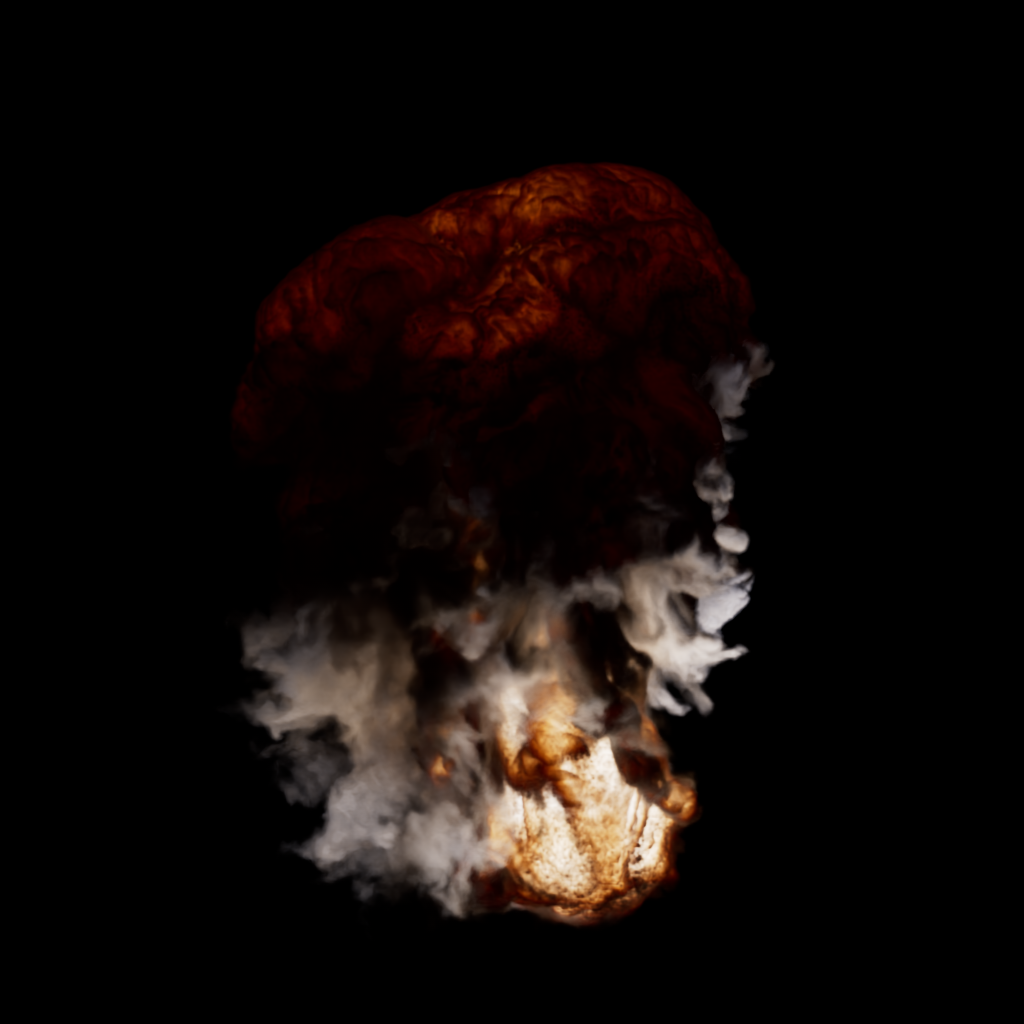
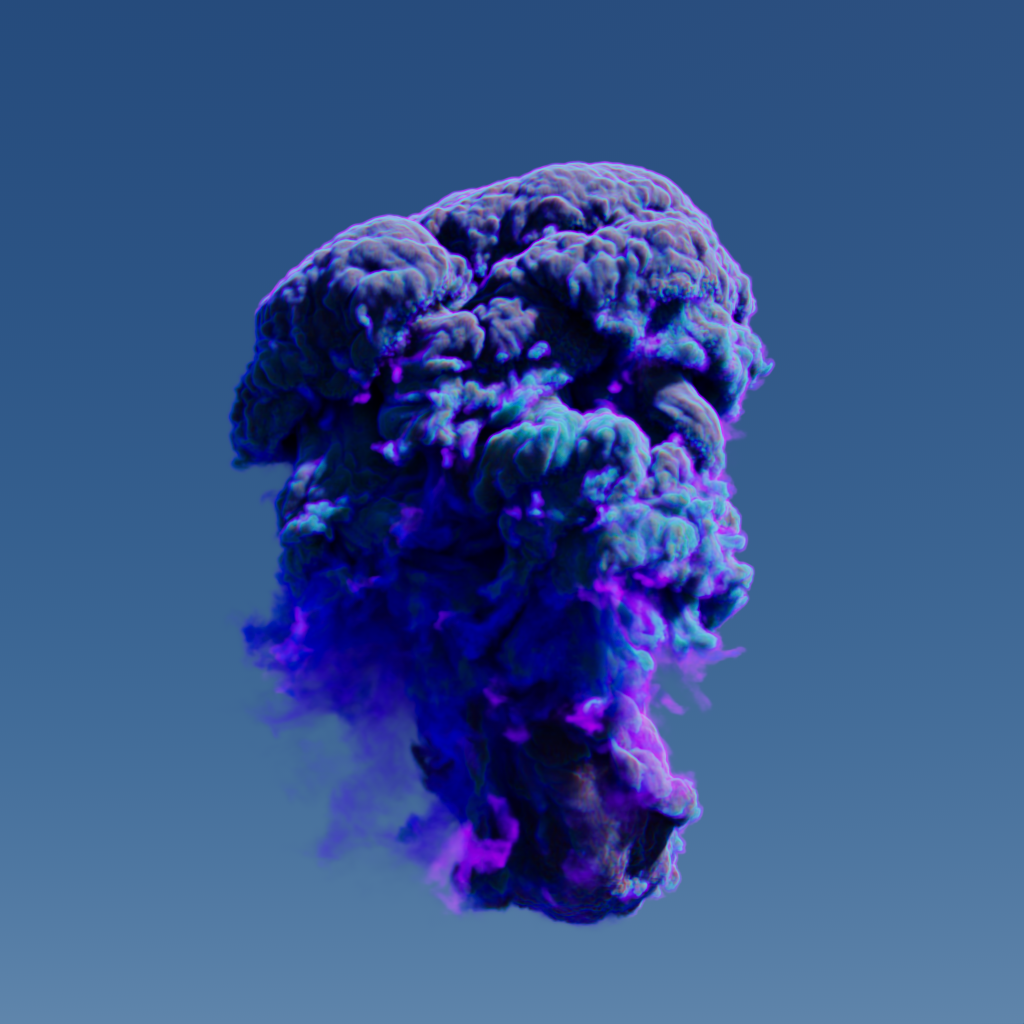
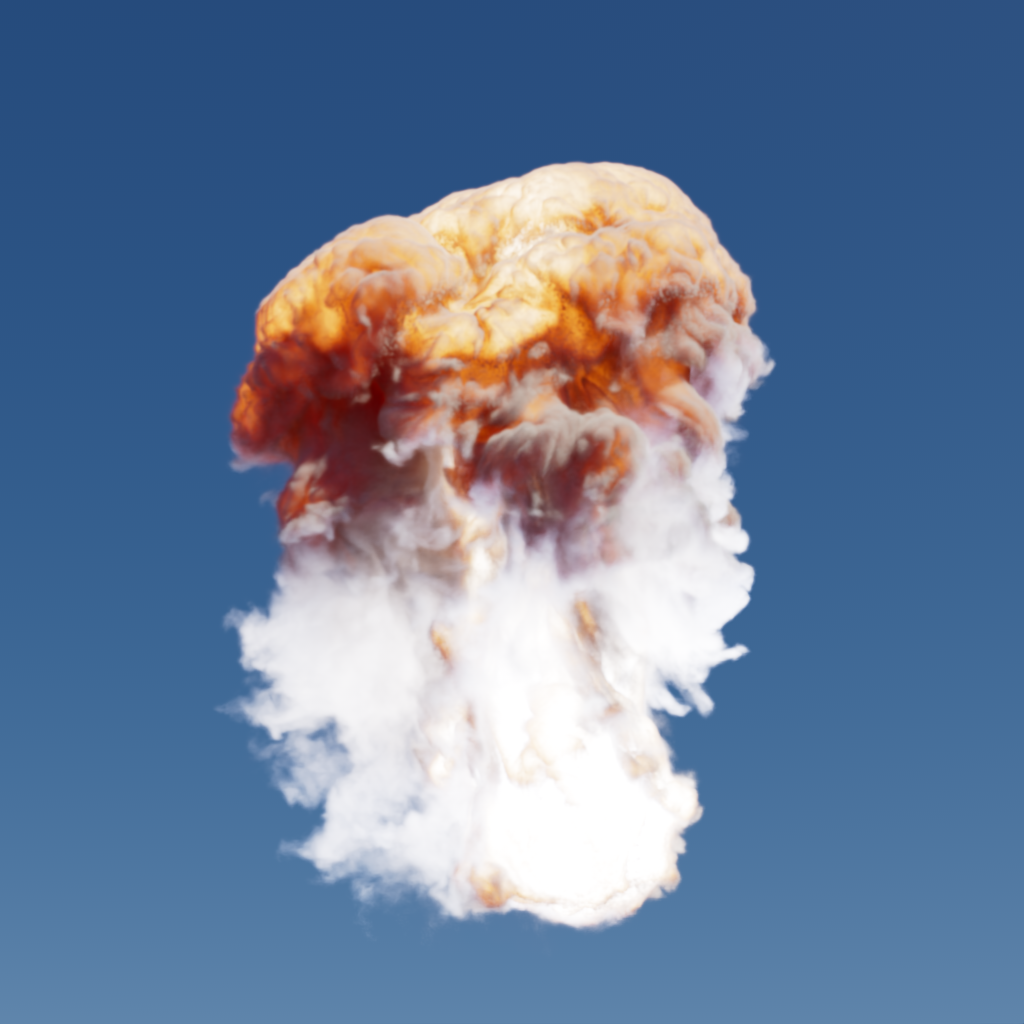
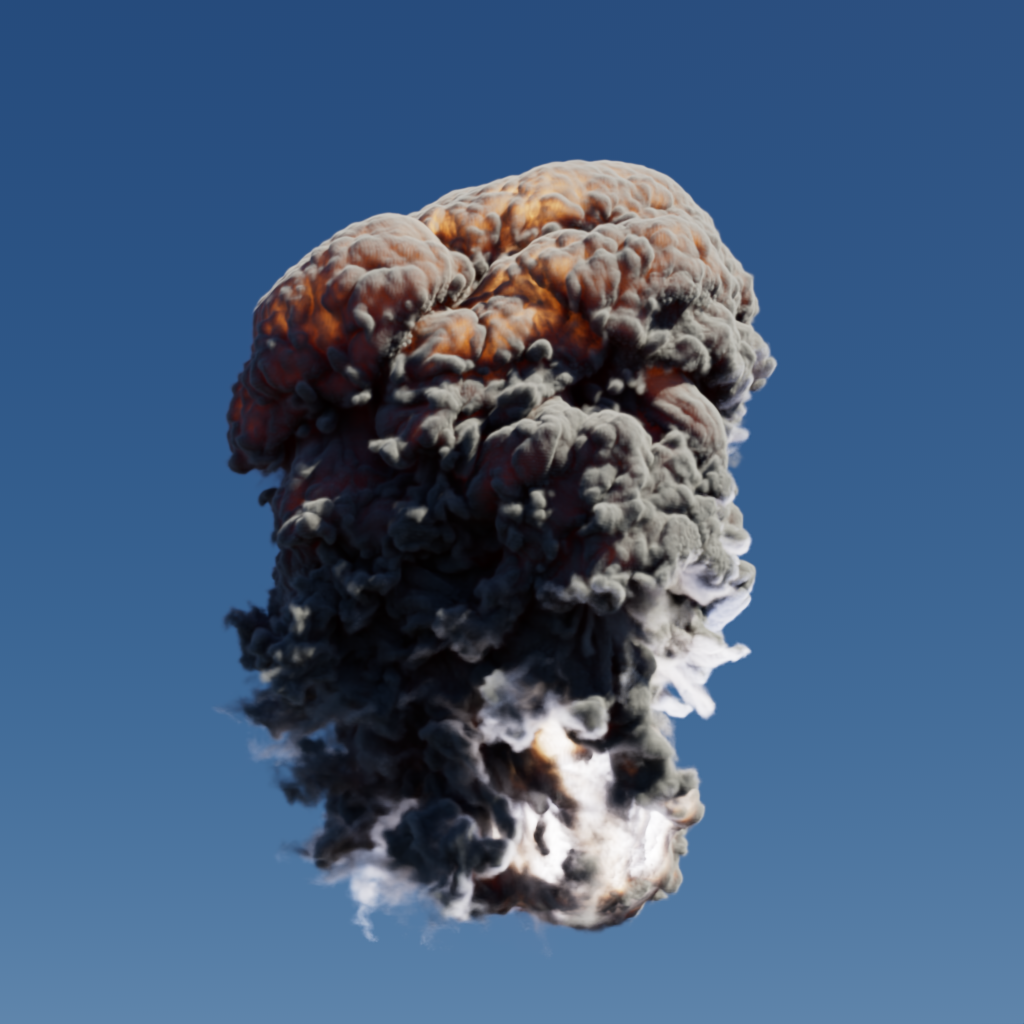
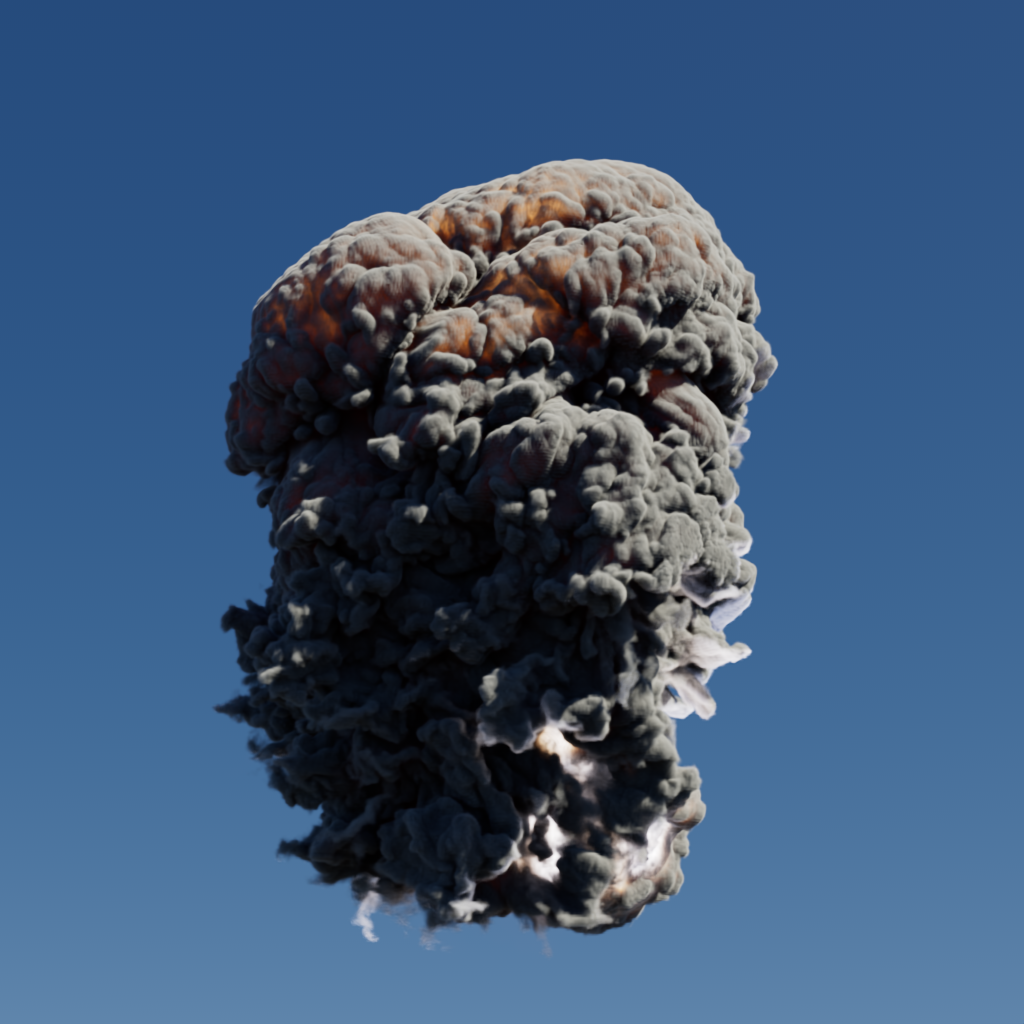
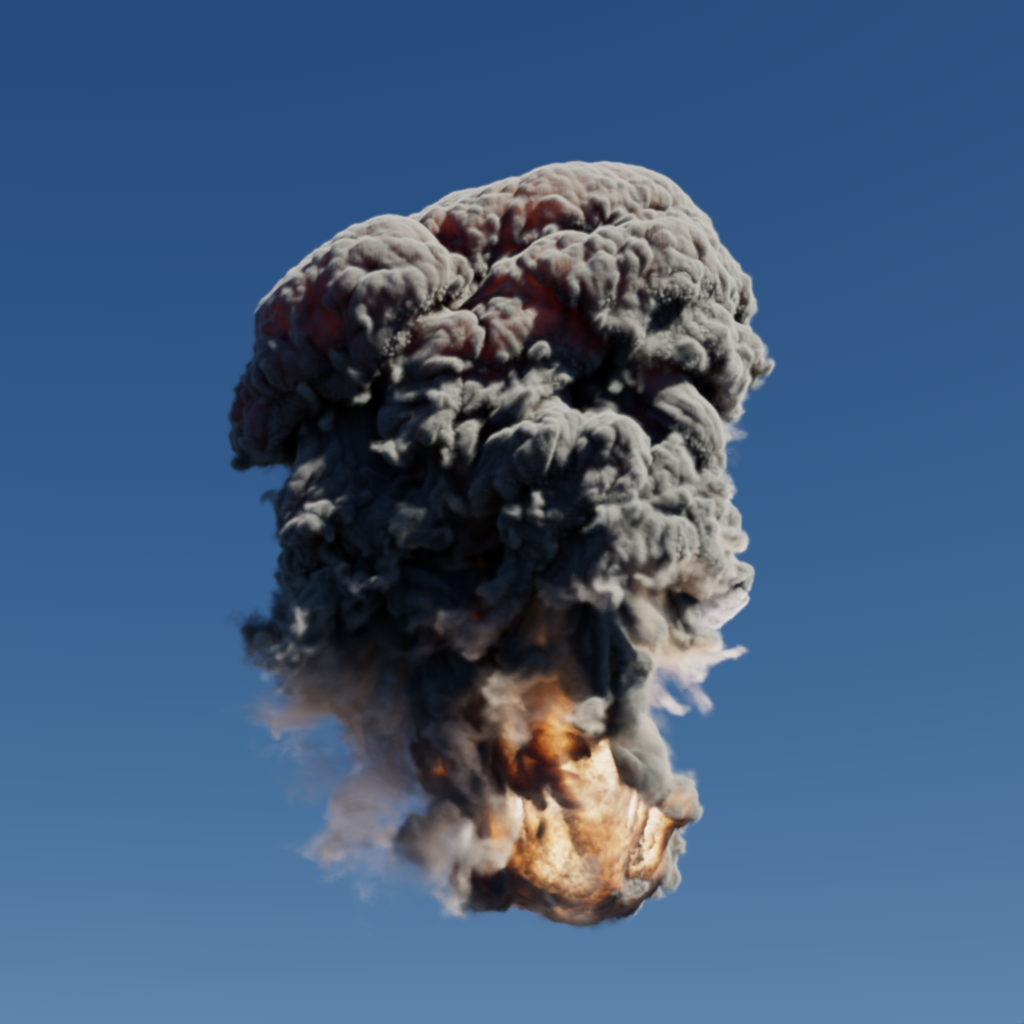
However, the emissive fire is able to travel farther and illuminate more of the smoke from the inside when comparing trace depth 1 to 11 as seen below where the only source of light is the volume's own emission.
|
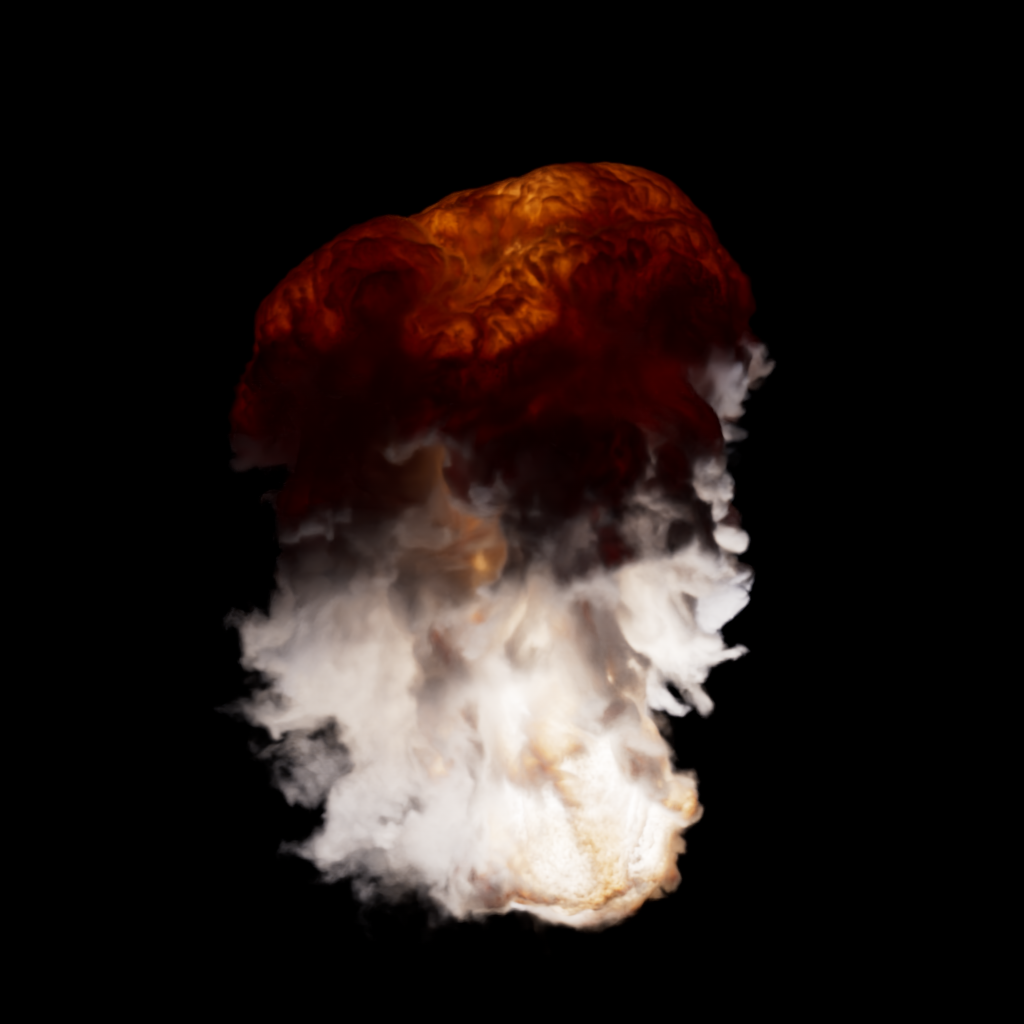
|
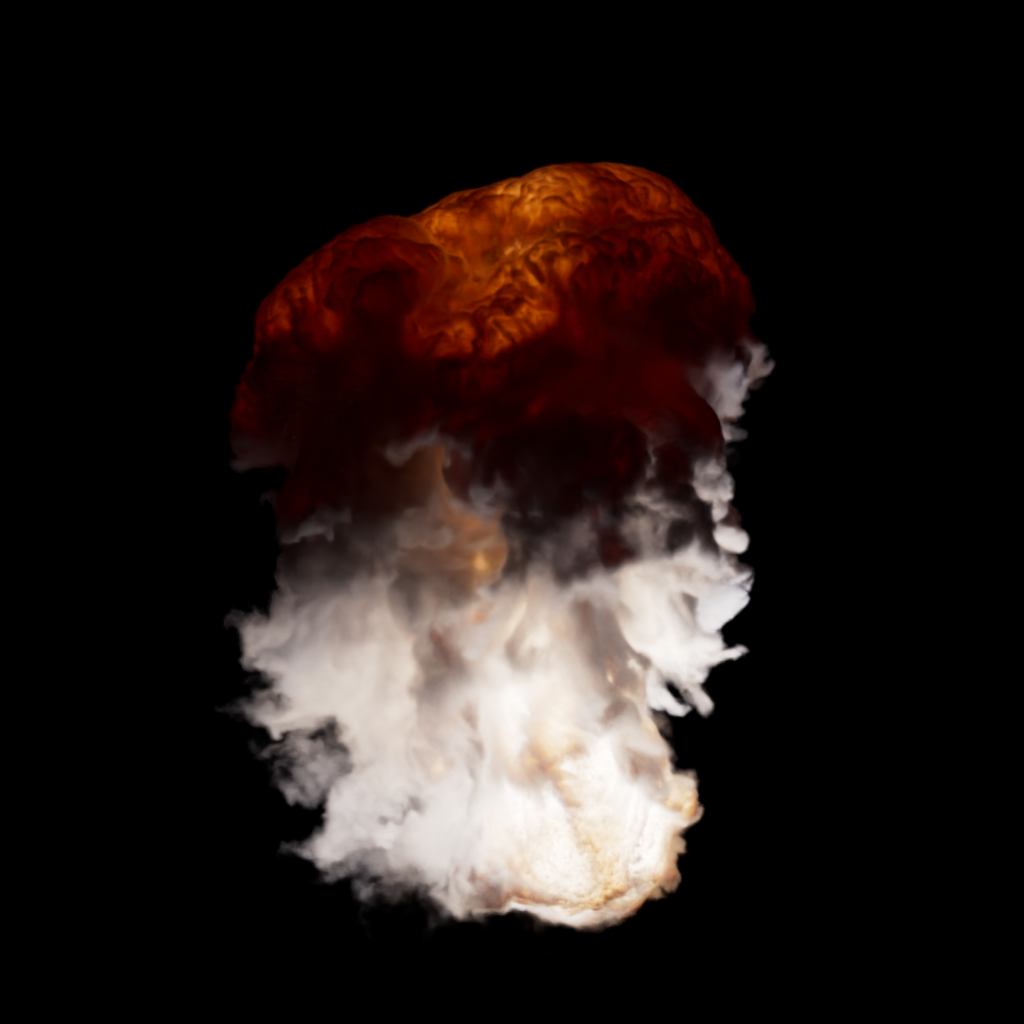
|
| Volume Trace Depth: 1 | 11 | 31 |
It is important to balance volume trace depth with the rest of the Volume Shader parameters covered in the section below as increasing the trace depth can have an exponential impact on render times. For the most realistic results higher volume trace depths will be required, but if faster render times are more important try adjusting the scatter / absorption coefficient ratio and decreasing the shadow density scale first and then increase the volume trace depth slowly as needed.
Multiscattering Demo Scene
|
A demo scene created by Saul Espinosa that uses the Disney cloud VDB is provided below as a starting point for better understanding the effects of multiple scattering and other volume shader parameters. The final look of the scene requires the photographic exposure post effect to match the example image.
Redshift Cloud Multiscatter Demo.zip (63 MB)
Download Contents:
-
Scene files for 3ds Max, Blender, Cinema 4D, Houdini, and Maya
-
HDRI dome light texture by Saul Espinosa
-
Example PNG render
Cloud VDB must be downloaded separately at Walt Disney Animation - Data Sets and the "wdas_cloud_half.vdb" should be placed in the same folder as the downloaded scene files.
The Redshift demo volume VDB (242 MB) can also be added to this scene and used.
Parameters
Scatter
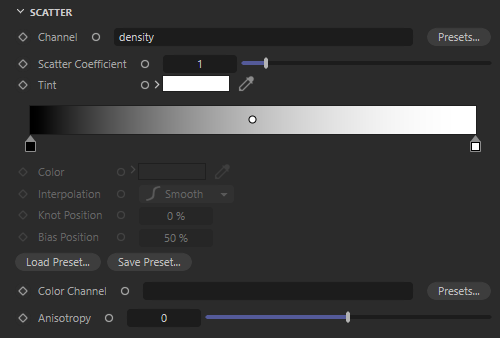
|
Channel
The scatter channel drives the overall look of a volume objects scattering contribution, this is the primary shading component for clouds and smoke. A VDB grid must be specified here by typing its name into the channel field before any scatter rendering can take place. The most common name for a scatter channel is 'density.'
Scattering can be driven by most available volume grids - as demonstrated in the example images below - but it's important to use the intended grid to drive a channel when trying to achieve a specific result.

|
|
|
| Scatter Channel: Density | Temperature | Velocity |
If a volume object is intended to render only an emissive type effect like a flame with no smoke then emission should be used by itself and the scatter channel can be left blank.
Cinema 4D 2023.1 includes a Pyro Volume material preset that creates a volume shader with 'density' and 'temperature' grids predefined for the scatter and emissive channels.
You can also use the scatter channel Presets button to reveal typical channel names for OpenVDB files created by ExplosiaFX, FumeFX, and Turbulence FD.
If you already have a Redshift Volume Object with a loaded VDB file the available Channel names from that file will appear in the Preset menu.
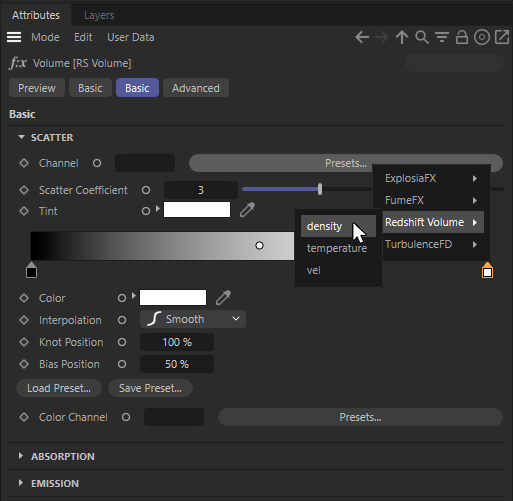
Loaded VDB Channel names will appear in the shaders 'Preset' menu.
Scatter Coefficient
Increasing the scatter coefficient makes the volume brighter by increasing the strength of the scattered light when it hits a volume object. Decreasing this value reduces the strength of the scattered light and a scatter coefficient of 0 will result in a volume that is completely black even if in direct light.
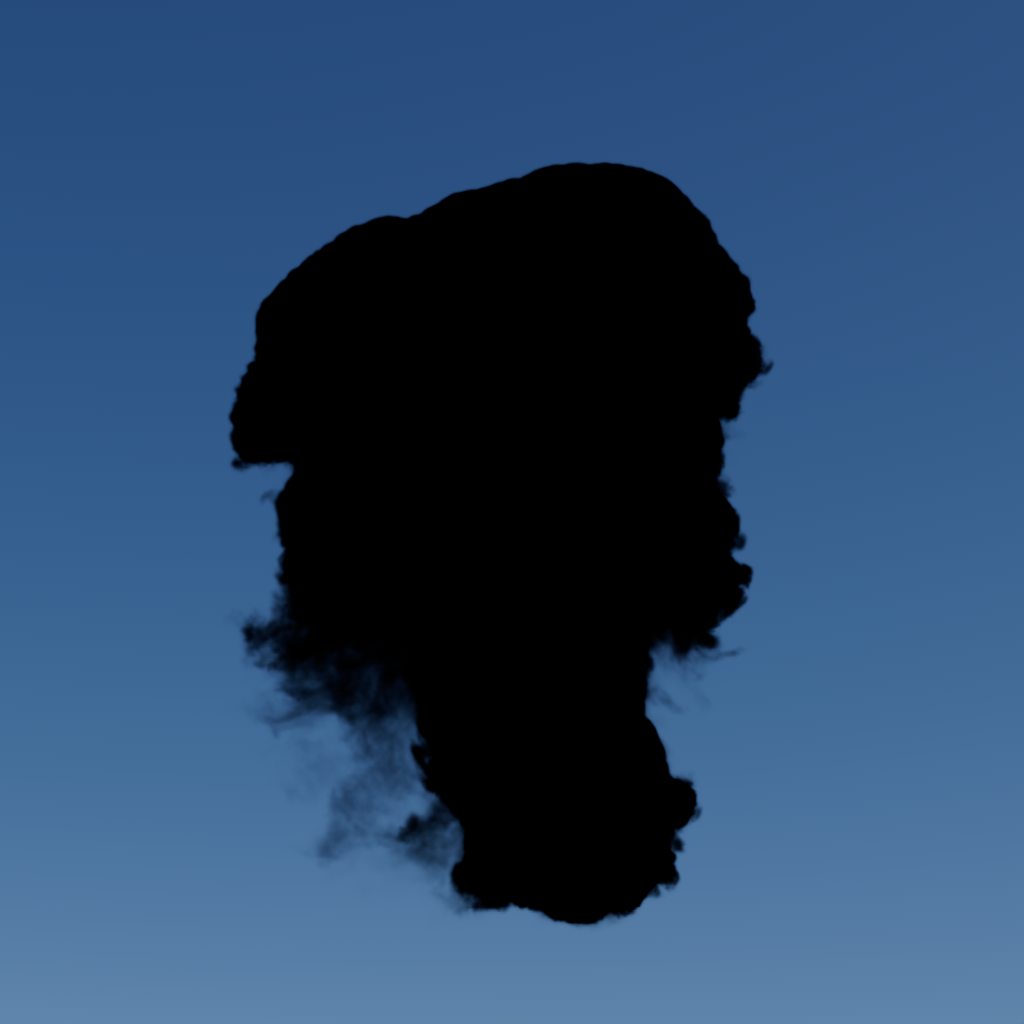
|

|

|
| Scatter Coefficient: 0 | 1 (Default) | 3 |
Scattering vs Absorption
Scattering works in combination with absorption as they are both controlled by the same volume grid being used to drive the scatter channel. To preserve energy conservation adjustments made to the scatter coefficient should also be made to the absorption coefficient, which controls how much light is absorbed by the volume, in equal amounts.
For example, usually increasing the scatter coefficient makes a volume appear brighter but if you also increase the absorption coefficient by the same amount the approximate intensity of the volume will be preserved while increasing the perceived density of the volume. In the example images below note how the overall brightness of the volume hardly changes despite raising the scatter coefficient since the absorption coefficient is raised the same amount each time. Instead, the apparent density is increased, make note of the changes in particular to the thin areas of the volume in the bottom left of the images below.

|

|
|
| Absorption Coefficient: 1 Scatter Coefficient: 1 |
3 3 |
50 50 |
Ratios weighted more heavily towards the scatter coefficient result in a brighter more airy volume compared to a darker more dense volume when weighted towards absorption coefficient. The larger the difference between the scatter coefficient and the absorption coefficient the more dramatic the effect.
|
|

|
| Absorption Coefficient: 1 Scatter Coefficient: 3 |
3 3 |
3 1 |
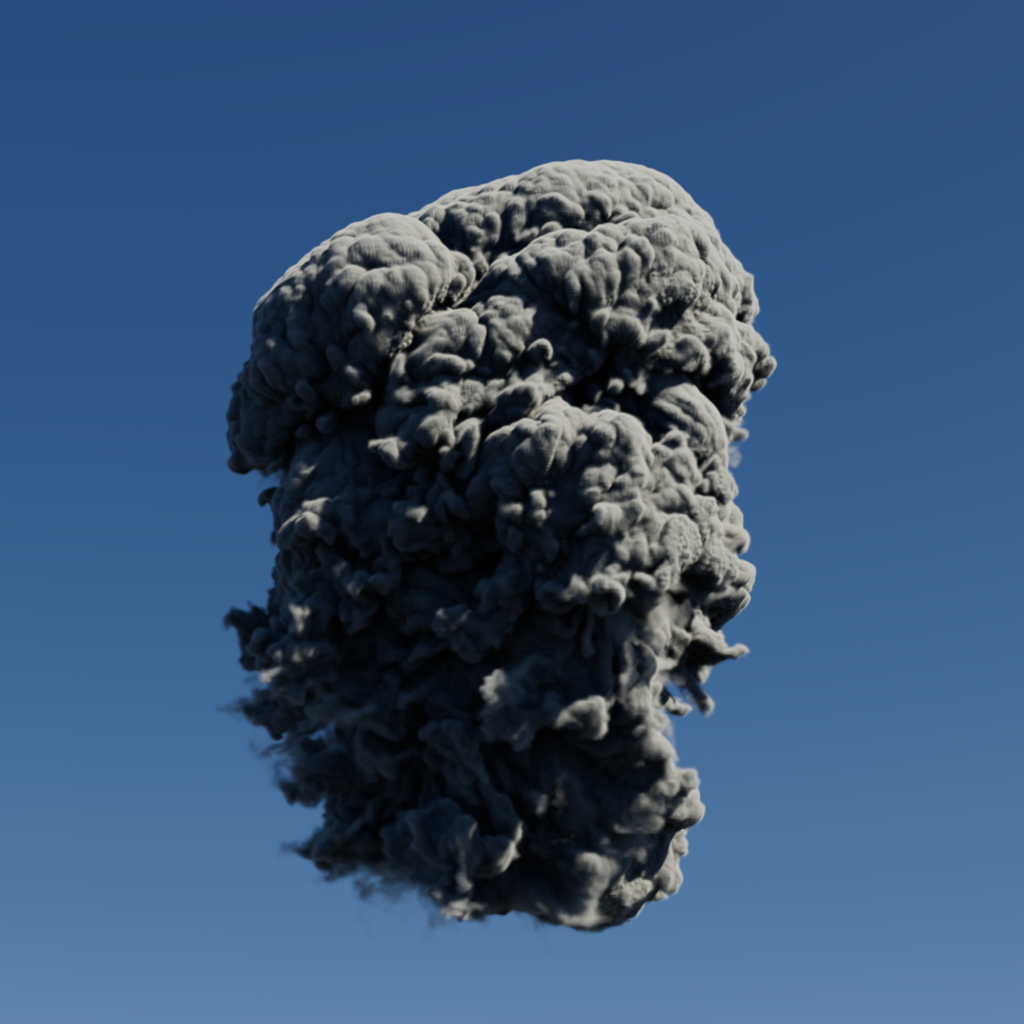
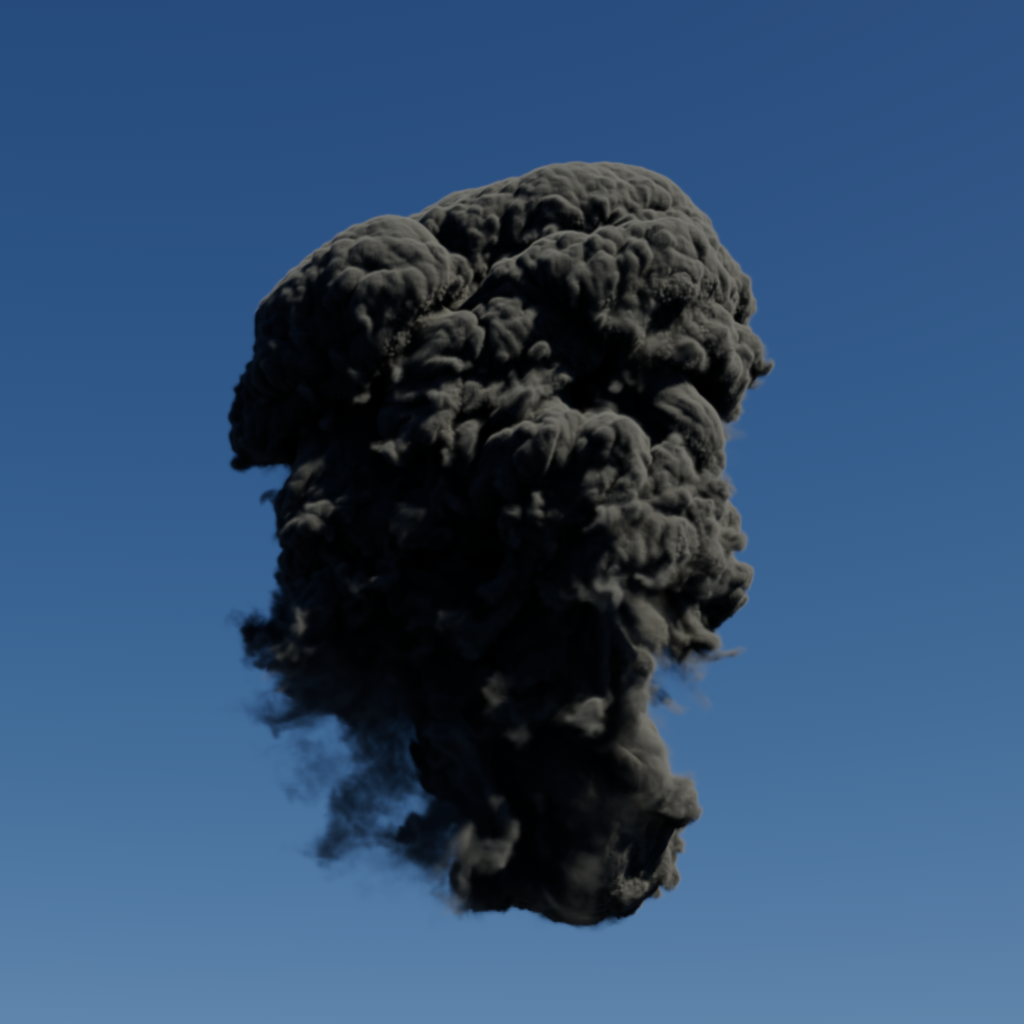
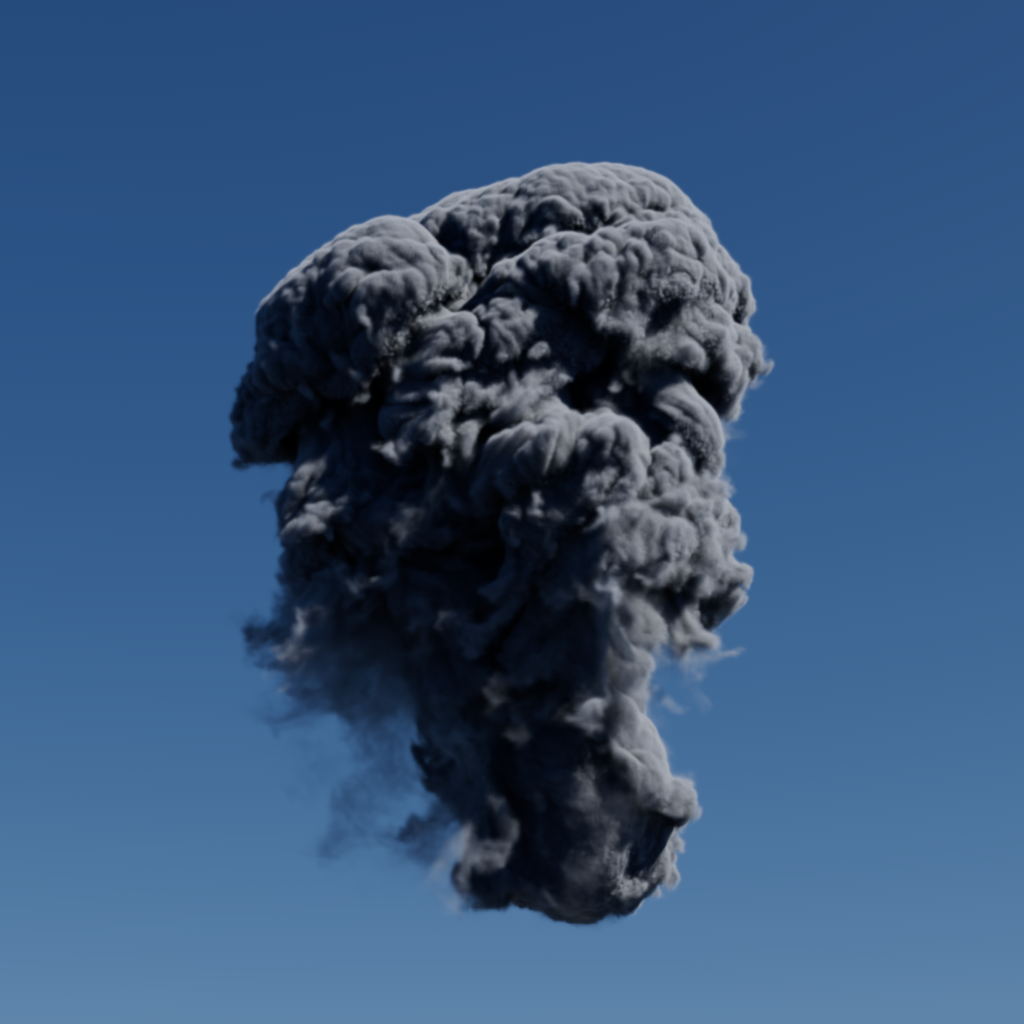
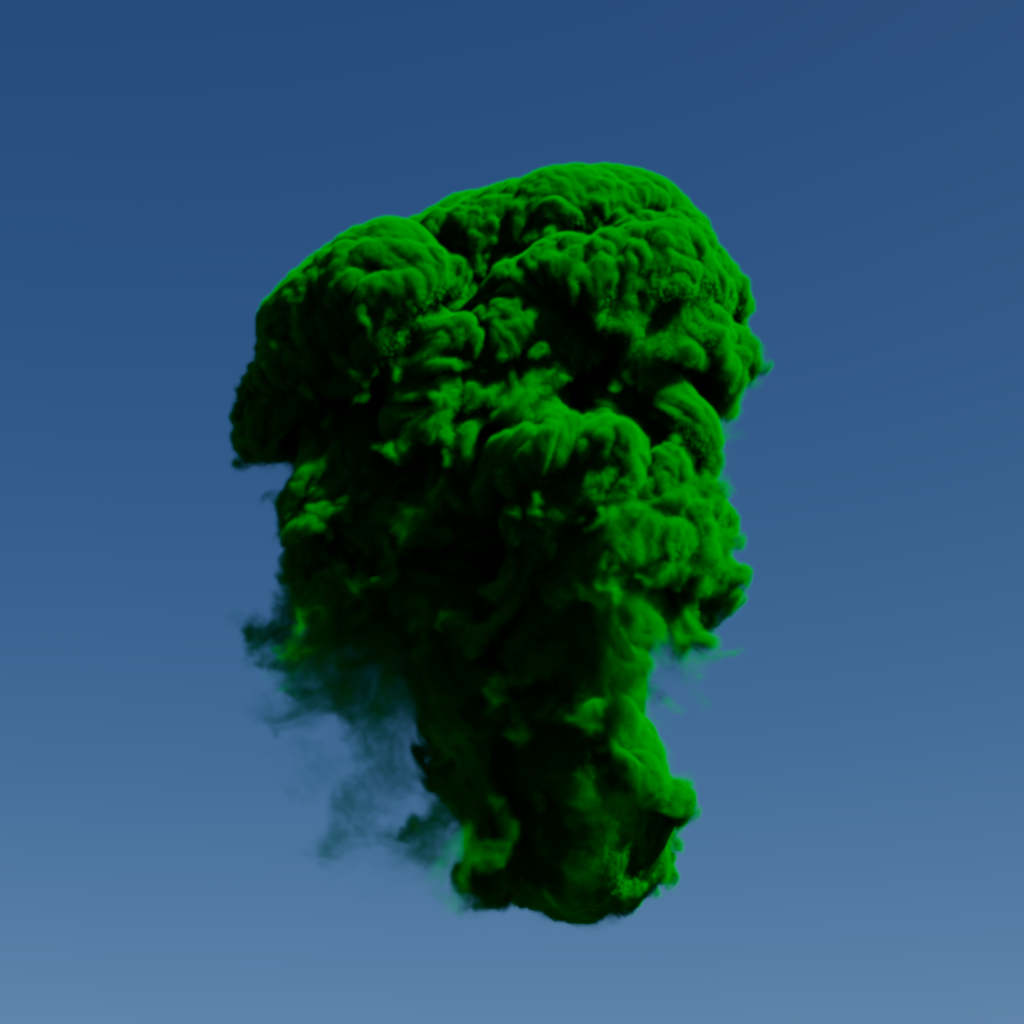
Tint
Tint controls the overall color of the volume, by default scatter tint is left white resulting in a grey smokey color.

|
|
|
| Scatter Tint: White (Default) | Light Blue | Green |
Scatter Remap Ramp
The Scatter Ramp color gradient allows you to color remap the scatter channel. Low density values are colored by the left side of the gradient, while high density values are colored by the right side of the gradient. By default a black and white gradient drives the scattering color but multicolored gradients can be used for more artistic effects as depicted below. Bright colors result in more scattering and dark colors result in less scattering.

|
|
|
| Scatter Ramp: Black to white (Default) | Black pushed farther to the right to more heavily darken low density areas |
Rainbow |
Color Channel
Instead of setting your own Tint or Scatter Ramp, an OpenVDB grid can be specified here for coloring the scatter component of the shader. This is useful when the coloration of a volume has already been determined.
Anisotropy
Anisotropy controls the direction light scatters inside a volume within a -1 to 1 range, adjusting a volume's anisotropy allows for more artistic control and increased realism. In the real world the composition of a volume can cause light to scatter in specific directions, for example, clouds frequently exhibit forward scattering (positive values) due the inclusion of water and ice molecules.
The default anisotropy of 0 results in isotropic scattering, when the light scatters equally in all directions, which is generally appropriate for smoke.
Positive values increase the chance for forward scattering, when more light is scattered in the direction the light rays are already traveling. Negative values increase the chance for back scattering, when more light is scattered back towards the location of the light source.
Values close to the extreme ends (-1 and 1) can result in unexpected or unwanted results as the light scattering becomes highly concentrated in a single direction.

|

|
|
| Anisotropy: -0.7 | 0 (default) | 0.7 |
|

|

|
Absorption
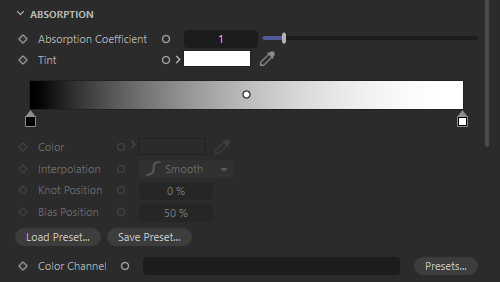
|
Redshift computes Absorption using the same OpenVDB grid used for Scatter channel.
Absorption Coefficient
Increasing the Absorption Coefficient makes the volume more opaque as more light gets absorbed by the volume. The more opaque the volume the less light will travel through it, high absorption coefficient values generally result in darker volume renders, particularly when the absorption coefficient is higher than the scatter coefficient, for more information please see the Scattering vs Absorption section.
|

|

|
|
Absorption Coefficient: 0.1 |
1 (Default) 1 |
3 1 |
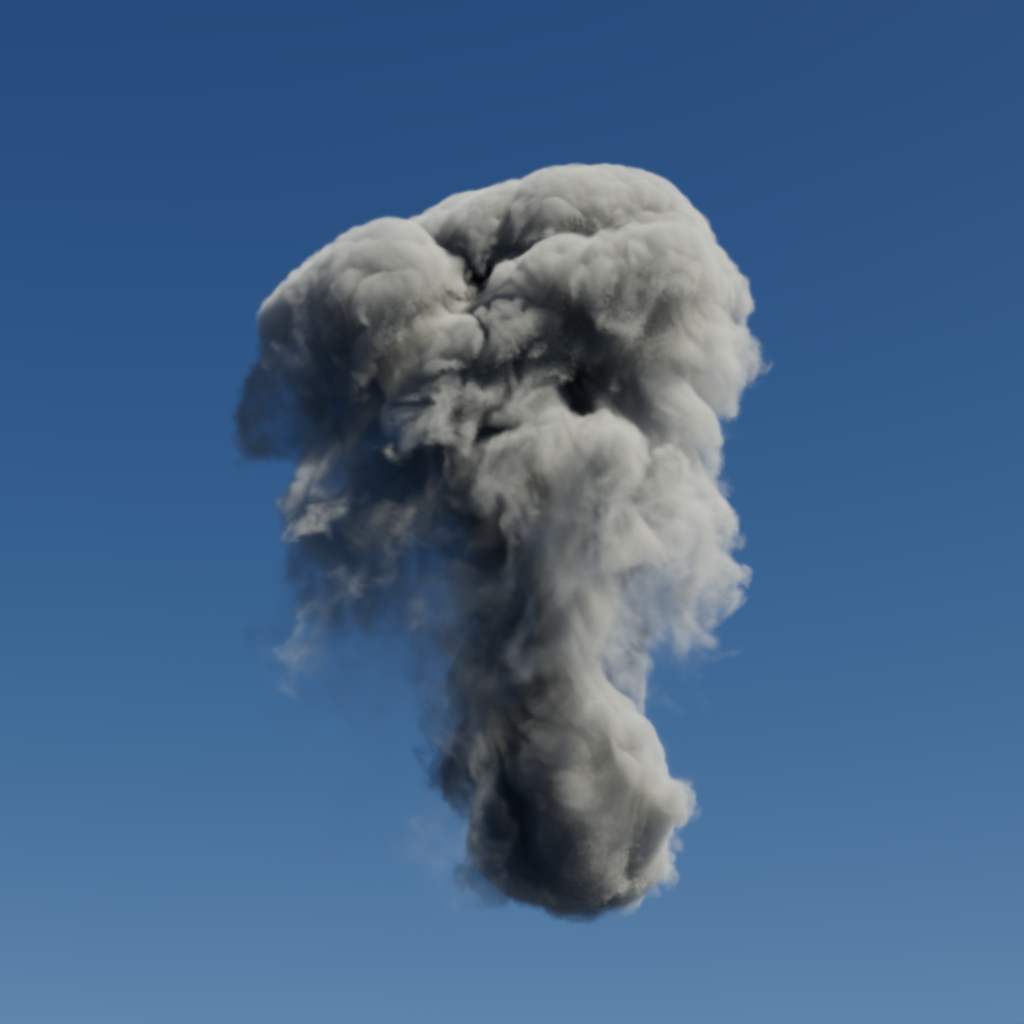
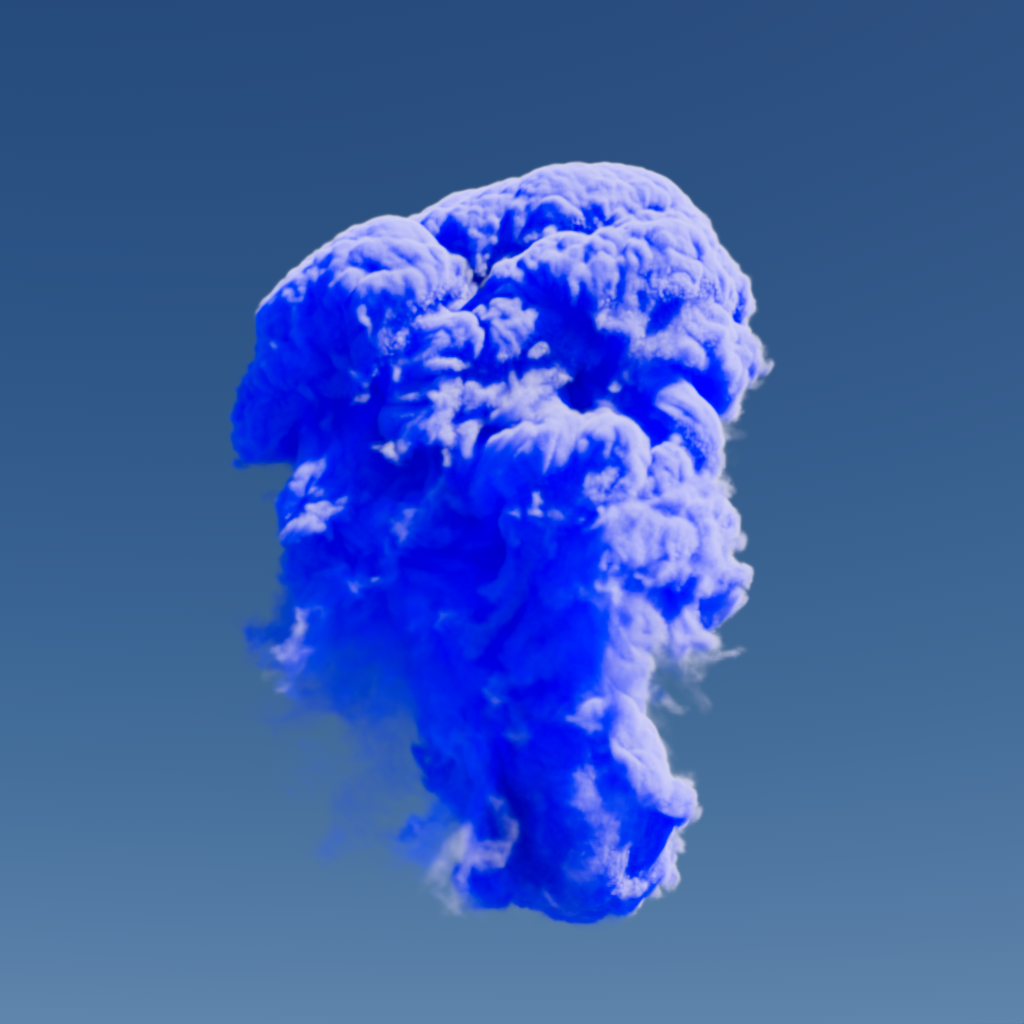
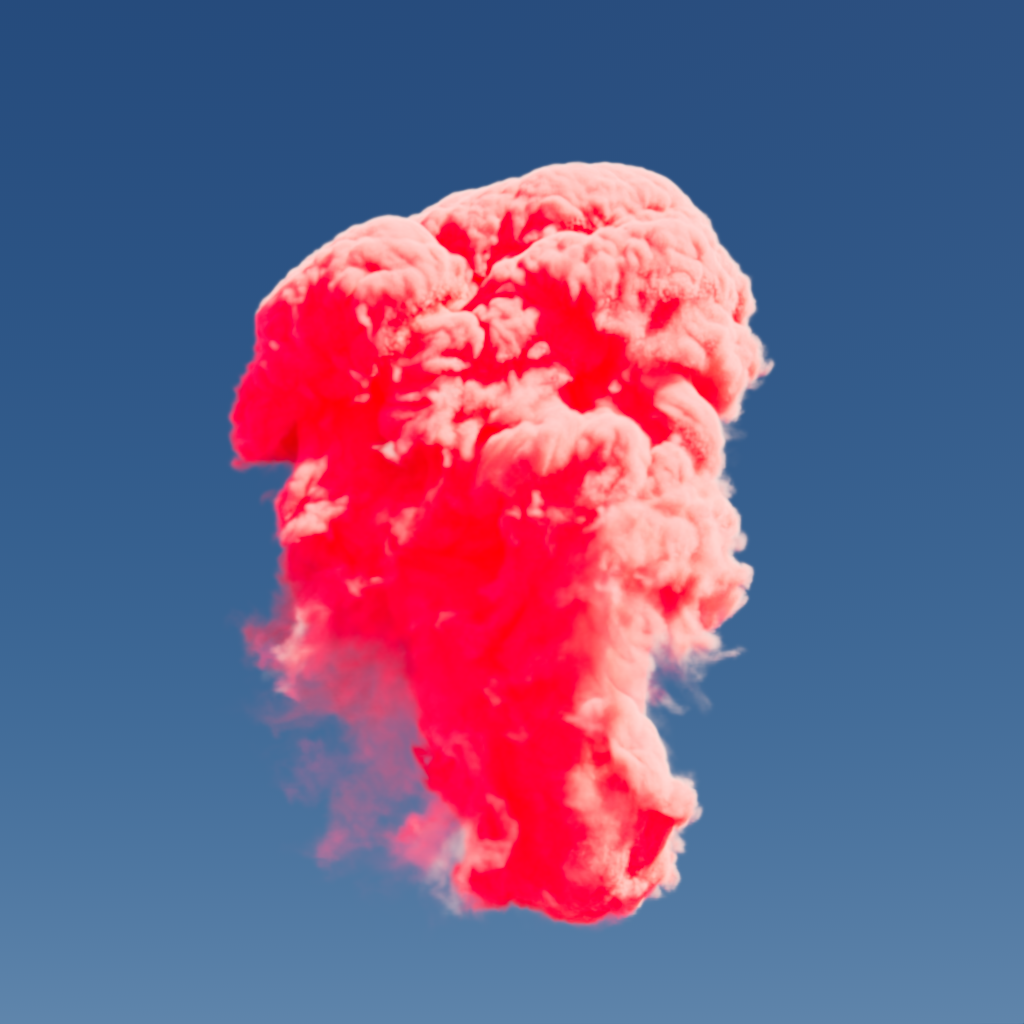
Tint
Use this to adjust the absorption color of the volume. Using darker colors results in reduced light absorption and brighter volumes, this is why the red and blue examples below look brighter compared to the white default.

|
|
|
| Absorption Tint: White (Default) | Blue | Red |
Absorption Remap Ramp
The Absorption Ramp color gradient allows you to color remap the scatter channel. Low density values are colored by the left side of the gradient, while high density values are colored by the right side of the gradient. By default a black and white gradient drives the scattering color but multicolored gradients can be used for more artistic effects as depicted below.
|
|
|
| Absorption Ramp: Black to white (default) | Teal stylized ramp | Rainbow |
Color Channel
Instead of setting your own Tint or Scatter Ramp, an OpenVDB grid can be specified here for coloring the absorption component of the shader. This is useful when the coloration of a volume has already been determined.
Emission
|
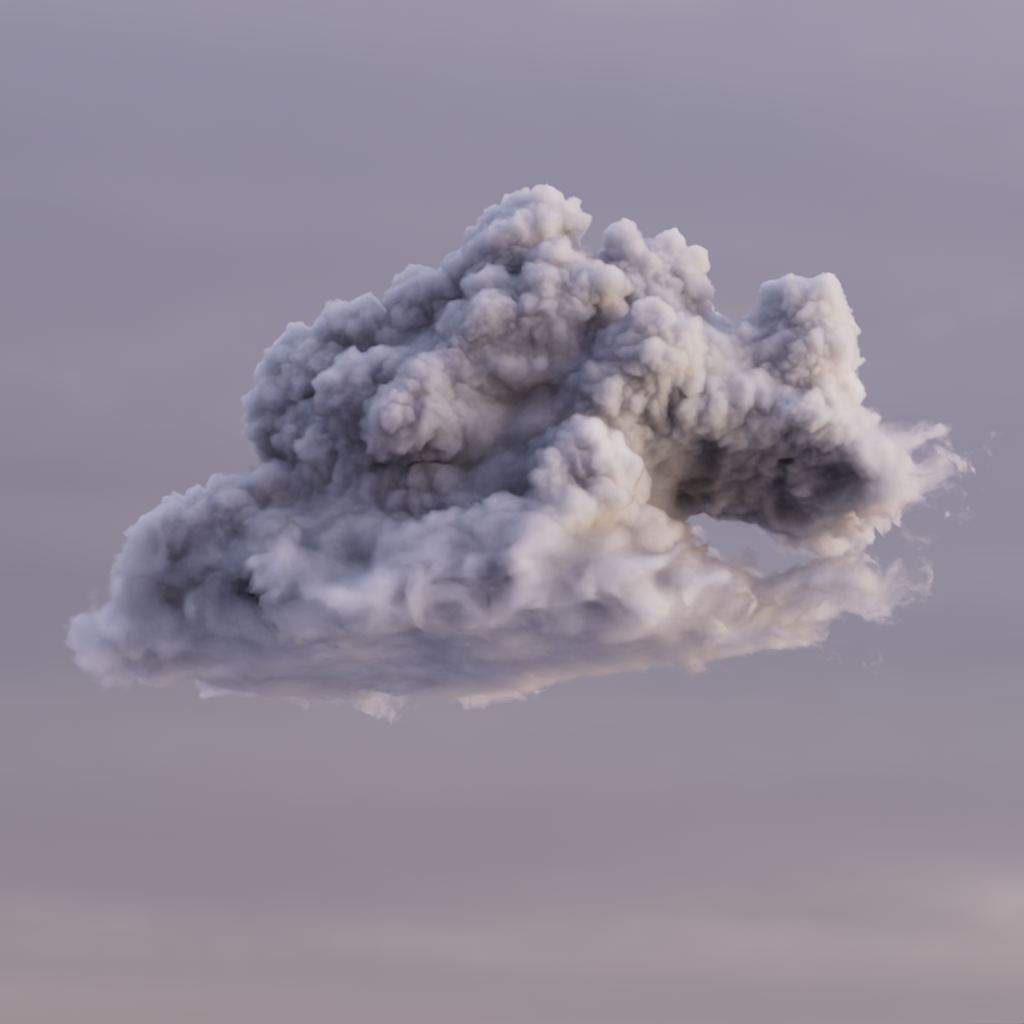
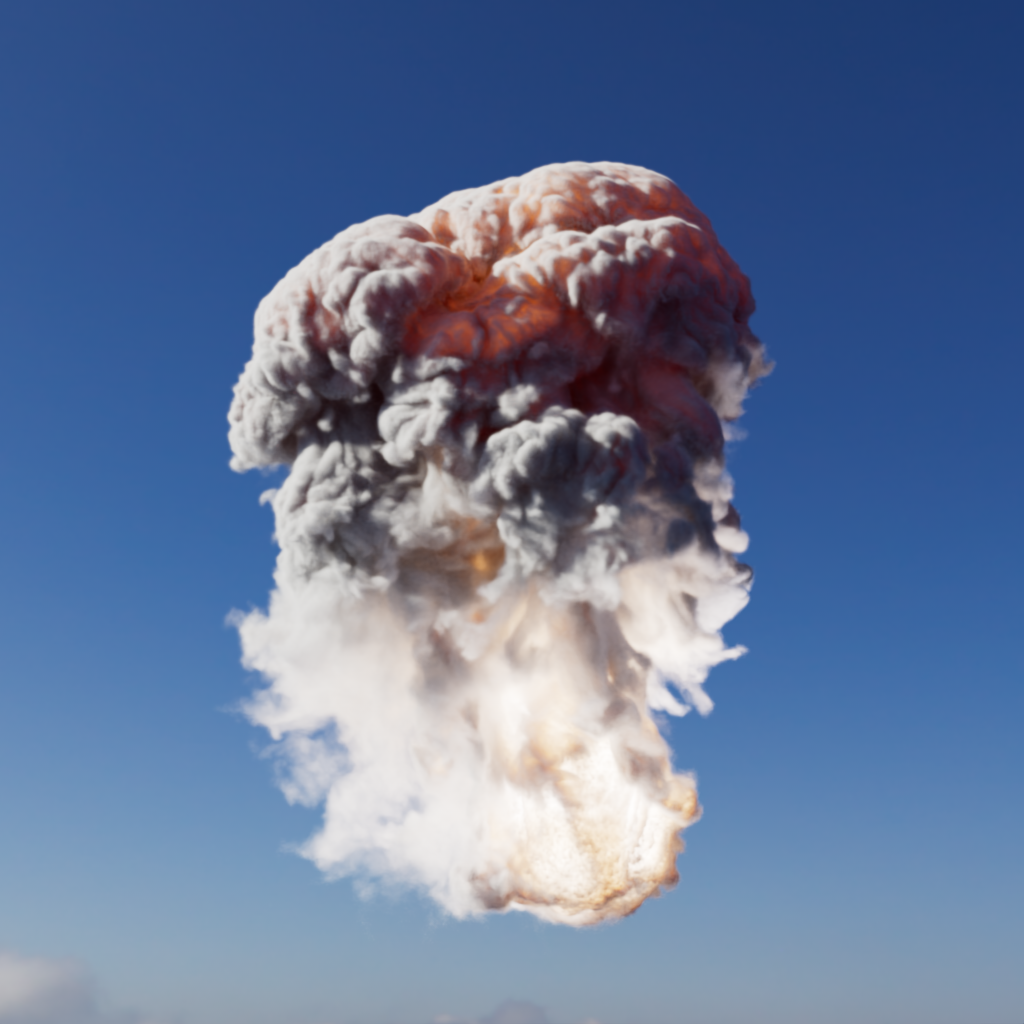
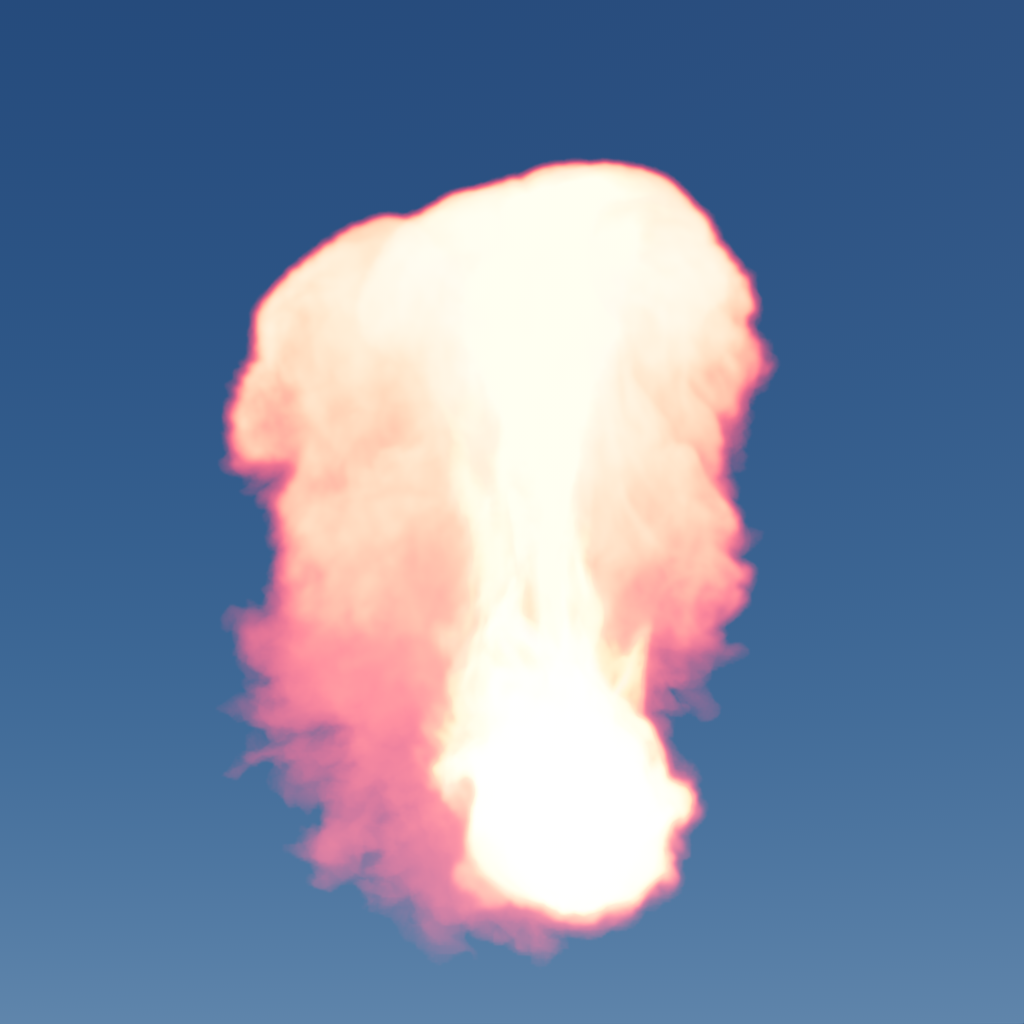
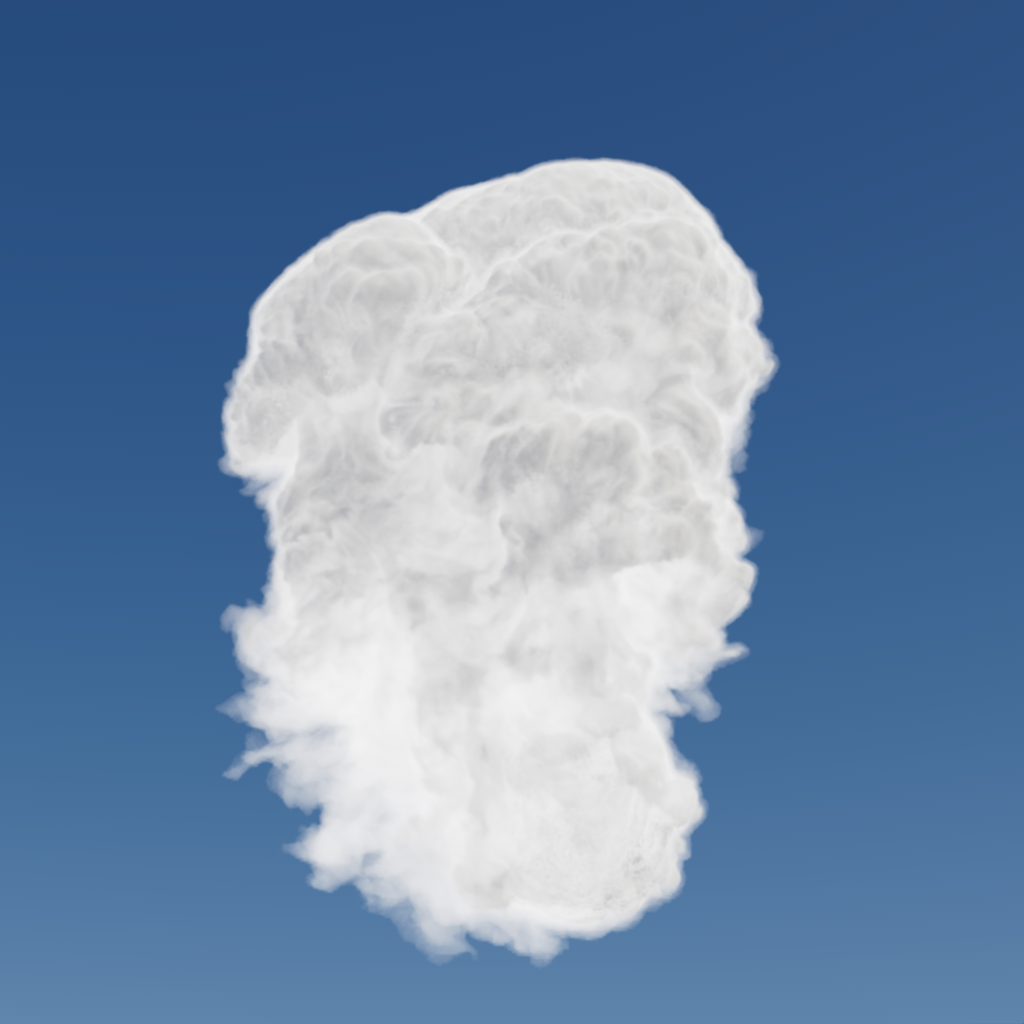
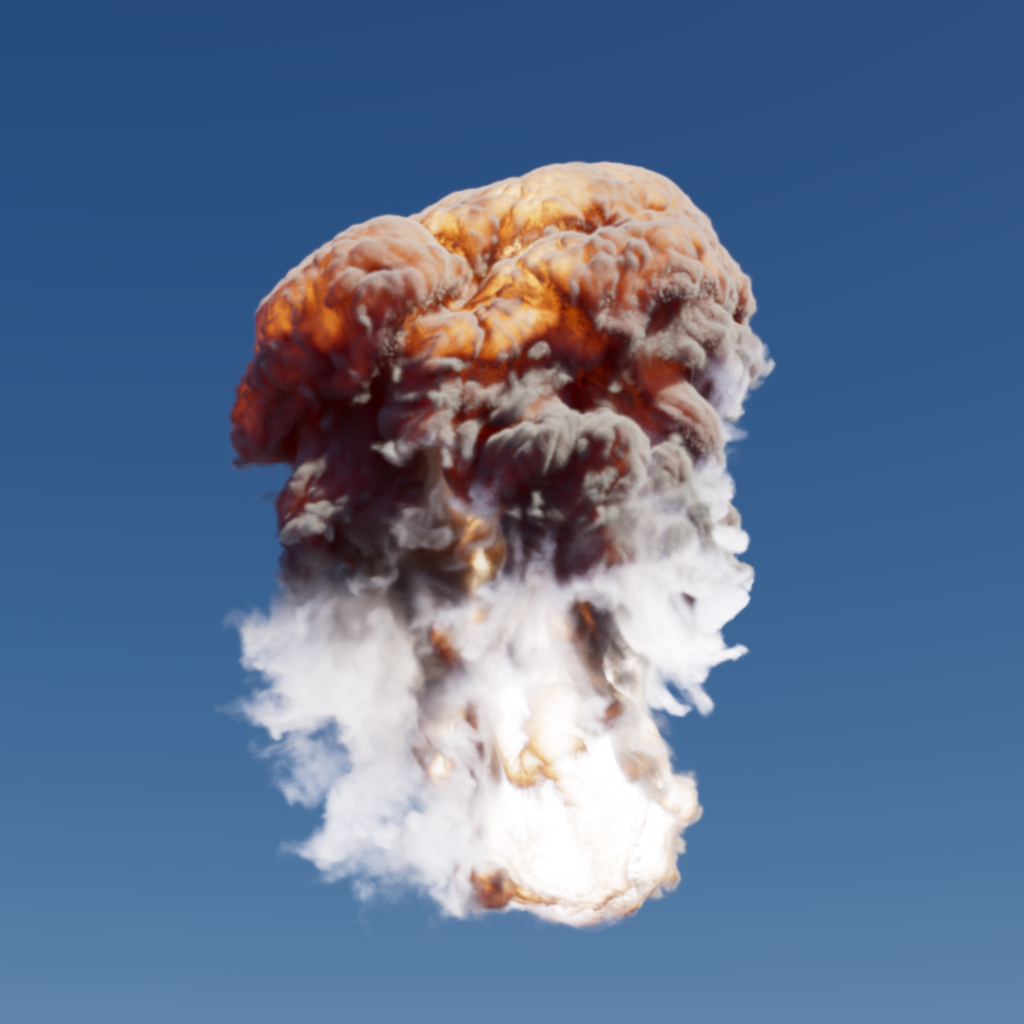
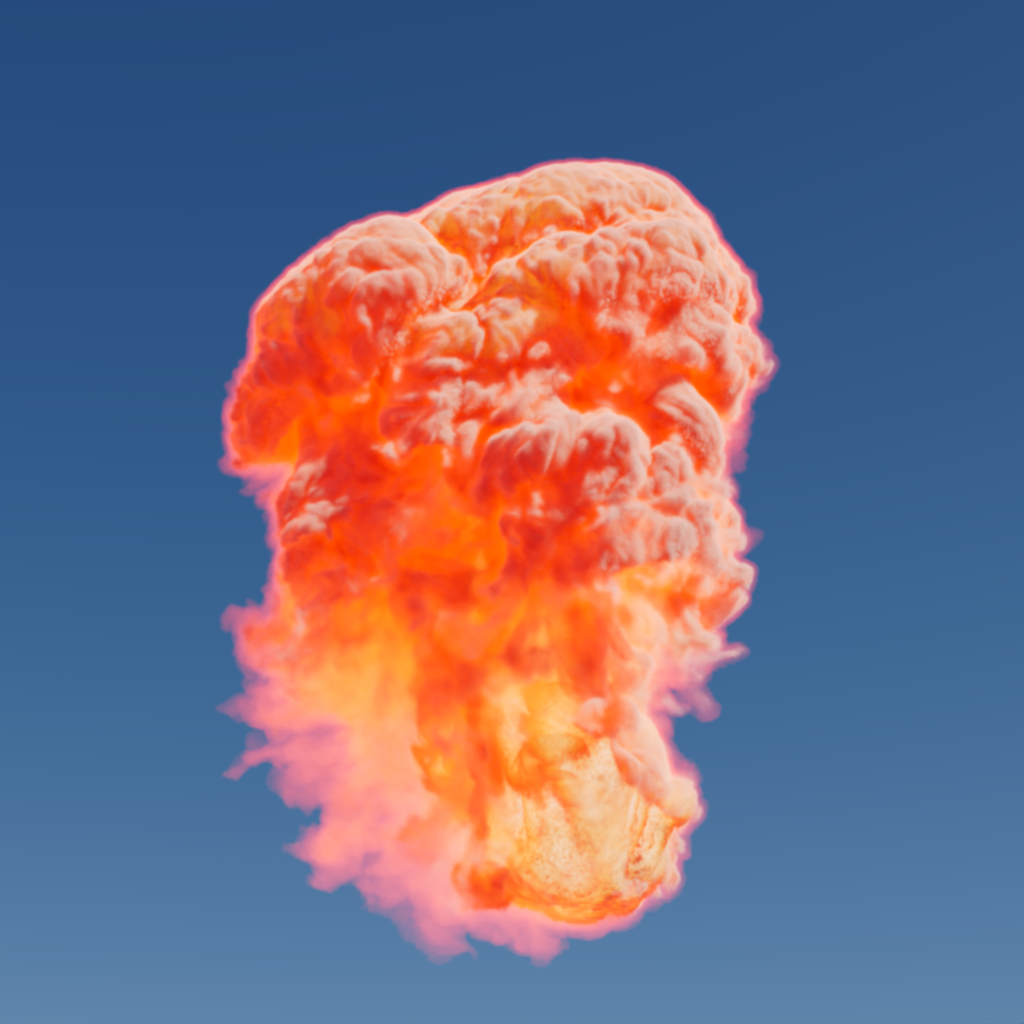
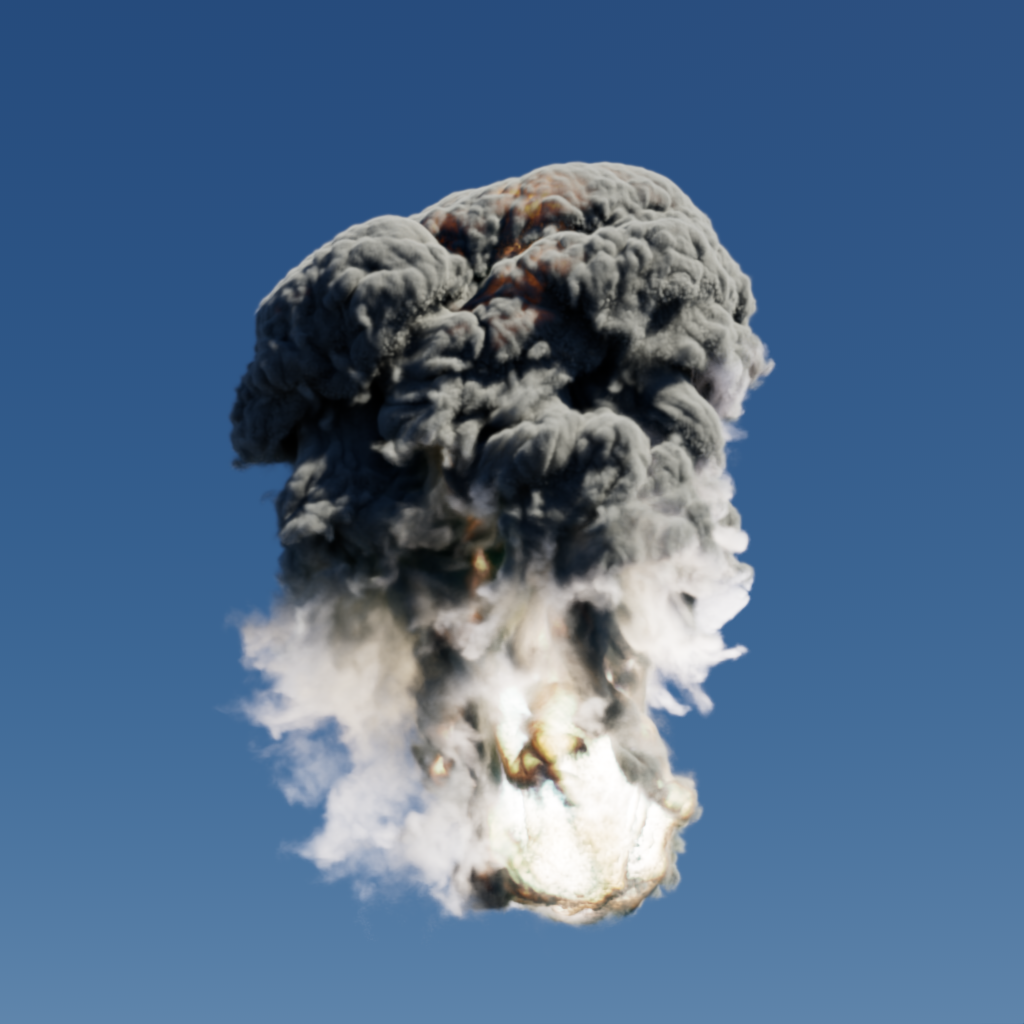
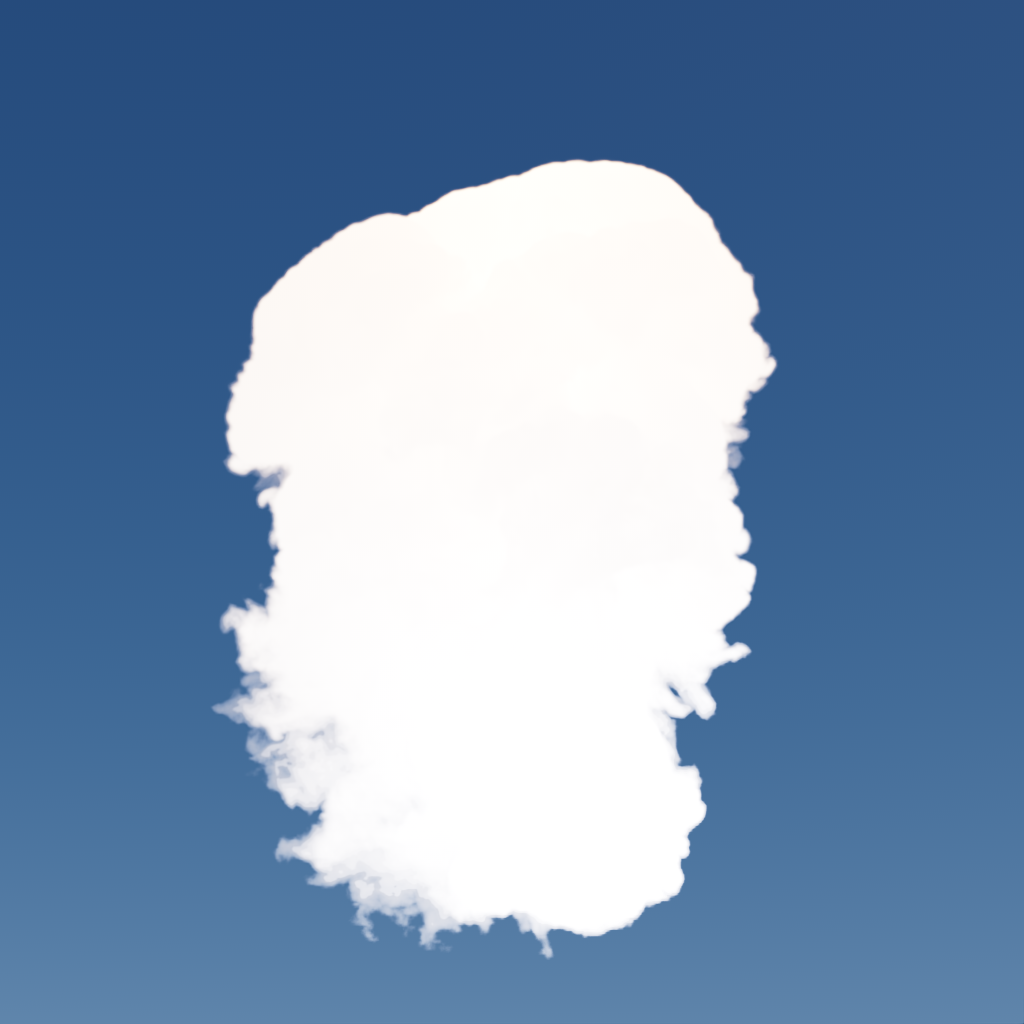
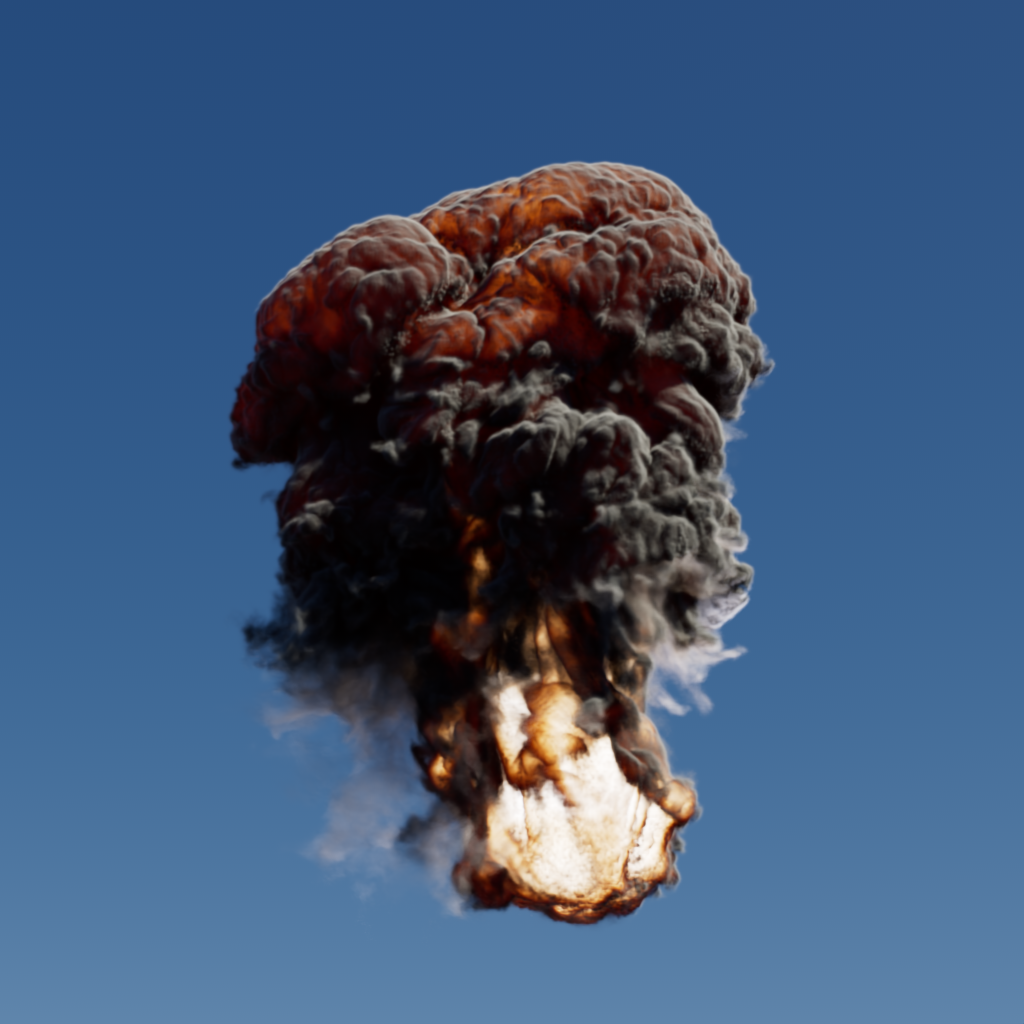
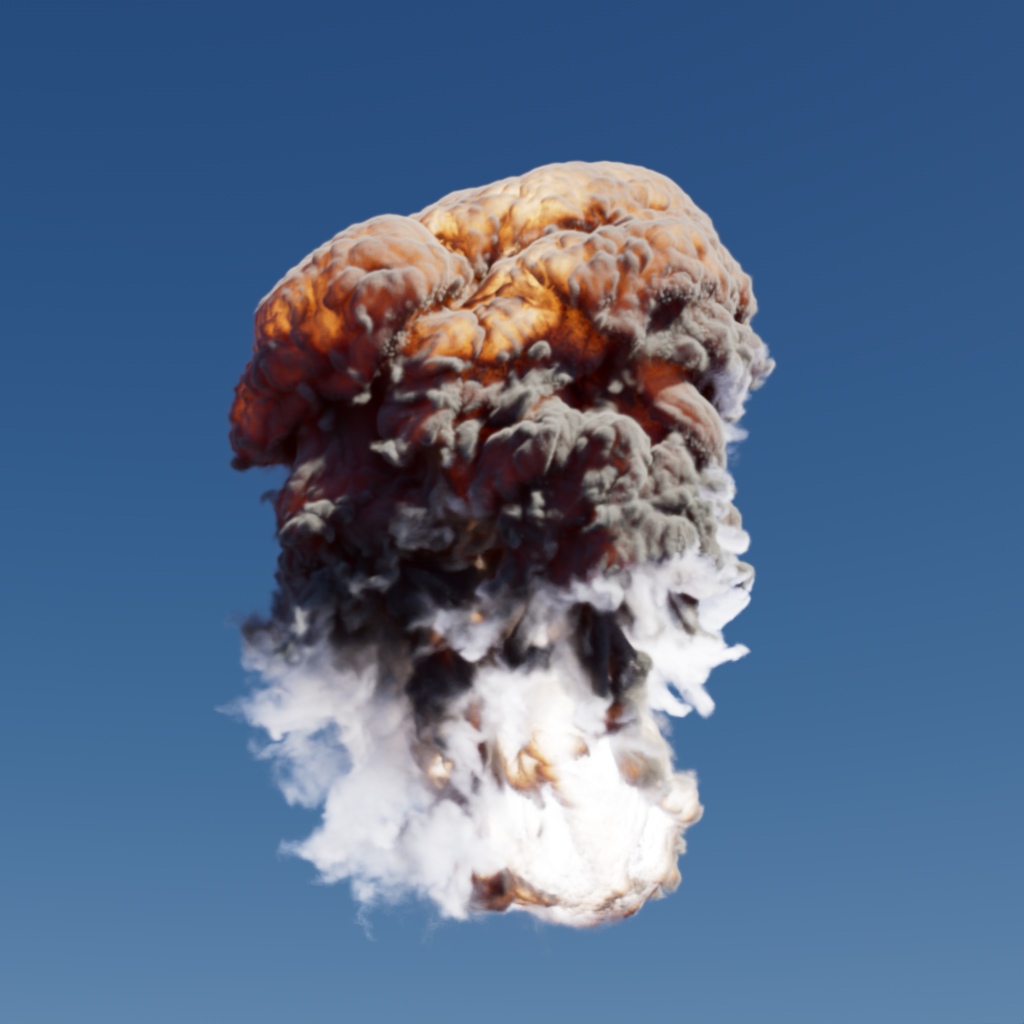
The emission component is used when creating effects such as fire, explosions, or any time you need a volume to emit light. In the images below all examples use the Blackbody emission mode unless otherwise specified.
|
|
|
| Without emission we can only see the smoke | With emission we can see the fire effect as well |
Channel
The emission channel drives the overall look of a volume objects emission contribution, this is a key shading component for fires and explosions. A VDB grid must be specified here by typing its name into the channel field before any emission rendering can take place. The most common name for a scatter channel is 'temperature.'
Emission can be driven by most available volume grids but it's important to use the correct grid to drive a channel when trying to achieve a specific result.
|
|
| Emission Channel: Temperature | Density |
Cinema 4D 2023.1 includes a Pyro Volume material preset that creates a volume shader with 'density' and 'temperature' grids predefined for the scatter and emissive channels.
You can also use the scatter channel Presets button to reveal typical channel names for OpenVDB files created by ExplosiaFX, FumeFX,Turbulence FD.
If you already have a Redshift Volume Object in your scene with a VDB file loaded the available Channel names from that file will appear in the Preset menu as well.
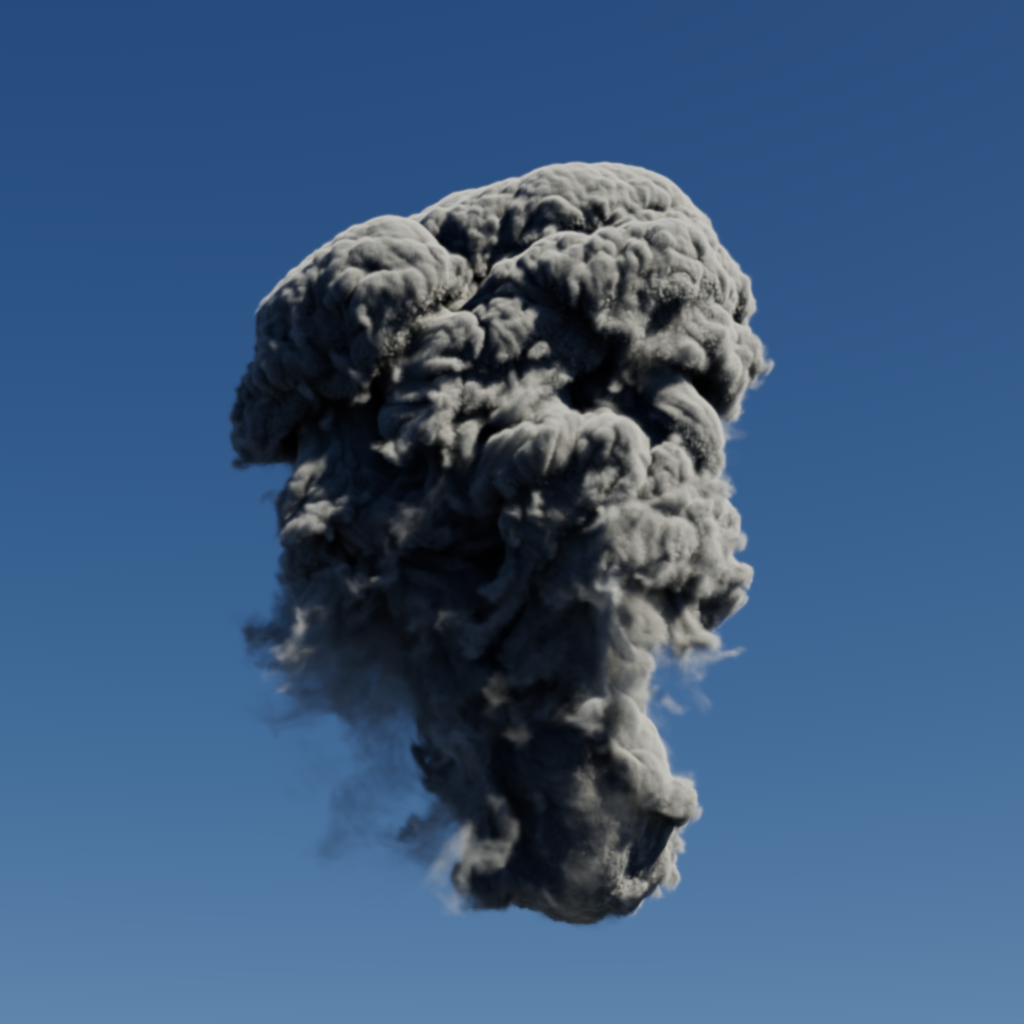
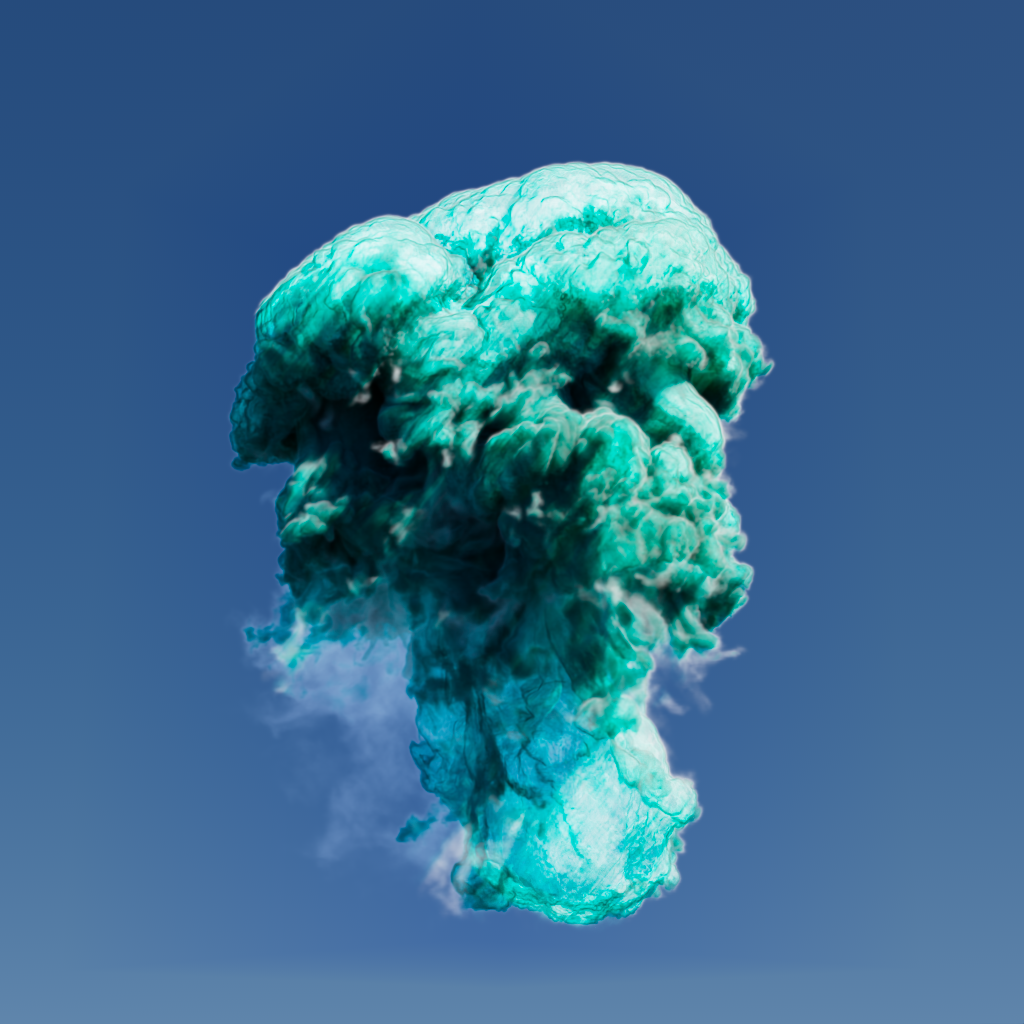
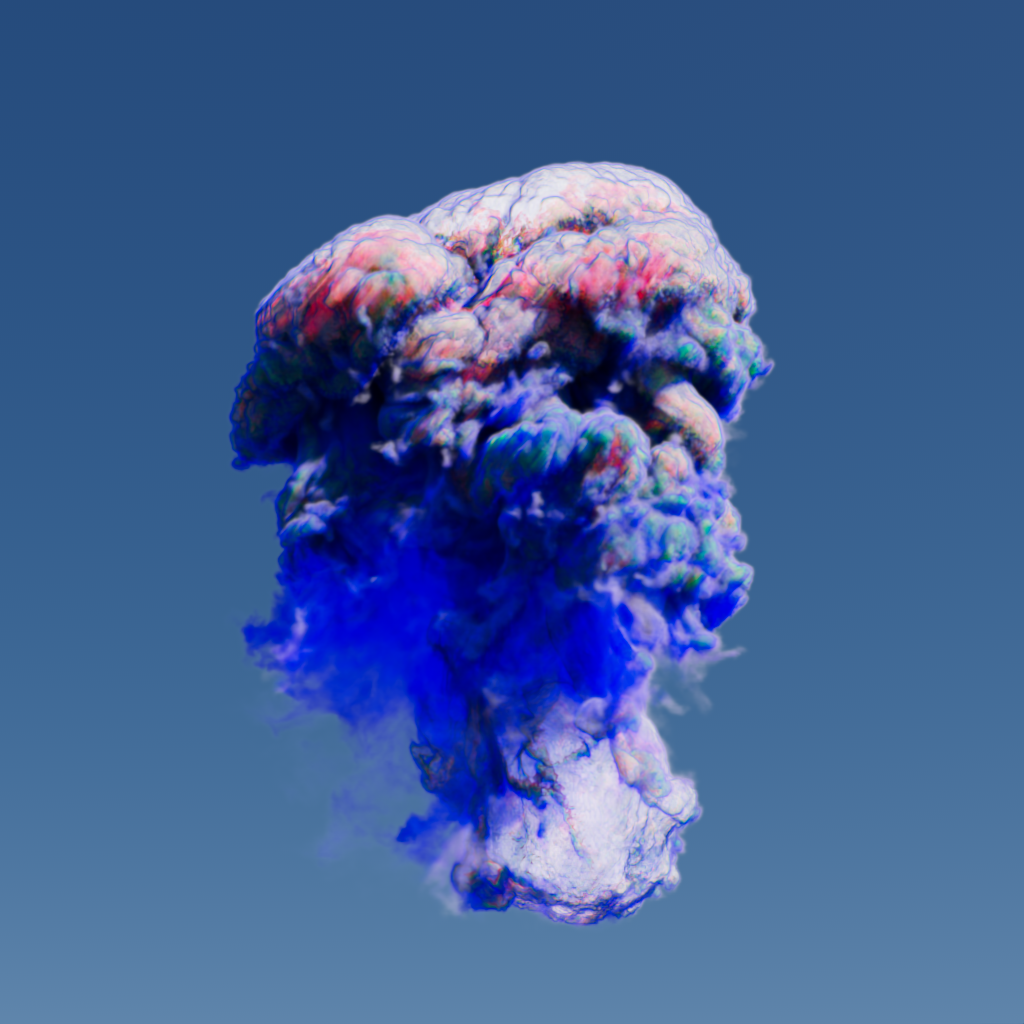
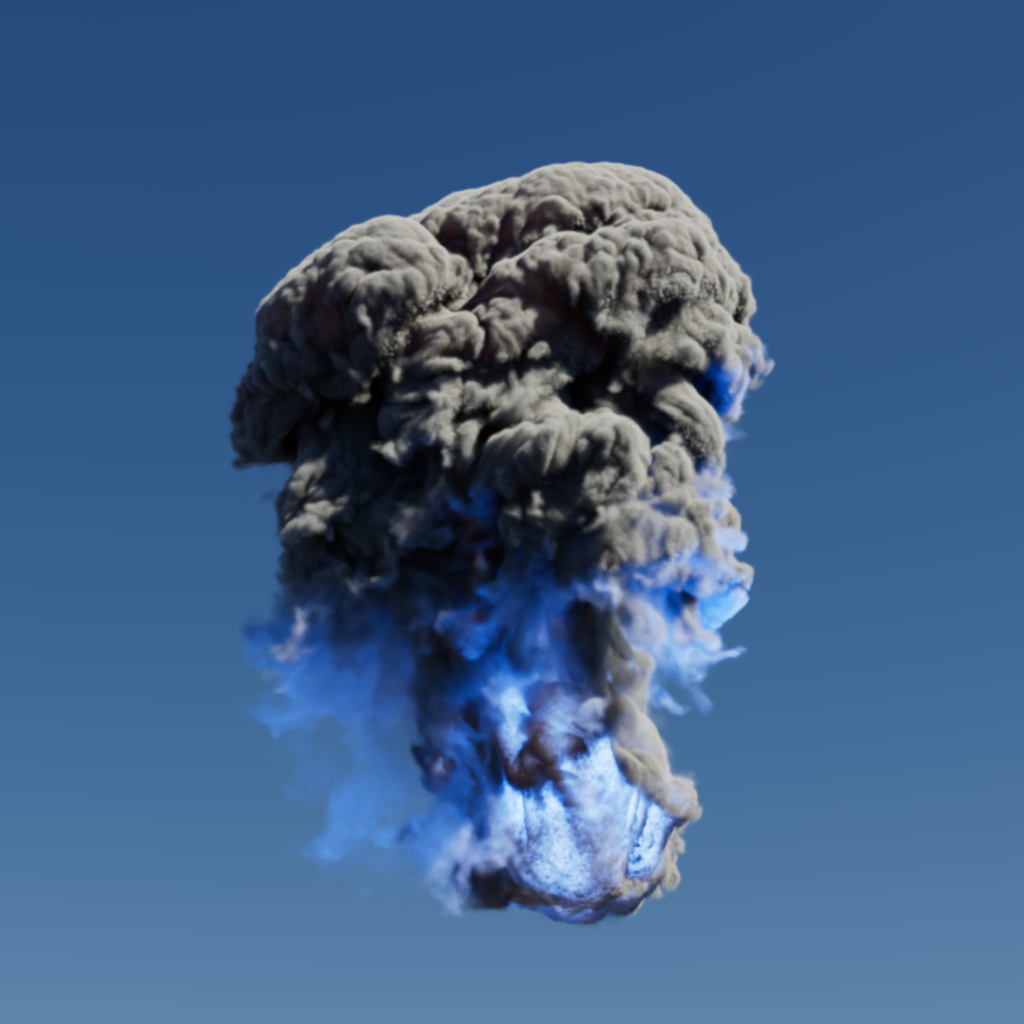
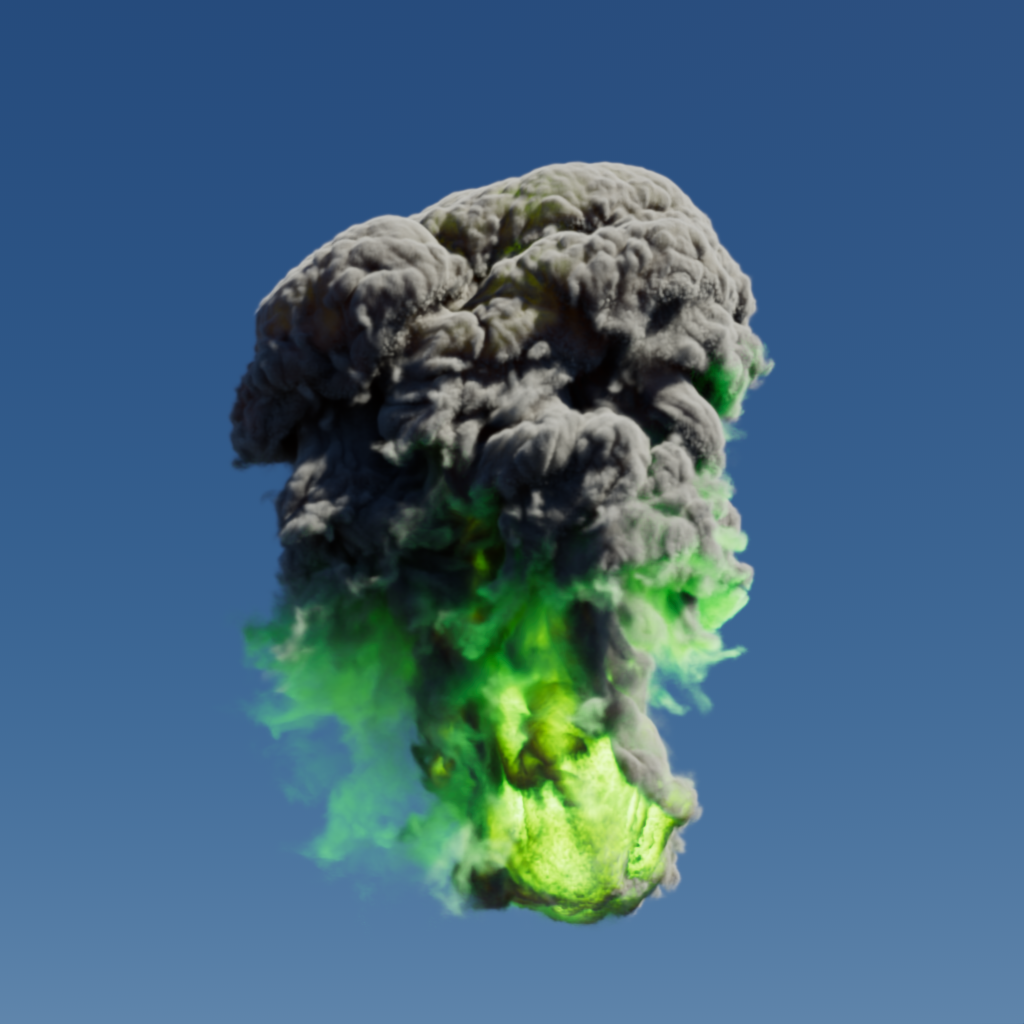
Tint
Use this to apply an overall color to the emission. Using darker colors will result in a reduction of the emission intensity.
.png)
|
|
|
| Emission Tint: White (default) | Blue | Green |
Scale
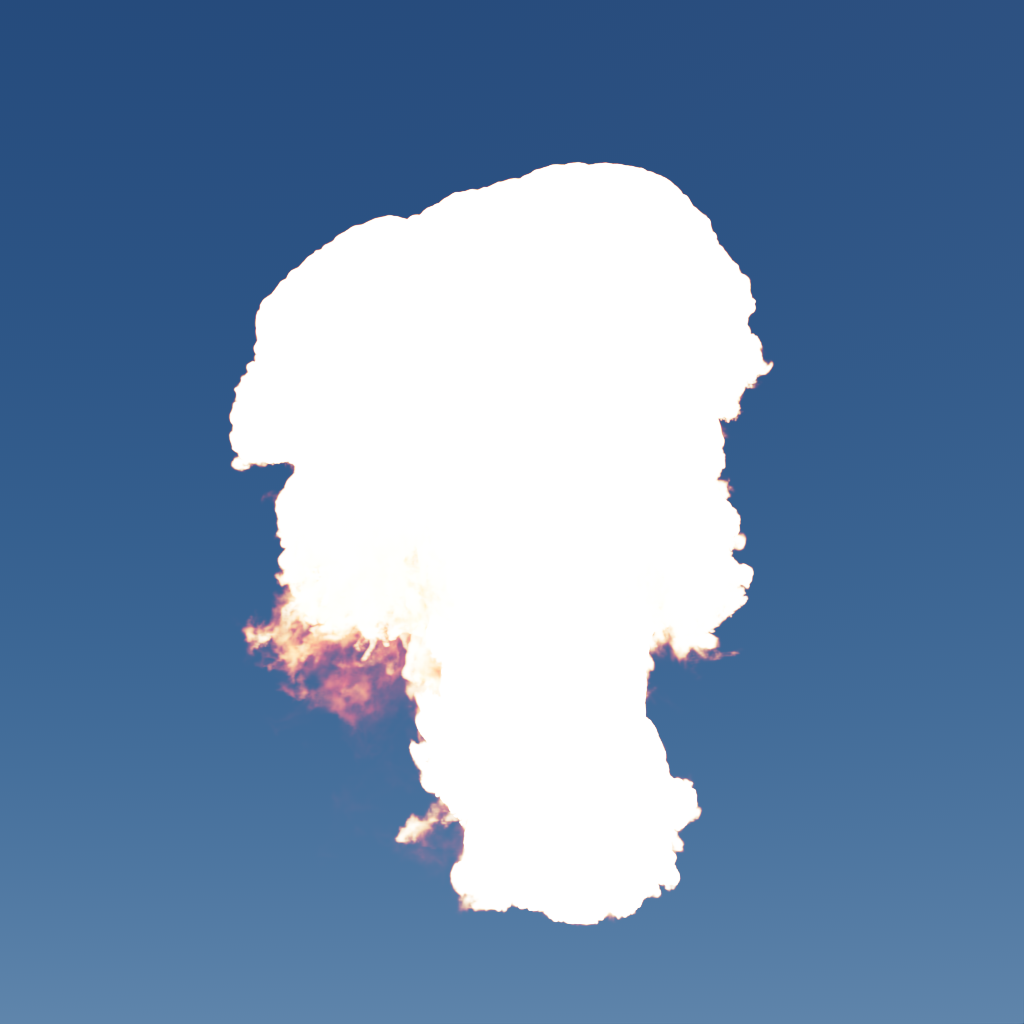
Use Scale as a multiplier for the emission Channel to increase or decrease emission intensity. A value of 0 results in no emission.

|
|
|
| Emission Scale: 0 | 1 (default) | 10 |
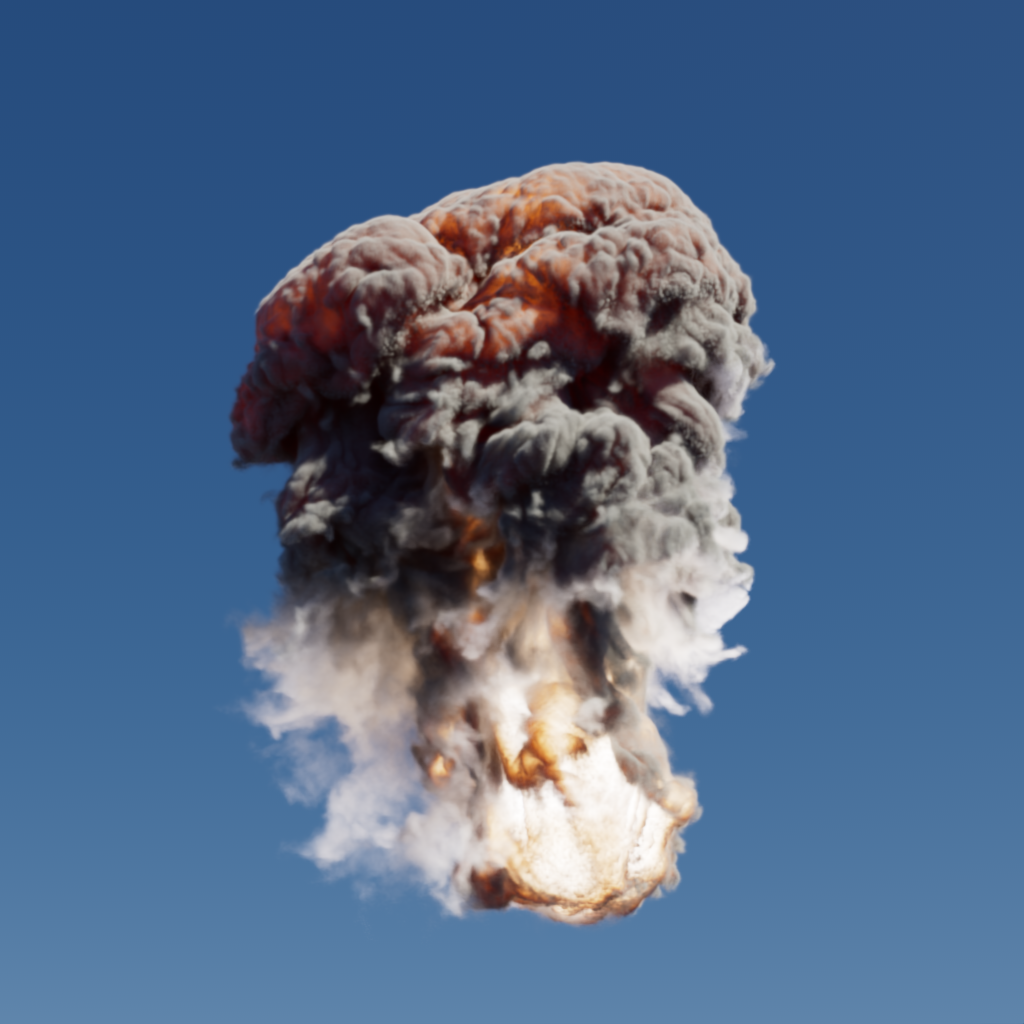
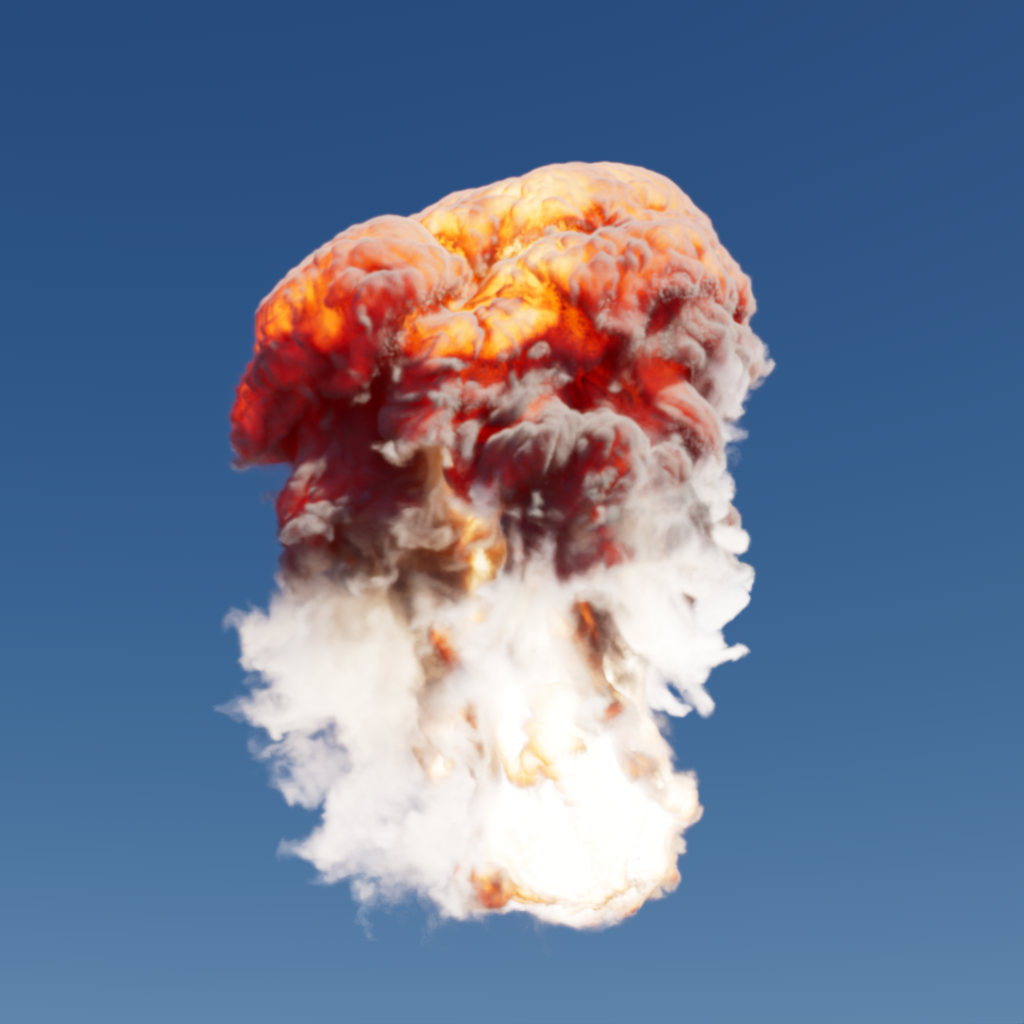
Emission Remap Ramp
The Emission Ramp color gradient allows you to color remap the emission channel when the emission mode is set to 'Color Ramp'. Low emission values are colored by the left side of the gradient, while high emission values are colored by the right side of the gradient. By default a black and white gradient drives the scattering color but multicolored gradients can be used for more artistic effects as depicted below.
When using the Color Ramp mode it's up to the user to adjust the Emission Ramp to 'translate' the temperature channel into the appropriate emissive colors.
As an example, a simple flame look can be achieved using a gradient ramp that looks like the following image:
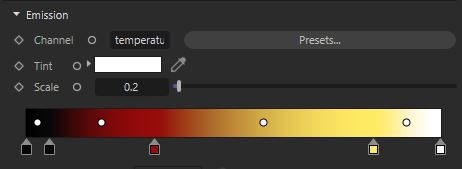
|
One way to read the above ramp is:
- For low temperatures, use black/gray
- For medium temperatures use red
- For higher temperatures use yellow/white
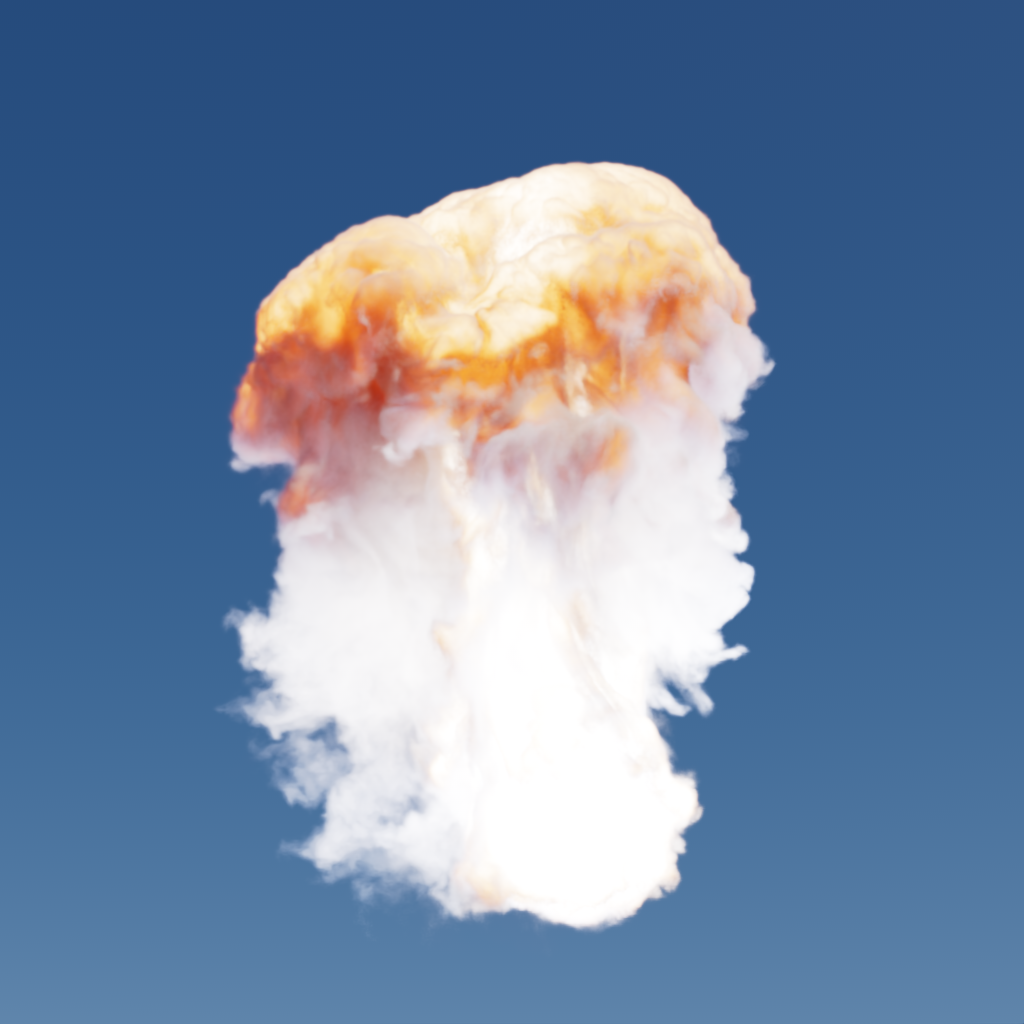
With the end result looking something like this:
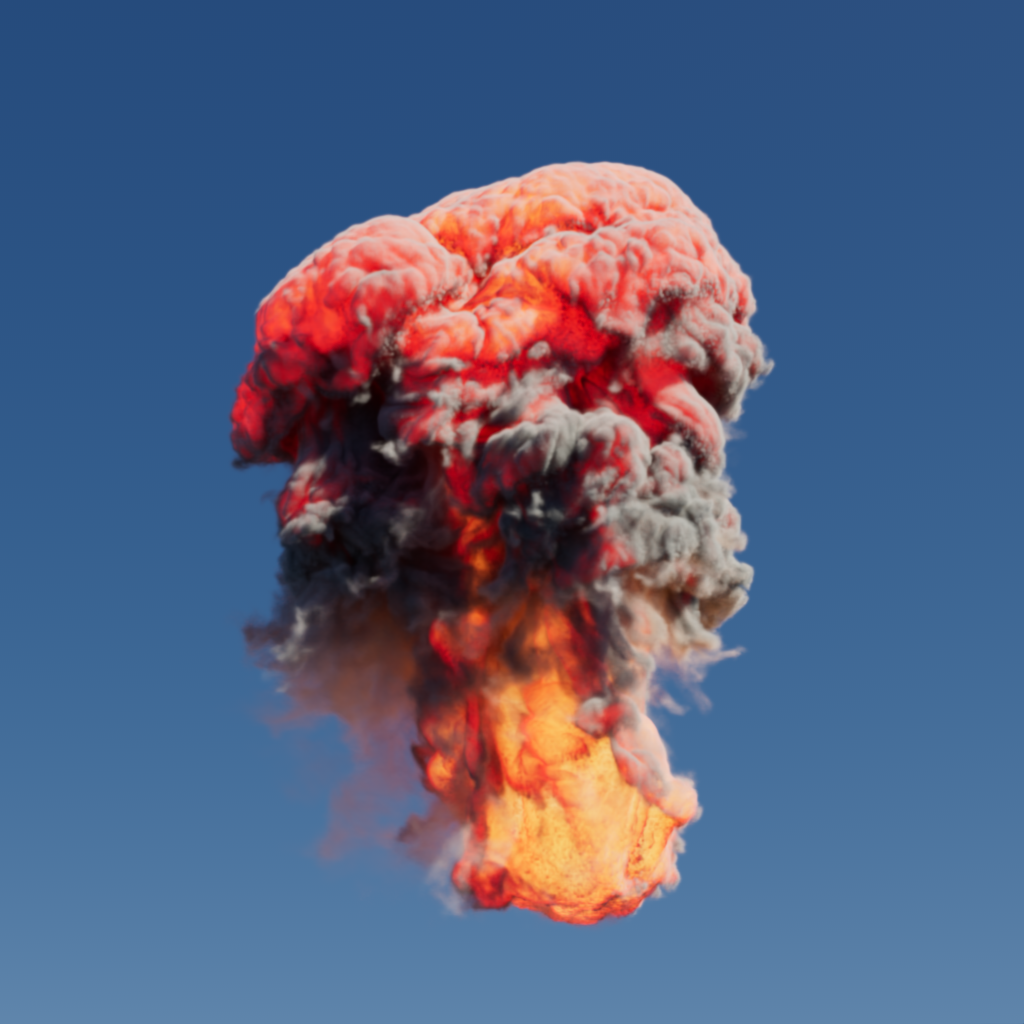
|
| Color Ramp with simple flame ramp |
For more realistic emission colors consider using the Blackbody emission mode instead.
Color Mode
Only relevant when using a Color Channel to drive emission for Color Ramp emission mode.
This mode controls the results of the Color Channel in combination with the Emission Remap Ramp and Tint. The following options are available:
- Multiply with ramp: The loaded Color Channel is multiplied by the Emission Remap Ramp and Tint.
- Multiply with temperature: The loaded Color Channel gets multiplied with the Emission Channel values, before it gets used with the Tint. The Emission Remap Ramp has no effect on the emission color.
- Replace: The Emission Remap Ramp has no effect on the emission Color Channel.
Color Channel
Only relevant when using the Color Ramp emission mode.
Instead of setting your own Tint or Scatter Ramp, an OpenVDB grid can be specified here for coloring the emission component of the shader. This is useful when the coloration of a volume has already been determined.
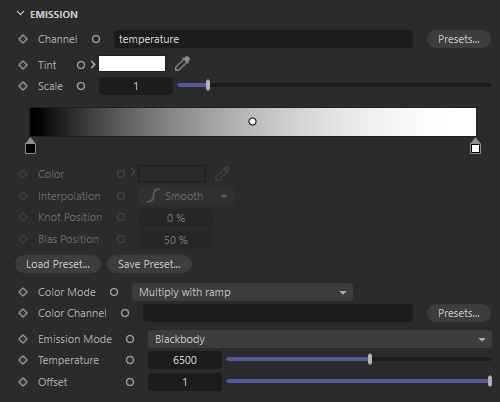
Emission Mode
Emission Mode controls how emission color is determined with the following options:
-
Color Ramp - Emission color is controlled by the user defined Emission Remap Ramp.
-
Blackbody - Emission color is controlled by a physically correct method of rendering volumes based on temperature for things like explosions and flames. Blackbody mode controls the both color and the intensity of the emission.
Achieving a certain look for emission can sometimes be challenging for two main reasons:
- Smoke (Scatter/Absorption) naturally obstructs fire (Emission) so it can reduce its effect. Therefore, care has to be taken to ensure that scattering and absorption are adjusted so that they do not interfere too much or too little with the emission.
- The Emission Ramp is commonly driven by a temperature volume grid. Depending on the 3D app used to author the OpenVDB file, the temperature ranges can be pretty dramatic. In certain cases, range remapping may help as described in the Emission Remap Range section.
|
|

|
| Emission Mode: Color Ramp (with default black and white ramp) |
Color Ramp (with custom flame ramp) |
Blackbody (default) |
Temperature
Only relevant when using Blackbody emission mode.
The temperature parameter maps the emission value to a Kelvin temperature range. Adjusting this value will change both the color and the emission intensity by making the volume hotter with higher values or colder with lower values.

|

|

|
|

|
| Temperature: 0 | 3000 | 6500 (default) | 9000 | 12000 |
| Note as the temperature parameter is increased the color of the emission changes and the emission intensity increases as well. | ||||
Offset
Only relevant when using Blackbody emission mode.
Offset interpolates the emission intensity between the emission channel value and the calculated physically correct radiance.
For physically correct results offset should be left at the default value of 1. Lower values will result in a more even and constant emission.

|
|

|
|
| Offset: 1 (default) | 0 | 0.5 | 2 |
Advanced
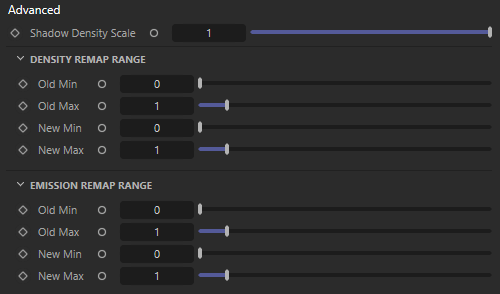
|
This section offers additional settings to tune the overall Shadow, Density and Emission evaluation
Shadow Density Scale
This parameter controls how dense a volume looks without affecting its overall shape the way making adjustments to scatter and absorption would. In effect it is a "trick" that can help emulate multiple scattering, i.e. the effect of light bouncing around a volume with a less severe impact to render times than actual multiple scattering by increasing the volume trace depth. An increased multiple scattering look may be achieved by setting the shadow density scale to a value below 1.0 while higher values will make a volume look more dense.
Absorption could be reduced to allow more light to pass through a volume, however, this would also make it appear more 'puffy' and transparent. Shadow density scale, on the other hand, retains a volume's overall shape while still allowing more light to pass through it.
|

|

|
|
| Shadow Density Scale: 0 | 0.5 | 1 (default) | 5 |
Range Remapping for Density and Emission
The values stored in OpenVDB channels can vary wildly depending on the 3d app that was used to author them. This can be true for both density and emission channels.
The range remapping controls allow the adjustment of these values before Redshift uses them. The Old Min/Old Max range is remapped to the New Min/New Max range.
Density Remap
If your volume looks blocky it can sometimes be helpful to remap the density ranges to allow for a more gradual falloff in volume shading, frequently this can be achieved by increasing the Old Max value.
|
|

|
|
|
| Density Old Range: 0 - 10 Density New Range: 0 -1 |
0 -15 0 -11 |
0 -1 (default) 0 -1 (default) |
0 -1 0 -10 |
0 -1 0 -100 |
Emission Remap
A temperature channel might contains values that range between 0 and 100 but the Emission Ramp only accepts inputs ranging between 0 and 1. In this case, the user should use old min=0, old max=100 and leave new min and new max at their default 0 and 1 respectively. In essence, this would remap or 'squash' the 0-100 range into a 0-1 range.

|
|
|

|

|
| Emission Old Range: 0 - 5 Emission New Range: 0 -1 |
0 - 2 0 -1 |
0 -1 (default) 0 -1 (default) |
0 -1 0 - 2 |
0 -1 0 - 5 |