Redshift Camera
The Redshift Cameras are only available if Redshift is activated as Renderer (see Cinema 4D Render Settings).
Overview
The updated Redshift Camera Object consolidates the same familiar parameters that have already been available while adding new functionality and improving overall organization. One of the key new features is the option for the Redshift camera to behave more like a real camera where settings like Aperture and Shutter Speed also affect the exposure instead of just controlling the depth of field and motion blur in isolation, for more information please see the Exposure Type parameter section.
Switching to the Redshift Camera changes the organization of previously existing camera parameters, please use the table below to see where things have moved.
| Redshift Camera Tag | Redshift Camera Object |
| Bokeh | Optical > Depth of Field |
| CoC Radius (Circle of Confusion) | Optical > Depth of Field: Controlled by the Aperture parameter when Bokeh is enabled |
| Distortion | Optical > Distortion |
| LUT | Color Correction > LUT |
| Exposure | Optical > Exposure |
| Contrast | Color Correction > Color Controls |
| RGB Curves | Color Correction > Curves |
| Exposure - Film Settings | Optical > Exposure |
| Exposure - Tone-Mapping | Color Correction > Tone-Mapping |
| Bloom / Flare / Streak | Lens Effects |
| Background | Background |
Using the Redshift Camera also updates the order of parameters in the Redshift Render View.
The Optical settings are not compatible with the Cinema 4D default camera and the Optical menu will not be visible in its usual spot in the Redshift Render View.
Please create a Redshift Camera Object to access these settings.
The easiest way to work with the Redshift Camera object is by using the Create menu and choosing one of the Camera objects there. If you only need a normal camera, select the Standard camera. Otherwise, additional camera types are available, e.g. for rendering special perspectives such as a spherical or cylindrical panorama. However, all these perspectives can also be switched later on the camera.
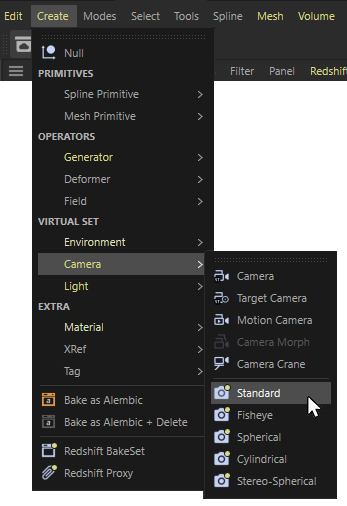 Native Redshift cameras can be added from the 'Create' menu.
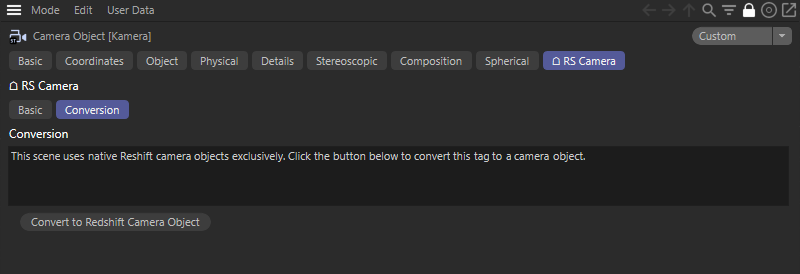
Redshift Cameras should only be used in new projects and not in combination with Cinema 4D Cameras that use the Redshift Camera Tag. In this case the Redshift Camera Tags will get deactivated and offer a new button to convert the Cinema 4D Camera Object and its Redshift Camera Tag to the new Redshift Camera Object (see image below).
If you need to work on an older Redshift project and add a Cinema 4D Camera/Redshift Camera Tag combination there, you can open the Cinema 4D Preferences from the Edit menü and open the settings for Renderer/Redshift. There you can find the option for Native Camera for New Scenes. Deactivating that option will still create Redshift Camera Tags for new camera objects, but only in new scenes that are still completely empty!
You can learn more about the Redshift Renderer Preferences here.
Converting camera types
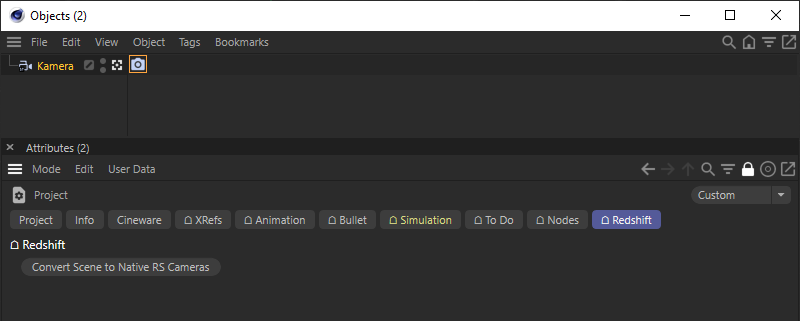
If you already created a standard Cinema 4D Camera Object or have an older scene with a Cinema 4D Camera in combination with a Redshift Camera Tag, you can use the Convert Scene to Native RS Cameras button, that is found in the Redshift tab of the Cinema 4D Project Settings. The Project Settings can be opened from the Cinema 4D Edit menu or by using the Shortcut Ctrl-D.
Many of the settings of a Redshift Camera are already known from the Cinema 4D Camera Object. Nevertheless, there are also functions here that are only available when rendering with Redshift.