Table Of Contents
Introduction
The Redshift Texture Options give you better control over texture filtering and MIP-mapping on a per-texture basis.
Unless absolutely necessary, it is recommended the Texture Options be left at the default settings, otherwise rendering and texture out-of-core performance can suffer.
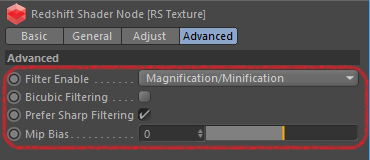
In C4D, the options are found under the 'Advanced' tab of the Redshift Texture Sampler node:

Options
Filter Enable
Selects the filtering enable mode of the texture sampler;
- None (no MIP-mapping, point-sampled for 'minification' and 'magnification')
- Magnification (no MIP-mapping, point-sampled for 'minification')
- Magnification/Minification (recommended default. MIP-mapped, with full filtering)
Sometimes a texture may require special filtering treatment, where the global texture sampling mode (found under the Optimization tab) might not be adequate.
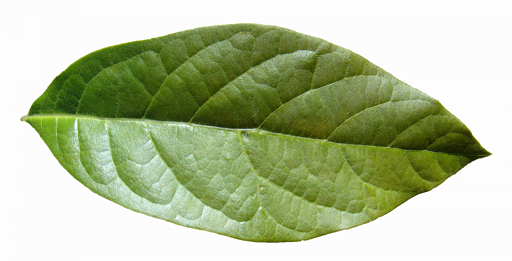
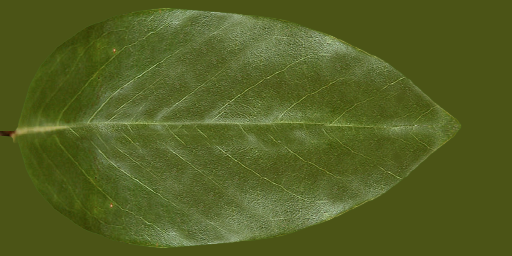
For example, this can be the case when a texture has an alpha cut-out and the color part of the texture is not configured to take texture filtering into consideration. When this is the case, filtering and MIP-mapping will result in undesirable color bleeding artifacts that can manifest as a halo around the cut-out texture. If correcting your texture in this kind of situation is not an option, then it is recommended you change the 'Filter Enable' property to 'Magnification', so you still get soft, filtered results when magnifying the texture, but no filtering and thus bleeding when 'minifying' the texture.
Below is an example of a poorly configured texture and a correctly configured texture:
|
|
|
| Poorly configured, problematic texture, with white fill around the leaf | Properly configured texture with leaf color fill around the leaf |
Below shows zoomed in examples of the rendered results with differently configured textures and different filtering modes:
|
|
|
|
| Poorly configured, problematic texture, with filtering. Notice the greyish outline | Poorly configured, problematic texture with no 'minification' filtering or MIP-mapping | Properly configured texture with default filtering |
Another situation when you might need to disable filtering is when a texture contains non-color information, such as rotation, which could be used to drive the anisotropy rotation of reflection. When this is the case, filtering and MIP-mapping will result in 'in-between' values that might not make sense for the rotation texture to function properly. So, setting the 'Filter Enable' option to 'None' is recommended to remove any undesired artifacts due to filtering. Below are example renders showing the undesired artifact that arises from the texture being poorly configured, with the solutions. Note the images are slightly blurred here because they have been enlarged from their original rendered size to better show the halo effect present when the texture has been poorly configured and is filtered. You can also clearly see the properly configured texture on the right has no halo effect, even with default texture filtering:
Bicubic Filtering
Enables bicubic filtering on textures that are magnified. This produces much softer looking textures than regular bilinear filtering, but at the expense of slower rendering.
Prefer Sharp Filtering
By default Redshift will attempt to bias texture filtering to produce the sharpest results. However, for very noisy tiled textures, sometimes this can produce interference patterns. Un-checking this option will disable the sharpness biasing, producing softer results that remove these interference patterns.
Note this option only takes effect when the 'Filter Enable' mode is set to 'Magnification/Minification'.
Mip Bias
Allows you to bias the MIP level, such that values less than 0 result in sharper quality, but slower texture sampling. Values greater than 0 result in blurrier lower quality, but faster texture sampling.
Note this option only takes effect when the 'Filter Enable' mode is set to 'Magnification/Minification'.
When MIP-mapping is enabled Redshift will load and sample pre-filtered multi-resolution texture data that is optimal for how large the texture appears in the render. For example, when a texture is very far away from the camera, less texture detail is required, so a lower resolution MIP level can be loaded without any loss of quality or perceived detail. Conversely, when a texture is very close to the camera, more texture detail is required, so the highest, native resolution MIP level is typically loaded. MIP-mapping is a necessary performance optimization that is commonly used in rendering.
There are some situations, however, when the algorithm to select the appropriate MIP level may not produce perfectly detailed results due to a non-perfect combination of the MIP-level pre-filtering and the AA settings. In this case, setting the MIP Bias to negative values will bring forward higher resolution MIP levels and thus sharpen the texture. Or, there may be a situation when you want to purposely soften the texture, so setting the MIP Bias to positive values will bring forward lower resolution blurrier MIP levels.
For example, a value of -1 will result in 2x the resolution of the MIP-level being used, while a value of -2 will result in 4x the resolution of the MIP-level, up to the maximum/native resolution of the texture. A value of 1 will result in 0.5x the resolution of the MIP-level, and a value of 2 will result in 0.25x the resolution of the MIP level being used, etc.
Be careful to not use too large negative values for the MIP Bias, as texturing and out-of-core performance can suffer, impacting render times.
The MIP Bias option has no effect when the 'Filter Enable' option is not the default 'Magnification/Minification'.


