 A displacement used in the classic Substance Asset material can only use the existing geometry of the object when rendering with Redshift.
Subpolygon Displacement cannot be used.
Quick access:
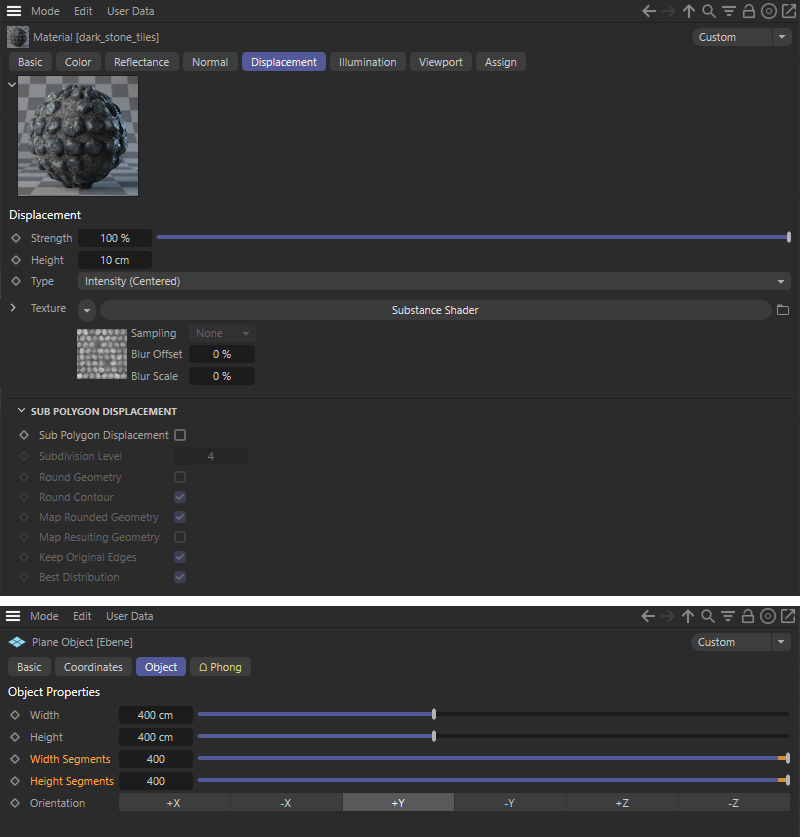
After loading the required Substance 3D assets (e.g. via the Load Substance... command from the Extensions menu, as described here), classic materials for the Cinema 4D renderer will be created by default. However, these can also be combined directly with the Redshift renderer. It should be noted that a displacement in the material of the Substance 3D asset only works with the existing geometry of the objects to which it is applied. You have to make sure that there are enough subdivisions on the object to allow the desired level of detail in displacement deformation. The Redshift Object tag cannot be used to increase the subdivision density on the object for displacement when rendering Cinema 4D materials through Redshift.
A displacement used in the classic Substance Asset material can only use the existing geometry of the object when rendering with Redshift.As you can see in the image above, it is easy to adjust the subdivision density on primitives by increasing the Segment value accordingly. With polygon objects, however, this is a bit more problematic, since this option does not exist there. This is also because the Cinema 4D material's Sub Polygon Displacement function does not work in Redshift, and the Redshift Object tag 's subdivisions cannot be evaluated for displacement of this normal Cinema 4D material.
The solution to this problem is to convert the loaded Substance 3D asset into a Redshift Shader Graph material (see next section on this page).
The actual settings used to calculate the Substance asset can be edited directly in the Attribute Manager after selecting the asset in the Substance Asset Manager. There is a special mode for displaying Substance assets, which is described here.
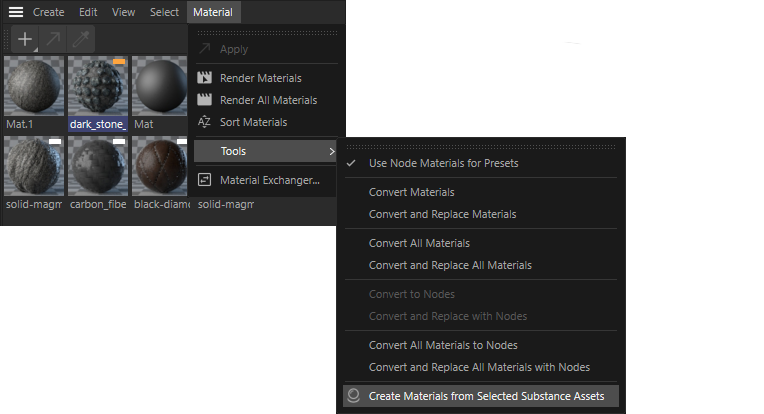
However, if you need all the options of a Redshift material and the Redshift Object tag, you can also have a loaded Substance 3D asset evaluated for Redshift. To do this, open the Substance Asset Manager in the Substance Engine category in the Cinema 4D extensions menu and select the desired asset. Then open the Material menu in the Material Manager and select Tools/CreateMaterials from Selected Substance Assets.
It is therefore important that the selection of a material in the Material Manager is not evaluated when this command is executed, but rather the selection in the Substance Asset Manager!
 An asset selected in the Substance Asset Manager can be converted to a Redshift Shader Graph material.
Once the command has been processed, a new Redshift Shader Graph material will appear in the Material Manager. If a Cinema 4D material already exists due to the original loading of the Substance 3D asset, this will also be retained. Double-clicking on the new Redshift material will open the Redshift Shader Graph Editor and display the Node setup of that material (see image below). Otherwise, you can also open the Redshift Shader Graph Editor at any time from the Redshift main menu in Cinema 4D.
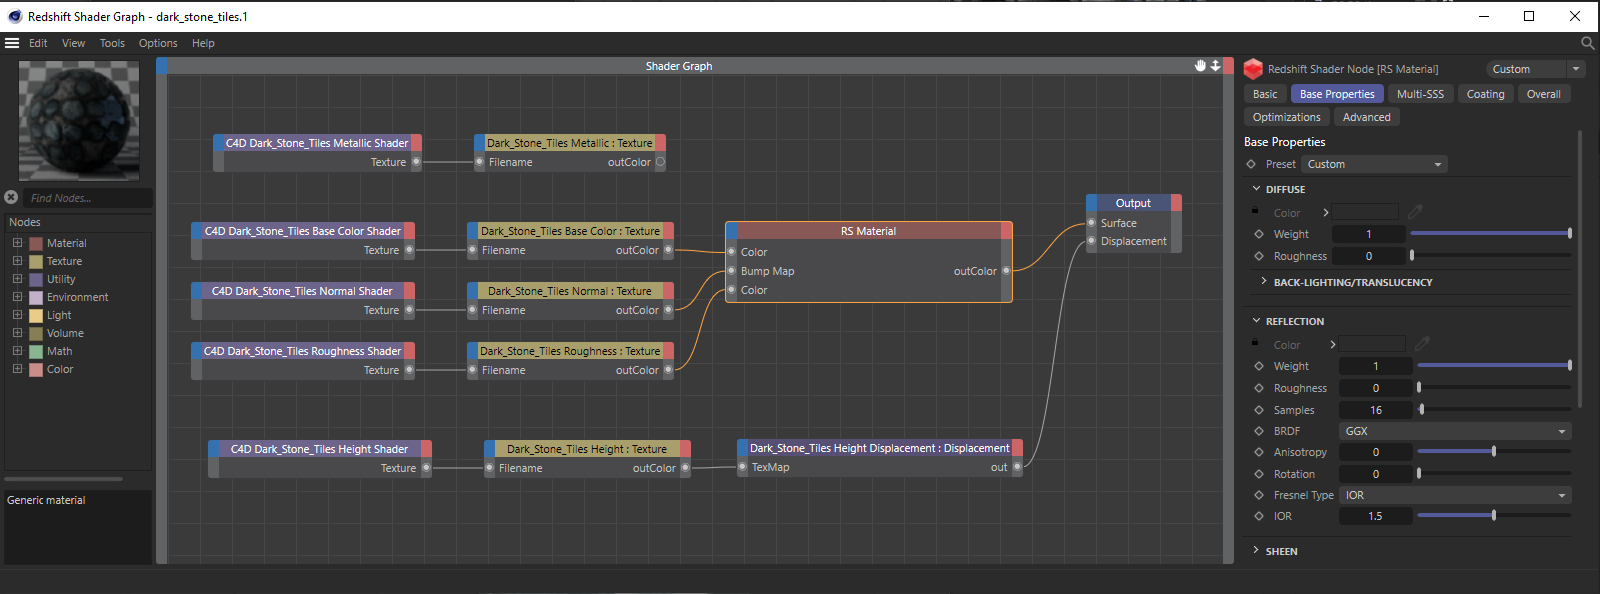 The Redshift material of a Substance asset in the Redshift Shader Graph Editor.
The number and type of Nodes used there depends on the respective Substance 3D asset and can therefore vary greatly. However, all textures offered by the Asset are represented via C4D Shader Nodes and Redshift Texture Nodes. A large part of these textures should already be correctly passed to an RS Material Node, but there are also textures that could not be clearly assigned by the Material Manager. In the image above, this can be seen, for example, in the Metallic Shader texture at the top of the circuit, which has not been connected to the material. In such cases, it is worth taking a look at the original Cinema 4D material to see how this texture was used there. This often involves additional gloss or reflection levels, for example, which can then be implemented in the redshift material, e.g. via the Coating plane.
For many Substance 3D asset materials, however, the Normal texture is also important, which - as can be seen above - was automatically assigned as a simple Bump map. This must be corrected manually so that the material can be calculated as desired. Such textures must be linked in Redshift via an RS Bump Map Node. In addition, you have to reverse the direction of the Y-axis (Flip Normal Y) to obtain the desired effect (see image below).
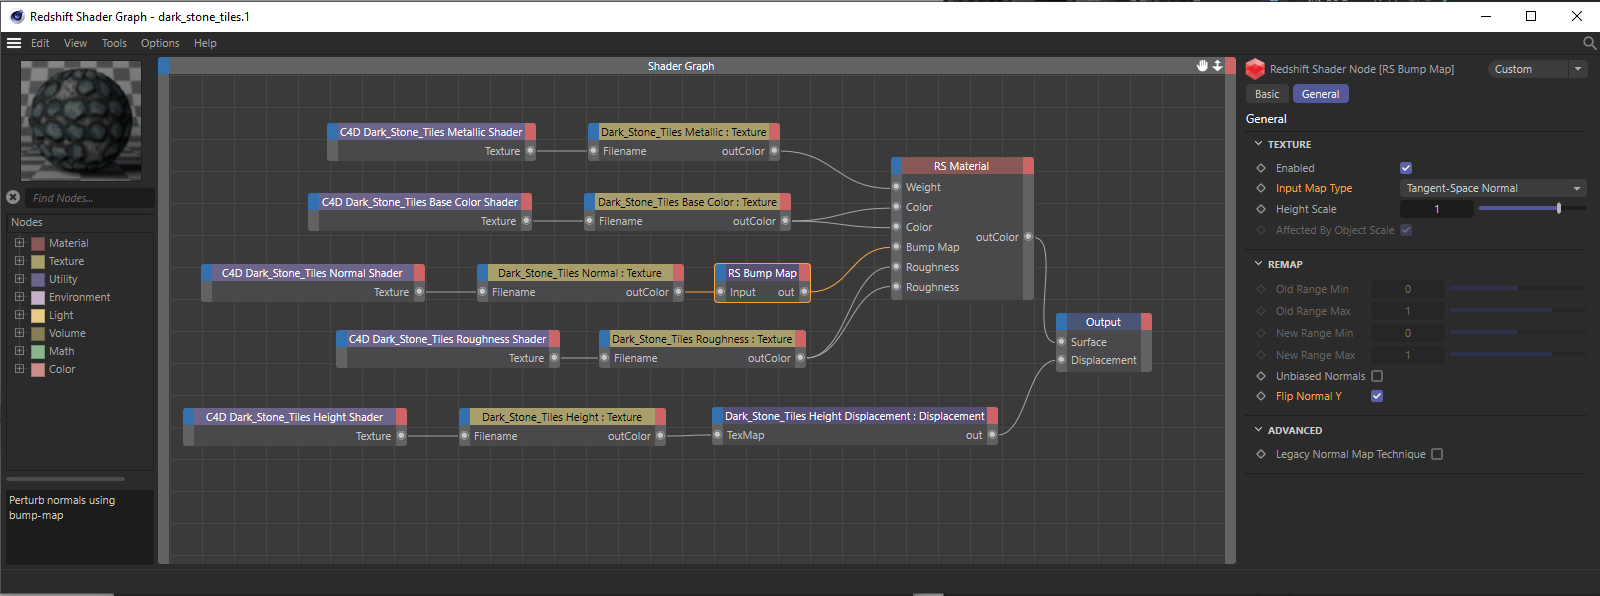 Correction of the normal texture assignment and optimization of the use of asset textures on the Redshift material.
As can also be seen in the image above, additional inputs can also be used on the RS material to use all textures as on the Cinema 4D material. Of course, this also opens up options for your own parameter and property controls on the Redshift material, should you want to adjust or optimize the material to suit your own needs.
Once you have assigned this new Redshift material to the object in the Object Manager, you can also call up a Redshift Object tag for this object. You can find this in the Object Manager under Tags/RenderTags. This tag is always required if the Redshift material uses displacement (see use of the Height Shader texture in the bottom part of the circuit above). Possible settings on the RS Object tag can be found in the following image.
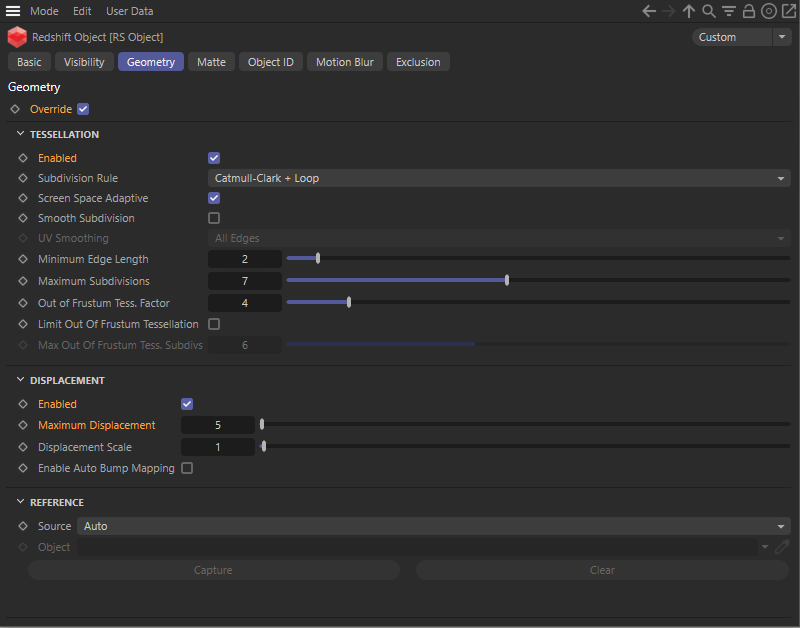 Settings on the Redshift Object tag to activate displacement on an object and, if necessary, have additional subdivisions added during rendering.
The Override option at the top of the tag's Geometry settings must be enabled to activate the Enabled option in the Displacement group. This is the only way to perform a displacement calculation on the object. There you will also find the value for Maximum Displacement, via which the maximum deformation of the surface is defined. As a rule, you should synchronize this value directly with the Scale setting of the Redshift Displacement Node, which can be found in the Redshift Shader Graph of the material.
To refine the subdivisions on the object, also activate the Enabled option in the Tessellation part of the settings and use this settings group to conimage the desired detail density for the displacement. The configuration here depends on the dimensions and the existing polygon density of the object. If necessary, read the documentation on the Redshift Object tag.
The actual settings used to calculate the Substance asset can be edited directly in the Attribute Manager after selecting the asset in the Substance Asset Manager. There is a special mode for displaying Substance assets, which is described here. Since the Redshift Shader Graph material also indirectly uses the Substance Shaders that were also used in the classic Cinema 4D material, both types of material react equally to changes to the Substance Asset.
A Substance Archive file (.sbsar) can be used directly in a Redshift Node material. To do this, simply drag the corresponding .sbsar file from the Finder or Explorer directly onto the Cinema 4D interface or call up the Support/Substance command in the Create menu of the Material Manager. A file dialog will open, which you can use to load the desired Substance file.
The result is a new Redshift standard material in which a Substance 3D Material Node will establish a connection to the .sbsar file and make the corresponding channels of the Substance asset available as baked textures (see example in the following image).
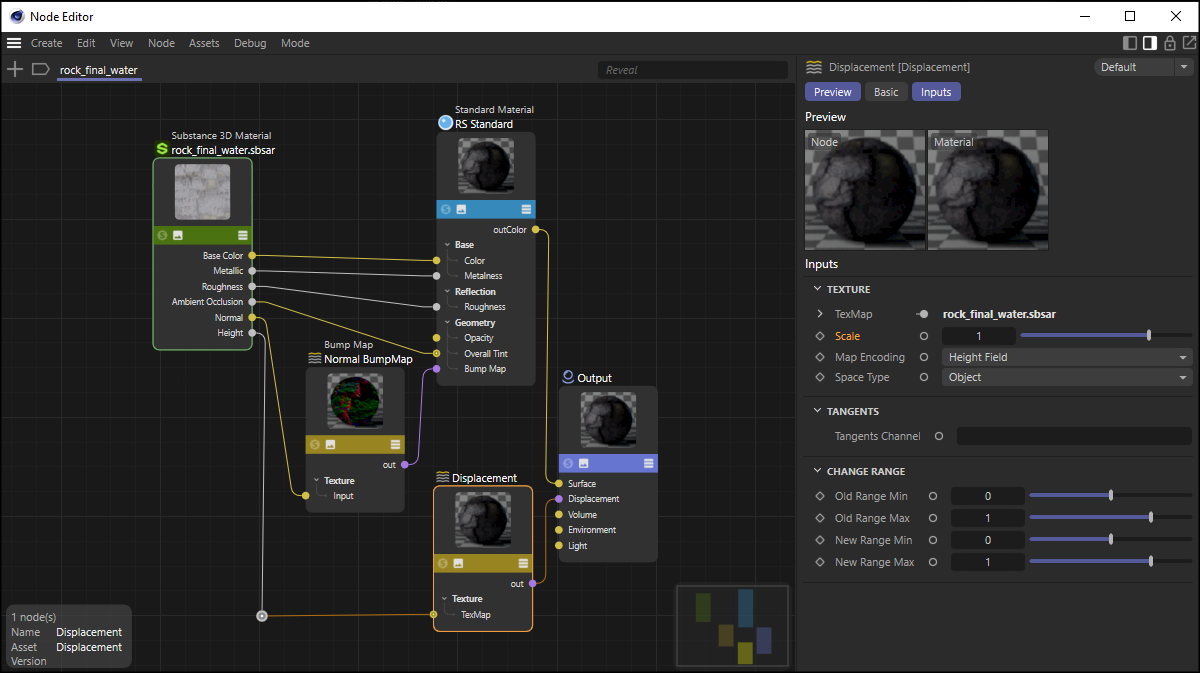 A Substance 3D Material Node can be used in Redshift Node Materials to read out a Substance Asset.
As can be seen in the image above, all texture channels of the Substance 3D asset will automatically be made available at the Substance 3D Material Node and - depending on the properties of the Substance 3D asset - automatically connected to the bump map, displacement and standard Material Nodes. Only the intensity of the displacement is only defined with the Scale value 1 by default (see image above) and must therefore be individually adjusted in some cases. .
Please also remember that a Redshift Object tag is also required on the respective object for the use of displacement, on which the displacement and the subdivision density to be used for this must also be configured on the object.
The Substance 3D Material Node automatically created by the workflow described above can of course also be added to a Node Material manually, e.g. using the search function in the Asset Browser. You will find the Substance 3D Material Node there in the category of Material Nodes. The option to load the desired .sbsar file can be found in the File menu in the settings for the Inputs category on the Substance 3D Material Node. To open a file dialog, simply click on the small folder icon to the right of the File Path field. If, for example, changes have been made to the Substance 3D asset, you can also trigger the reloading of the asset at any time using the Reload button in the Commands tab.
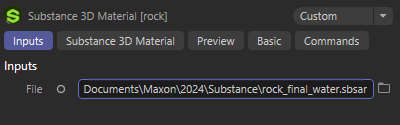 The Substance 3D Material Node also enables manual linking with an .sbsar file.
On the selected Substance 3D Material Node you will also find a Substance 3D Material category in the Attribute Manager, in which you can select the desired resolution of the textures via Width and Height parameters, which are then made available at the outputs of the Node (see following figure).
Please also note the Lock Ratio option. If this is active, only square textures can be calculated. This often makes sense, as these can be compressed and processed by the graphics card in a more memory-friendly way. Deactivate this option if you still want to use different values for Width and Height.
Finally, this category also contains an Random Seed value that forms the basis for all random calculations of the loaded Substance 3D asset. Change this value to obtain a new variant of the asset.
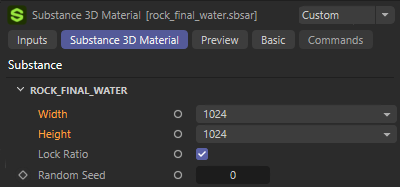 The desired resolution for the output textures of the Substance 3D asset can be set on the Substance 3D Material Node.
The specifications for Width and Height are also used for manually saving the output textures. You will find a button for exporting the textures as TIFF files in the Command settings of the Substance 3D Asset Node.
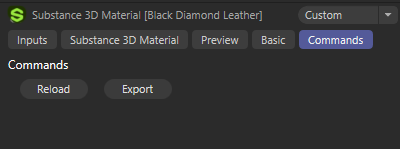 In the Node's command settings you will find buttons for reloading the Substance 3D assets defined under File and for exporting the output textures as individual TIFF files. The latter then enables the use of individual Substance 3D asset properties as normal bitmap textures.
If additional parameters were used in the Adobe Substance 3D Designer to control the Substance calculation and were made available to the user, these settings can also be edited directly via the Substance 3D Material tab in the Attribute Manager if the Substance 3D Material Node is selected within the Node material (see example in the following figure).
The number and type of these settings can vary greatly from asset to asset. Substance 3D assets that offer no settings at all and therefore only produce a static result that cannot be edited or animated in Cinema 4D are also conceivable.
Please note that - depending on the complexity of the Substance Asset - the textures provided at the outputs of the Substance 3D Material Node must be recalculated after changing the settings offered. The use of large texture resolutions (see Width and Height settings) also plays a role in the calculation time of an update.
Please note that linking options for bitmaps and fonts cannot be made available on the Substance 3D Material Node.
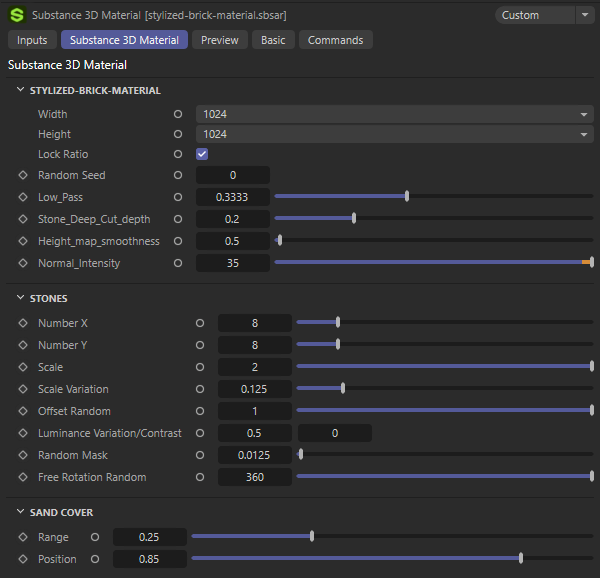 Example of settings for a Substance 3D asset on a Substance 3D Material Node.
From case-to-case, additional technical settings may also be offered in a separate Technical Parameters group, as shown in the following illustration. This concerns the procedure with which the RGB values of the normal calculation should be interpreted.
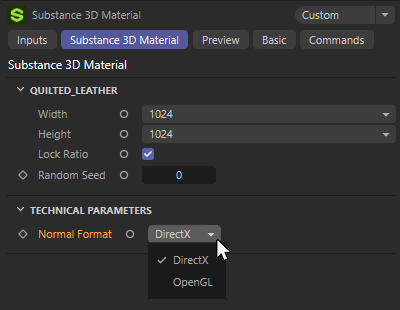 Option for the interpretation of calculated Normal maps.
OpenGL and DirectX interpret the RGB values of a Normal map differently. The main focus here is on the green values of this texture. With OpenGL, the first pixel of the green color channel is expected at the bottom, whereas with DirectX the first green pixel is expected at the top. Selecting the "wrong" method can therefore result in the effect of an inverted green channel and thus an inverted Y direction for the Normals.
In most cases, the correct method will automatically be defined here. However, if the asset does not provide any information on the format used for the normals, DirectX will automatically be used and the inversion of the Y-portion of the normals will bactivated at the bump map node. If you do not want this, you can also switch these settings manually.
This switch is only offered because the Substance Engine is available based on both OpenGL and DirectX and it is therefore not always clear which of these versions is used to create the assets and therefore also to calculate and evaluate the Normal maps. You can see which of these variants is being used at any time in the Preferences menu under Extensions/Substance Engine under Active Substance Engine.