Surface Attract
Here you can select how the particles should react to a dynamic surface:
- Follow: If a dynamic surface lies in the path of a particle, the particle is deflected along the surface and follows its curvature and course as far as its speed allows. Fast-flying particles will detach from the surface's sphere of influence more quickly than slow-flying particles. Particles can fly around obstacles, for example, even without active collision detection.
- Attract: The dynamic surface exerts an attractive force on the particles. The particles near the surface are accelerated to their next surface position. However, the particles can subsequently fly through the surface and the volume unhindered and are only affected by the distance-based forces of attraction to the surface.
- Land: In this mode, the particles are actively captured by the dynamic surfaces and can only move along their surfaces if they are captured within a defined radius.
The following video shows an example of the application of the Land Mode, in which the particles are captured by a sphere and kept in motion by a Turbulence force.
Use this Radius to define the thickness of the layer along the surface of the dynamic objects in which particles can be affected by the Modifier. This means that there is no direct collision detection with the actual surface.
Use these values to control the forces of attraction that the dynamic objects exert on the particles. In Follow mode, both strength values are available for this, in Attract and Land modes, only the value for the Attract Strength is available.
The Attract Strength controls the change in the particle trajectories in the direction of the nearest surface (within the Radius setting). As there is no collision calculation, the particles are accelerated towards the surface and in many cases penetrate it. The following video demonstrates such a case.
The Follow Strength was left at 0%. The particles are accelerated towards the object surface as they approach and penetrate the object several times. The brightening of the material on the object indicates contact and penetration of the particles.
In the following video, however, the Follow Strength was increased to 100% and the Attract Strength was left at 0%. The particles are thus captured by the object close to the surface (see Radius setting) and their flight directions are aligned parallel to the surface. The particles therefore appear as if they are flying around the object. Depending on the speed of the particles, their influence can vary. Faster particles can therefore detach from a curved surface earlier than slower particles. This becomes particularly clear in the following video at the right edge of the object, where the particles further out leave the object's area of influence earlier than the particles closer to the surface.
In Follow mode, this detachment of the particles can be avoided by using both values, i.e., the Attract Strength and the Follow Strength, as can be seen in the following video. The particles are influenced both in the direction of the surface and parallel to it.
This setting influences the flying speed of the particles in the area of influence of the dynamic surfaces. The longer particles spend in the area of influence of a surface, the slower they become. This can lead to a complete standstill of the particles. The following video shows an example of this.
If this option is active, the effect of dynamic objects on the particles is varied randomly. This concerns a variation of the Radius and the position calculation on the surface to which particles are accelerated.
If this option is activated, the intrinsic speed of a dynamic object can also be transferred to the particles in its area of influence. The following video gives an example. In each case, the Attract Mode was used, which accelerates the particles to the next position on the surface. The particle system on the left shows the effect of Apply Object Velocity and how this also gives the particles an additional lateral velocity component due to the oscillation of the sphere. The particles in the right-hand particle system only see the current position of the surface and therefore do not perceive its lateral movement.
Object Velocity Strength[-∞..+∞%]
If Apply Object Velocity is active, the intensity of the motion transfer can be selected here. Animating this value also makes it possible, for example, to smoothly fade in and out the coupling between particle movements and object movements.
Align to Surface Rate[0..100%]
In Follow mode, the axis systems of the particles can also be aligned in the vicinity of the collision object. The higher this value is, the faster the particles react to the surface normals. In general, the Y-axes of the particles are aligned perpendicular to the colliding surface, as shown in the following image.
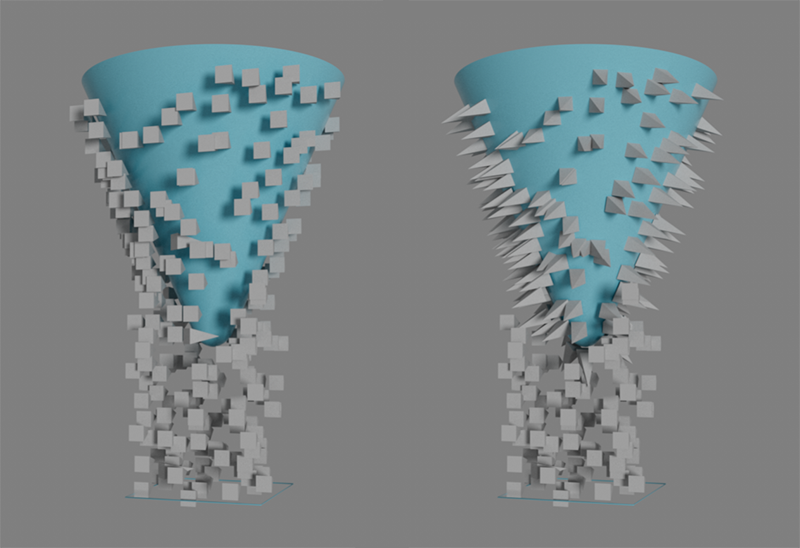 Here, small pyramids meet a cone as particles from below. On the left, with a Align to Surface Rate of 0%, no realignment of the particles takes place; on the right, 100% was used.
The approach or contact of the particles with the Collision object can also be used to transfer the particles into a new group. By activating this option, a new particle group can be assigned to the following target group.
The Modifier enables particles to be transferred to another Particle Group as soon as they come into the sphere of influence of a dynamic object. In this way, the particles are only affected once when they enter the Radius range of a dynamic surface for the first time. Simply drag the desired Particle Group from the Object Manager into this field or click on the pipette symbol next to the linking field and then on the Particle Group in the Object Manager.
This button can be used to create a new Particle group that is automatically used as a Target group.
By default, all objects that have one of the dynamic simulation tags (such as a Collider or Rigid Body Tag) are evaluated for the distance calculation of the particles. This is because the list of Simulation Tags in the Surface Attract Modifier is empty and the Exclude Mode is active. This means that no objects are excluded for the distance calculation. Alternatively, you can also drag individual dynamic objects into the list of Simulation Tags. In Exclude Mode, the surfaces of the corresponding objects would then be ignored for the distance calculation.
You can reverse the effect with Include Mode. In this case, only the objects that were linked in the list of Simulation Tags are taken into account for the distance calculation.
The objects with dynamic tags can be dragged from the Object Manager into this list. Depending on the selected Mode, these objects are then excluded from the distance calculation or only the listed objects are taken into account.
As is usual with such link fields, you will also find a pipette symbol to the right. Clicking on it activates a selection mode that allows you to click directly in the Object Manager on the objects that you want to add to the list. This selection mode remains active until you click on the pipette again or press Esc.
A small context menu also opens after right-clicking on the link list or any existing entries. There you will find commands for removing all entries or only for removing the clicked list entry. You can also start the selection mode for additional dynamic objects or select the objects of individual entries.
Behind each list entry there is also a switch symbol with which individual objects can be temporarily deactivated for the distance calculation.
Select Geometry to attract towards
Clicking on this button selects all objects in the list for the Simulation Tags.