Redshift
Redshift Version
Here you can find the version number of the Redshift core application. This information may be helpful, as Redshift can also be updated manually via the Maxon app. By comparing the version numbers, you can always be sure which version you are currently using.
Plugin version
In addition to the core application, Redshift also uses a plugin to offer Cinema 4D-typical control elements and functions in Redshift, for example. You will find the version number of the currently installed plugin here. You can also read the minimum version of Cinema 4D required to use this plugin at the end of this text line.
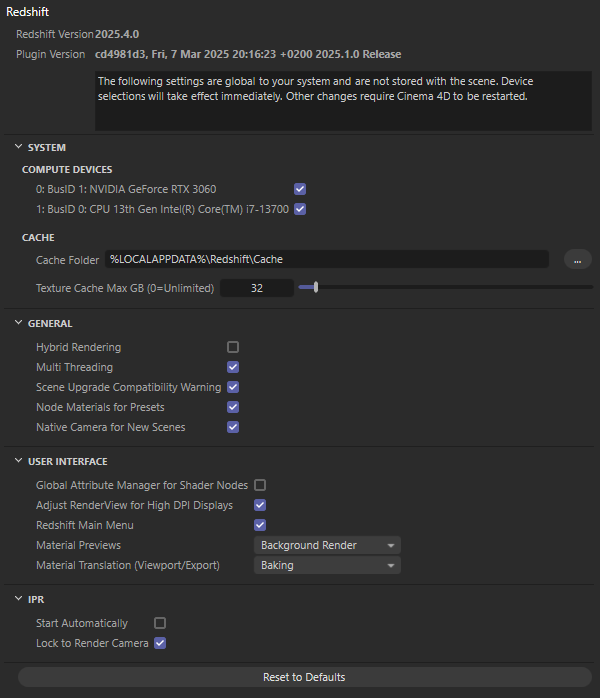
The following settings are used globally on your system and are not saved with your scene. Settings relating to the hardware to be used for rendering take effect immediately, whereas other settings, such as changing the Texture Cache Size, may require a restart of Cinema 4D.
This means that you can easily try out different hardware configurations for rendering, e.g., if you have several graphics cards available.

Calculation Units
In addition to the CPUs, all Redshift-compatible GPUs on your system are also listed individually here and enable individual activation for rendering with Redshift. As a rule, it makes sense to only use GPUs for rendering, as they can often work many times faster than a CPU.
If, for example, a GPU and the CPU are activated as options, only the GPU is used for rendering by default, unless you have also activated the Hybrid Rendering option, which allows CPUs and GPUs to work together. Without Hybrid Rendering, your selection of CPUs for rendering is therefore irrelevant, as only the selected GPUs are used for this.
If you have several graphics cards available, you can try out different activations to find the optimum constellation for rendering on your system. As Cinema 4D does not have to be restarted after making changes to these options, a new rendering can be started immediately afterwards and the rendering time can be compared with other activation constellations.
Cache
The cache files are stored by default under Redshift/Cache within the Cinema 4D preferences. If you prefer a different storage location, you can also specify a different folder here.
Texture Cache Max GB (0=Unlimited)[0..2147483647]
Redshift creates caches for rendering in order to speed it up and also enable the rendering of native Cinema 4D shaders, for example. These caches contain, among other things, converted or baked textures and compiled shaders. These caches are not automatically deleted when you exit Cinema 4D or close a scene and can therefore become larger and larger over time. However, the size of the texture memory can be limited using this setting. If this memory space is no longer sufficient, the oldest cache files are automatically removed.
The caches can also be deleted manually at any time. You will find the commands Clear Memory Caches and Clear Baked Textures in the Redshift menu under Tools.
These commands are also available via the Commander, which you can open using the keyboard shortcut Shift+C. If you enter the term delete in the search bar, you will also find these two commands for deleting the baked textures and the memory caches.
As missing caches are always recalculated in preparation for a rendering, you can have the caches deleted at any time to free up memory again. Just be careful not to remove the caches while a rendering is still running!
Activate this option if you want to use the CPUs and GPUs activated for the Compute Devices for rendering at the same time. As a GPU is usually many times faster than a CPU for rendering, the effect is often only minimal and this option is therefore switched off by default.
In general, the following rules apply when using your hardware for rendering with Redshift:
- With activated CPUs and GPUs in the list of Compute Devices:
-
Hybrid Rendering is activated: In addition to the activated GPUs, the activated CPUs of your system are also used for rendering.
-
Hybrid Rendering is switched off: Only the activated GPUs are used for rendering. All activated CPUs are therefore ignored for rendering.
-
If no GPUs have been activated in the list of Compute Devices:
-
It does not matter whether Hybrid Rendering is activated or deactivated. Only the activated CPUs are used for rendering.
-
If no CPUs have been activated in the list of Compute Devices:
-
Here too, it does not matter whether Hybrid Rendering is activated or deactivated. Only the activated GPUs are used for rendering.
This splits computing operations into separate tasks and threads for the CPU, which can be executed in parallel and therefore make optimum use of your computing power.
Scene Upgrade Compatibility Warning
This causes a warning to be displayed when loading projects that were created with older Redshift versions. Due to ongoing changes to the Redshift engine and any newly added options, the rendering of such scenes may lead to different results. You will therefore often be shown that a loaded, older scene has been adapted to the current Redshift version. After saving and reopening the scene, this warning does not appear again.
As this option is active by default, newly created Redshift materials are automatically created as node materials in the Cinema 4D Node Editor. Only deactivate this option if you prefer to configure materials in the Redshift ShaderGraph. ShaderGraph materials can often also be easily converted into Node Editor materials. You will find the corresponding commands in the Material Manager (under Material>Tools). Only the reverse conversion, i.e., from Node Editor materials to ShaderGraph materials, is not possible.
Currently, ShaderGraph materials still have the advantage of being able to process many of the Cinema 4D shaders that are not yet available in the Node Editor. Otherwise, however, Node Editor materials offer the more modern interface and the look and feel of Scene Nodes.
Redshift can also use the normal Cinema 4D camera for rendering, but offers additional post effects and render options. For this reason, it is also recommended to use the native Redshift camera, which gives you direct access to these options.
Activating this option therefore automatically creates a Redshift camera in a new scene if Redshift is the active renderer (see Render Settings).
Please note that older Redshift versions still worked with a combination of a legacy Cinema 4D camera and a Redshift Camera Tag. If you open such a scene and add a camera there, this old camera configuration is also created in order to guarantee the compatibility of the scene.
You will get the same result if you deactivate this option. The old Cinema 4D cameras and Redshift Camera Tags are then also created in newly created scenes. However, you will find the greatest wealth of rendering options on the native Redshift camera. This option is therefore active by default.
Global Attribute Manager for Shader Nodes
This option is only relevant for editing materials in the Redshift Shader Graph. If the option is switched off, the settings of selected shader Nodes can be edited directly on the right-hand side of the ShaderGraph. If this option is activated, the normal Attribute Manager can be used for this.
Adjust RenderView for High DPI Displays
This optimizes the icon sizes and menus of the Redshift RenderView for display on monitors with a high dpi resolution.
This activates the Redshift menu in the top Cinema 4D menu bar. You will find many common Redshift managers and commands there. If you need to work on smaller monitors or displays, you can also deactivate this menu to gain a little more space in the Cinema 4D menu bar. In this case, the majority of the entries listed there can also be found in other places in the Cinema 4D layout. For example, Redshift lights and cameras can also be called up via the Create menu in Cinema 4D. The Redshift RenderView can also be accessed via the Render menu.
Leave this option active to have the preview of a material recalculated immediately after changing a material parameter. To save computing time, this option can also be switched off or you can have the update performed only when Redshift is not already busy rendering:
- Off: Material preview images are not updated automatically. You can still perform the recalculation manually, e.g. viaMaterial>Render Materials for selected materials in the Material Manager.
- Background Render: The renderer tries to update the material previews even if the renderer is busy with other tasks. Although this can lead to increased memory requirements during rendering, it also allows you to continue working normally on materials while an image is being rendered at the same time.
Material Translation (Viewport/Export)
Here you will find options that can be used to influence the display of the materials in the viewports:
- Draft: This is an approximate representation of the materials used, which does not require any pre-calculation and is therefore directly available. This corresponds to the standard procedure in Cinema 4D versions up to 2025.1.
- Baking: This mode evaluates all elements of the material and creates individual bitmaps for the property channels of the material. This is therefore accompanied by a rendering of these bitmaps, which extends the time until they are displayed in the viewports accordingly. This rendering generally takes place on the CPU of your system and is therefore only dependent on the CPU performance. When baking scenes with a large number of materials, it can therefore take a little longer until all material properties have been baked as bitmaps.
However, the algorithm is designed to be flexible and independently recognizes material properties for which no textures need to be baked, e.g. if only a constant colour value is required. In such cases, the corresponding material properties are automatically displayed in Draft mode.
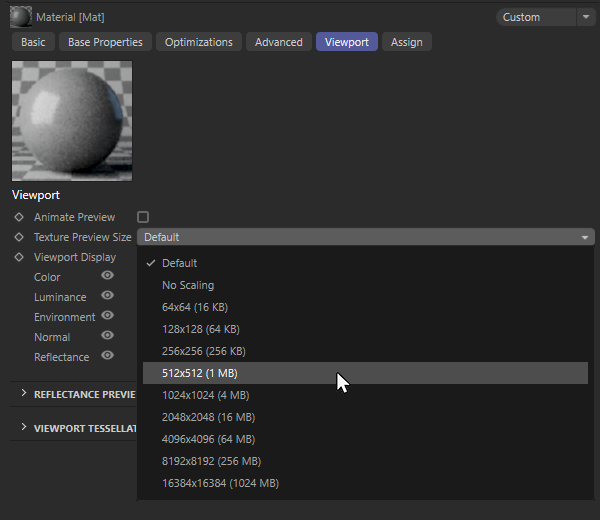
You can configure the resolution of these baked textures yourself via the Viewport settings of the materials. There you will find a setting for the Texture Preview Size, which is evaluated for this purpose (see also the following illustration). The Default resolution for the editor display and the baking of textures can otherwise be found in the Viewport Hardware settings within the C4D Preferences.
Please note that these settings are also used for exporting the project to external formats, provided that the selected export format also supports the transfer of materials.
In general, Baking mode is particularly helpful when the materials used involve mathematical calculations. Materials that only use simple colors and value settings directly on the respective material node or loaded textures, on the other hand, do not benefit from this and can already be displayed sufficiently well in the viewports in Draft mode.
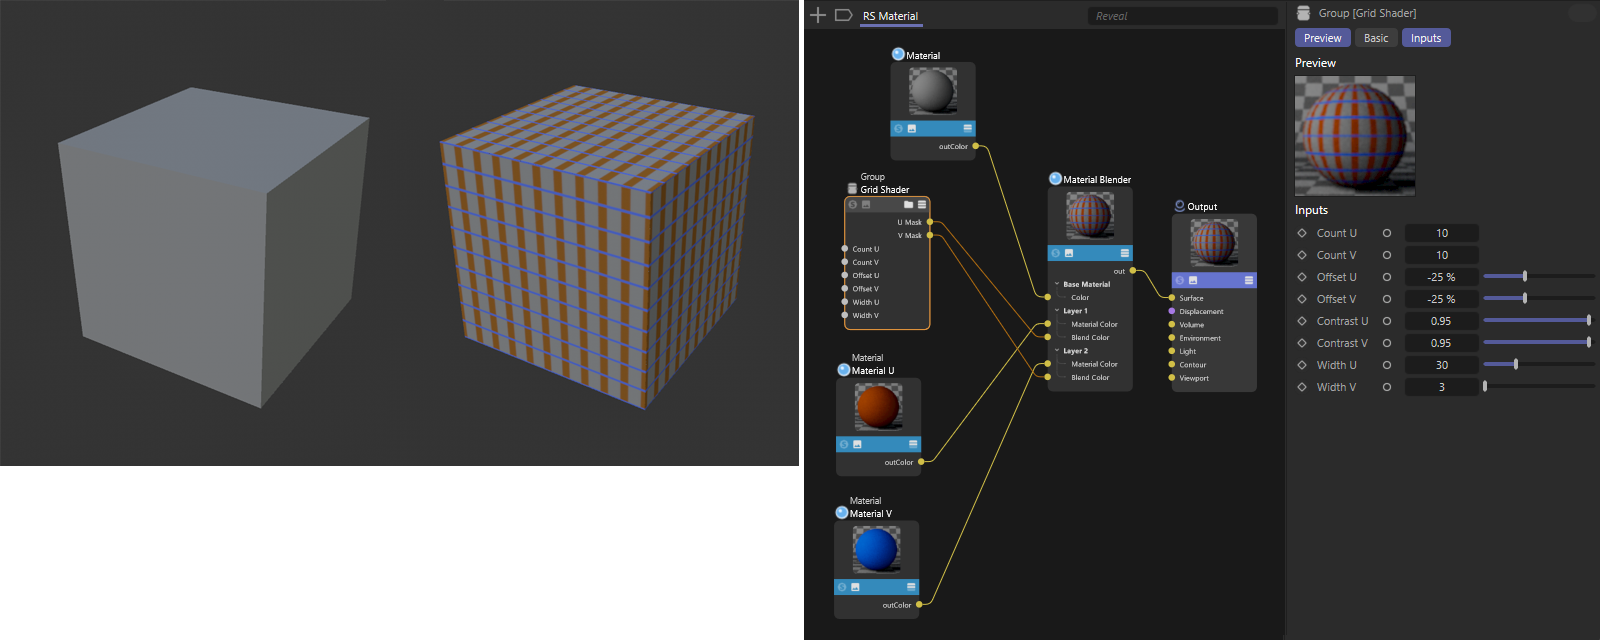
The following illustration demonstrates the effect of baked textures in the views. There, a cube was covered with a material that uses various mathematical calculations to provide masks for a Material Blender. In Draft mode, these calculations remain invisible and the cube only appears in the gray base color of the base material. Only when the Baking setting is activated are the mathematical calculations of the material evaluated and used as a baked texture on the Material Blender. The tile pattern calculated using sine curves is now also visible in the viewports without having to render them separately.
This automatically starts the interactive preview renderer in Redshift RenderView as soon as you open it (Interactive Preview Renderer, IPR for short). Otherwise, you will also find a button in the RenderView to start or stop this process manually. The IPR can also be started and stopped via the Redshift menu of the editor views.
Within Redshift RenderView, a render camera menu can be used to individually select which standard viewing direction or camera is to be used for rendering. Activating this option automatically ensures that the camera currently active in your scene is always used. In any case, you still have the option of releasing this lock within RenderView and activating a different camera or viewing direction.
Reset to default values
This button can be used to reset all options and settings on this dialog page to the default settings.