Basic Properties
When tags are created, they are automatically given a name according to their function. For example, a Vertex Map tag is appropriately called a "Vertex Map".
However, you can also give all objects and elements (e.g. shaders) any name you like. The object or element appears under this name, e.g. in the XPresso Editor or in the Timeline or link fields.
So far, so good. However, there are tags that can be assigned as often as required (e.g. Selection tags, Vertex Color tags, etc.). If they all had identical names, this could lead to problems. Imagine 2 Polygon Selection tags with the same name and you want to restrict a material to one of the selections: this becomes difficult with identical names, as only the Selection tag furthest to the left is used.
This is why Cinema 4D numbers them consecutively where it makes sense. For example, 3 Polygon Selection tags on the same object:
- Polygon Selection
- Polygon Selection.1
- Polygon Selection.2
This automatic numbering occurs when creating tags using the menu/command, when duplicating with the ctrl key and with some tag-creating tools such as the Paint Tool, MoGraph Selection, Bind Tool, etc.
If desired, a name can be entered for a given marker. The name will appear next to the marker in the Timeline Ruler.
If the element (object, tag, track, etc.) has been assigned to a layer, you will find the layer name and color here. Layers can be dragged here directly from the Layer Bowser or from other similar fields. You can also use the menu behind the small triangle button on the right to assign layers or remove the element from the current layer. Show in Manager opens the Layer Manager.
Click on the small triangle to the left of Layer to show the layer properties. This gives you access to all properties that are otherwise only accessible via the Layer Manager.
The Marker will also be displayed with this color in the Timeline.
The time in the animation at which the marker lies.
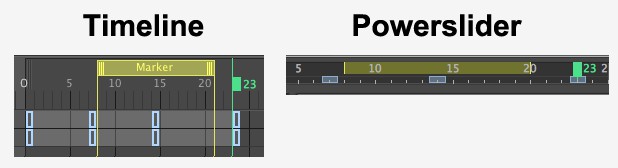 Range markers are also displayed in the Powerslider.
Markers can now be made to include ranges. The temporal length of such a range can be defined here. With snapping, the start and end of the range will be snapped to.
Use this setting to define the marker color. This color will be ignored if the marker itself is assigned to a layer, in which case the layer color will be used.
Using these options, tasks that need completing or improvement can be marked (see To Do). Enable Task and type a descriptive text into the Note field (which will later be displayed in the Project Preferences). Done can be enabled for a given task after it has been completed (this option can also be defined, remotely’ from the menu). Note that markers can be deleted in the Preferences menu.
This option defines an FBX export for the animation Take. The following will apply:
- If the Marker has a defined Length, this length will be the duration of the Take
- If the Marker has a defined Length of 0 you will need the 2nd Marker with this option enabled (the Take will then lie between the Markers) or the 1st Marker with this option enabled (the Take will then have a duration from this Marker until the end of the document).
Here you can add an explanatory text to each Marker.