![]() Phong Tag
Phong Tag
Phong Tag
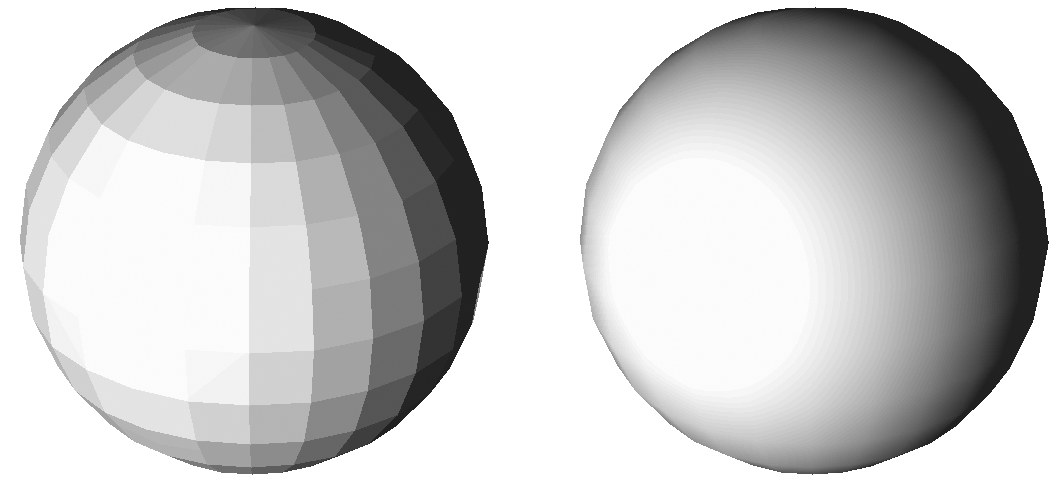
This tag gives objects a smooth appearance. The picture below left shows a sphere before and after a Phong tag is applied. Look closely at the right sphere and you will notice straight lines around its silhouette. Phong shading does not increase the number of polygons. Rather, think of it as an illusion that loses its effect around the silhouette.
If you need to smooth the silhouette region, you must use more subdivisions. To specify the maximum smoothing angle, enable Angle Limit and enter the desired angle into the text box.
When Cinema 4D calculates the Phong shading, it assumes that the surface Normals are aligned. If this is not the case, shading anomalies may appear. All primitive objects are aligned by default.
Smoothing is a good way to reduce render time and save on memory. Without the Phong tag, an object would require a far greater number of polygons in order to appear smooth. Note that smoothing can only take place across connected surfaces (surfaces that share points).
Each surface has a normal (often called a surface normal) that is perpendicular to its surface. The color and brightness of a point is determined by the angles which the normal forms with the rays of the camera and the light sources.
Without smoothing, two connected surfaces will have a hard transition, because each surface has its own normal. This will cause brightness bands.
If a Phong tag is activated, the Normals will be interpolated. There will be a soft transition between one normal and the next (provided that the surfaces are connected). If a Phong tag is not applied, there will be no interpolation.
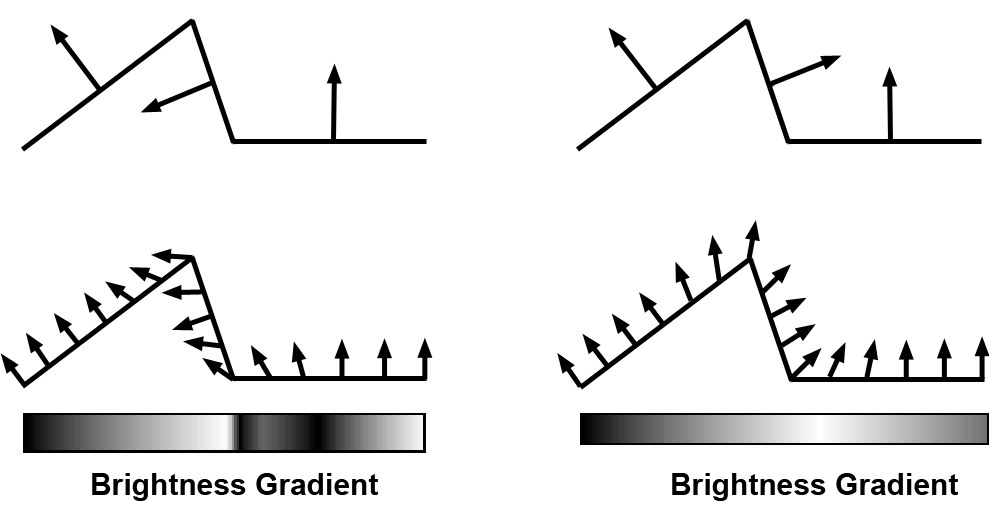
Figure 1 shows three connected surfaces. The middle surface is not aligned to the other surfaces (you can tell by the direction of the Normals). Figure 1a illustrates how the Normals are interpolated for smoothing. The light bar shows the hard transition caused by the non-alignment.
Figure 2 shows the same three surfaces, but this time they are aligned. Notice how the interpolation (Figure 2a) is much smoother this time. The light bar is smoother as a result.
These pictures illustrate why it is important for surfaces to be aligned. The convention is that the Normals should point outwards from the object. For example, if you have an apple, the Normals should point outwards into the world, not inwards towards the core.
The normal direction plays an important part in decal mapping, such as when you put labels onto bottles. All primitive objects are created with aligned Normals (you do not need to edit their Normals — they will be correct).
To see the Normals, activate the Tinted Poly Normals option in the Display tab of the Phong tag’s View Settings menu and select their polygons. For example, create a sphere and choose Mesh / Conversions / Make Editable (this will convert the sphere to polygons). Select the Polygon tool from the left toolbar and select some polygons using one of the selection tools (or choose Edit / Select All). The Normals appear as thin, yellow lines perpendicular to the surface. To align Normals, choose Mesh / Normals / Align Normals.