Keys
Many of these options function the same as those of the same name found in the Key Properties. These options can be accessed instantly via their corresponding keyboard shortcuts, which saves you from constantly having to switch to the Attributes Manager.
Spline Types
 Left to right: Initial state; Soft; Ease In; Ease Ease; Ease out; Zero Angle / Length.
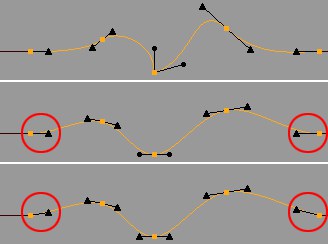 Top to bottom: Initial state; Auto Tangent; Soft.
Soft has the same function as Auto Tangent with one exception: When soft is applied the first and last keys’ tangents will be aligned in accordance with a soft interpolation.
Ease interpolations are used for making an object’s acceleration and / or deceleration more realistic. They are depicted as horizontal tangents on the F-Curves.
- Ease In: The tangents will be broken. The right tangent remains unchanged and the left tangent will be rotated horizontally.
- Ease Ease: The tangents will be placed horizontally. The F-Curve will be assigned a local minimum / maximum, preventing the animation from over-rotating.
- Ease Out: The tangents will be broken. The left tangent remains unchanged and the right tangent will be rotated horizontally.
Sets the key tangents back to a defined basic state (soft interpolation). This reflects the enabled Auto Tangents option but without having to switch to this mode.
We suggest applying this setting only to broken tangents. The right tangent will be mirrored and will replace the left tangent.
Locks the current time in the animation. See also here.
Locks the key value. See also here.
Sets a soft interpolation for all selected keys. See also here.
Defines a soft interpolation with a fixed tangent slope for all selected keys. More details can be found here.
Makes the left tangent independent of the right tangent (and vice-versa). The tangents can be broken while editing them by pressing Shift when modifying them. Details s. here.
Use this function to give selected keyframes a special color (for more information see Breakdown Color).
Sets the tangent to a horizontal position. In doing so, the animation near the key will not reach greater/lesser values than those defined in the key itself.
Sets the tangent length to zero, which prevents a kink in the curve. Two sequential keys with this property will produce a linear interpolation between them.
Adjusts the left tangent length to that of the right tangent length. Both will have equal lengths.
Sets the left tangent to the same orientation as the right tangent (only the tangent end point will lie opposite the other tangent). Their lengths will remain constant.
Locks the tangent angle / length. See also here.
Two consecutive keys with equal values will be interpolated linearly. An exaggerated curve will result. See also here.
Use this command to make Keys relative. This means that they will move relative to neighboring Keys that are moved. (see also Make Relative).
Interpolation
Activating this command (or its icon) will display the interpolation between Keys. If more than one type of interpolation is defined for the Keys, this command will remain disabled.
Sets interpolation to linear / step (abrupt transition between keys will result).
Use this setting to set the interpolation type to Spline without changing the existing tangent settings.
Use these options to mirror all selected keys.
The mirror axis will be set as follows:
- Mirror X: Centered between the first and last selected keys.
- Mirror Y: Centered between the largest and smallest key value of selected keys.
In the course of editing your animation one or more keys may end up at a location that is not a whole key, e.g., frame number 12.3475. Applying this option will place a key on its nearest whole frame (in the case of our wayward frame: Frame 12).
Use this command to mute selected Keys. Executing the command again will unmute the Keys.
The state of selected Keys can be recognized by the different color of the command and of the Keys themselves. If selected Keys have different states no activation will be shown.
The angle between the left and right tangents remains constant when a tangent is edited, i.e., the other tangents move accordingly.
Enable this option to make the tangent length dependent on distance it lies from the neighboring key. Details can be found here.
Enable this option to prevent overshooting. Details can be found here.
Details can be found under Automatic Weighting.
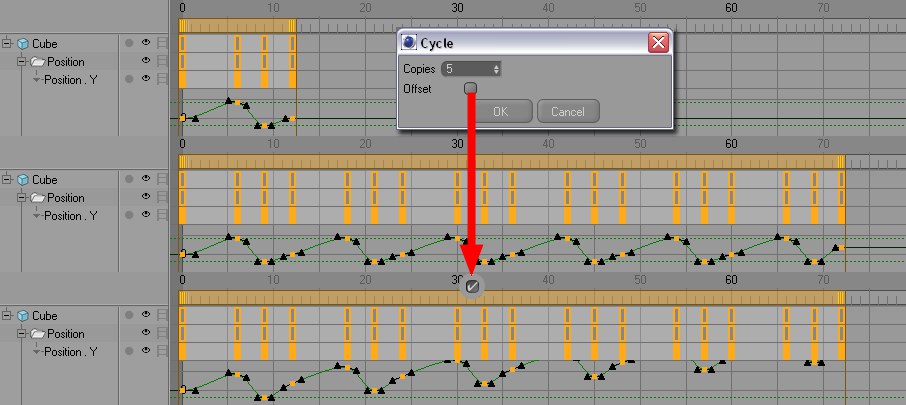 The initial animation consisting of four keyframes (top) was duplicated using Cycle. Offset has been deactivated in the center and activated at bottom.
Cycle lets you repeat an animation as often as you like. A given track’s keys will be duplicated and arranged consecutively. The last key will be replaced by the first key of the cycle.
To apply the Cycle function, switch to Dope Sheet mode in the Objects Area and select a given animation track to be duplicated (not the keys!).
Animations can be repeated or an offset can be applied to make the repetition relative, e.g., for a walk cycle in which the feet don’t just move back and forth but also have to move in the general direction in which the figure is moving.
Selecting this option will open a dialog window with the following settings:
- Copy: Use this setting to define the number of times the cycle should repeat.
- Offset: If a difference in values between the first and last keys exists, this difference will be added by each cycle to the previous cycle, for all keys. Use this method for walk cycles.