Object Manager
![]()
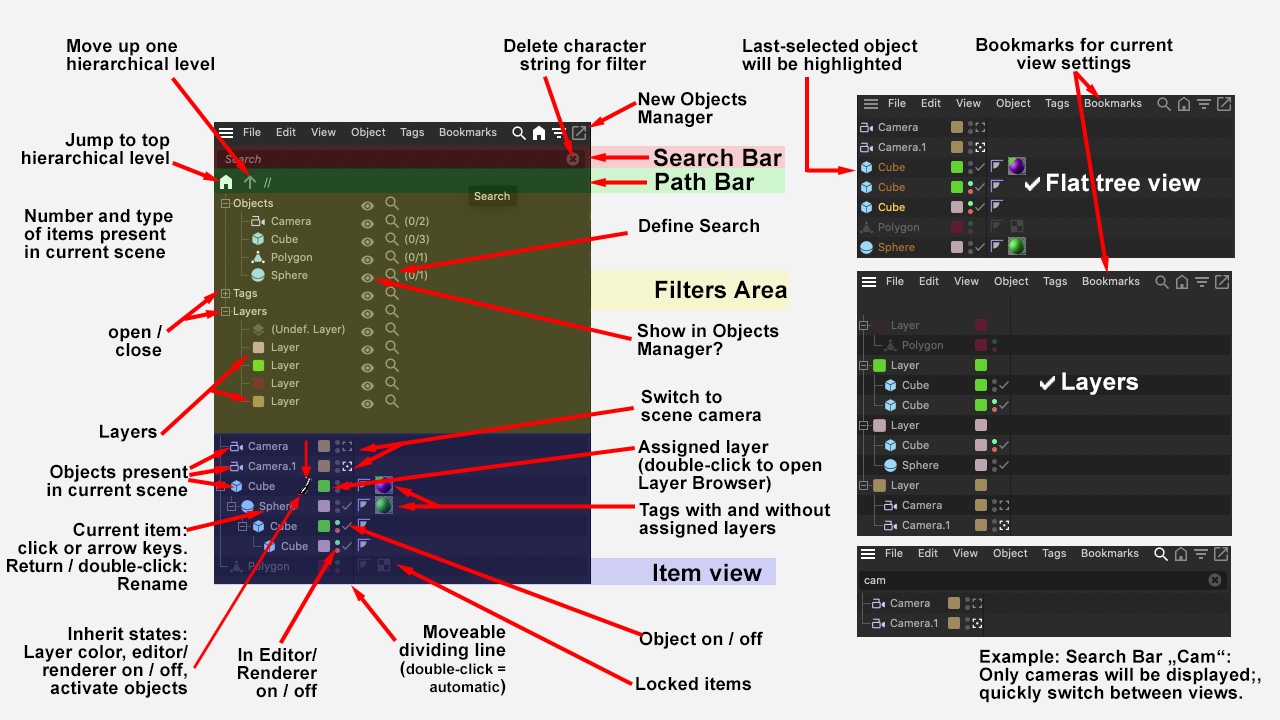 Various Object Manager configurations, which are controlled by the View settings. In addition to displaying objects and tags, the Object Manager offers powerful filtering options.
- Are the items you are looking for hidden by the filter? (Object Manager: View / Show Filter)
- Is text entered into the search bar (Object Manager: View / Show Search Bar) filtering out the items?
- Are the missing items on a hidden layer? (Layer Manager: View / Manager)
The Object Manager is the control center for all objects in the scene including their tags. You are free to choose which items are shown in the Object Manager. You are modeling and all you want shown is the polygon object itself? No problem. Choose for this object to be shown and hide everything else. You have a very complex scene but for now all you want to do is work with its 17 lights? No problem. Hide everything else!
When part of a hierarchy is hidden, this is how it looks:
 Before (left) and after (right) hiding the cube’s green layer.
A dashed line indicates a hidden part of the true hierarchy (as used internally and for rendering).
These features have been designed to give maximum flexibility. What the Object Manager displays can be completely different depending on the view mode and filter. Powerful filters give you full control over which items are shown in the Object Manager. You can open and work with up to three additional Object Managers and integrate them into the layout.
No matter how complex your scene, here you can keep it easy to manage. Bookmarks give you a fast way to switch between completely different viewing variations.
Main tasks of the Object Manager:
- Management of objects’ names, hierarchy, visibility and so on.
- Management of other objects such as tags, which you can assign to objects here.
- Using the Object Manager together with the Layer Manager, you can assign items to various layers. You can then manage items via their layers. For example, you can hide or lock all items on a particular layer.
The following description applies to the Object Manager in its default "factory settings" state, with the search bar, path bar and filter hidden.
How the Object Manager looks can vary depending on its menu settings, which are described under the corresponding menu item.
Down the left side of the Object Manager you will find a list of all items in the scene, represented graphically in a tree structure.
To open and close branches, do one of the following:
- Click on the + or -. Hold down Ctrl/Cmd at the same time to completely open or close the entire branch.
- Press the left or right cursor keys to open or close the active branches .
You can rearrange items or groups of items in the Object Manager via Drag & drop. Hold down Ctrl/Cmd at the same time to copy the items. You can make objects children of other objects.
You can control which objects are displayed using the filter and search bar, which are described further below. For descriptions of objects, tags and materials, please see the corresponding sections in this help.
You can select items by clicking them, dragging a marquee or, if items are already selected, using the cursor keys. Hold down Shift at the same time to add to the existing selection.
The following keyboard shortcuts apply when you click on an object in a hierarchy:
- Middle click: Selects the object you click including all its children.
- Alt + middle click: Selects the object you click and all objects on the same hierarchy level except children.
You have several ways to multiple select. The main ways are:
- Drag a marquee.
- Click on an item then Shift-click another item. This selects the two items and the ones between them.
- Hold down Shift and press the up and down cursor keys.
- Use the selection commands on the Object Manager's menu.
- Use the Ctrl/Cmd key to invert the selection status of the items.
If multiple items are selected, the Attribute Manager displays their common settings, where you can edit them. If only one item is selected, all of its settings are displayed.
Selected items are color highlighted in the Object Manager.
The object selected last will have a slightly lighter color (see top right of image above). Several functions such as the Spline Boole command benefit from this feature.
Child objects of selected objects are also color highlighted but in a weaker color if the children themselves are not selected.
To rename items you can:
- Double click on their names.
- Select an object and press Return.
With the name input field open you can quickly rename multiple items using the up and down cursor keys to move to the next item. There is no need to press Return in the process.
The narrow central column in the Object Manager contains various switches. The switches available can vary from object to object. From left to right, these are:
Layer color, Editor/Renderer On/Off (you will also find these switches on the Basic Properties tab for objects as well as on the Object Manager's Objects / Object Display sub-menu, where they are also described), Object Activation (on/off) and in the case of cameras, a switch to look through the camera in the Perspective view.
You can paint the switch status for layer, Editor/Renderer On/Off and Object Activation from one object to another via left-drag. The mouse pointer becomes a paintbrush while you paint. Simply paint the status onto the objects above or below.
The right side of the Object Manager is where you will find the objects’ tags.
Drag-and-drop
Drag-and-drop is the technique of clicking on an object/tag, holding down the mouse button and dragging the object/tag to another position; when the target location is reached, you release the mouse button and the object will be dropped there. Depending on the target location, this may have different results.
Rearranging objects/tags
There are many ways to re-arrange objects in the Object Manager and these are described below. The icons show how the mouse pointer changes while doing the actions as described.
Drag an object between two others or to the end of the list.

If you want drag to create a copy, use Ctrl-drag.

A line will show the location where the element will be pasted.
Changing the Object Hierarchy
To change the object hierarchy, drag the object on top of an existing one in the list. This makes the dragged object a child of the other.

If you want to create a copy and make it a child of another object, use Ctrl-drag and move the mouse pointer over an object.

You can also drag-and-drop tags. To transfer a tag from one object to another, drag the tag icon on to the line of the other object.

If you want to create a copy, use Ctrl-drag.

The future Parent object will be highlighted in advance in the list.
If an operation is not available, this icon appears.
