Object Menu
If you have created selections for point, edge or polygon selection using the Set Selection command, you will find these selections listed here. You can restore a selection by choosing its name from this list.
You can also select this command, as well as others, on the Attribute Manager’s tag page provided that the Selection tag is selected.
The items in this menu control the viewport and render visibility for the selected object. Alternatively, you can change the visibility using the visibility dots in the middle column of the Object Manager:

Both dots are grey by default. The upper dot controls viewport visibility, the lower dot render visibility. Each dot has three states: grey, green and red.
The object adopts the viewport visibility of its immediate parent. If the object is on the top hierarchy level (i.e. has no parent), it will be displayed as normal. Editor Unchanged is the default setting for new objects.
The object will be visible in the viewport, even if the hierarchy parent is invisible (red).
The object is hidden in the viewport, even if the hierarchy parent is visible (green).
The object adopts the render visibility of its parent. If the object is on the top hierarchy level (i.e. has no parent), it will be rendered as normal. This is the default setting for a new object.
The object will be visible in the render, even if the hierarchy parent is invisible (red).
The object is not displayed in the render, even if the hierarchy parent is visible (green).
The states can also be painted onto objects directly above or below by clicking and dragging the mouse.
Generators and deformers are two of the most important object types in CINEMA 4D. Generators use other objects or data to create new surfaces. Generators include most Generator types. Deformers modify an existing object. Deformers include not only those listed in the menu, but also Subdivision Surfaces, metaballs and the Symmetry object.
All generators and deformers have the two standard visibility dots (see Object Display above) in the Object Manager. In addition, they have a third switch for Object Activation.
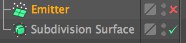
This switch has two states: enabled and disabled. The enabled state switches on the generator (i.e. surfaces are generated) and is represented as a green check mark. The disabled state is indicated as a red cross and tells you that the generator is switched off (i.e. not generating surfaces). To toggle between the enabled and disabled state, click the enable switch.
The states can also be painted onto objects directly above or below by clicking and dragging the mouse.
Example:
You have placed several splines into a Loft object. If you want to edit the splines extensively, you can see them more clearly if you turn off the skin of the Loft object (click the enable switch for the Loft object to change its icon from a check mark to a cross). Note that this does not hide the Loft object — rather, it switches off its effect.
Example2:
Create a cube and make it a child of a Subdivision Surface object. The cube will be deformed into a sphere. If you click the enable switch, only the cube (the original object) will be shown.
See Mesh / Conversion.
See Mesh / Conversion.
See Connect Objects.
You can use this command to group objects in the Object Manager. To group objects, select the objects that you want to group and choose Group Objects. A Null object is created and the selected objects (including their children) are placed inside the null. Existing hierarchies are preserved within the new group.
Objects one level below the parent are moved to the same level as the parent. Existing hierarchies within the group are preserved.
Look up Make Editable command.
Look up Current State To Object command.
Look up Connect command.
Select this option if you want to delete an object without deleting its children.
Use this command to set the parent of selected objects and their children. Simply select the object(s) to parent, then run the command to enter a picking session and select a parent object either in the Object Manager or the viewport.
Use this command to break the parenting of selected objects. Simply select the objects you wish to unparent and run the command. The objects will be placed at the top of the hierarchy.
Material Commands
These commands are for the most part the same as in the Material Manager (you can find all details here ), only that here you can assign the newly created material to all selected objects using a Material tag.
This saves you from having to switch to the Material Manager to do so, which optimizes your workflow.
Existing Material
Here you will fine a list of all existing materials. Select one to assign it to the selected objects.
This command can be used to select the material assigned to the selected object in the Material Manager. For multiple selections, only the last object/tag will be selected.
Use this command to select the Material tag for the selected object. For multiple selections, only the last Material tag for the last object will be selectec.
Info

This command displays the following information about the selected object (including its children): size in KB, number of points, number of polygons and number of objects. If you see figures in brackets, these are the number of points and polygons that will be created if you make the object and its children editable.
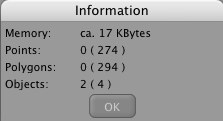
This command displays the following information about the scene: size in KB, number of points for the number of polygons and number of objects. You are not required to select an object before using this command. If you see figures in brackets, these are the number of points and polygons that will be created if you make all objects in the scene editable.
Not included in this information are, for example, the amount of memory required for undo or copy functions, texture memory, etc. Therefore, don’t be surprised if your operating system displays a higher memory requirement than Cinema 4D does here.