User Data
For What is User Data used?
Often, complex scenes contain a vast quantity of objects. If such scenes are passed on to other users for modification (e.g., rigged characters that need to be animated) it’s a good idea to create User Data that effect the actual scene objects via XPresso Expressions (don’t panic, these Expressions are really simple … ). Subsequent users will then only be presented with the parameters they need to make the required changes. In most cases, a Null Object can be created and assigned an XPresso tag tag in which the User Data are saved. However, User Data can basically be assigned to any element that can be displayed in the Attribute Manager. User Data are saved with the scene and can be copied from one scene to another.
Example
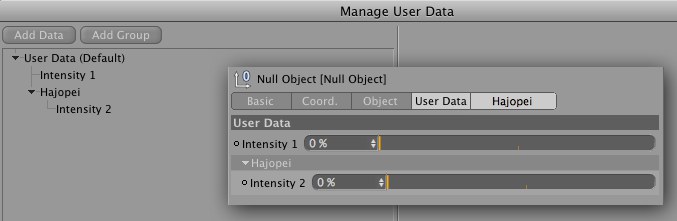
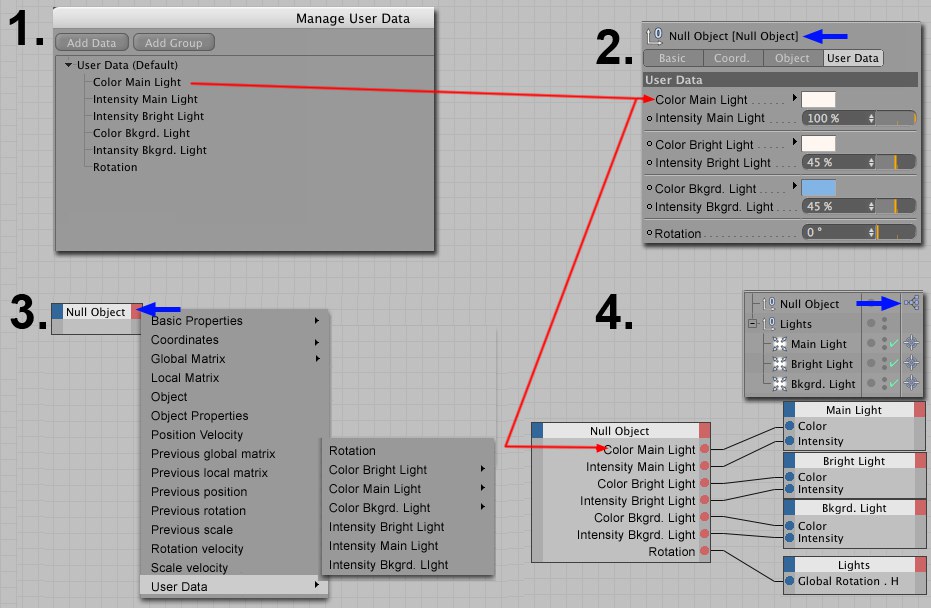 The steps from User Data to actual parameter control.
This User Data in this scene’s Null Object control color, brightness and orientation of three light sources.
User Data Dialog Window
This window opens if an object or a tag is selected and one of the commands from the User Data menu is executed. In this window you can create or delete User Data.
The dialog window is made up of two areas:
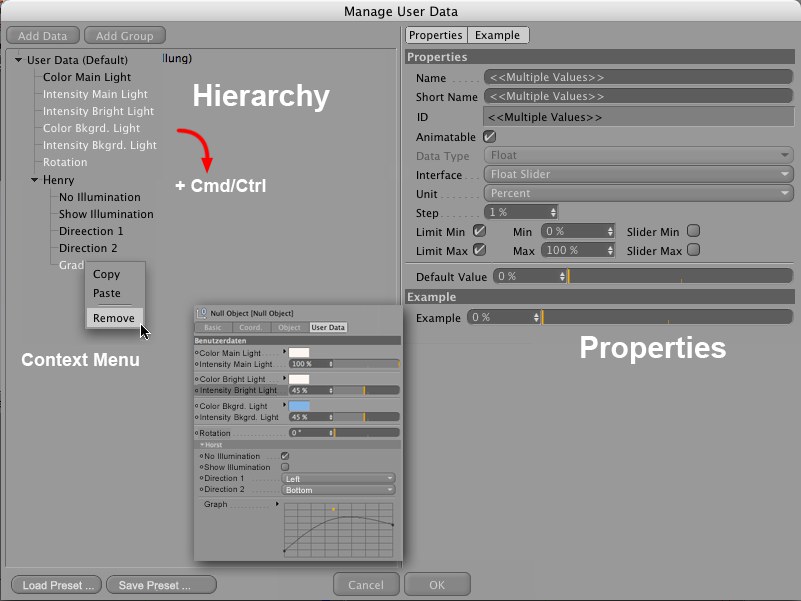 Existing User Data can be copied via Ctrl+click; right-clicking on a User Data item will open a context menu.
The Hierarchy
The hierarchy displays all User Data (hereinafter called parameter). The User Data can be resorted via drag & drop or grouped (subtabs that can be opened or closed). Existing groups or parameters can be copied using the Ctrl key.
Multiple selections can be made in the usual manner using the Shift and Ctrl/Cmd keys.
Parameters can be added to this field using the following methods:
- Click on the Add Data button
- Copy object or tag, etc., parameters from the Attribute Manager by right-clicking them and selecting the Copy User Data Interface command. Select Paste User Data Interface from the User Data menu. Note that only the interface components will be copied and are not linked to the original elements via XPresso!
Right-clicking on an element will open a context menu containing the following options:
Copies the selected parameter.
Pastes a copied parameter.
Deletes the selected parameter.
User Data Properties
In the properties area at the right of the Manage User Data window are the properties of the selected User Data items to the left. These properties define how the parameter settings should be in the Attribute Manager. For example, integer values from 20% to 120% can be defined.
In addition to the Properties menu, the following are also available for some data types:
- Details: Here are additional options that can be used to define how the respective data type should be displayed. It’s best if you select the Preview tab simultaneously and test the various options to see what they do.
- Preview: Shows a preview of the effect the settings in the other tabs have.
This name also appears in the Timeline and XPresso nodes. Normally this name is the same as the Short Name. This is why the Short Name parameter is automatically defined in the beginning.
Use this option to enter an abbreviated version of the parameter’s actual name. This comes in Handy if the name happens to be too long to fit in the Attribute Manager.
This is a parameter you normally do not have to modify. However, for the sake of completeness we have included it in the documentation: Each User Data parameter is given an ID for each object. If identical IDs with identical parameter data exist for various elements, these will be displayed in the Attribute Manager if these elements are selected simultaneously.
If the Animation icon appears next to the parameter it is animatable.
Cinema 4D contains numerous data types (e.g., integers, colors, gradations, etc.) that unfortunately do not work in conjunction with every parameter. Sufficient for the most common uses are floating points, integers or color.
Button is somewhat different because it is not addressed via XPresso but via Python (e.g., a command can be called up by clicking on this button).
More information regarding data types can be found here.
The following parameter differ depending on data type. Below is a description of the most important ones:
Float Slider
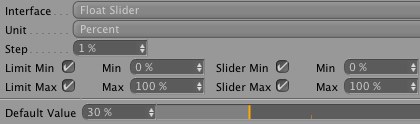
The Float Slider is probably the most commonly used User Data parameter. It is used to define numeric values (optionally with positions after the decimal point).
Unit: You can select between Real, Percent, Degree] and Meter. This can make it easier to calculate angles. Nodes only respond to radian angle values (360° equal 2*pi). Select the Degree option. If you enter a value of 180° the Nodes will interpret this value as pi=3.1549 … . Nodes will calculate a percentage value between 0% and 100% with in a value range of 0 to 1.
Step: The parameter will be modified in accordance to this step value.
Limit Min / Max: Defines the limits within which the parameter can be defined for a given GUI element. The first Min/Max values define the range covered by numeric inputs; the Slider values only define the minimum and maximum values that can be reached by moving the sliders.
If values outside of the slider’s value range are used a colored marker will be displayed.
This parameter defines the value (or Spline, depending on data type) with which the parameter will initially be displayed in the Attribute Manager or when it is set using the Reset to Default command.
Radio Buttons, Selection List, Cycle Button, Quicktab Radio
Both are available for the Data Type Integer option.
These modes can be used to create selection options:
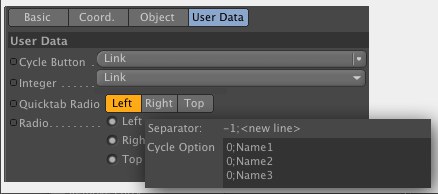
The syntax looks like this:
0;Name1
1;Name2
2;Name3
etc.
Each line must be followed by a hard return. If you want to separate lines, type -1 into that line.
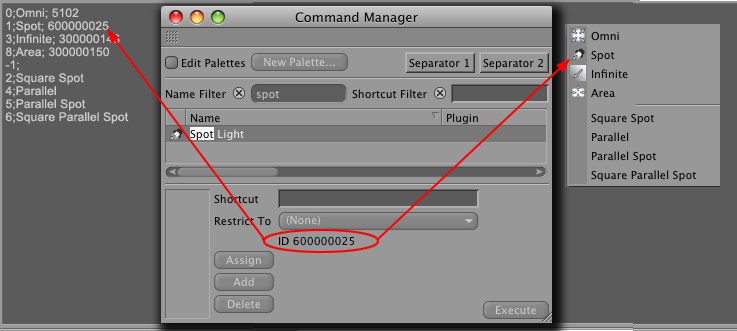
The selection list and switch buttons also make the program icons available for selection. Its ID can be found in the Command Manager. Refer to the image below for the correct syntax:
Vector
The Vector data type has two Interface modes: Vector and 2D Vector Field. The 2D Vector Field can also be integrated into the HUD, which lets you quickly modify the vector’s X and Y values.
Spline
The Spline data type has its own Details tab that contains various (self-explanatory) parameters for displaying the Spline element.
Separator
Separators are used to visually separate parameter groups. If the Separator Line option is enabled these groups will be separated by a line. Otherwise they will be separated by a type of subtab. You can enter a name but this is not a requirement. Omitting names will keep your separated groups visually "cleaner".
Group Parameters
Defines if the subtab should be open by default.
Defines whether or not subordinate parameters should be displayed in a separate tab in the Attribute Manager (the group must lie on the same hierarchical level as the User Data (Default).
If enabled, list text fields will be scaled to the maximum possible height in the Attribute Manager.
Lets you arrange parameters in multiple columns.
Commands
Adds a parameter. To add a sub-parameter to an existing group, select the group and click on the Add Data button.
Adds a Group Data element, to which subordinate parameters can be added. These groups can be opened or closed in the Attribute Manager:
If you place a Group (must contain at least one parameter) on the same hierarchical level as User Data (Default) a tab will be added in the Attribute Manager:
If the Title Bar option is enabled, Group parameters will be arranged in a separate sub-menu (group name) in the XPresso Node.
- Parameters (for objects, tags, etc.) that have been copied from the Attribute Manager using the Copy User Data Interface command can be pasted using the Paste User Data Interface command. Only the interface components will be copied, which are not linked via XPresso to the original object.
These two commands can be used to save selected user data as presets (or several, which will then be saved in a single preset) and load them - under the currently selected list.