Info Area
Information can be added to any asset. Much of this information is read out automatically (e.g., resolution of a given image), other information must be assigned explicitly (e.g., keywords). This information is called meta data.
The Info area serves to add and display meta data. Meta data makes it easier to find and manage assets. The Info area displays the information of a selected asset or its selected versions..
The Info area is not displayed by default and can be opened using the icon at the top right of the Asset Browser.
The Info area also allows multiple selections: you can, for example select 34 assets that share an identical keyword.
You will find two icons at the top right of the Info area:
- Status: This icon can have various states and functions:
- Unavailable: This asset is not available in the current Cinema 4D version (or not permitted by your license type). This asset cannot be downloaded, copied or loaded into the scene.
- Download: The asset has not yet been downloaded. Click on this icon to download the asset.
- Locked: The asset cannot be modified. Clicking on the icon might let you copy the asset to another database where it can be modified. However, this is not possible for all assets, e.g., the Cinema 4D Nodes.
- Copy: Click here to copy the asset to another database.
- Two Commands are hidden here:Copy ID to Clipboard: Each asset has a unique ID. This ID can be copied to the clipboard (if multiple selections are made, these will be separated by commas). The asset can, for example, be located by entering the operator "assetid" in the search bar
This is, for example, very useful if you want to pass the assets to a co-worker without actually sending the file. Simply send the asset ID and they can enter "assetid:xxx" into the search bar (xxx = the asset ID that was sent) and the asset will be displayed. Of course both parties have to have access to the database, which, for example, applies to all Maxon databases available online. Copy Typ ID: Each asset has a Type ID (e.g., Spline Presets have the Type ID net.maxon.assettype.preset.spline) that you can copy to the cache using this command. You can then - as described above - type "assetid.xxx" (whereby the xxx stands for the Type ID) in the search bar and all assets of that type will be displayed.
The Info area is divided into a preview area and 4 separate sub-tabs:
Preview
At the left of the Info tab you will find an icon that can be used to enable or disable the preview display of the selected asset.
A maximum of 9 previews will be displayed. If you have more assets selected, e.g., 56, "+47” will be displayed on the last tile, which means that 47 additional assets can be displayed. In this case, the following mouse clicks will work as follows:
- Clicking on the last tile (e.g., +47) will switch to the next 8 previews
- Clicking on a preview will select only this asset
- Cmd/Ctrl+clicking on a preview will remove it from the multiple selections made
The following commands are available when you right-click on a preview image (note that you can only edit your own assets using this method):
- Update Preview from Clipboard: Replaces the current preview with the image from the clipboard
- Update Preview from File: Here you can load an image from the hard drive with which the preview should be replaced. If you select a video you can play it back in the preview using the Play icon (place the cursor over the preview)
- Create Preview: Deletes the current preview and replaces it with a default icon or for objects/scenes with the Viewport preview
Info
In this tab you will find a range of different information depending on the asset type. At the top half of the area on the right (General Information) you will see the information that is supplied for almost all asset types: name, type and which database the asset lies in. The bottom half contains asset-specific information such as the number of objects and materials for a scene or the resolution and color profile for images.
For multiple selections only the identical information will be displayed. Asset fields to which information can be added (e.g., name and comments for custom assets) can be filled out identically for the entire selection.
Proxy Geometry
This is an interesting function for object assets. The ![]() Placetool can be used to place objects directly from the Asset Browser into a scene. Now imagine a complex object with millions of points: to ensure a smooth placement, a proxy geometry can be defined here with whose help the placement can be made. It’s advisable to use a less complex mesh with roughly the shape, size and position of the original object.
Placetool can be used to place objects directly from the Asset Browser into a scene. Now imagine a complex object with millions of points: to ensure a smooth placement, a proxy geometry can be defined here with whose help the placement can be made. It’s advisable to use a less complex mesh with roughly the shape, size and position of the original object.
If you want to define a proxy geometry, click on the Edit Proxy button. In the dialog window that opens you can select an object from the Object Manager to apply (then click on the Apply button) or you can load a file. Done.
Click on Edit Proxy and this dialog window will open:
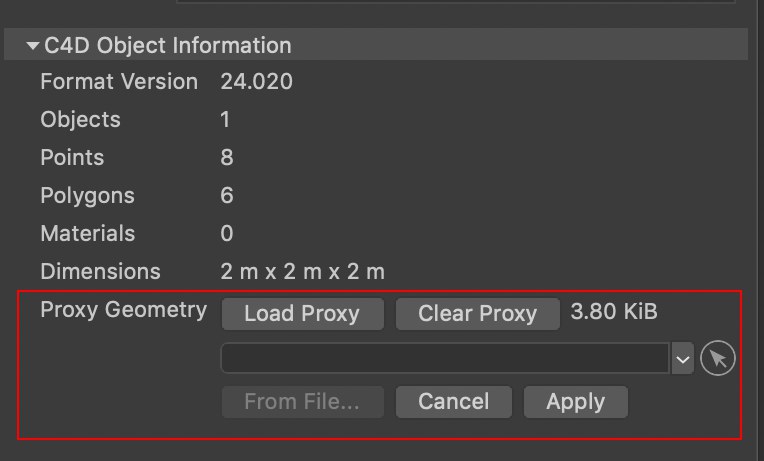
The buttons/information have the following functions:
- Load Proxy: If a proxy object was defined, it can be loaded into the Object Manager, e.g., to fine-tune and re-apply it.
- Clear Proxy: The proxy geometry will be deleted.
- Size: Displays the size of the proxy geometry.
- From File: Here you can load a proxy geometry from a file (other 3D formats such as .obj can also be loaded). If multiple files are located here, the first will be used.
- Apply: Assigns the selected object as proxy geometry.
- Cancel: Aborts the process altogether.
If no proxy geometry is defined, the object’s bounding box will be used.
Dependencies
What are dependencies? In order for Cinema 4D scenes to work, other files are often required that are linked within the scene file such as materials that use textures or sound files that affect an Effector, for example.
In the Dependencies tab you can see two elements for a selected asset (click on both icons at the bottom left to switch the display):
-
All assets/files (e.g., textures, XRefs), Node Spaces or any required plug-ins required for the selected asset (e.g., scene) will be displayed.
- All assets for the selected asset (e.g., bump map) will be displayed in which this bump map is used.
Listed assets can (if they lie on a server) be downloaded to your hard drive by clicking on the download icon on the right.
If no dependencies are found, "No dependencies found” / "No dependencies used” will be displayed, respectively.
Incomplete dependencies will also be displayed (details can be found here).
At the bottom of the dialog window you will see the above-mentioned icons for displaying items as a list or as tiles as well as the slider for adjusting the preview size. In the tile view you can hover the cursor over a given preview to display more information about that asset.
Keywords
Keywords are random descriptive terms that can be assigned to assets and can be used to later find and manage these assets. Example: You want to arrange your object assets according to color and you want to list all red and blue assets. To do so, create the keywords "red” and "blue” and assign them to the respective assets. These can then be located by searching for the respective terms in the search bar ("keyword:red”). You can save smart searches to make this process even faster.
The keyword functionality is divided into the following 2 fields:
Assigned Keywords (top)
Here you will see all keywords assigned to the selected assets.
A keyword can be removed by clicking on the "x” (or double-click/drag&drop on the keyword). For multiple selections and differently assigned keywords, the respective number of keywords will be displayed in parenthesis.
Assignable Keywords (bottom)
Here you can define new keywords, independent of the selected asset. Assigned keywords can be deleted again using the Smart Search/keywords in the category list.
To start, a search bar is available in which you can enter a series of characters to display matching keywords. This is very useful when working with hundreds of keywords. This works as follows:
First, a keyword list is filtered by entering a test string and confirmed by clicking on the Create button.
- If the Return key is pressed, the current series of characters will be assumed as the keyword (a database selection dialog window will open).
- If the Cmd/Ctrl key is pressed, the current series of characters will be assumed without opening a database selection dialog window. The keyword will be saved in the preferences.
- If the Shift key is pressed in conjunction with Up/Down arrows, you can navigate through the keyword list and assign by pressing Return for the respective selection.
- If the Shift key is pressed in conjunction with Left/Right arrows, the series of characters entered can be selected (e.g., to copy them to the cache).
Below you will find the Create button ("+” icon) for creating a new keyword and other functions for existing keywords. Once a series of characters has been entered, click on this button and enter a name and database in the dialog window that opens (upper and lowercase is irrelevant). Click on OK to create the new keyword and assign it to the selected assets.
If you have at least one asset selected, keyword icons with a "+” icon will be listed. If you click on this icon – or double-click on the keyword – the keyword will be assigned to all selected assets and will then appear in the Assigned Keywords field at the top (and will be removed from the field below).
Additional Keyword Functions
- The keywords listed under Keywords or via Smart Search in the category area can also be assigned to an asset (which will be displayed in a separate Asset Browser) via drag&drop.
- Custom keywords can be added from the asset list to a category list (but not to the top-most hieararchy) via drag&drop. When selected there, all respective assets will be displayed on the right.
- In the search bar, the operators "keyword” or "keywordcount” can be called up to define corresponding searches (see also Asset Browser Search).
- Multiple keywords can be selected in the keyword list or removed from it using Shift or Cmd/Ctrl. Keywords selected multiple times can be assigned to the top area using the Shift key + drag&drop.
- If you right-click on a keyword, a context menu will open with several useful commands (that are described elsewhere in the documentation).
Versions
Versions is a very interesting function. It not only lets you save the state of a given material, object, Node, scene, etc. as an asset but also the path to that state, i.e., in-between states. Instead of saving elements as, for example, sequentially numbered scenes, you can save an asset with numerous versions.
You should already be familiar with this concept from the Nodes, which has been part of the Cinema 4D functionality for several releases now. This can now be done for almost all other asset types (exception: categories and keywords, for example).
Generally speaking, the following applies: Each asset type can only have 1 selected element of the same type assigned to it as a new version. Example: A selected material asset can only have one other selected material assigned to it – and no object, for example. All asset versions will be displayed with a preview and the database in which it lies (asset versions must not be saved in a single database).
If you click on the "+” below, the one selected element will be saved as a new version for the selected asset. A dialog window will open in which you can define the name, version info, database and category.
This icon will be grayed out if no fitting element is selected for the current asset.
When selecting versions, their properties will be displayed in the Info area’s other tabs.
All versions listed here can be loaded in Cinema 4D (double-click or drag & drop). If necessary, the asset will first be downloaded – this can be done manually by clicking on the Download icon. The database in which the asset lies is displayed on the right.
You will find several useful commands in the context menu that primarily reflect those of the Asset Browser menu.
Workflow Example
The Version function makes completely new workflows possible: For example, if you are modeling a very complex object you can simply define it as a new asset version from time to time instead of saving the entire scene each time. You can then access an earlier version at any time. In the search bar you can, for example, enter "version:version name” (name that was defined via version info in the asset assignment dialog window) to locate a specific version.