Stereoscopic
 This image practically reaches out to you if viewed through 3D anaglyph glasses (red-cyan).
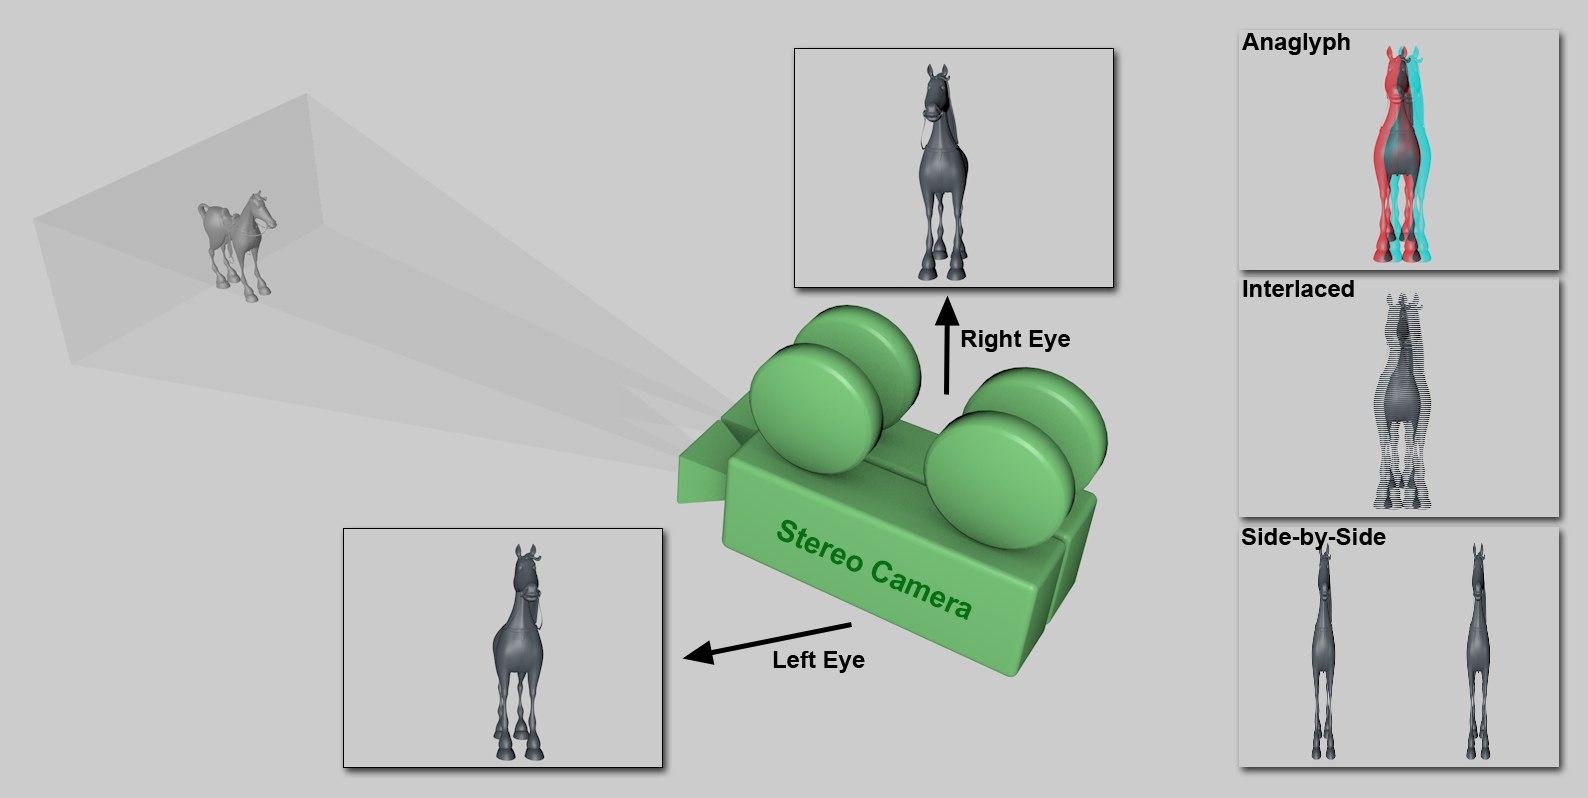
Over the years, several attempts have been made at displaying images, movies and videos in three dimensions. More recently – mainly as a result of the numerous 3D movies – a new 3D boom has taken place. Among the reasons for this are most likely the advance in technology that makes it possible to display 3D images and movies true to color and free of fatigue for the human eye. What most techniques have in common is that they basically record two images of the same scene from slightly offset perspective views (namely that of the left and right "eyes", respectively). These two images must then be displayed to the viewer in a way that the left eye only perceives the left image and the right eye the right image (which is done using specially designed glasses). The rest is done more-or-less automatically: the brain combines these two images into a single image.
Of course this is a task that Cinema 4D has also mastered. We’ve made it easy to place any number of cameras in a scene in order to render it from all possible angles.
 Two images with different perspectives are combined to create a stereoscopic image.
Cinema 4D uses the following techniques:
Anaglyph (rendering and Viewport):
This is the most well known method, which has been used in movie theaters since the 50s. An image’s color information is separated using 2-color glasses (previously red-green, today most commonly red-cyan). Advantage: simple, affordable glasses. Disadvantage: color range is in part very limited.
Shutter (Viewport only):
The most high quality method is the use of special glasses that are synchronized with a monitor, which makes it possible for images to be displayed alternately to the left and right eye. Advantage: best quality, true color reproduction. Disadvantage: expensive (special hardware, monitor must offer 120 Hz).
Interlaced (rendering and Viewport):
This method requires a monitor with a polarization filter and glasses with polarized glass. Since both images are coded into a single image (e.g., left eye all even, right eye all uneven lines), the resolution is halved. Advantage: affordable glasses, good color reproduction. Disadvantage: special monitor required, reduced resolution.
Side-by-Side (rendering and Viewport):
Left and right images are switched and squeezed into a normal image size. Some televisions use this technique for HD 3D because the transmission band width is the same as the HD band width. The terminal device must be able to decode these double images and display them sequentially (most commonly in combination with shutter glasses). Disadvantage: reduced resolution, expensive technology (special hardware required).
auto-stereoscopic:
For additional auto-stereoscopic techniques any number of views that lie within the range of the defined Eye Separation value can be rendered for the left and right eye (the auto-stereoscopic Channels setting can be found in the Render Settings’s Stereoscopic menu).
In Cinema 4D, a scene can be displayed stereoscopically in the Viewport (for which 3D anaglyph glasses and special hardware, incl. shutter glasses are required) or rendered in stereoscopic format.
Stereoscopy is created in Cinema 4D as follows:
-
The parameters required to render a scene stereoscopically can be found in the Stereo Camera’s Stereoscopic tab. Naturally this camera must be selected for the given view.
-
If you want to display the scene stereoscopically,
 Stereoscopic must be enabled for a given Viewport (Options menu). Additional settings can be found in the Viewport’s Configure… settings’ Stereoscopic tab.
 -
If you want to render stereoscopically, numerous settings are available in the Render Settings’ Stereoscopic menu with regard to how double images can be coded and rendered.
-
In the Picture Viewer’s Stereo tab you will find a selection menu that lets you define exactly what will be displayed in the Picture Viewer (e.g., the stereoscopic image or only the image for the left eye). Here you can also interactively adjust both camera views to a single stereoscopic image.
- A spherical camera (360° view) has been integrated into Cinema 4D R19. This camera has special stereoscopic settings (its perspective cannot be displayed in the Viewport).
It is not possible to render stereoscopic images in the Viewport.
Here you can define how the stereoscopic images should be rendered (and displayed in the Picture Viewer) and saved (this is defined in the Render Settings’ Save menu).
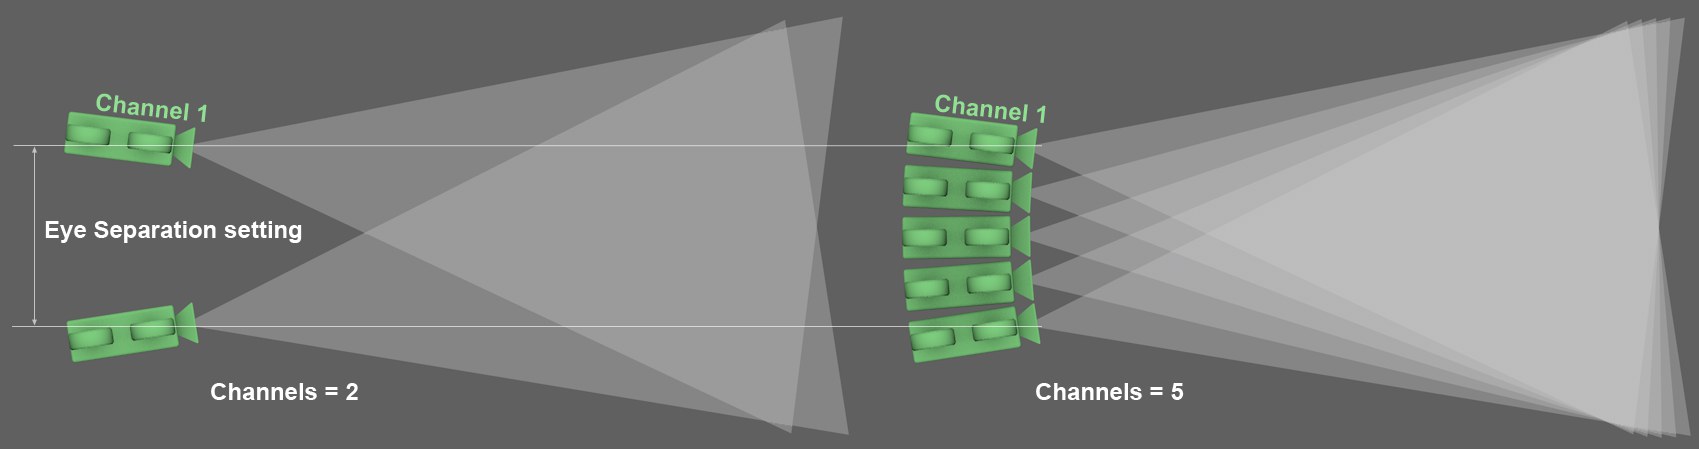 At left a stereoscopic setup with 2 channels, at right a stereoscopic setup with 5 channels.
In contrast to stereoscopic techniques that use 2 channels, multi-channel techniques let you render multiple camera views, which can then be edited as channels (or streams) using external applications. auto-stereoscopic playback devices can then be used to view these images with two matching channels (that can change depending on the angle of view).
Several camera views can be rendered, depending on the number of channels defined. Channel 1 will always be the left eye perspective and channel X will always be the right eye perspective. If Channels is set to greater than 2 additional views will be rendered between these views. Select this mode if you want to subsequently create a stereoscopic image, either in the Picture Viewer or using an external application.
A stereoscopic image will be rendered using the left and right eye views only and no other channels. This is the mode with which you will normally render.
Individual Channels and Merged Image
In addition to the left and right eye views (or any number of additional intermediate camera views), a combined, stereoscopic image will be created out of a combination of these views.
Only the channel defined by the Single Channel value will be calculated. This mode is recommended if you – for whatever reason – only want to render a single camera view.
If this option is selected you can define which channel should be rendered. 1 will always render the left eye view and the value defined for Channels will be the right eye view. in-between values will represent the intermediate camera views, as described in Placement.
Enable this option if the normal camera view (i.e. the camera view as defined in the camera’s Coord. tab) should be calculated in addition to the stereoscopic (or auto-stereoscopic) views.
If enabled, individual channels ("channel left", "channel right", etc. or sequentially numbered if more than 2) and the stereo image ("channel combined") will each be placed in their own folder at the location defined in the Render Settings’ Save tab. The path name will be added to the file names.
Mono images on the other hand will not be saved to an extra folder.
Here you can define any number of channels (=intermediate views). How these cameras are arranged is described under Placement.
This is the most well known method, which has been used in movie theaters since the 50s. An image’s color information is separated using 2-color glasses (previously red-green, today most commonly red-cyan). Advantage: simple, affordable glasses. Disadvantage: color range is in part very limited.
Left and right images are switched and squeezed into a normal image size. Some televisions use this technique for HD 3D because the transmission band width is the same as the HD band width. The terminal device must be able to decode these double images and display them sequentially (most commonly in combination with shutter glasses). Disadvantage: reduced resolution, expensive technology (special hardware required).
This method requires a monitor with a polarization filter and glasses with polarized glass. Since both images are coded into a single image (e.g., left eye all even, right eye all uneven lines), the resolution is halved. Advantage: affordable glasses, good color reproduction. Disadvantage: special monitor required, reduced resolution.
Additional Parallax (pixel)[0..2147483647]
Moves the image halves by the defined value in pixels. This can be used to increase the stereoscopic effect.
If enabled, the left and right image halves will be swapped.
 Anaglyph
The color of the stereoscopic color coding can be defined here when using the Anaglyph mode. Both colors should be the same as the lenses of the 3D anaglyph glasses you will be using. If your client does not supply you with color information, use Red-Cyan. This is the most commonly used color combination and can display numerous colors compared to the primary color combinations of red-green or red-blue.
You can use the Custom option to create your own color combination (however, it will then be difficult to find a matching pair of glasses…).
If Method is set to anything else but Full you will only be able to define the left eye color. The right eye color will automatically be set to the left eye’s complimentary color.
Here you can define the individual colors for the stereoscopic color coding (System must be set to Custom). The left color must be the same as the color of the left lens of the glasses.
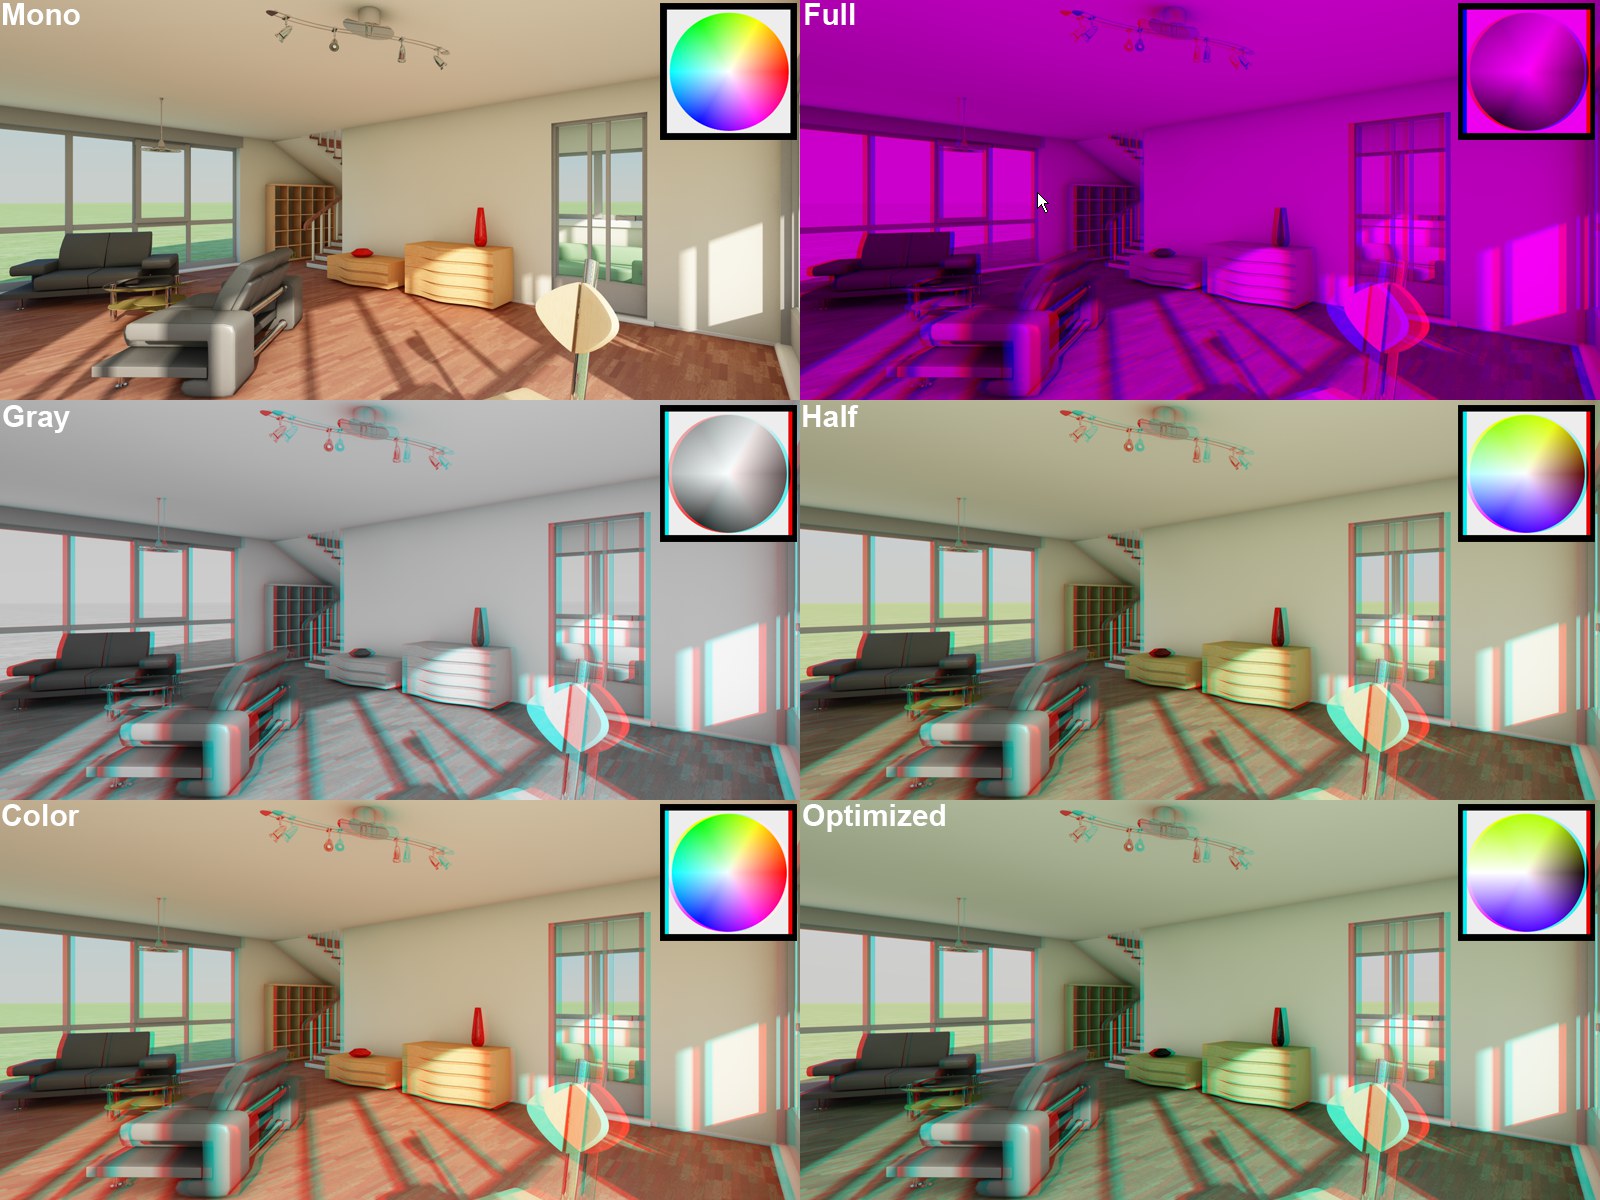 The different available methods (Full with anaglyph colors red-blue). Models by DOSCH Design.
Using this setting’s options you can affect the color of the stereoscopic image. A problem with the anaglyph technique is the color deviation of the original scene. Some colors cannot be displayed without straining the viewer’s eyes (red when using red-cyan coding). It is suggested that Optimized be used because it offers the least strenuous "viewing experience".
Red-Blue or Red-Green should be used when Method is set to Full…
The following list is closely arranged according to the quality that can be expected from anaglyph images. The list is arranged from worst to best:
The oldest (and lowest quality) method of anaglyph display due to the fact that the display is dark and monotone. This mode is designed for use with the Red-Blue or Red-Green anaglyph techniques.
The anaglyph image will appear as a gray-scale image through the glasses (not designed for use with red-blue or red-green). For brighter images use Full.
These modes allow only a limited color reproduction compared to the previously described options. Blue, green and yellow tones can be reproduced very well when the common red-cyan code is applied. If Color is selected, "retinal rivalry" can occur, i.e., red surfaces (red-cyan) will cause the left eye to pass on maximum color intensity to the brain and the right eye will only see "black". This is irritating and strenuous for the eyes (can be observed on the red vase in the image above). This effect can be minimized by selecting Half Color. However, red will then be darkened to such a degree that it can no longer be recognized as such.
This mode is similar to the Half Color mode but it offers better color reproduction and minimizes the retinal rivalry effect (see above).
Side-by-Side
This mode defines whether or not both image parts should be arranged next to each other (horizontally or vertically).
If Mode is set to Side-by-Side you are given the option of mirroring the image halves along the X or Y axes.
Interlaced
If Mode is set to Interlaced, you can also define whether the coding should take place via offset lines (Horizontal) or columns (Vertical). Furthermore, there is an additional combination of both modes called Checkerboard.
A few guidelines for achieving good stereoscopic images
There are several rules that should be followed when creating stereoscopic images. This is necessary so they can be easily viewed without any unnatural effects or fatigue for the viewer’s eyes. Hence, the following guidelines should be followed.
- Depth of Field: It is generally suggested that a larger depth of field (i.e. little blur) be used. A common 2D technique is to take the background out of focus using a slight depth of field. A blurred wall behind a sharp object makes this surface look flat. Such techniques are in contrast to stereoscopic techniques.
- Distance from object(s): The 3D effect depends a lot on how far the viewer is from the projection plane (monitor, screen, paper, etc.). The farther away the viewer is from the projection plane, the stronger the 3D effect will be (the perceived impression of depth between an object that is near and one that is far away)! This should be taken into consideration when creating a stereoscopic zone.
- Ghosting is when one eye perceives the image information of the other eye (leads to irritation). This is especially noticeable in images with high contrast (anaglyph images in particular are prone to this). Therefore, you should avoid such contrasts in your images if at all possible. Very small parallax values can also reduce ghosting.
- It is often irritating for the eye when objects are cut off at the edge of an image (if they do not lie on the projection plane). However, because there are always objects that lie on the edge of an image, it shouldn’t necessarily be the most important object in the image, the one that is currently the center of attention, that is being cut off.
- For videos it is important to give the eye time to adjust to strong parallax changes (between different settings). Short, fast cuts should then be avoided.
- Avoid exaggeration: Chain saws constantly flying towards the viewer or similar scenes can be fatiguing for the eye. Such visual gimmicks should be used sparingly or be well thought out.
- Read the Camera Viewport and stereoscopy descriptions. Here you will find additional guidelines that should be followed.
As you can see, the creation of (good) stereoscopic images can be challenging and many things have to be taken into consideration. But isn’t this true for all areas of expertise…?
Limitations for Stereoscopy
Note that a Stereo camera’s Child objects cannot be rendered in stereo.