Rotate
![]()
This tool rotates the selected objects or elements when you drag the mouse from an empty space within the viewport.
Depending on the mode selected, the Rotate tool can be used to select objects, points, edges and polygons by clicking on them.
As always, the following applies when selecting (and generally for all selection methods):
- Increase selection with Shift+click
- Remove elements with Ctrl/Cmd+click
Note also the functions described in the Select menu section, which also apply here.
The selections can be "drawn" by simultaneoulsy pressing the right mouse button (i.e., the selection will work like the Live Selection).
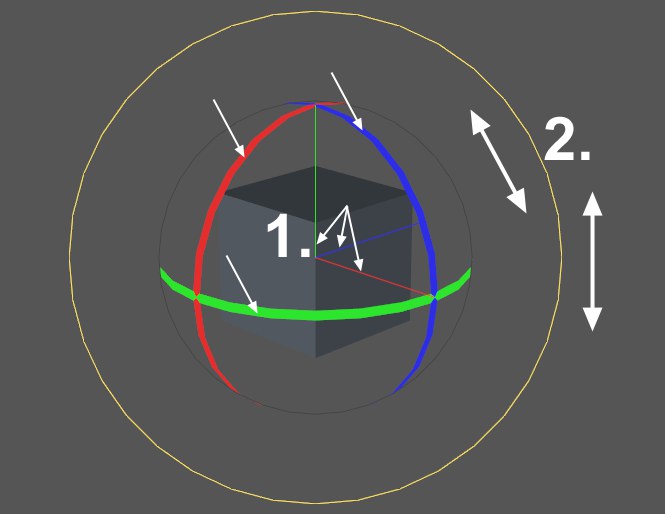
The Rotate tool offers numerous interactive manipulation options:
-
The rotation bands can be clicked upon and dragged to rotate an object. Pressing the Shift key does the following: if pressed after the rotation has already started, the rotation will be quantized, i.e.,done in steps. Simulaneously pressing Cmd/Ctrl will do the following:
- Duplicates the object when in Object or Model mode.
- When in Edge or Polygon mode, the selected edges or polygons will be duplicated but will remain attached to the mesh, which basically results in a rotating free extrude.
- Double-clicking on one of the elements marked in the image above will lock the direction of rotation. A single click on an unlocked element will lock it. Double-clicking on the element again will unlock the element.
- Rotation can take place within or outside of the rotation circle. It is displayed as a circle that is always parallel to the view plane. Drag from an empty part within the circle to rotate in any direction or from an empty part outside the circle to rotate on the same plane as the circle (you may find it helpful to think of the virtual circle as a potter’s wheel that is spinning around).
The cursor keys (+Shift for the Z axis) can also be used to rotate individually selected objects. The degree of rotation the object will be turned each time the key is pressed can be defined in the Rotate (Attribute Manager, Model > Quantize) setting.
</PIC>
The Axis Extensions can be extended to any length, which makes it easy to align objects to each other. Take a look at the example above: a cone has to be aligned to the corner of a cube. Proceed as follows (enable Vertex Snap in the menu):
- Ctrl/Cmd+right-click on the green rotation band and release the mouse button. A guide line will be displayed.
- Drag the mouse/guide line onto the tip of the cone (without pressing the mouse button) until it snaps in place.
- Click and drag to the cube’s point and release the mouse button. Done.
This method can, for example, be used to easily and precisely rotate one object to another.
Rotating multiple objects
When multiple objects are selected, a shared axis system appears in the viewport between the selected objects.
- You can rotate the objects using the shared axis system
- You can rotate the objects using any one of their object axis systems (click the origin of the object axis system that you want to use)
- You can enable the Per-Object Manipulation tool in the Rotate too’s Object Axis menu and rotate each selected object around its own axis.
Move, Scale and Rotate with mouse
Moving, scaling and rotating with the mouse
You can use the mouse for moving, scaling and rotating. A left/right drag manipulates the x axis while a back-and-forth drag controls the Y axis. For the Z axis you have to use the right mouse button. Macintosh users: As usual, use the Command key to simulate the right mouse button. You can toggle instantly between the left and right mouse buttons. If you are currently pressing the left button, press the right one before releasing the left and vice-versa.