Spline Pen
![]()
General
The Spline Pen, which you can access without having to switch to Use Point mode (it also works in the normal Use Model mode), replaces the previous versions of the Bézier, B-Spline, Linear and Akima Spline tools. The Spline Pen is equipped with a wide range of new functions. Similar to the Polygon Pen for polygons, the Spline Pen offers spline functionality that was only available with individual tools. Contrary to the somewhat cumbersome operation of the previous tools, many of the Spline Pen’s functions work intuitively, elegantly and are very functional. The Snap settings are used while working with the Spline Pen.
The Spline Pen can be used to create or edit splines.
Use
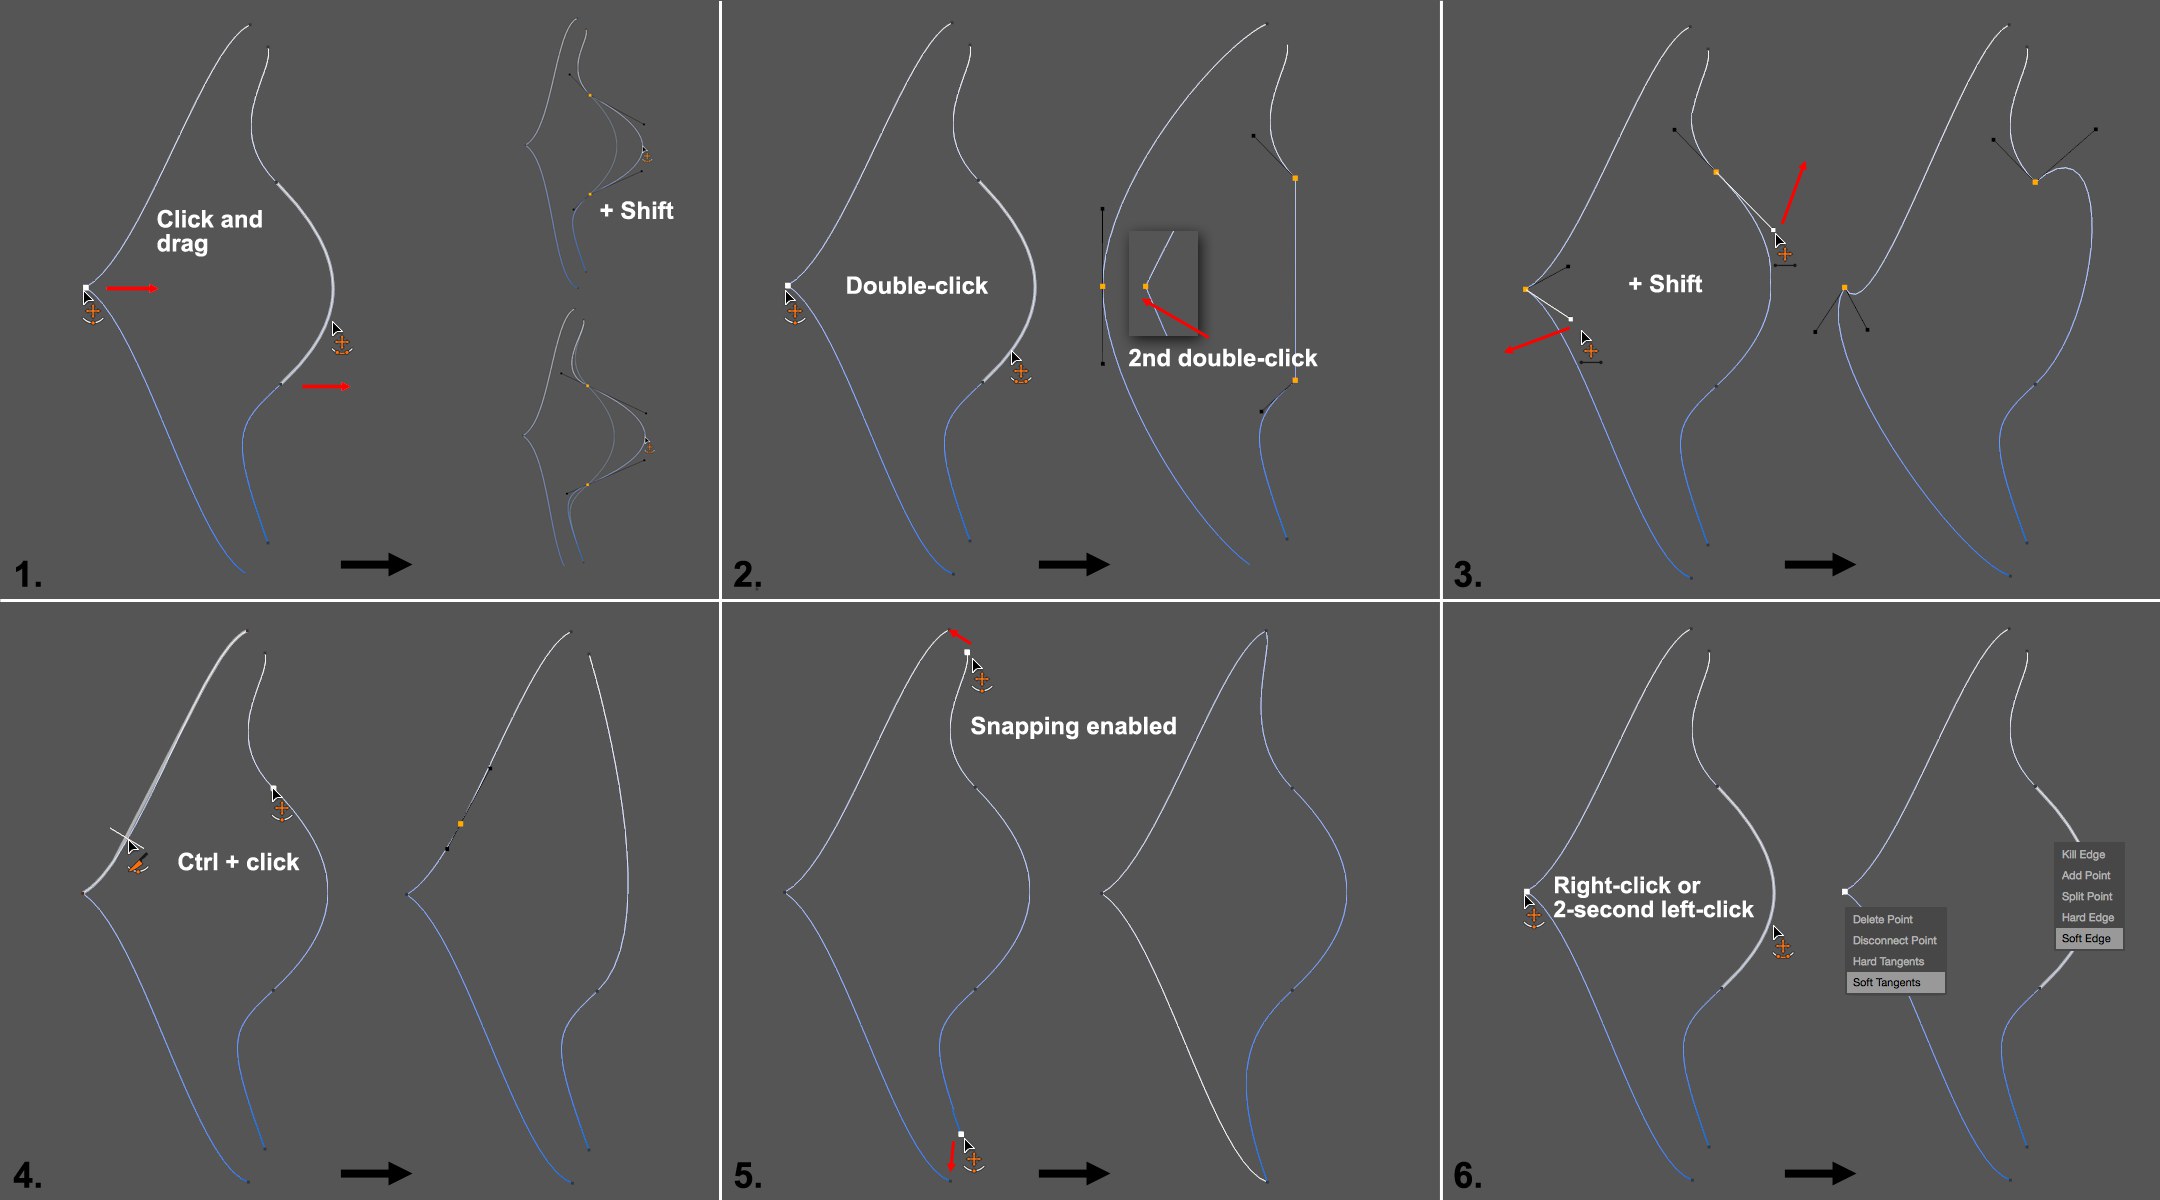
After activating the tool, click in the Viewport to create a spline point (contrary to previous releases you no longer have to press the Ctrl/Cmd key). If you click and drag, a tangent can be created at that point to create a curved section. A ghost preview of the next section will be shown before you create the next point. Points that have been created can be selected and moved without switching tools. If an existing point or edge is clicked upon (for edges, both neighboring points will be selected), they will be selected (multiple selections (or de-selections) can be made in combination with the Shift key). Existing tangents will be displayed and can be edited. If you want to extend a spline at its beginning or end, select the respective point and create a new point (if a point is selected along the spline, press Ctrl/Cmd to continue at the spline’s end.
If the cursor is positioned over a spline point or section (the part of the spline that lies between 2 points), these will be highlighted. Right-clicking on a point or section display a menu with several options.
Spline sections can be grabbed and moved. With Bézier splines, both supporting points will not move - only the tangents will change (if and how this happens can be defined in the tool’s settings). For all other spline types, both neighboring points will move accordingly. Note that, depending on where the spline section is grabbed (distance from the points), the nearest point (or tangent for Bézier splines) will be affected more. Grab the spline section as close to the center as possible to make sure the section is affected equally along its length.
For all spline types other than Bézier: the closer you are to a point when a section is grabbed, the more the movement will reflect the modification of the point itself. If you grab a section at the end of the spline the end point will not move.
If you create new spline points, these will always be created perpendicular to the angle of view through the plane that runs through the world origin.
The Spline Pen offers the following functions:
 A spline with 2 segments is edited using the Spline Pen.
-
Spline points and sections can be moved by clicking and dragging on them. If Shift is pressed while a section is moved, the tangent will be broken and the section will be ,bent’ only between the neighboring spline points. Otherwise the tangents will remain straight and will also affect the spline beyond both points. If the tangents are already broken, the Shift key does not have to be used.
-
Double-clicking on a spline point with a broken tangent will straighten the tangent and set both halves to the same length (soft tangent); clicking again will set the tangent length to zero; subsequent double-clicks will switch back-and-forth between the two states.
The same happens when a point with an unbroken tangent is double-clicked for the first time: it will switch between the soft tangent and a null tangent. Double-clicks on spline sections switch between linear interpolation and soft tangents (if the section has an end point, 2 double-clicks will be required for the linear state). This is a quick method of resetting faulty tangents. -
Unbroken tangents remain linear when a tangent end point is moved; tangents that are already broken aren’t affected. Unless you press the Shift key, which will cause them to move accordingly in correspondence with their angle difference. The tangent properties (e.g., length) can be locked in the Spline Pen’s settings.
-
If you hover over a spline section with the Ctrl/Cmd key pressed, a preview will show where a point with a matching tangent would be inserted if you clicked with the LMB. If this is done on a point, the point will be deleted. A preview will also be displayed here as long as you haven’t clicked.
-
Spline sections of a single spline can be connected if you connect a spline end point with another section’s point. If you connect a spline’s start and end points the spline will be closed. If the spline contains other open sections, a new spline will be created (Cinema 4D does not allow a single spline to simultaneously contain both open and closed sections).
-
Right-clicking (or clicking and holding for 2 seconds) a spline point or tangent (1-4 in the following list) or a spline edge (5-9) will open a context menu.
If you click on the start or end point of another spline (not a Spline primitive) with Vertex Snap enabled, both splines will be connected and combined to form a single spline. If you want to prevent this from happening, press the Ctrl/Cmd key when clicking.
The context menu offers the following options for Bézier splines (other types have fewer available options):
- Delete Point: deletes the selected point. Ctrl/Cmd+click will do the same.
- Disconnect Point: disconnects the spline at this location and creates a new point in 2 spline sections. For closed spines, the spline will be separated at this location and both end points will have a shared location.
- Hard Tangents: sets the tangent length for Bézier spines to 0 and creates an angular point.
- Soft Tangents: sets tangents to an unbroken default tangent with equal tangent lengths. Or put differently: a smooth and constant curve is created at this location.
- Kill Edge: deletes the spline section and therewith creates a new spline section.
- Add Point: adds a new point at the location at which the section is clicked without affecting the spline’s overall shape.
- Split Point: adds two new, non-coherent, congruent points at the location at which the section is clicked. The spline will be split into sections.
- Hard Edge: the section of a Bézier spline on which you click will be made linear and both respective tangent lengths will be set to zero. Double-clicking on the spline section will do the same.
- Soft Edge: the section of a Bézier spline on which you click will be made curved by setting the tangents of both neighboring points to a fitting length and angle. Double-clicking on the spline section will do the same.