Blend Modes
Cinema 4D offers numerous possibilities for blending and mixing colors, images and layers. Most of these settings carry the moniker Mix Mode or Blend Mode. These modes define how the resulting color (these are mostly pixel colors of two images) should be ascertained. These modes are often fine-tuned using a neighboring slider that lets you adjust the effect stepplessly from 0% (no effect) to 100% (full effect).
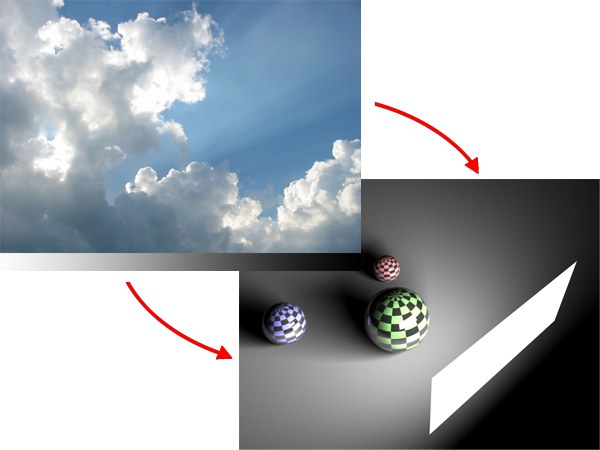
In the description below we are assuming that 2 images are layered over one another. The top image is named Blend_image and the bottom Base_image.
The following modes are available (these are all modes available in Cinema 4D; the selection menus only display the most useful ones):
Normal mode (e.g., in BodyPaint 3D)
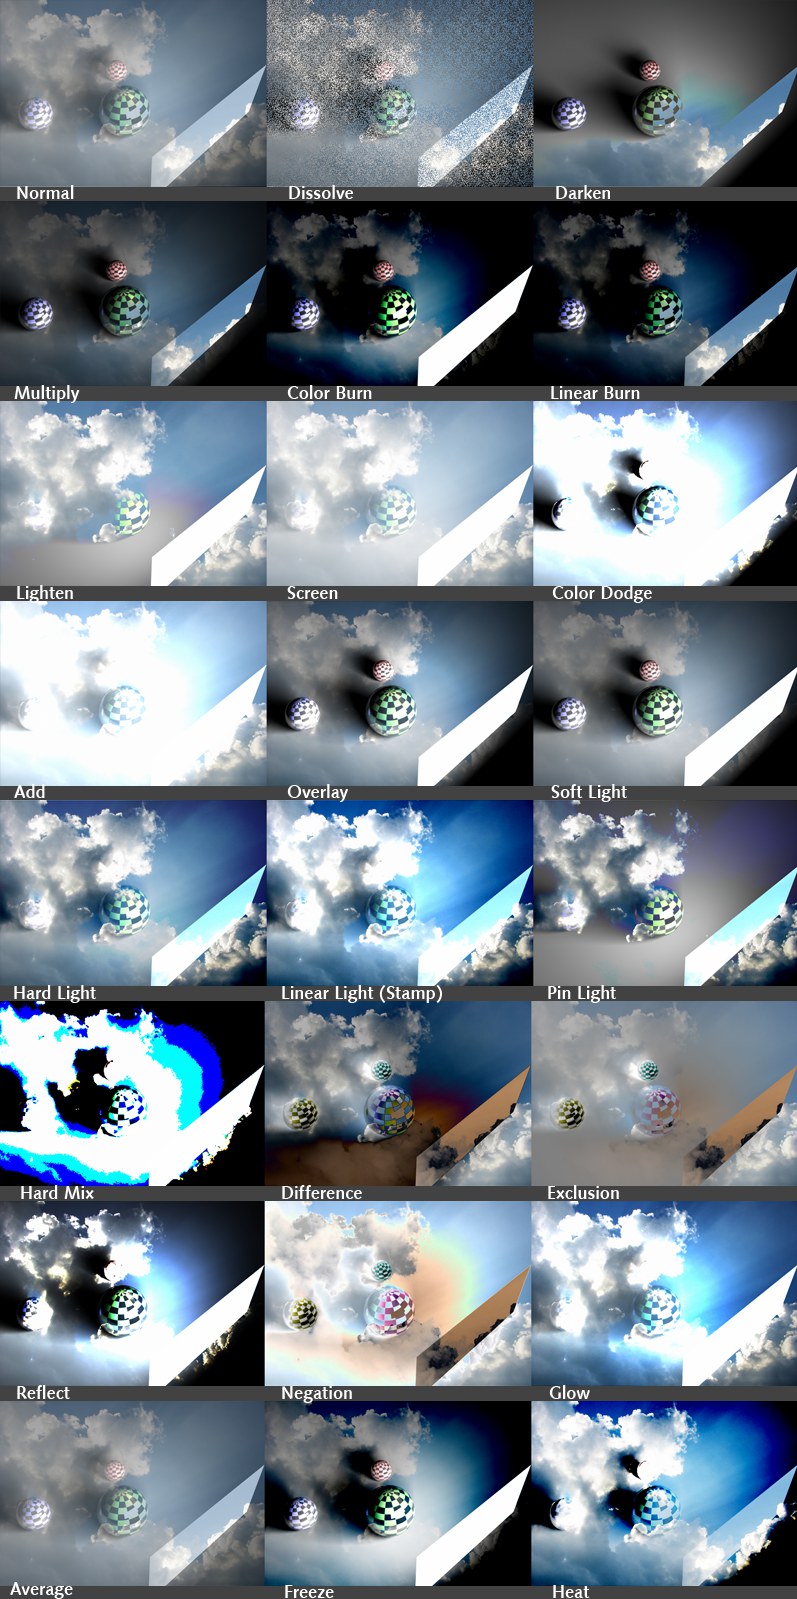
The Blend_image will cover the Base_image partially or completely, depending on the strength value selected (sample image: 50% strength).
Depending on the strength value selected, pixels in various sizes are placed randomly over the Base_image (sample image: 50% strength).
The pixels of the Blend_image and Base_image (separated for the 3 color channels) will be compared. The areas of each image that are darker in comparison with the other image will triumph and remain visible.
The colors of the Blend_image and Base_image will be multiplied which, in most cases, will result in a darker overall image (unless one of the images contains areas of white). Areas of complete black in one of the two images will result in pure black.
Darker areas of the Base_image will be colored using areas of the Blend_image. Brighter areas will receive less influence.
Functions very similar to Color Burn but has a more understated effect.
The pixels of the Blend_image and Base_image (separated for the 3 color channels) will be compared. The areas of each image that are lighter in comparison with the other image will triumph and remain visible.
This mode has the opposite function of the Multiply mode. The inverted color values will be multiplied with each other and the result will then also be inverted. The result will always be brighter than the original images (as well as the Lighten mode).
Here the result will also be brighter than the original images, whereby brighter areas will be colored more intensely. Black areas will remain unaltered.
Functions similarly to Color Dodge with a more understated result when a lower contrast value is used.
Blends the original images, whereby the bright and dark areas of the Base_image will be retained.
The Base_image will be darkened or lightened (stepless), based on the Blend_image. However, complete white or black values will not be reached. This blend mode differentiates between areas with more or less than 50% gray.
Hard Light is a combination of Multiply and Screen and the effect is similar to Soft Light in that the Base_image will be darkened or lightened based on the Blend_image’s gray values, yet black and white areas can result from the Blend_image.
This mode uses brightness to lighten or darken the Base_image in accordance to the Blend_image.
This mode will, more or less, be applied universally, depending on the gray scale dispersion of the Blend_image. At a value of 50% gray the Blend_image will be transparent, and values of 0% and 100% respectively will result in a universal application.
Depending on the strength of the Blend_image, the Base_image will be converted into up to 8 colors (rasterized): Red, green, blue, cyan, magenta, yellow, black, and white.
Depicts the difference between the Blend_image and Base_image. If the result shown is black, both images are exactly the same, the more colorful the result the more the images differ from each other.
Basically the same as Difference but a 50% gray in the Blend_image will also be depicted as gray.
This mode is especially good for painting reflective environments onto game textures. This mode resembles Color Dodge.
Generates a negative of the Base_image based on the grayscale values of the Blend_image (white: 100% negation, black: 0% negation).
This mode is the opposite of Reflect.
Reflects the Normal mode at 50% strength.
This mode is a variation of Reflect, whereby the colors of the Base_image and Blend_image will be inverted and the result inverted again.
Also a variation of Reflect, whereby the colors of the Base_image and Blend_image will be interchanged.
The following sample images are comprised of two images placed into two layers, lying on top of each other. The different blend modes were then applied.


The following modes can, for example, be found in Hair and Sketch and Toon materials, and Nodes.
A mix between Self-Blend and Multiply, depending on the background color.
The brightness of the blended pixels is used to brighten (Lighten) or darken (Dodge) the background pixels.
Color values are added or subtracted per RGB channel.
A blended pixel with 50% brightness will not affect the background. Brighter or darker blended pixels brighten or darken the background accordingly.
Background pixels and blended pixels will be linked via the logical Xor function.
In this mode, the hue, saturation and/or luminace of blended pixels will be applied to the background pixels.
The result is a red, green or blue channel of the blended pixel and the background pixel’s respective two remaining channels. For example, the Green mode will produce a mix of the green color channel of the blended pixel and the red and blue color channel of the background pixel.
Very useful for technical illustrations using patterns. This mode ignores the opacity (that is used to supplement the pattern) and overwrites it so the pattern is always visible.
The value of the blended pixels is used to create a contrast to the background pixels.
Similar to muliplying negatively. Brightens the basic image according to the values of the mix image.
These modes are specially designed for use with alpha channels:
To make sure you use the correct mode, you must know how the alpha channel was calculated (layer with Straight or Premultiplied) in order to get the correct display method. You will have the most luck using Straight.
The following mode can be used with the Variation shader, and nowhere else:
Uses Blend_image for objects/polygons randomly selected form an algorithm.
The Variations Shader can still work with this mode, which is otherwise not used anywhere else: Replace
It usies the unmodified blended image for random objects/polygons selected by the algorithm.
Layer Sets (e.g., in BodyPaint 3D)
Layer sets have an additional setting named Pass Through. If this mode is enabled for a layer set, BodyPaint 3D will ignor the existence of the layer set (but not its layers). The layers will then be stacked and rendered as if they were not part of a layer set.
Otherwise (other modes) the layers of a layer set will first be combined internally, including their mix modes, and mixed with the other layers as a whole with the layer set’s mix mode.