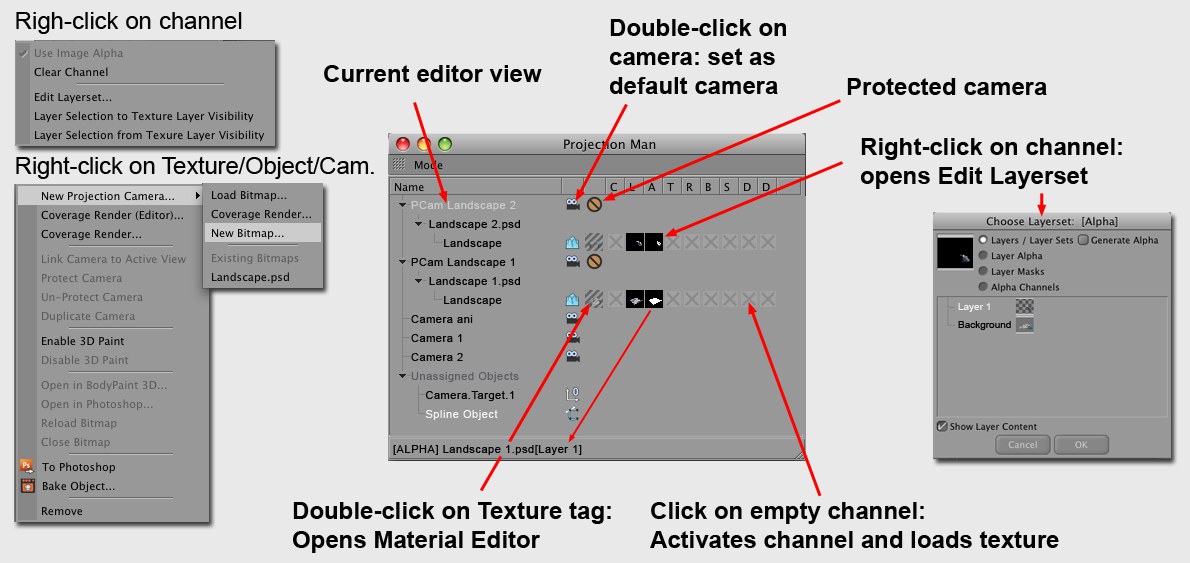
Projection Man Manager Interface

In the Projection Man Manager you will find a list of all cameras and their camera projection textures. Each texture has the object to which it is applied as a Child object in the list. This lets you quickly see which camera projected which texture onto which object. At the right of the dialog window is a list of texture channels, including a small thumbnail.
All objects that have not been textured using camera projection are listed under Unassigned Objects.
The Projection Man status bar (bottom of window) displays additional information regarding elements over which the cursor is currently being held (e.g., a texture’s directory path, the type of channel, etc.).
Objects can be dragged & dropped onto a camera (e.g., onto "Camera 1" in our example) or onto an existing camera projection texture (e.g., "Camera 1.psd"):
- Camera: A menu will open from which you can select if an existing texture should be loaded (Load Bitmap), the existing texture should be coverage rendered, a new texture should be loaded or if the existing texture should be used. If necessary, the layer selection dialog window open so you can select alpha channels for projection. Material and Material tags will automatically be created for the corresponding object.
- Texture: A layer selection window will open in which you can select the layer you want to use. Material and Material tags will be created automatically.
It is also possible to drag & drop multiple objects onto a camera. A prompt will then ask if all objects should be assigned the same layer set or if each object should receive its own layer. Confirming the latter will open a separate layer selection window for each individual object and a material will be generated for each object as well.
Objects selected in the Projection Man Manager will simultaneously be selected in the Object Manager.
Double-clicking on a camera icon in the Projection Man Manager will set the active Viewport to this camera.
On the right half of the Projection Man Manager you will find thumbnail previews of all objects textured using camera projection. Right-clicking on Edit Layerset will open the layerset selection menu with which you can quickly and easily define layers (or alpha channels or layer sets) for a multi-layer file.
Clicking on one of the empty channels (grey X) will activate it and load the Multi-Layer, on which you can right-click (Edit Layerset) to select the desired layer.