Render Queue
![]()
 The Start Rendering command is located in the Job menu.
If you worked with the Batch Renderer in the past, the new Render Queue performs a similar function but with far more available functions and more comfort.
For example:
- You can render almost any number of files consecutively without supervision
- You can easily redirect save paths, select cameras, Takes and render settings - without opening the file itself
- Extensive Render Queue configurations can be saved as presets
- Log files can be saved and viewed
- Rendered images are displayed in a preview window during rendering
- The rendering of animations (individual frames - not videos!) can be interrupted and later continued automatically at the same location
- Simultaneous rendering in the Picture Viewer and Render Queue
- Scenes can be rendered without opening them in the Viewport, which saves memory
The top part of the Queue Manager is reserved for displaying the job list. So how can scene files be added to this list?
- Using the various File menu commands.
- Per drag & drop from the Explorer/Finder/Content Browser
As soon as a file is in the job list the check box in the second column can be used to enable or disable rendering. Multiple jobs can be selected using the usual hotkeys (
Note that the Queue Manager only uses saved scenes. Scenes that are open in Cinema 4D that have been modified and not yet saved cannot be used.
If, after a while, you should encounter problems with regard to the Sleep or Log Out functions, even though Cinema 4D still has several hours to render, simply disable the option "Log out after XX minutes of inactivity" (macOS: System Preferences / Security) or extend the time allowed before you will be logged out. You can also extend the time for the "Require password XX after sleep or screen saver begins" setting.
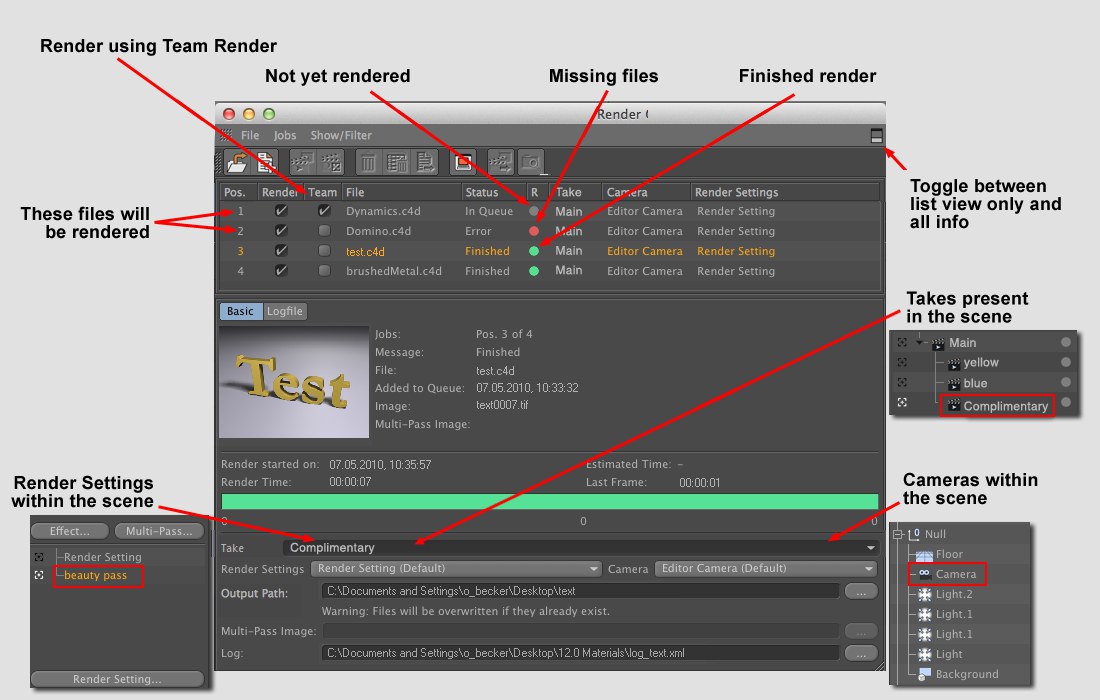
The job list contains the following information:
Pos.: All jobs are consecutively numbered.
Render yes/no: All jobs with an enabled check box will be rendered in order from the top of the list to the bottom as soon as Start Rendering is selected from the
Team: Here you can define which jobs should be rendered using Team Render.
Status R: Displays a job’s current status
In Queue/R: ready to render
In Progress: is being rendered
Take: the Take selected for rendering (this selection can be made further below in the dialog window)
Finished: render completed successfully
Stopped: render was halted before being completed
Error: error occurred during rendering
Camera: This is the scene file’s camera from which the scene is rendered (can be selected at the bottom of the Queue Manager)
Render Settings: The Render Settings with which the file is rendered. These can also be selected at the bottom of the Queue Manager.
Message: Pertinent messages are displayed here, e.g., if a file is missing, information for saving, etc.
An existing job list will be maintained even if you close Cinema 4D. The list will reappear when Cinema 4D is restarted and the Queue Manager is opened.
At the bottom of the Queue Manager you will find information pertaining to the selected job, a preview of the last frame rendered and the following settings and buttons:
This selection menu shows all Takes that are in the selected job file. The render cameras and render settings defined in the Take will be set automatically by the following two selection menus.
This drop-down list contains all Render Settings for the selected job. Select the Render Settings with which you want to render the job. By default, the Render Settings active in the scene will be used.
This drop-down menu contains all cameras contained in the selected job scene (including the Perspective view) and Stage objects. Select the camera from whose view you want to render the scene. If a Stage object is selected its animated cameras will be used.
Here you can define a save path different from the save path defined in the selected job scene. If you do not select a different save path the path defined in the scene will be used. If the Auto Renaming option is enabled, the Render Queue will check if the exact save path and name are used by other jobs and will modify the name automatically (to prevent one job from overwriting another). If the option is disabled, you have to make sure that no double file names are used. You can also set this option globally in the Preferences menu (Renderer menu) where both options will be set synchronously.
Wouldn’t is be practical if file and path names would, for example, orient themselves according to Project names or render resolutions so you wouldn’t have to change file/path names each time you change the resolution, for example, in order not to overwrite existing files? This is what the Variable Path and File Names are for. These also work in conjunction with the Protocol setting described below.
If Multi-Passes are defined in a scene (or a Multi-Pass save path) an alternative, separate Multi-Pass save path and name can be entered here.
A log file can be created for each job processed by the Queue Manager. Its save path is defined in this field. The log file is always displayed in the Logfile tab, even if the log itself is not saved. The saving function of the log file can be disabled in the Program Settings.
If a job scene is missing textures their names will be displayed here.
Information pertaining to the selected job(s) rendered, your system, the scene and the render result are displayed here. In the
In the
This button can be pressed during rendering to display the most current log stats.
From this menu you can open any Cinema 4D file, which will then be added to the job list. Files can also be added to the job list via drag & drop from the Explorer/Finder/Content Browser.
This command loads the scene currently in the Viewport into the job list. The command is also available separately in the Render Menu’s main menu (Add to Render Queue).
Use these commands to open a Project file for which either all or marked Takes will be placed into the Render Queue as separate jobs. If no Take is selected, the Main Take will be used.
Note also the Take Manager’s Render menu, which can also be used to render multiple Takes without using the Render Queue (see
Use these commands to place all or marked Takes in the currently open Projects into the Render Queue as separate jobs. If no Take is marked, the Main Take will be used.
If you have modified the path, cameras and/or Render Settings at the bottom of the Queue Manager this command will reset the corresponding element to its saved state in the scene.
Complex (and of course less complex) Queue Manager configurations can be saved as presets in the Content Browser (Presets/User/Queue Manager Preset) and accessed at any time.
Starts the render process for all activated jobs in the order in which they are listed.
Stops the render process. The process can be restarted using the previous command. Partially rendered movies will, however, be rendered again from the beginning (as opposed to individually rendered images, whose rendering will continue from the point at which it was halted).
Deletes all selected jobs from the job list.
Deletes all jobs from the job list.
Loads all selected scenes into Cinema 4D where they can subsequently be edited. Don’t forget to save the scene so the Queue Manager can render the most current version of the scene.
If enabled, render jobs that are missing textures (and only these) will be stopped. The Queue Manager will automatically continue with the next job. If disabled, jobs will be rendered despite any missing textures.
Use this option to check if any textures are missing (if the option is enabled, an error message will appear in the Jobs List) when loading new Jobs. Since looking for textures can take a long time – depending on the Project – this option can remain disabled. The Project will still be rendered.
Calls up the Preferences for the Queue Manager.
Displays the finished image/image sequence in the Picture Viewer.
Jumps to the rendered images in the Explorer (Windows) or Finder (macOS).
Jumps to the finished Multi-Pass images in the Explorer (Windows) or Finder (macOS).
Opens the log file (the same one displayed in the Logfile tab) of the selected job in your system’s default browser.
Filter Log
Here you can define which information should be shown in the Logfile tab. The System information is for the most part of less interest. You can simply disable this display.