Sculpting Layer Manager
![]()
A main advantage of Sculpting is the ability to work non-destructively in layers that can be disabled (steplessly) at any time. Sculpting layers (in the following referred to simply as Layers) can be compared in their function to those in BodyPaint 3D or Photoshop for 2D bitmaps, only that the Sculpting layers work additively.
 The lines on different Layers are additive.
Sculpting is basically nothing more than moving object points (primarily raising and lowering but also planar) on a base object. For example, one Layer can raise a point by 5 cm and another Layer can lower the same point by 7 cm. If both layers exercise their full influence simultaneously, this point will be lowered by 2 cm.
Get accustomed to begin sculpting on newly created Layers (instead of working on the base object directly).
Basic information about Layers:
- Make major sculpting changes on Layers with less subdivision.
- When a new Layer is created it will always (and permanently) be assigned the current subdivision level (Level value).
- Layers with different subdivision levels will continue their effect if the subdivision level is changed, i.e., if you have sculpted details at a higher subdivision level and subsequently switch to a lower subdivision level, these details will still be visible (rougher, according to the Level value defined). This also works vice-versa, for example if you make wide-ranging changes using the Grab brush, these changes will still be visible at a higher Level setting.
- Even though brushes only affect the active Layer they also include all visible elements. Let’s say you have a fine skin structure on Layer 6 and a mole on Layer 7. If you apply the Smooth brush to Level 7, the skin structure will also be affected visually (even though Layer 6 will not be modified). If you want to apply the Smooth brush to the mole only, hide Layer 6 first.
- The Base Object Layer is a special layer – and the only layer – on which sculpting can take place in all subdivision levels. This Layer cannot be moved via drag & drop (and also not placed into a folder) and cannot be deleted (except for the contents itself). Use the
 Flatten
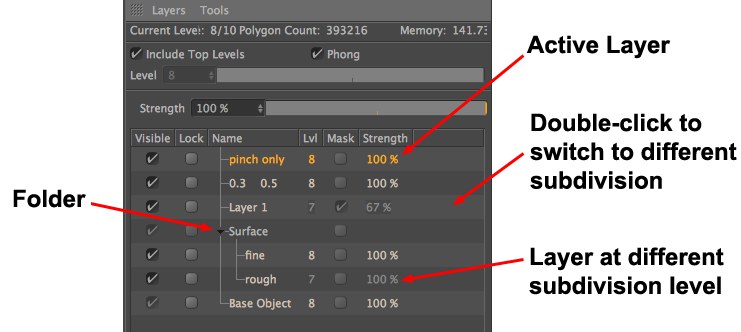
The Sculpting Layer Manager lets you create, re-arrange, rename and select Layers as well as anything else that can be done with Layers.
The first line contains information about the currently selected Sculpt object (or multiple selected objects). The same information is displayed in the HUD at the top right of the Viewport. Note that the memory requirement only applies to Sculpting, other parts of Cinema 4D are not included.
 At subdivision level 6 the left brush stroke was made with this option disabled, the right stroke was made with this option enabled.
Use this option to enable or disable the display of subdivision effects greater than that of the current subdivision level.
To better understand how this function works, imagine a Sculpt object in which you have sculpted numerous very fine details at a high subdivision level (like the example above at a Level setting of 9). If, for example, you switch to Level 6 and paint on a material using the Wax brush you should first disable the Include Top Levels option to avoid the details at level 9 from being affected by the Wax brush (this would otherwise produce unwanted changes when you switch back to 9).
 Left: Phong option enabled; right: Phong option disabled.
Sculpting uses its own Phong shading, which works independently of the standard Phong tag (this tag will be grayed out when a Sculpting Phong tag is used). This Phong shading can be disabled. This is a practical feature because the entire mesh can be made visible (and you can increase the subdivision, if necessary), which can be useful if you want to edit very fine regions.
This value represents the respective level of subdivision. You can switch back-and-forth between Level 0 and the maximum subdivision (which can be increased using the Subdivision button) at any time.
When sculpting across expansive surfaces with large brushes a lower Level should be used; when working on detailed regions a higher Level should be used because you will be working with a higher subdivision.
Any number of Layers can be created for each Level. These will affect only that Level and will be disabled for interactive sculpting at other Levels.
A Level can also be modified as follows:
- Using the Increase and Decrease commands located to the left of the Sculpting Layer Manager.
- By double-clicking on an empty area to the right of the Strength column in the Sculpting Layer Manager. You can then jump to the desired Level.
Use this setting to steplessly adjust a Layer’s influence. A value of 0% will disable the Layer’s influence, a value of 100% will maximize the Layer’s influence.
In the layer list you can re-arrange Layers per drag & drop (the Layer order is irrelevant) and do the following in the respective columns:
- Visible: Switches the Layer’s visibility on or off (same as 0% or 100% Strength value). Folders, Base Objects and Layers with different subdivision levels cannot be switched on or off.
- Lock: Enable this option to protect a Layer from inadvertently being modified (they can, however, still be deleted!).
- Name: Double-click on the Layer’s name to rename it. Press
Enter to confirm.
- Level: Displays the subdivision level for a Layer
- Mask: Enables or disables masks
- Strength: Defines the strength of a Layer. Double-click on the value to enter a new value or use the Strength slider at the top of the Sculpting Layer Manager to adjust the value.
- Empty column: Double-click on the empty column to set Level to the corresponding Layer’s subdivision level.