Team Render
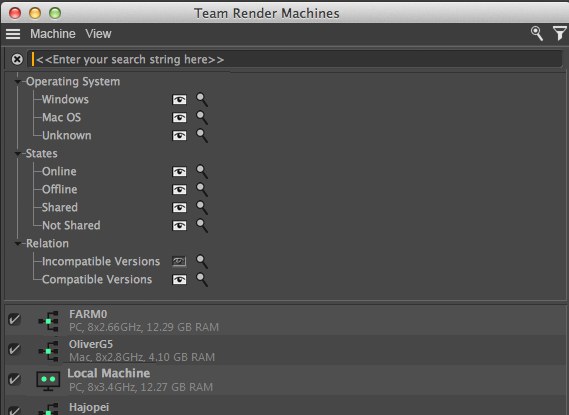
 All verified (green) computers can take part in rendering. Search bars and filters are shown in this image.
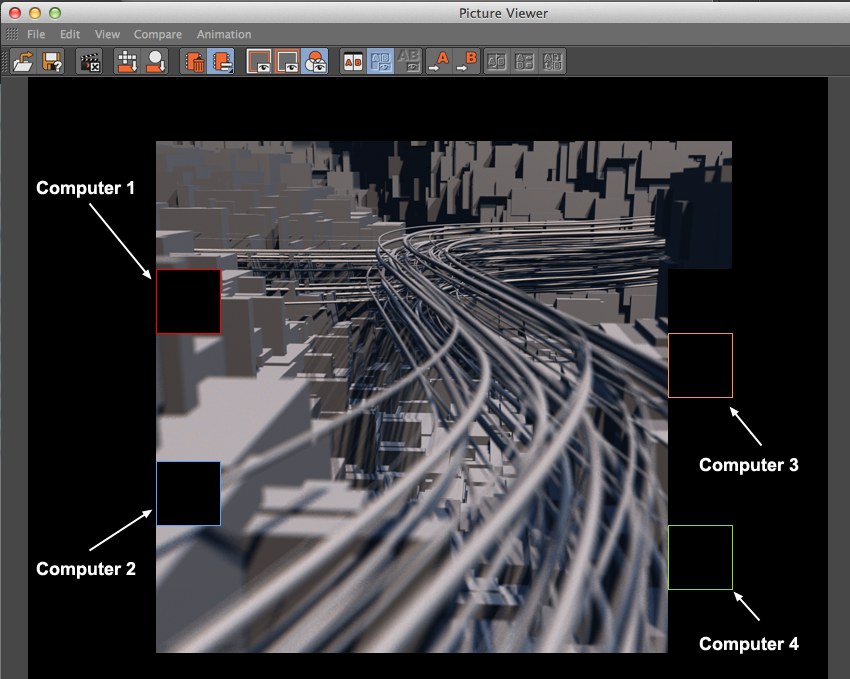
With Team Render, you can quickly and easily render on multiple computers (on which the same version of Cinema 4D must be installed) across a local network with the click of a button. These computers can not only be used to render animations but can also be combined to render a single(!) image:
 4 computers are used to render a still image (differently colored Buckets via
 If Team Render is used to render an animation, each client computer will render one entire frame of animation at a time.
If you have at least one Team Render client installed via the installer, this entire program directory can be copied to other computers without using the installation medium.
If desired, a Team Render server can be started that makes the Team Render functions available per remote control via a website. More information is available under The Team Render Server.
Proceed as follows to render using Team Render:
- Make sure that the Enable Team Render option is enabled in the Preferences menu.
- Select the Team Render Machines command from the main
menu. - In the window that opens, all computers located within the local network will be displayed. Right-click on the computers you want to use and select Verify. Enter the Security Token (which can be defined individually for each computer) and click on OK. The check box at the left of each computer must be enabled to use it for Team Render.
- Select the Team Render to Picture Viewer option from the main
menu. Done (note that the Projects/textures must first be distributed to the computers, which can take a while in some circumstances).
All you have to do now is wait. Once the Project file has access to all textures/XRefs/Assets or other external files, they will automatically be distributed to all computers and rendering will begin.
In the following description, numerous references are made to servers and render clients:
- Server: The computer from which the Team Render rendering is initiated This can be a normal installed version of Cinema 4D or a Team Render server.
- Render Client: The computer(s) to which the server sends render jobs via Team Render (this can be a regularly-installed version of Cinema 4D or a Team Render client installed via the installer).
- Server and render clients must have the same software versions.
- All corresponding plugins and other elements (e.g., Houdini versions, if used; in short, all third-party software needed for rendering the scene) for a given Project file must also be installed on all render clients.
- The following applies to rendering stills: The faster an image’s Buckets can be calculated by a single computer, the less sense it makes to use Team Render. Why: Each rendered Bucket is sent across the network to the server. If the frequency with which the rendered Buckets arrive is too high, the traffic overhead on the network will simply be too great and will actually slow rendering. Even if a still requires only a few seconds to render, using Team Render will NOT speed up rendering for the same reason.
- A similar problem as described above occurs if you render animations that are very long and whose individual frames are rendered very quickly. It may appear that individual machines are no longer taking part in the rendering even though the job is still running. This is correct because the actual rendering is indeed finished but the server is still processing the Clients’ images.
- A fast TCP/IP network is recommended because the amount of traffic back-and-forth between server and render clients can be immense. Surprisingly high amounts of traffic can be generated in particular when sending various cache files in conjunction with GI over the network (example: a test render of a still on 3 computers with activated Irradiance Cache and Light Maps can generate 500 MB of traffic (or more) - with a render time of only 50 seconds).
- In heterogeneous networks with different computers (in particular different CPUs), differences can occur when calculating various effects such as video textures (different video frameworks) particle streams, cloth, hair, Dynamics, Delay Effector or GI. Particles will in part be rendered at different locations on various computers. The reason for this is the differing calculation precision of each computer’s math units (FPU - Floating Point Unit). Some calculate earlier than others. Generally speaking, effects should be baked for such projects. This problem can generally be eliminated by using computers with exactly the same configuration - this will produce identical results for a single scene. Cache files can be uploaded to the Team Render server for GI calculations (see also GI and animation).
- Projects that use the Irradiance Cache (Legacy) function cannot be rendered using Team Render. If an attempt is nevertheless made, a warning will be displayed after which the current Irradiance Cache function will be substituted and rendering via Team Render will continue.
- For performance reasons, the use of WiFi in conjunction with Team Render is not recommended. Team Render can generate a high amount of traffic, which can lead to bottlenecks when using multiple computers to render via a single WiFi network.
- Note that the entire Project must be loaded and processed even when rendering a very small section of an image (in case you’re thinking about using that old computer you have standing around with 2GB of RAM …). A faster computer can have multiple buckets rendered by the time that dusty old computer is even up and running with Team Render.
- If a rendering animations in the Render Queue is stopped it wil continue when the render job is restarted. However, Cinema 4D must have saved the previously rendered images to a save path so they can be found by the Render Queue.
- When rendering video files, make sure that the correct codec versions are installed on the server (the Format setting is the decisive setting).
- Enough hard drive space must be available on the render clients for rendering (e.g., Project files, textures, GI cache files and extra space for virtual memory requirements). If less than 2 GB are available, the Render Client will abort rendering with an error message (however, if less than 3 GB are available, a warning message should already have been displayed).
Where are the Team Render settings located?
- In the
menu: Team Render Machines - In the
menu: Renderer/Team Render - In the
menu: Team Render - A render job can be defined for Team Render in the Render Queue’s Team column.

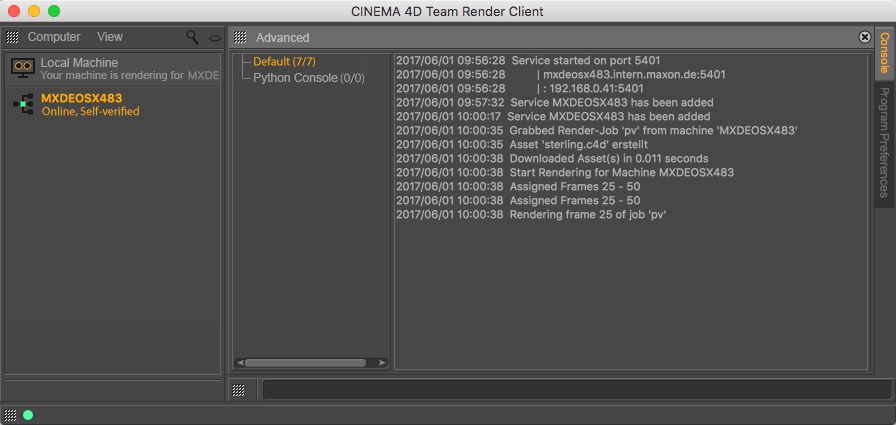
The installer can be used to install Cinema 4D instances solely as render clients with a reduced GUI. These instances will only consist of the list of machines (see also The Team Render Machine List) a console and selected commands such as Preferences, Help, Update, etc. These functions should already be familiar to you from the normal Cinema 4D installation.
Note that warning and error messages are also displayed in the console. This can include messages regarding missing textures, full hard drives, etc. (these are, by the way, the same prompts that can be found in the Render Queue’s Log file).
These render clients can be restarted from the server (right-click on a render client in the server computer’s Team Render Machines list and select Restart Client).
This information will in part be displayed in the Jobs and Network logs. Note that they will, for the most part, be in English (and in some cases in the language of the operating system you’re running, e.g., for error messages).
Note also that the render client will at least list the Team Render server in green (currently, render clients can only be verfied by the Team Render server and the machines list only serves informational purposes). Any parallel render clients that may be present will NOT be listed here.
The Python field below is not a special Team Render function but is a general access point for the Python API (details regarding Python can be found at http://developers.maxon.net).
Easy connection of multiple render clients with the server
If you want to automatically connect multiple render clients with the server without verification, create a text file named ,c4d_net_server.txt’ with the following content:
Server address:Port:;server’s security key
This would, for example, look like this: 192.168.0.45:5402;abcde, whereby the IP address can be replaced by the host name.
Place this text file in the same directory as the Cinema 4D Team Render Client executable file. When the render client is started, it will automatically connect with the server (which must already be running). Using this text file can save you a lot of time, e.g., when connecting dozens of render clients.
If you do not want to create this text file yourself you can use the Save Server command described below.
Render clients use the following specific commands:
This function can be used to save the server to which the render client is (or was) assigned in a text file named ,c4d_net_server.txt’. This text file is the same as described above but might have to be supplemented by a security token (a prompt will appear if this is required).
This command can be used to load the text file if you do not want to save it in the Cinema 4D program directory.
The following functions are not supported by Team Render:
- Stereoscopic rendering
- Sound rendering
- Sub-Frame Motion Blur (previously known as Scene Motion Blur) for single image rendering
- Vector Motion Blur post effect for single image rendering (the Motion Vector Multi-Pass function DOES work)
- For PyroCluster projects, inconsistent results can be produced when using a non-homogenous network
- The Viewport Renderer is not supported.
- If a Spline shader is used in conjunction with fonts, problems can occur if render clients are running on different operating systems that don’t have the exact same fonts installed.