TP Settings
![]()
To unleash the power of Thinking Particles, you will frequently need to use particle groups. This is the place to create them. In addition, you can define global and local settings for the groups, including how a group’s particles are represented in the viewport.
To take full advantage of the power of Thinking Particles you should always try to work with particle groups. Particle groups enable you to achieve extraordinary control over your particle effects.
For example, suppose you have created a shoal of fish from a single emitter and these fish are swimming together. Suddenly predators arrive on the scene and you want to separate the shoal into two smaller shoals that dart away in opposite directions. Particle groups give you an easy way to achieve this.
Assign half of the fish to one particle group, the other half to another group, then send the groups in opposite directions. This is just one simple example of the countless uses of particle groups. Whenever you want to treat some particles differently to others, you probably need to use particle groups. The Thinking Particles Settings is where you create these groups.

In the Thinking Particles Settings, you can also check information such as the total number of particles in a particular group at the current frame, or change how particles are displayed in the viewport and more.
To access the Thinking Particles Settings:
From the main menu, choose Simulate / Thinking Particles / Thinking Particles Settings.
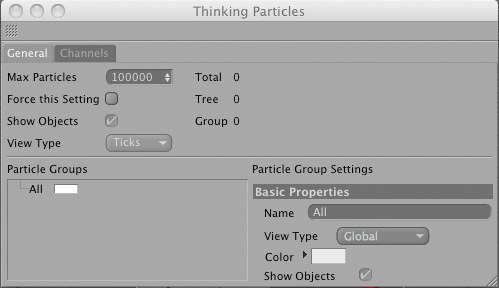
Choose how particles are represented in the viewport and whether objects used as particles are shown. On the General tab you will also find information such as the total number of particles and the number of particles in each group at the current frame.
The number of particles that exist at the current frame — a total count of all the particles in all of the groups.
The number of particles in the currently selected branch of the particle tree. A branch is a hierarchical level within the Thinking Particles group system. See also Particle Groups, below.
Shows the number of particles that currently belong to the selected group. See also Particle Groups below.
Defines the maximum number of particles that can be generated. This setting helps you to prevent situations where you accidentally create so many particles that your computer system simply cannot cope with them all!
This parameter is a global setting that controls how the particles are represented in the viewport. The particles can be shown as flakes, dots, ticks, drops, boxes or they can be hidden.
The View Type setting has no affect on how the particles will look when rendered. It is purely a visual aid to help you recognize the particles in the viewport. However, each particle group has its own settings and may use a different view type to override this global value. For more information on these settings, see Particle Groups, below.
Enable this option if you have used an object for particles and you want the particle objects to be shown in the viewport. Keep in mind that hundreds of complex objects may slow down the viewport’s refresh rate. This value is a global one that may be overwritten using settings of each particle group. For more information on these local settings, see Particle Groups, below.
Each particle group has its own display settings that usually override the global View Type and Show Objects settings described above. However, sometimes it can be useful to force all particle groups to use the global settings.
For example, suppose your scene has 20 particle groups, each with its local Show Object setting enabled (you access these local options by choosing Settings from the particle group’s context menu). To speed up the viewport’s refresh rate, you decide to hide the particle objects. Although you could disable Show Object for each particle group, it’s quicker to disable the global Show Objects setting and enable Force This Setting. All groups will then be forced to use the global value.
Using separate particle geometries
Certain particle groups can also be assigned to geometry objects. This is necessary if, for example, if only a specific group should be affected by PyroCluster. To do so, two (or more) particle geometry objects must be created and different groups must be assigned to them. The geometry object whose particles should be displayed using PyroCluster will then be assigned the PyroCluster material.
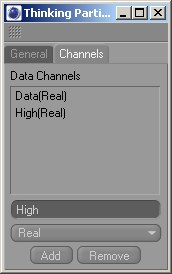
Here you can create data channels that will enable you to pass custom values to the Thinking Particles expression.

You can pass your own data to a Thinking Particles effect via data channels. These operate in the same way as the user data ports of XPresso Expressions.
You can add data channels as ports to PGetData nodes and PSetData nodes.
The data types available are the same as those for XPresso – please refer to your Cinema 4D reference manual for a description of these data types. To remove a channel from the list, select the channel and click Remove.
You can also use XPresso’s user data ports to pass values to the expression.