File Menu
This command opens a new project and makes it the active (current) project. Until you save the new project and give it a name, the title bar of the project window will show Untitled. If you have several projects open, you can switch between them using the main Window menu.
This command loads a file (a scene, a material, etc.) from a storage device (such as a hard disk) into memory and opens it in a new project window. If the current project window is empty, this is used instead.
You can also use the Open command to import files (see the Import filters in the preferences).
Recognition of these formats is automatic. Filename extensions (Windows) are superfluous, as are types and creators (Macintosh). You can also use this command to view images or load other settings. Alternatively, you can open a file by dragging it in the Explorer (Windows) or the Finder (macOS) onto a viewport.
This command lets you add scenes, objects, materials, etc. to the active project.
When merging scenes that use special render effects (e.g., HAIR, Sketch and Toon), make sure to activate these effects in the current scene as well. This will not be done automatically (however, related Assets in relative paths must be copied manually)!
Merging Projects, including Takes
Let’s say you have an opened Project with Takes to which you want to merge another Project that includes Takes. How can these Takes be combined?
When a Project containing Takes is merged, the following prompt will appear: Do you want to reassign included Takes?.
You have three options from which to choose:
- Yes: The dialog window below will open
- No: The merged Project’s Takes will be ignored
- Cancel: The Merge function will be aborted
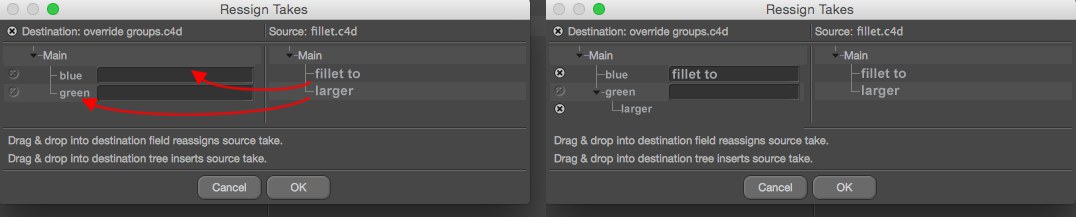 The Takes listed on the right can be dragged to two locations.
There are two ways Takes from a Project being merged (shown at right) can be incorporated into a Project with existing Takes:
- Drag the Take into the hierarchy in which you want it to lie.
- Drag the Take into one of the linked fields, i.e., the overridden settings of file being merged will be integrated into the respective Take. In both cases the assignment type will be represented by a corresponding icon (at right of image).
This simply means that, for the first method, the Take will remain unchanged, including its name, and that it will be incorporated in an existing take with the second method.
The small x icons can be used to delete the respective assignment (which will anyway first be confirmed when OK is clicked).
This command reverts the scene to its most recently saved version. Because you will lose any changes made to the current project since it was last saved, a dialog first checks that you want to revert to the saved version.
Closes the active project. If it contains any unsaved changes, a dialog opens to check if you want to save the scene before closing it.
Closes all open projects. If any projects contain unsaved changes, a dialog opens to check if you want to save the scene before closing it.
This command saves your project without first opening the file selector. The scene is saved using the name chosen when you selected the Save As command (i.e. the name that appears in the title bar). If this is the first time you are saving a new project and it does not have a name yet, then the Save command behaves just like Save As.
Save As always opens the system file selector. The filename you enter here will be displayed in the project window’s title bar. Cinema 4D automatically appends the appropriate extension (.c4d for scenes) to the filename.
Each time a file is saved using this function, a new file will be created, numbered sequentially in ascending order. An unlimited number of copies can be saved (at least until your hard drive is full).
If a file name is sequentially numbered, e.g., xxxxx001, this number will automatically be recognized and subsequent files named accordingly (xxxxx002, xxxxx003, etc.).
This function saves all open projects. If a scene has not yet been saved (and therefore is untitled), the appropriate system file selector opens for you to choose a name and path.
Transferring scenes from one computer to another is always particularly challenging for a project leader. Selecting this command opens the usual system file selector for saving files. Choose a folder and enter a name. Cinema 4D creates a new folder in the specified path and saves the scene there. In addition, it may create an additonal folder (e.g., named ,tex’ or ,vol’, depending on the file type), into which it copies all the files necessary for rendering the scene. You can now move the project to another system.
If it is discovered that assets are missing upon executing the command, a dialog window will open (Asset x cannot be found. Do you want to select a path?) with the following options:
- Yes: A file selection window will open in which you can select the missing asset. If other missing asets are located in the same directory, they will be found automatically.
- No: The current assed will be ignored, i.e., will not be copied.
- Cancel: The command will be terminated. Files already copied will be maintained, those not yet copied will be omitted.
Note also the Project Asset Inspectir, which can display all missing assets.
Use this option if you want to save a Cinema 4D project for use with third-party applications (those in which the .c4d file format can be opened). Polygon copies created by geometry generators and material properties will be saved within the file. Details can be found under Cineware.
This command will be made available if you have Allplan 2008 installed on your computer. A temporarily cached file will be created that will open the currently open Cinema 4D in Allplan. If Allplan is not running, the application will be started automatically. See also Save Polygon Objects for Melange Exchange.
Cinema 4D remembers which files you have opened recently and lists them on this sub-menu for quick access. Define the maximum number of files listed in Edit / Preferences (Files page).
This command will quit Cinema 4D and free the license (see also Lizence Manager). For example, if you have 2 licenses running on 3 computers, Cinema 4D should always be quit using this command so the license can be used by another computer.
When Cinema 4D is restarted, a free license will be requested immediately (contrary to the ![]() Sign-Out
Sign-Out
Note for mac users: This command can be found under Cinema 4D if the main mac menu is enabled.
File / Quit quits the program. If any unsaved changes are detected, a dialog asks you if you wish to save these before quitting. Clicking on Cancel in this dialog returns you to the program.