Hair material
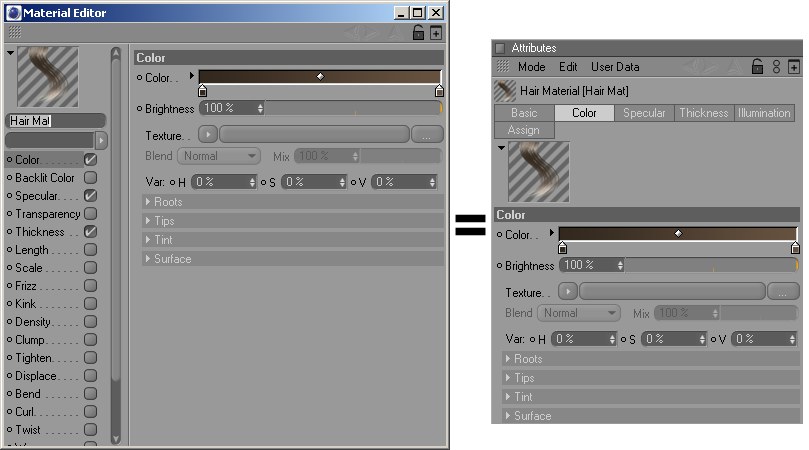
Just as with other materials in Cinema 4D, the Hair material can also be edited in either the Material Editor window (double-click on the Hair material) or in the Attribute Manager. The Material Editor is used for the following descriptions and screenshots.
A Hair material is made up of numerous material channels. You can activate or deactivate these channels to your heart’s content, and see what all you can create! When you click on a material channel, its properties will be made visible on the right-hand side in the Material Editor. As you can see in the image above, most channels also contain settings within menus that can be opened and closed (e.g., Roots, Tips, Colors, etc.). Clicking anywhere on the corresponding bar will open or close that menu.
At the top left of the Material Editor you will see a preview of the Hair material. This preview works similarly to the normal Cinema 4D material preview.
Hair materials offer the following additional menu items (right-click on the preview image):
- Quality: Select Low, Medium or High for the quality of your preview image. The higher the quality, the longer the preview will take to generate.
- Strand: Uses a strand of hair as a preview image.
All Hair channels are described here.
In most cases, the Hair material will be automatically assigned to the Hair object if you use the Create Hair command to grow hair on an object or selected item. The thickness of the hair and its style will then be influenced by the guides.
The Hair material can also be applied manually to the following types of objects:
- Hair ‘s own Feather object.
- Geometry, i.e., primitives such as cubes, spheres, etc. and polygonal objects. The Hair material will then behave like fur. The amount of hair and length is then adjusted using the Render tag.
- Splines: These will then be treated as individual hairs.
- Emitters: The particles will be treated as individual hairs. Used in conjunction with the Render tag, you will have several additional settings at your disposal. If you use Thinking Particles, the Hair material must be assigned to the TP Geometry object.
A Hair material with numerous Hair channels applied to an object requires a projection type. First, determine which of the following applies:
- In every channel into which a texture can be loaded, the texture needs to somehow be projected onto the surface on which the hair is to grow, in order to be able to maintain control of all applicable settings (e.g., the Volume channel / texture, where the volume of the hair is defined). UV Projection should always be used. If several UVW Tags exist, you can, in the Hair object’s Advanced Tab, drag the corresponding UVW tag into the UV Tag field. Otherwise, the first UVW tag (at the top left of the Object Manager) will be used.
- Several channels let you project the texture directly onto each individual hair (e.g., the first Texture in the Color channel). Since the hairs don’t actually possess UV coordinates, the result can first be seen when they are rendered. You can find out more about this topic here: Hair Material tag.

A Hair object can be assigned several Hair materials by simply dragging and dropping the Hair material from the Material Manager onto the Hair object in the Object Manager. Each time, a Hair Material tag (see Hair Material tag) will be created that defines how the Hair material is blended.
The Hair material channels will always be applied in the following order:
- Thickness
- Curl
- Bend
- Displace
- Kink
- Frizz
- Wave
- Twist
- Tighten
- Straighten
- Clump
- Length
- Scale
This applies only to the channels listed above and not to other channels.
Is the order in which the above channels are applied important? Well, it’s similar to the Cinema 4D Deformation objects – a different sequence would lead to a different result.
Although this sequence cannot be changed, there is a trick you can use to work around this, if necessary:
Let’s say you decide you want to apply Frizz before Bend is applied. To do this, you need two materials - one with Frizz active, and Bend deactivated, and the other with Bend active, and Frizz deactivated. Apply both materials to the Hair object. In the Hair Material Tags that are subsequently created, deactivate the Use Available option for each tag. This lets each tag have an equal effect on all hairs.
A deciding factor for the order in which channels will be applied is their placement in the Object Manager. The left-most Hair material will be applied first.
Editing Parameters Using Function Graphs and Textures
Hair materials offer two basic methods for editing, which apply to almost every channel.
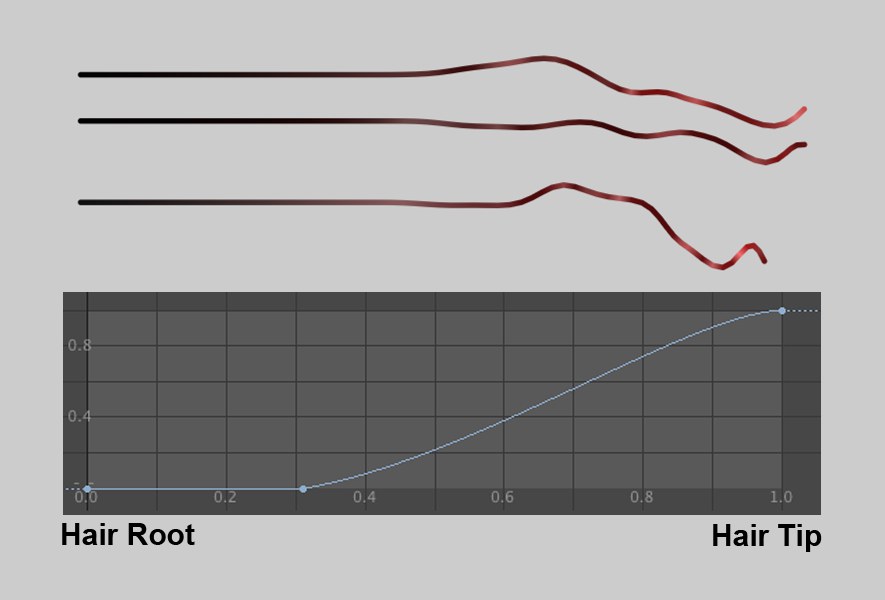
Function graphs can be used to adjust the strength of a channel’s influence along the length of the hair. The left end of the graph represents the hair root, the right end represents the tip of the hair. In the example above, the Kink of the hair was defined using the curve. The left half of the curve has a value of 0, i.e., the hair remains straight. The curve’s value increases on the right, resulting in the hair being influenced by the Kink more and more towards the tip. Often, such a curve will have a separate parameter which lets you set a maximum value for a channel.
Several function graphs have both a negative and a positive range. In this instance, a null-curve will result in a straight hair at mid height.
 In this example, the Hair material channel Kink is defined using a texture.
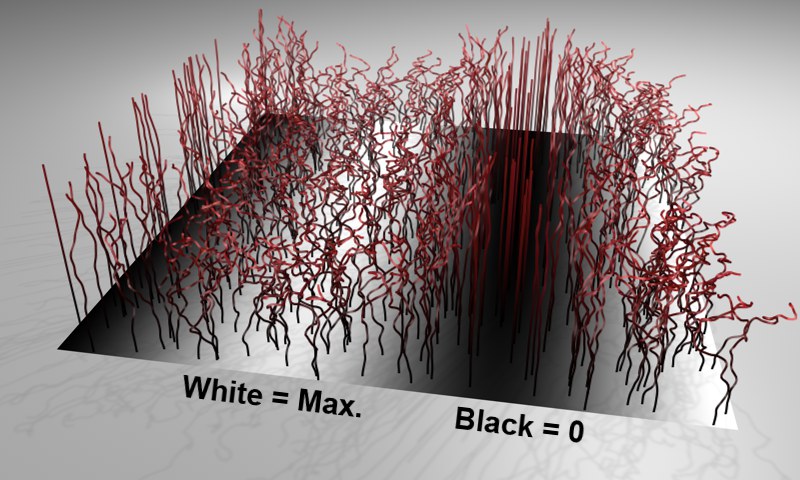
Most channels can also be controlled over an entire surface using a texture (vertex maps can even be painted!). Such a texture is always assigned to a setting that defines a maximum value that can be applied. In most cases, only the a shader’s or bitmap’s grayscale will be used.
- White = maximum
- Black = minimum (0)
- Anything between black and white will be defined according to its respective value.
The only exception: In rare cases, the RGB values will be utilized to define direction (e.g., Displacement channel: Direction).