File Menu
A dialog opens when you select this command. Use the dialog to select the bitmap file you wish to load.
BodyPaint 3D can open and load as a texture all formats listed in the Image Formats. The following formats can be loaded and saved with layers:
- .bp3
- .tif
- .psd
When in Projection Painting mode, this command can be used to save the Layer Manager’s temporary layers (use a common format such as .psd or .b3d). Several additional layers will be created, such as a complete copy of the 3D view, which will make navigating the file in an external application easier.
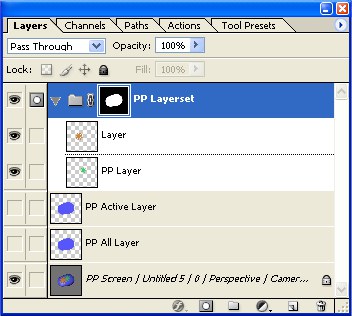 A texture created in Projection Painting mode and saved as a .psd file. All layers, except those in the PP Layerset are merely help layers that make working in Photoshop easier. Once the file is imported back into Cinema 4D/BodyPaint 3D via Load Textures, the layers in the PP Layerset will be loaded as temporary layers in the Layer Manager.
This command reverts the current texture to its last saved state. Any changes made to the texture since it was last saved will be lost; a dialog will ask you to confirm the action.
These commands remove either the active texture or all textures from RAM. If a texture’s current state has not been saved, a dialog will appear to offer you the chance to save it.
Save Texture will save your texture without a dialog appearing. That is, unless you are saving the texture for the first time, in which case a dialog opens so that you can specify the filename and folder for the texture. At the right you will see a button for modifying image format settings (details about these formats and their settings can be found here).
When you select Save Texture As, a small dialog will open.
Use Save File As to specify the texture’s file format.
Once you clicked OK, a dialog will open to allow you to specify the filename and save path.
The following formats can be loaded and saved with layers:
- .bp3
- .tif
- .psd
You can find out more here: Projection Painting and the Layer Manager.
You can use this command to save a copy of the current texture. Note that the current texture’s name in RAM and in the material channel is not changed in the process. This is in contrast to Save Texture As.
Use this command to save all the textures. If any of the textures are being saved for the first time, the following process is repeated for each new texture:
- A dialog opens. Use the dialog’s drop-down list to specify the file format for the texture and click OK.
- A dialog will open to allow you to specify the filename and save path.
This command is located in the Texture / Texture menu. Use this command to load external image files as layers. The best results will be achieved when loading Photoshop files are loaded.
If you are using BodyPaint 3D with 3ds max, LightWave 3D, Maya or Softimage, this command sends the painted scene back to that application.