Highlights
Highlights are added where the rendered pixels are brighter than the Threshold value. 100% represents bright white (RGB 255/255/255). Values greater than 100% restrict the highlights to non-clamped colors (i.e. colors brighter than RGB 255/255/255).
Note that non-clamped colors are no brighter on screen than pure white. However, restricting effects such as highlights to these colors enables you to achieve a sense of intense light in your pictures.
Keep in mind that if you set the value too high, the threshold may not be reached and, as a result, no highlights will be added.
Minimum Flare Intensity [0..+∞%]
Maximum Flare Intensity [0..+∞%]
These parameters define the intensity of the highlights. The intensity is calculated dynamically based on the brightness of the rendered pixels. The higher you set the Minimum value, the more intense the highlights will be, although never brighter than the value for Maximum. The intensity also affects the size of the highlights. Try various settings and adjust them as desired.
Defines the overall size of the highlight effect.
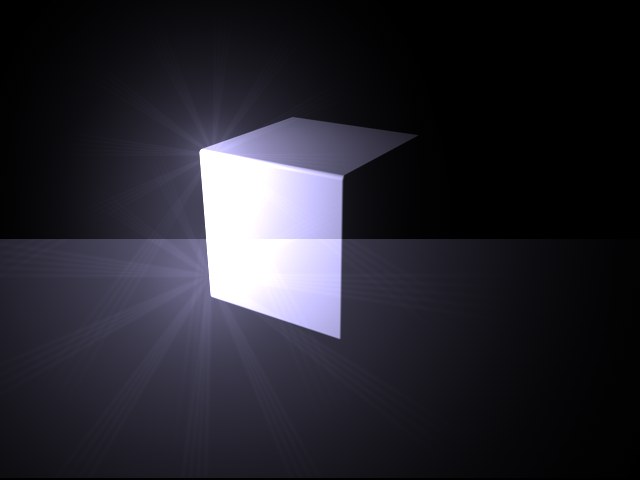 Two flares of different Flare Size on the same object.
Here you can choose the type of highlights that will be added to the rendered picture. To edit the chosen type, click the Edit button. The Glow Editor will open, the parameters of which are described below.
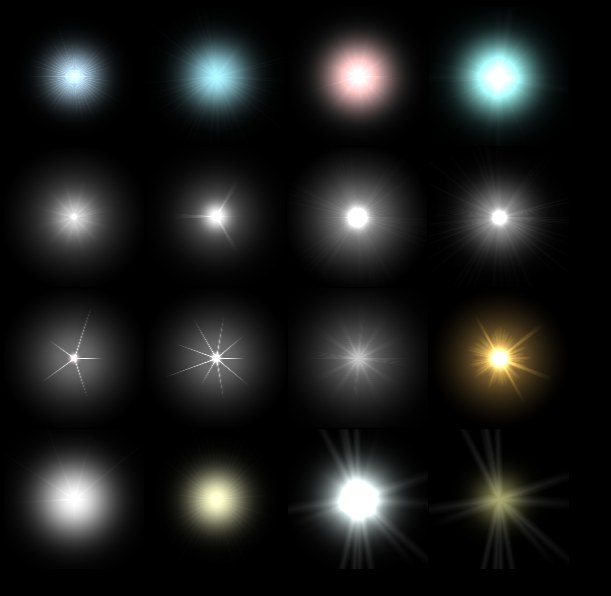 From top left to bottom right: Fine Regular, Fine Random, Wide-angle, Zoom, Camcorder, Searchlight, Streaks 1, Streaks 2, Star 1, Star 2, Flashlight, Sun, Broken Star, Fine Yellow Star, Soft Streaks 1, Soft Streaks 2, Blue.
A preview of the Highlight.
The Object ID corresponds to the object buffers defined in the Compositing tag.
Suppose there are two objects in the scene and you want each object to use its own highlights settings. In the render settings, on the Effects page, add the Highlights post effect twice. Set the Object ID to 1 for the first effect and to 2 for the second effect. Assign a Compositing tag to the two objects and enable Buffer 1 for the first object and Buffer 2 for the second.
Each object now has its own Highlights post effect.
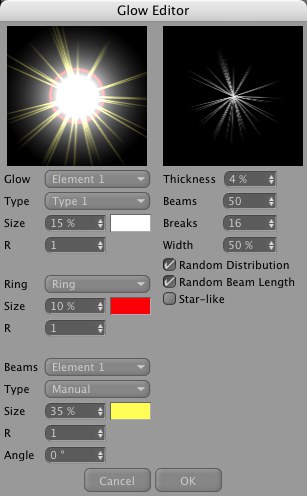
Using the Glow Editor, you can edit the various properties of the highlights such as the ring elements, beam colors and number of beams.
There are four main areas in the Glow Editor dialog: one area for the glow itself (top left), one for the surrounding ring (Ring, center left), one for beams (bottom left) and one for the type and look of the beams (top right).
Glows consist of separately editable elements. Use the drop-down list to choose which element you want to edit.
Choose a glow type for the element from the drop-down list. This defines the distribution of brightness for the element.
Here you set the overall size of the glow element as a percentage of the screen’s size. A value of 100% represents the distance from the center of the screen to the edge of the screen.
This value defines the aspect ratio for the glow. A value of 1 results in a circular glow, whereas values greater or less than 1 produce a horizontal or vertical ellipse.
To set the color for the glow element, click the box to the right of Size. The color picker for your operating system will open. Pick the desired color.
Choose one of the following Ring settings from the drop-down list: Inactive (no ring), Ring (set the ring’s color via Color, described below) or Rainbow Ring (multi-colored ring).
Here you set the overall size of the ring element as a percentage of the screen’s size. A value of 100% represents the distance from the center of the screen to the edge of the screen.
This value defines the aspect ratio for the ring. A value of 1 results in a circular ring, whereas values greater or less than 1 produce a horizontal or vertical ellipse.
To set the color for the ring element, click the box to the right of Size. The color picker for your operating system will open. Pick the desired color.
Beams consist of separately editable elements. Use the drop-down list to choose which element you want to edit.
Choose a beam type for the element from the drop-down list. This defines the distribution of brightness for the element.
Here you set the overall size of the beam element as a percentage of the screen’s size. A value of 100% represents the distance from the center of the screen to the edge of the screen.
This value defines the aspect ratio for the beam element. A value of 1 results in a circular shape, whereas values greater or less than 1 produce a horizontal or vertical ellipse.
To set the color of the beam element, click the box to the right of Size. The color picker for your operating system will open. Pick the desired color.
To rotate the beam element to a particular angle, enter the value for the angle here.
Defines the width of beams as a percentage. The lower the value, the narrower the beams will appear.
Defines the total number of beams. Up to 200 beams are allowed per light source.
Add breaks to the beams by entering the number of breaks here. The breaks are added to the gaps that already exist between beams. Use the Width parameter (described below) to control the size of the breaks.
Defines the size of breaks.
For a random arrangement of beams, enable this option.
Enable this option if you want the lengths of the beams to be varied.
To have the beams arranged in a star-like pattern, enable this option. The beams will become thicker towards the center. For a realistic star, use a low number of thick beams.
- Problems may occur in areas where highlights are seen in reflections or behind transparencies.
- The Highlights filter cannot be used with PyroCluster or the Depth of Field post effect.