Substance Asset Manager
![]()
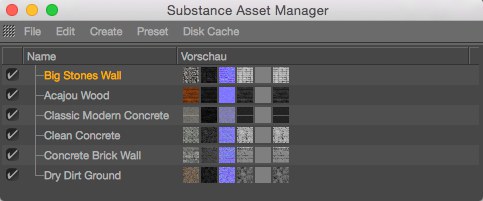
The Substance Asset Manager stores and manages all loaded Substances and Assets. Items in the list can be dragged to a new position and selected in the same way other elements are selected in Cinema 4D (Ctrl/Cmd to select or deselect individual or multiple items; Shift to select a range of items; Del to delete a selection). An Asset can be renamed by double-clicking on it.
Assets can be dragged and dropped from the Asset Manager to the following locations (all links will be created automatically):
- Material Manager: a material will be created
- Texture field: a material incl. Substance shader will be created
- Asset link field: a new link will be created
- An Object: a material incl. Substance shader will be created and assigned to the object
When materials are created via drag & drop, a material will be created each time according to the Auto mode described here.
Assets can be dragged from the Asset Manager into a preset library (the Substance file will also be saved) from where it can again be loaded into an Asset Manager.
When Assets are selected, their properties will be displayed in the Attribute Manager (which has a special display mode for Substances).
At the left of the Asset’s name you will fine a check box, which can be used to freeze the Asset with its current settings. This is useful, for example, if you are working with a scene that reacts too slowly due to Substance Engine calculations (e.g., you have an animated Asset parameter and you are working with the Timeline and all Asset textures have to be re-calculated for each frame. This can end up being quite arduous, which means that the Asset should be disabled).
If an Asset is disabled, its settings can be modified and these will also be saved but these will first be passed on to the Substance Engine when the Asset has been enabled.
Make sure that the Asset is enabled prior to rendering (especially Asset parameter animations).
At the right of the Asset’s name you will find a preview of the textures that are also displayed in the Attribute Manager, albeit somewhat larger.
Clicking on the column’s title bar will arrange the list alphabetically (in which case the items can no longer be re-arranged per drag & drop). Clicking again will arrange the items in reverse order and clicking a third time will remove the alphabetical arrangement.
File Menu
Use this command to load a new Asset into Cinema 4D (alternatively you can drag and drop the file into the Substance Asset Manager). A Substance file must have the extension *.sbsar. Depending on the Substance Engine preference settings, a material will also be created that will also be linked accordingly.
This also applies to relative and absolute paths for Substance files.
This command can be used to load an entire folder of Substance assets (without the sub-folders).
If you opened a file with Assets and one of the Substances is changed or published in the Substance Designer, call up this command to reload the Substances.
Edit Menu
This command removes the selected elements and copies them to the system cache. The elements can be inserted using the Paste command.
This command copies the selected elements to the system cache. They can be inserted any number of times using the Paste command.
This command inserts the elements cut or copied to the system cache.
This command deletes the selected items. Pressing the Del will do the same.
This command deletes all Substances to which no material is linked.
This command selects all loaded Assets.
This command deselects all Assets.
This command selects all Assets whose linked materials are selected or marked in the Material Manager (marked materials have a yellow frame around them, i.e., the object to which they are assigned is selected).
This command selects all Assets that are assigned to the selected objects via a material.
These commands select all materials/objects that are linked wih the currently selected Assets.
These commands enable/disable all Assets. What this means can be read here.
This command calls up the Substance Engine Preferences
Create Menu
By default, the corresponding Cinema 4D material will be created with the following assignment when an Asset is created:
| Substance Output Channel | CINEMA 4D Material Channel |
| Diffuse | Color |
| Basecolor * | Color |
| Emissive | Luminance |
| Reflection | Reflectance |
| Environment | Environment |
| Bump | Bump |
| Opacity | Alpha |
| Specular | Reflectance/Specular-Standard |
| Height | Displacement |
| Normal | Notmals |
| Ambient Occlusion | Diffusion |
*If no Diffuse output channel exists or if the Create Metallic Materials command is called up.
This command can be used at any time to create a material with the aforementioned channels.
The Substance Designer basically assumes two methods with which physically-based rendering can be displayed with regard to textures.
First, the Metallic/Roughness workflow - as it’s called in the Substance Designer - that displays at least the characteristic Base Color, Metallic and Roughness output channels (textures).
The other is the Specular/Glossiness workflow, which offers at least the characteristic Diffuse, Glossiness and Specular textures.
Both workflows use functions available in the Reflectance channel in Cinema 4D.
Both the Create Metallic Materials and the Create Glossy Materials commands load the following items in addition to the output channels described:
- Create Metallic Materials: Substance output channels Metallic and Roughness fitting for the Reflectance channel’s respective layers and settings.
- Create Glossy Materials: Glossy Substance output channels fitting for the Reflectance channel’s respective layers and settings.
This ensures that the rendered result looks as much as possible as that of the Substance Designer (identical results are rare). This breakdown can be used as a starting point. You can, for example, disable the Color channel, as previously described in the Additional differences to the previous system section.
Use this command to duplicate selected Assets.
Use this command to duplicate selected Assets including all corresponding, linked materials.
Preset Menu
These commands don’t apply to the Cinema 4D Content Browser. These are Substance Asset Presets (files with the extension *.sbsprs). These are presets that can be created by both the Substance Designer and Cinema 4D. They make it possible to transfer Asset settings between applications without having to load their specific file format.
Of course it make the most sense to use presets together with the Assets to which they belong. However, "foreign" presets can also be used:
This command assigns a Substance Preset to all selected Assets. Parameters that are not included in the preset will be reset to their default values. If multi-graphs are among the selected Assets, a dialog window for the selected graph will be displayed. Parameters in the preset that are not included in the Asset will be ignored.
This command assigns a Substance Preset to all selected Assets. However, all Asset Parameters that are not included in the preset will remain unchanged. Parameters in the preset that are not included in the Asset will be ignored.
This command exports a Preset file for each selected Asset. Only those settings will be exported that deviate from their default values.
Disk Cache Menu
When a scene is loaded, all Asset textures must first be created again (and placed in the RAM). This can take quite some time, depending on the number and resolution. To shorten this process, the textures can be saved to a "substance cache" directory in the scene’s own directory.
Depending on their resolution, these textures can require a lot of memory (tip: the texture creation can be set to PNG or JPEG compression in the Substance Engine Preferences!).
This command caches all selected Substances.
Only those textures that have modified in comparison to the cached Assets will be cached (if settings are changed, updated textures will not be automatically cached).
Textures of all Assets will be cached.
These commands delete the cached textures (only for the file format defined in the Preferences menu) for selected/all Substances.