Overview
Missing assets, such as bitmaps used for materials, can cause errors when rendering a scene. To detect and fix such errors before rendering, Redshift Asset Manager is available. In fact, it has many of the same features as Cinema 4D's classic Project Asset Inspector, so you'll be familiar with many of its functions and the way it works.
The Project Asset Inspector has some functions not available in the Redshift Asset Manager and can handle Redshift assets as well.
To give a quick demonstration, we create a standard Redshift Material and use a Texture node to link one of the bitmaps from the Asset Browser to the Diffuse Color.
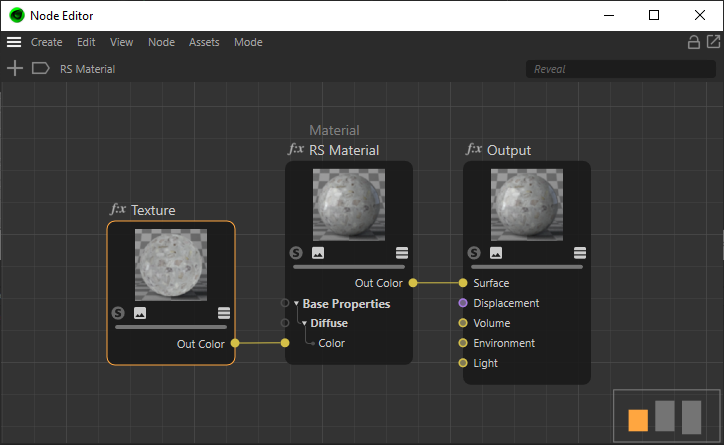
A Texture used for the Diffuse Color.
Opening the Redshift Asset Manager will display a list of all used assets of your project. In this case there is only our bitmap listed, that is used with the material.
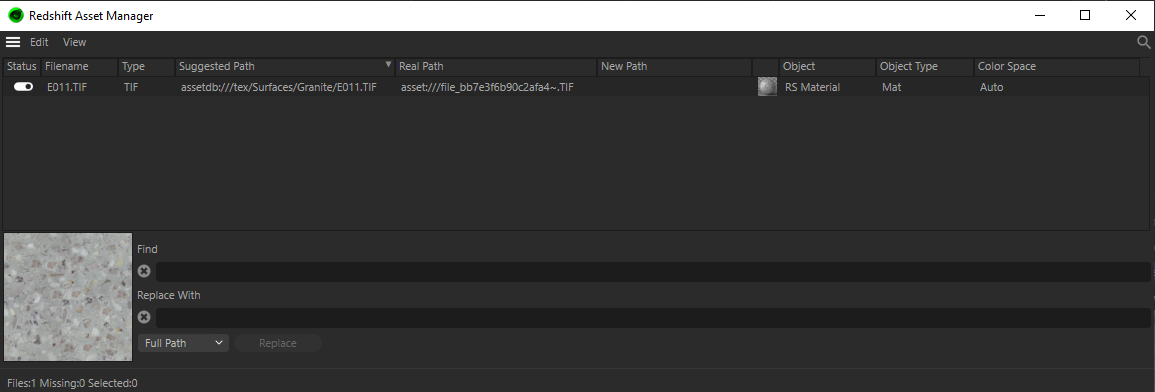
The Redshift Asset Manager, listing all used assets of the active project.
View menu
The information for each asset can be filtered using the View menu. Let's take a quick look at the available categories:
- Filename: This is the name of the asset
- Type: This is the datatype of the asset, for example TIF for a bitmap in TIF format or vdb for a VDB file used with a Redshift Volume object
- Suggested Path: This is the file path for the assets, as it was used for example in the Texture shader.
- Real Path: The actual path used to load the asset. In most cases this is identical to Suggested Path for found assets, but assets loaded directly from the Cinema 4D Asset Browser might have a different name and path structure.
- New Path: When you relink an asset, you can read the updated file path here
- Icon: This icon shows the object or material preview, where the asset is used.
- Object: The name of the material or object, where the asset is used.
- Object Type: This can be Mat for a material, Redshift Volume for a volume object or, for example, Redshift Light for a light object.
- Color Space: Redshift is set up by default to automatically convert any textures used with materials and lights into the rendering color space. This is indicated by the word "Auto". If you have manually chosen a color space, you can see its name here.
- Layer: Here you can find the color and name of a used layer that for example has been used with a material
- Sequence: When the asset is a movie or an image sequences, you can read the playback mode here (such as "Simple", "Loop" or "Ping-Pong"), as well as the range of frames in the sequence.
- Cache: Giving feedback, if the asset is cached or not.
Edit menu
these command allow you to select the listed assets, to change or relink their pathes and to manually create or delete caches.
- Select All: Select all listed assets
- Deelect All: Deselect all listed assets
- Select Missing Files: Only those assets are selected that could't be found at the given path.
- Ivert Selection: Inverts the selection of the listed assets.
However, you can also use a manual selection. Selections of listed assets can also be created by simply clicking on a line or by framing with the left mouse button held down. Selections can also be expanded by holding down the Ctrl key. Likewise, incorrectly selected entries can be deselected again by Ctrl-clicking.
- Show in Attribute Manager: The attributes of the selected asset will be shown in the Attribute Manager.
- Localize Files: Removes the asset paths from all selected assets and only utilizes the file name. This turns an absolute path into a relative path.
- Globalize Files: Turns a relative path into an absolute path for all selected assets. The complete file path will be used.
- Relink files: This command re-links selected assets with assets of the same name in a selected directory. Depending on the location, absolute (outside of Cinema 4D’s search paths) or relative (within Cinema 4D’s search paths) will be created.
- Replace Files With: Allows to exchange a selected asset with another one.
- Clear Files: Deletes all links to the selected assets. This can, for example, be used to remove all texture links to non- existent files.
The following commands allow to cache textures. This can speed up rendering, if you have a project with long image sequences and many textures.
- Cache Textures: Selected textures will be converted to Redshifts own texture format and stored in the Redshift Cache folder for faster access. This can speed up rendering for projects with many textures or long image sequences.
- Delete Cached Textures: Is deleting cached textures from this projects Cache folder.
- Use Cached Textures: Will use the cached files instead of the original textures.
Set Color Space using OCIO is switching color spaces for selected textures from the default "Auto" setting to the detected color space, for example, sRGB for a simple JPEG texture, used as a diffuse color.
The Find and Replace With fields allow to exchange parts of, for example, an outdated asset path and to Replace it with a new path. Please have a look at the examples an the pages about the Project Asset Inspector that offers the same functionality.