The Denoising feature exists only in the Redshift 2.6+ versions!
Altus Denoising is availble for free with Redshift versions 2.6.53+ and 3.0.15+
Table Of Contents
Introduction
Rendering effects like depth of field, motion blur, global illumination, area lighting and others require the renderer to shoot multiple rays into the scene. If a low number of rays ("samples") are shot, the final result can appear noisy ('grainy'). The typical solution to this is increasing the number of samples (as explained here), but that means longer render times.
An alternative (and faster) solution is to use denoising instead. "Denoising" refers to a rendering technique that removes noise from an image. The process can be fast (in the case of NVidia's OptiX, it's near real-time) or can take a good few seconds. In both cases, though, it should take less time than what Redshift would need to render the scene if samples were significantly higher.
Redshift supports two different denoisers: Innobright's Altus and NVidia's OptiX AI denoiser.
Innobright's Altus uses a traditional and production-proven techniques to achieve its denoising effect. On the other hand, NVidia's OptiX AI denoiser uses a deep learning algorithm that has been trained with tens of thousands of images.
Each of these two denoising solution has pros and cons:
Altus pros and cons
![]() Uses production-proven algorithms so results can be more predictable
Uses production-proven algorithms so results can be more predictable
![]() Denoising takes several seconds to compute so it's not possible to use in an interactive fashion
Denoising takes several seconds to compute so it's not possible to use in an interactive fashion
OptiX pros and cons
![]() Is very fast and can be used in interactive rendering while editing the scene
Is very fast and can be used in interactive rendering while editing the scene
![]() Sometimes it can't detect noise as noise because it hasn't been trained with that particular case, so it has trouble cleaning it
Sometimes it can't detect noise as noise because it hasn't been trained with that particular case, so it has trouble cleaning it
It should be noted that denoising is not a silver bullet! If the rendered image is excessively noisy, denoising can fail in multiple different ways:
- The denoise might simply fail to denoise the image to a sufficientl degree (i.e. noise will still be present after denoising)
- It might 'oversmooth' certain parts of the image and lose considerable amounts of detail, especially in textures or small geometry details
- It might produce weird visual artifacts. In the case of OptiX, these artifacts might look like brush paintstrokes
- In animations, the noise might appear as ugly 'flickering splotches' which can be more visually distracting that the original noise!
For the above reasons, we recommend that denoising is primarily used to clean "the last few percent" of noise. In other words, the user should still tune their settings for an 'ok' level of noise and then employ denoising to make the frame perfect. This workflow is particularly important to follow when rendering animations.
|
|
|
|
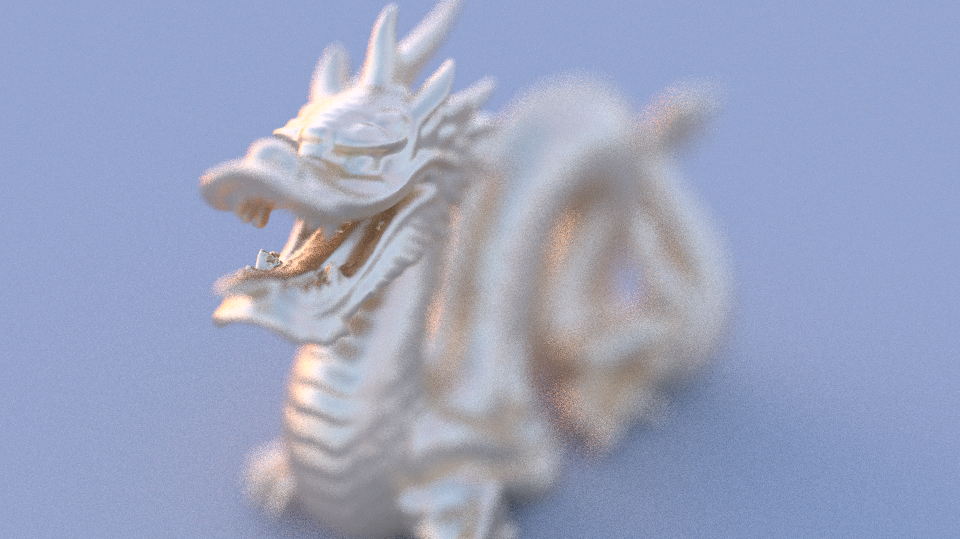
Before denoising |
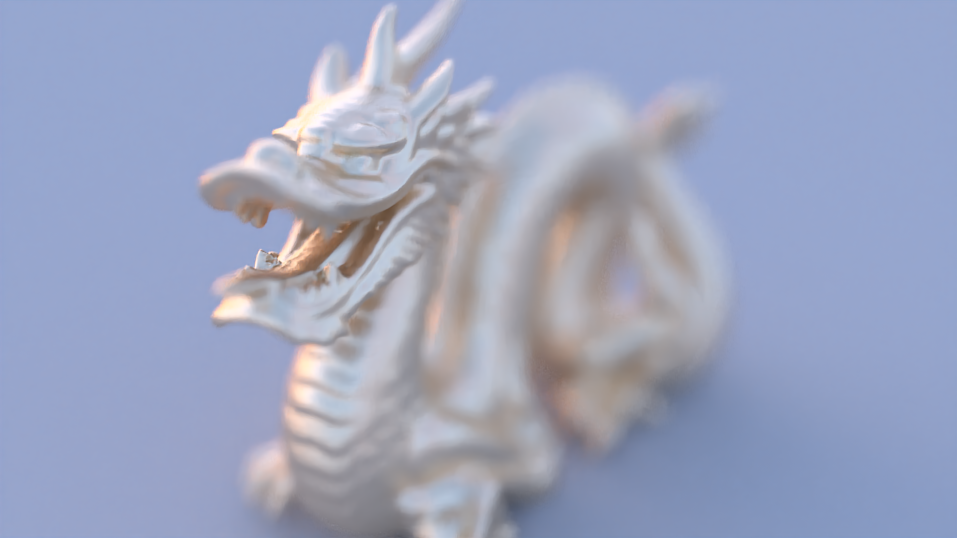
After denoising (with OptiX) |
Altus
The Altus denoiser options can be found in Redshift's Output tab.
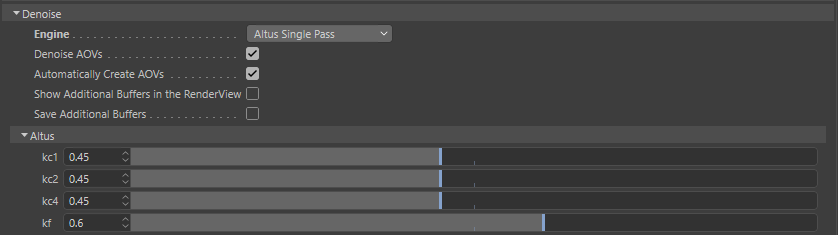
To enable denoising with Altus simply select "Altus Single Pass" or "Altus Dual Pass" for the denoise engine and then do bucket rendering (Altus does not work in progressive!) using the Render View.
"Altus Single Pass" means that the frame will be rendered once and then Altus will execute denoising. "Altus Dual Pass" means that the frame will be rendered twice before denoising.
In the early days of the Altus-Redshift integration, there was no Single Pass mode available in Altus so the only option available to users was the Dual Pass approach. Altus required two separate rendered frames to determine where the noise is. The drawback of this approach is that the frame takes twice as long to render because it gets rendered two times! Some users got around this by tweaking their unified sampling settings and increasing the error threshold right before denoising. This lowered render times but also meant that both frames would be noiser - but that was ok because Altus would clean the noise.
At a later point in the Altus-Redshift integration, Innobright introduced their Single Pass technique which can determine per-pixel noise in a single render pass. This approach is much more natural as it doesn't double the frame time and doesn't involve the user having to do any tricks like the above tweaking of the unified sampling settings.
We recommend using the "Altus Single Pass" denoise engine, especially if you are a new Altus user!
Altus can achieve more accurate results with the use of additional Redshift AOVs. When "Automatically Create AOVs" is enabled, Redshift will automatically add any AOVs that Altus needs to achieve its denoising results. Unticking that option means that the user will manually add the necessary AOVs. The AOVs used by Altus are: Diffuse Albedo, World Position and Bumped Normal
While Redshift is rendering, it generates some aditional images ("buffers") which are essential for the denoising process. These buffers are normally hidden from Redshift's Render View but if you check "Show additional buffers in RenderView", those buffers will appear in the Render View's AOV list and will be previewable. This can be sometimes useful when diagnosing denoising.
The kc1, kc2, kc4 and kf settings allow the user to control the quality and "denoising strength" of Altus.
- kc1 controls how much high-frequency detail will be retained (i.e. sharp image features)
- kc2 controls how much medium-frequency detail will be retained
- kc4 controls how much low-frequency detail will be retained (i.e. chunky image features)
Lower kc values will retain more detail while higher values will make the denoising stronger. I.e. it will produce smoother results but it might lose details
The kf parameter controls AOV influence. I.e. determines how much AOVs affect the denoising results. Smaller values make the AOVs affect the denoising result more. So, for example, if you have a bump map and you see Altus smoothing the lighting on it too much, lowering the kf value will help. However this will also constrain the denoiser which means that, if the image is very noisy, it will not be able to denoise it too much around the "bumpy areas" (in this example).
After the frame has rendered and Altus has denoised it, you can toggle it on or off (to better see its effect) in the Render View by pressing the
![]() button of the Render View.
button of the Render View.
OptiX
The OptiX denoiser options can be found in Redshift's Output tab.

To enable denoising with Optix, simply select "Optix" for the denoise engine and render either in progressive rendering or bucket rendering with the Render View.
OptiX can achieve more accurate results with the use of additional AOVs. When "Automatically Create AOVs" is enabled, Redshift will automatically add any AOVs that OptiX needs to achieve its denoising results. Unticking that option means that the user will manually add the necessary AOVs. The AOVs used by OptiX are: Diffuse Albedo
While Redshift is rendering, it generates some aditional images ("buffers") which are essential to the denoising process. These buffers are normally hidden from Redshift's Render View but if you check "Show additional buffers in RenderView", those buffers will appear in the Render View's AOV list and will be previewable. This can be sometimes useful when diagnosing denoising.
As mentioned above, OptiX is a very fast denoiser however, even with its speed, it can still "steal away" a percentage of the frame's total render time. That's especially true when rendering large-resolution images in bucket rendering because Redshift denoises the entire frame after each bucket. For this reason, Redshift supports a "denoise overhead" setting for bucket and progressive rendering. These settings control how often OptiX is executed. A setting of 10 means "execute OptiX as often as needed but ensure that it doesn't take more than 10% of the entire frame time". A setting of 100 means "execute it after every single pass (in progress) or bucket (in bucket rendering)". A setting of zero tells Redshift that it should only OptiX-denoise only once at the end of the render.
Please note that the functionality of "denoise overhead" is based on estimate so it does not guarantee that OptiX will take exactly the specified percentage of frame time.
The benefit of lower "overhead" settings is that OptiX processing will take less time. The drawback is that, because OptiX only gets executed even few passes (in progressive mode) or every few buckets (in bucket rendering), some "visual lag" might be noticeable. That's the main reason why Redshift detaults denoise overhead to 10% for bucket rendering (where lag matters less and rendering performance more) and 100% for progressive rendering (where the opposite is true).
After the frame has rendered and OptiX has denoised it, you can toggle it on or off (to better see its effect) in the Render View by pressing the
![]() button of the Render View.
button of the Render View.
Animation Considerations
When rendering an animation, we recommend disabling Redshift's "Randomize Pattern on Each Frame"!
Doing so will make the noise effect be "stuck on the camera" instead of "dancing around like TV static". While the "stuck on camera" noise effect is undesirable in regular rendering, .it can really help denoising because it maximizes the possibility that the noise shape will remains consistent around a pixel between adjacent animation frames. This, in turn, reduces the possibility for flickering "splotchiness" on the final denoised results (which can be really distracting).