Table Of Contents
- Overview
- Global Illumination
- Brute Force GI
- Irradiance Caching
- Irradiance Caching Preset
- Irradiance Point Cloud
Overview
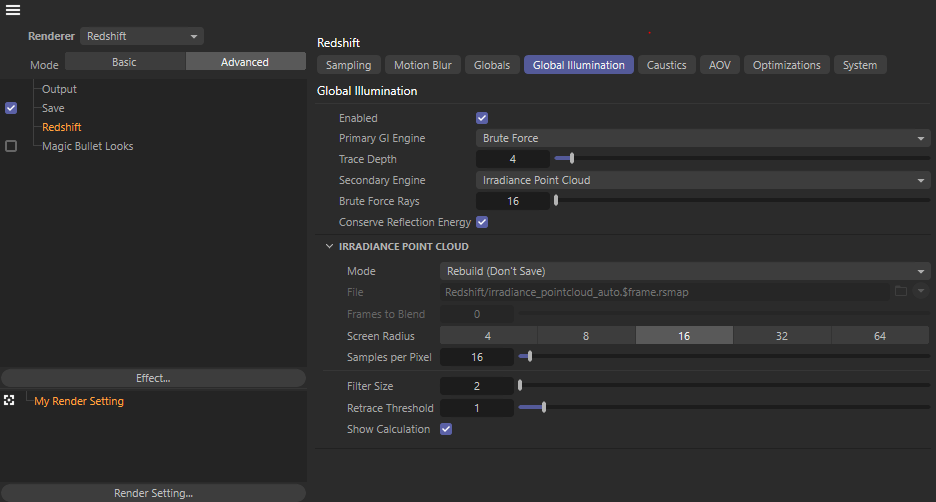
Advanced Global Illumination Settings
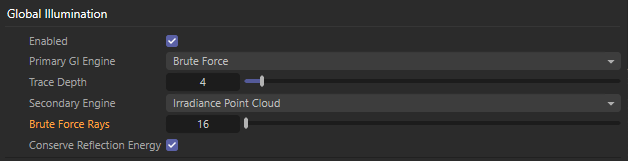
Global Illumination
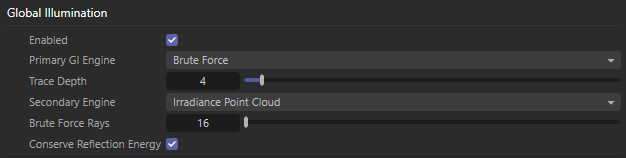
Global Illumination Settings
The Global Illumination settings tab covers the use of indirect lighting in your scene.
For more information on the fundamentals and concept of GI please see these Global Illumination pages.
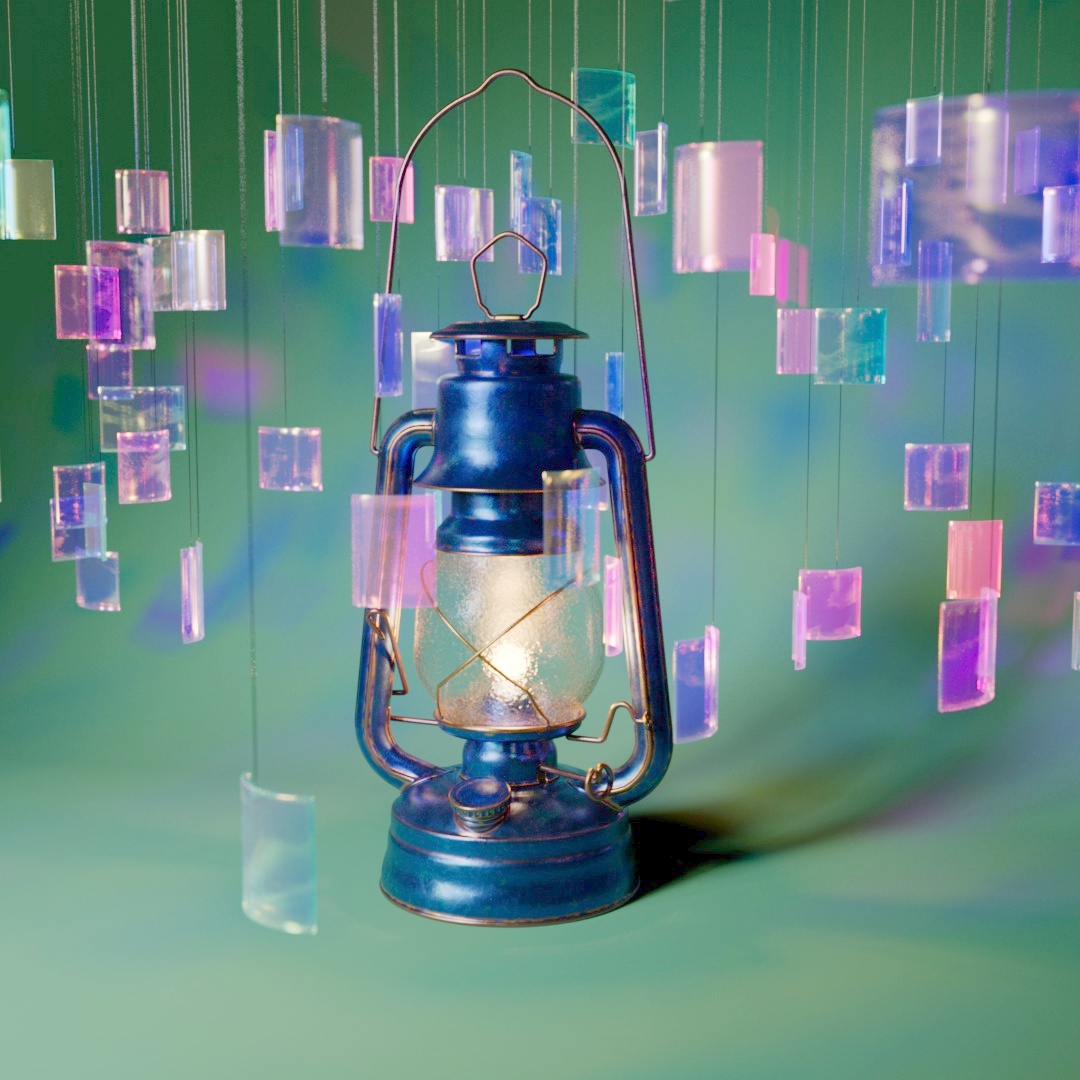
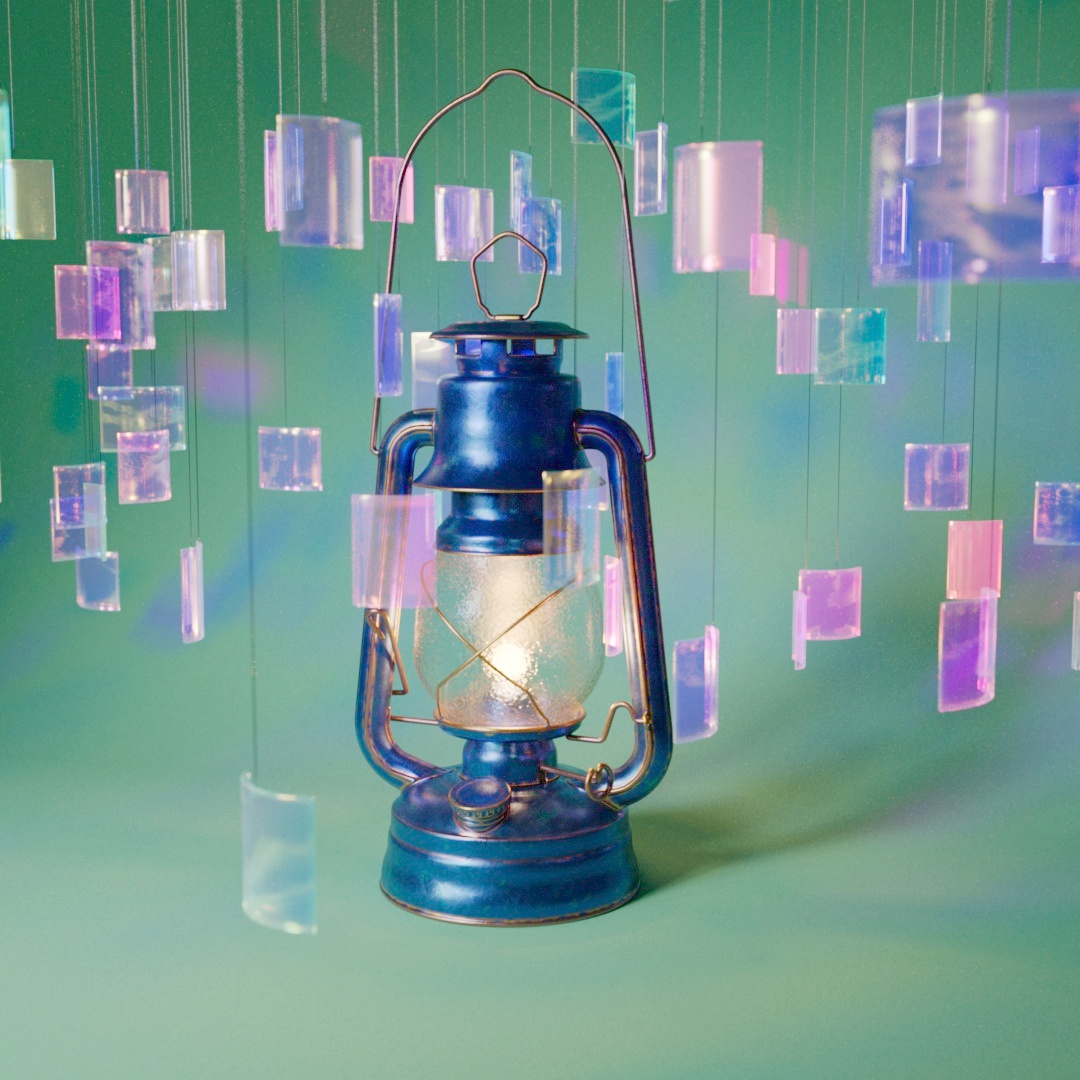
Enabled
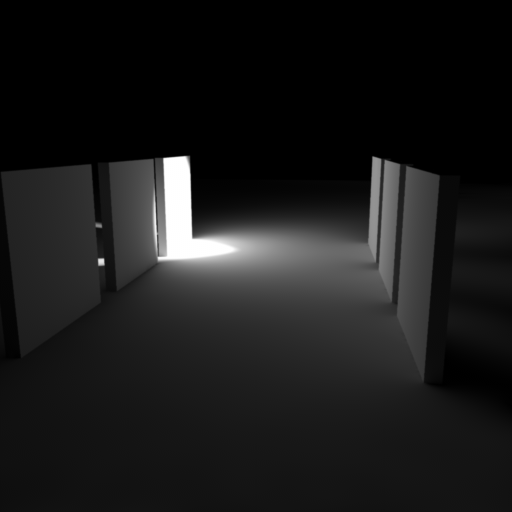
Enables or disables all global illumination.
|
|
|
|
Global Illumination: Disabled Render Time (Min:Sec) : 2:59 Notice the very dark shadow behind the lantern due to the lack of indirect lighting from global illumination. |
Enabled 3:17 |
Primary GI Engine
Sets the primary global illumination engine that will be used on the first indirect lighting bounce. The options available for Primary GI engine and their pros and cons are:
- Brute Force (default)
- Pros
- Most accurate
- No flickering in animations
- Simple to control with one setting (Brute Force Rays)
- Compatible with interactive feedback
- Cons
- Slowest GI engine
- Can be very noisy with low Brute Force Rays
- Pros
- Irradiance Cache
- Pros
- Can produce cleaner images much faster than Brute Force
- GI result can be saved and loaded for each frame allowing for faster iteration when tweaking non GI settings
- Handles large flat surfaces like building interiors very well
- Irradiance cache time tends to scale better than linearly when increasing image resolution
- Cons
- Can be splotchy and flicker in animations, frequently this is more distracting than standard visual noise.
- More complex to control and fine tune for splotch and flicker-free results.
- For scenes with lots of small detail (like foliage) irradiance cache tends to be less efficient than Brute Force
- Not compatible with interactive feedback
- Pros
Trace Depth
Specifies the total number of indirect lighting bounces that will occur.
If Trace Depth is set higher than 1 the Secondary GI Engine will be used for all bounces 2 and up.
GI Trace Depth
Global Illumination Trace Depth is still clamped by the Combined Trace Depth parameter found in the Globals tab.
Increasing GI Trace Depth will often make your lighting brighter and more realistic but it will also make the render time slower.
Sometimes increasing the number of bounces can result in lighting that looks washed out, for this reason users sometimes choose to limit the number of bounces.
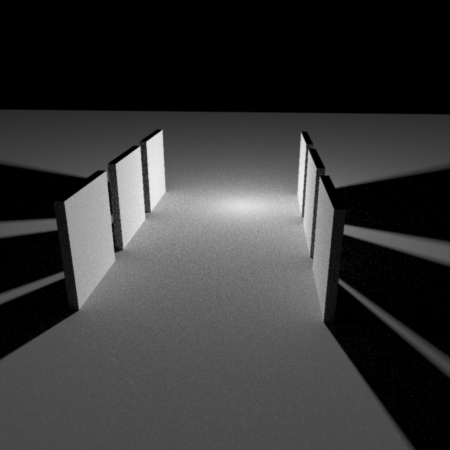
The scene shown below contains a few vertical tiles, one of which is lit with a strong spotlight. Note that these images were rendered using Irradiance Caching for the primary GI engine and Irradiance Point Cloud for the secondary GI engine.
|
|
|
|
Trace Depth: 1 Primary GI only. The right tiles are only lit by the direct lighting on the center illuminated tile. |
2 Primary and Secondary GI. The indirect lighting on the right tiles is now bouncing off once and illuminating the left tiles. The ground below the right tiles also receives extra illumination from this additional bounce. |

Secondary Engine
Sets the secondary global illumination engine that will be used on all indirect lighting bounces after the first. The options available for Secondary GI engine and their pros and cons are:
- Irradiance Point Cloud (default)
- Pros
- Helps make primary Brute-Force and Irradiance Cache faster and cleaner
- Much more efficient for very difficult lighting situations
- Cons
- Requires some storage
- More options to manage than Brute Force
- Only provides a benefit when multiple bounces are needed, if the scene contains lots of lights or when the lighting conditions are difficult
- Pros
- Brute Force (default)
- Pros
- Very accurate
- No flickering in animations
- Simple to control with one setting (Brute Force Rays)
- Compatible with interactive feedback
- Cons
- Slowest GI engine
- Can be very noisy with low Brute Force Rays
- Pros
Only available when Trace Depth is set above 1.
|
|
|
|
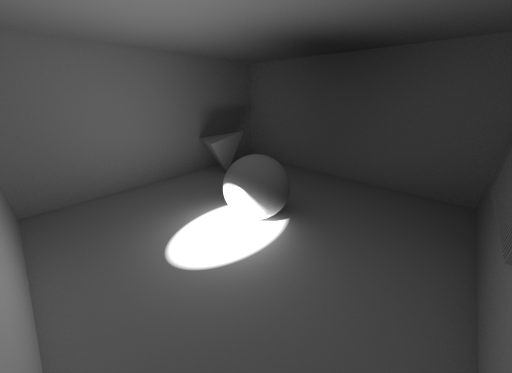
Secondary Engine: Brute Force Even with 4000 Brute Force Rays, there is noise everywhere. |
Irradiance Point Cloud The results are much cleaner and the frame was completed in nearly half the time. |

Conserve Reflection Energy
When enabled, Redshift uses a cheap trick which adds the reflection energy that would be lost (i.e. the reflection color tint) to the diffuse color tint of materials during GI calculation.
Redshift does not currently support reflection ray sampling during GI calculations which can lead to a loss of energy, so enabling "Conserve Reflection Energy" gives the illusion of reflection ray bounces contributing to GI, which can be particularly noticeable with strong or colored material reflections.
Brute Force GI
Brute Force GI Settings
Brute Force Rays
Controls the number of Brute Force GI rays to shoot per pixel.
The higher the number the cleaner the result but the longer the render time.
Depending on the scene Brute Force GI can require extremely high ray counts to clean GI noise.
|
|
|
| Brute Force Rays: 16 | 512 |

Irradiance Caching
Cinema 4D Irradiance Caching
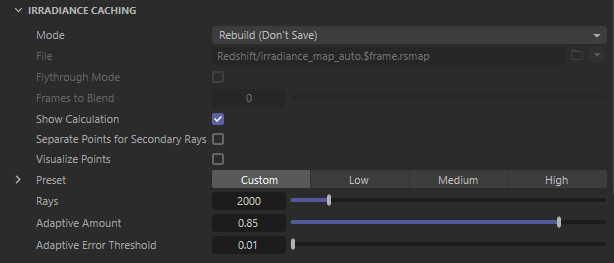
Irradiance Caching section is only visible when Primary GI Engine is set to Irradiance Cache
Irradiance Cache data is a view-dependent GI method which means that it has to be re-generated when either the camera or any objects move. It also has to be regenerated if lights change (position or intensity) and if materials are adjusted. However, there are a few settings that do not affect the irradiance cache:
- All anti aliasing settings
- Any parameter that has to do with "number of samples". For example "number of area light samples"
If you are making any last-minute adjustments to your frame and tweaking these kinds of parameters you can save some time by re-using the irradiance cache you computed last time using the "Load" mode.
Please refer to the Irradiance Cache page for more information.
Mode
Specifies the Irradiance Caching mode to be used from the following options:
- Rebuild (don't save) - Redshift will compute a new irradiance cache from scratch (for each frame) but will not save it to disk. The frame will be rendered to completion.
- Rebuild (prepass only) - Redshift will compute a new irradiance cache from scratch (for each frame) and will save it to the user-specified file. The final rendering pass will be skipped.
- Rebuild - Redshift will compute a new irradiance cache from scratch (for each frame) and will save it to the user-specified file. The frame will be rendered to completion.
- Load - Redshift skips the computation stage and the data is loaded from the user-specified file in the parameter below. The frame will be rendered to completion.
File
Specifies where to save or load the Irradiance Caching data depending on the Irradiance Caching mode as covered below.
- Rebuild (prepass only) - Save Irradiance Caching data to the user-specified file.
- Rebuild - Save Irradiance Caching data to the user-specified file.
- Load - Load Irradiance Caching data from the user-specified file.
Flythrough Mode
When enabled, it allows Redshift to compute the current frame's irradiance cache points while using the last frame's points.
This mode should only be used on flythrough animations, i.e. only when the camera is moving.
If any objects or lights move, this parameter will produce visual artifacts.
Since this mode helps with construction of irradiance cache points, it's only available on the two "Rebuild" modes and is grayed out for "Load."
Frames to Blend
When enabled, it allows Redshift to average the results of multiple irradiance cache files (one for each frame) together depending on the specified number of frames.
Only available when Irradiance Caching is set to Load mode since it relies on loading preexisting irradiance cache data for multiple frames.
Irradiance Cache frame blending can be used to improve flickering that might be present due to insufficient quality settings or difficult lighting situations.
Please refer to the Irradiance Cache page for more information.
Show Calculation
When enabled, a rough estimate of the Irradiance Cache points is made visible in the render view to help visualize the results as they are computed.
It will almost certainly contain noise and some visual glitches – don't worry, though, these are to be expected!
Separate Points for Secondary Rays
When enabled, irradiance cache points are treated separately for secondary rays like reflection and refraction in an effort to reduce flickering.
By default, irradiance cache points generated by primary (camera) rays are stored together with points generated by secondary rays such as reflection and refraction. While this is typically okay, sometimes there can be flickering artifacts caused by this because the point densities can vary wildly. If you're getting flickering artifacts on scenes using reflections/refractions, this option will treat the points separately and try to avoid such issues.
Treating the points separately incurs a (typically) small performance and storage cost, so enabling this option is advisable only if such flickering issues occur.
If you're getting irradiance cache flickering issues, we recommend rendering a few frames both with and without reflections/refractions. You can quickly enable/disable reflections/refractions in the Globals tab.
Please ensure that you enable the "Separate Points for Secondary Rays" option only if you see flickering with reflections/refractions enabled and no flickering with reflection/refraction disabled!
Visualize Points
When enabled, Irradiance Cache points will be rendered as small discs with an added bit of color to each point to make sure that even near-black ones can be seen.
This diagnostics mode is useful in finding out if some settings are too aggressive. For example if you see a mostly flat part of the image containing too many points this might mean that "Color Threshold" is too aggressive.
Using this mode can also help users better understand the effect that thresholds can have on the point densities.
Rays
Controls the quality of each irradiance cache point.
The lighting at each point is computed in a way similar to brute-force GI, i.e. several rays are shot out of it. Using too few rays will introduce a "splotchy" effect that is very distracting.
|
|
|
|
Rays: 100 Irradiance Cache time: 1.5 seconds Many splotches visible in wall corners and between the wall blades. |
2000 2.4 seconds Splotches are greatly reduced. |

Scenes that contain several lights (or fewer big lights) can typically use fewer rays (between 500 and 1000). If the scene contains very few bright lights or not enough lighting is coming through small openings (windows) the number of rays might have to be increased a lot to get clean results. Some architectural interior scenes require ray counts as high as 2000 – 4000 for a perfectly clean result.
Not all irradiance cache points need the same number of rays. For example, some points might be in 'exposed' areas and can be seen by several lights – these points only need a few rays to get a clean result. Other points, on the other hand, might be hidden behind objects and might have a hard time finding light – these points need more rays. Redshift takes care of this situation using adaptive sampling, i.e. it automatically adjusts the number of rays for each irradiance cache point based on the specified Adaptive Amount and Adaptive Error Threshold parameters covered below.
Adaptive Amount
Controls the percentage of rays that should be shot initially.
The lower the number, the less adaptive and efficient the algorithm is, an Adaptive Amount of 0 results in the shooting of all rays for each point.
For example:
- If "Rays" is 1000 with "Adaptive Amount" set to 0.8: 80% of the rays will be adjusted (i.e. 800 rays) and the initial 20% of the rays will be shot (i.e. 200 rays).
- If "Rays" is 1000 with "Adaptive Amount" set to 0.3: 30% of the rays will be adjusted (300 rays) and 70% of the rays will be shot (700 rays in this example).
-
If "Rays" is 1000 with "Adaptive Amount" set to 0: Redshift will shoot all 1000 rays for each point.
Scenes of average contrast should work fine with the default 0.85 value. If you have a scene that has extreme contrast (i.e. very strong indirect illumination coming from a small light source, or a far away light source), it might be necessary to reduce Adaptive Amount to something like 0.5 in order to avoid 'early termination' artifacts.
Early termination is when the algorithm thinks that there is no more lighting to be gathered and stops abruptly – even though there might actually be more lighting that could have been gathered with more rays. Another way of fixing this issue is leaving the "Adaptive Amount" as-is but actually raising the "Rays." This means that the algorithm will shoot more initial rays and will have a much better chance of finding any 'difficult' light sources.
Adaptive Error Threshold
Controls how many of the remaining rays will be used that are leftover from the initial ray casting determined by the Adaptive Amount parameter.
As mentioned above, the algorithm always shoots a percentage of the rays initially. These initial rays are used to compute a contrast value which is compared against "Adaptive Error Threshold." The comparison defines how many more rays will be needed for that irradiance cache point.
The lower this parameter, the more 'sensitive' the algorithm becomes - which means that more rays will be shot.
If your renders exhibit persistent 'splotches' (meaning: you increased the "Rays" but the results are still not clean) the reason might be that "Adaptive Error Threshold" is set too high: you could try reducing it to values like 0.005 or even 0.001.
|
|
|
|
Adaptive Error Threshold: 0.01 Rays: 2000 2.4 seconds High ray count that is mostly clean but some artifacts remain that may 'ripple' in animations.
|
0.005
3.8 seconds By decreasing the Adaptive Error Threshold these artifacts are cleaned up without increasing the overall ray count. |
Irradiance Caching Preset
Irradiance Caching Preset Options
The Preset section allows you to quickly switch between predefined quality settings that adjust the Irradiance Cache settings covered below.
There are 4 Presets to choose from:
- Custom (default) - User controlled mode with default quality settings that sit in between Low and Medium.
- Low
- Medium
- High
Min Rate
Controls the lowest resolution that the irradiance cache will use to insert points.
Lower resolution passes are intended to take care of flat surface and low-contrast lighting areas.
| Min / Max Rate value |
Irradiance Cache pass resolution |
|---|---|
| -8 | Divide render resolution by 256 |
| -7 | Divide render resolution by 128 |
| -6 | Divide render resolution by 64 |
| -5 | Divide render resolution by 32 |
| -4 | Divide render resolution by 16 |
| -3 | Divide render resolution by 8 |
| -2 | Divide render resolution by 4> |
| -1 | Divide render resolution by 2 |
| 0 | Use render resolution (max setting for "Min Rate") |
| 1 | Use 4 samples per render resolution pixel |
| 2 | Use 16 samples per render resolution pixel |
For example: a 1920x1080 resolution render with a setting of (-3 Min, 0 Max) will render in the following four passes:
- 240x135
- 480x270
- 960x540
- 1920x1080
Most scenes will render fine with the default -3 Min Rate setting. If your render resolution is very high (like 4K, for example) you might want to lower the Min Rate to something like -4 or -5, especially if it doesn't contain too much detail.
Max Rate
Controls the highest resolution that the irradiance cache will use to insert points.
Higher resolution passes are intended to insert points around areas of more detail or contrast.
If your scene contains sub-pixel detail, you might see artifacts around that detail if you use a max rate setting of 0. In these cases, it's advisable that you raise the max rate to 1.
Generally speaking, if the max rate is not high enough, small details will be missed and the final render might have GI artifacts appearing as too bright or dark pixels, splotches and light 'leaking.'
While working on your scene (and doing draft renders), these artifacts might not be as important as rendering speed. For these cases, a max rate of -1 might provide reasonable results. For final renders, though, (and especially if you are rendering animations) it is advisable to use a max rate of 0.
|
|
|
|
Max Rate: -1 Min Rate: -3 The max rate being -1 is the reason why there are lighting artifacts around the thin geometry |
0 -3 Increasing the max rate to 0 solves these issues. |

Color Threshold
Controls how aggressive changes in color contrast are detected in the irradiance cache points and inserts more points around areas of high contrast.
The lower you make this number the more aggressive the detection and the sharper your GI shadows will be but more points will have to be computed, which means longer rendering times.
The values for this parameter should typically range between 0.01 and 0.001.
For draft renders you can set this to 2.0 which will introduce the least amount of points and render the fastest but will make the GI shadows blurry and might introduce flickering during animations.
It is important to remember that you have to use enough irradiance cache rays (described above) to get a reasonable amount of lighting smoothness on your irradiance cache points before lowering the color threshold parameter. Not doing so will make the algorithm incorrectly think that there is GI contrast detail and will introduce even more points.
Distance Threshold
Controls the number of irradiance cache points used near corners and creases in the scene. The higher the quality the more irradiance cache points will be inserted, quality settings are set from the following options:
- Very Low - Best used for draft renders.
- Low
- Medium - Should work well for most cases.
- High
Corners and creases often make GI change rapidly so more irradiance cache points will be needed around them in order to catch these rapid lighting changes. If you are doing draft renders you can use the "low" or "very low" settings – this will introduce the least amount of points around corners / creases and renderer the fastest but will make corner GI lighting blurry (and possibly splotchy) and might also introduce flickering during animations.
Normal Threshold
Controls how the curvature of objects affects irradiance cache point density. The higher the quality the more irradiance cache points will be inserted on curved surfaces, quality settings are set from the following options:
- Low - Best used for draft renders, uses the least amount of points.
- Medium - Should work well for most cases.
- High
Just like corners and creases, curved surfaces also can translate into rapid changes of lighting. If lighting appears to be too soft or you're getting some flickering (during animations) on curved surfaces, you can try using the "high" setting. During draft rendering you can use the "low" setting which will introduce the least amount of points but will make GI lighting too soft on abrupt curvatures and might also introduce flickering during animations.
Min Detail
Controls the screen-space density of irradiance cache points across the entire scene.
The higher the number, the fewer points will be created which will make the rendering faster but also blurrier and potentially with animation flickering.
The threshold parameters covered above might introduce a very high number of points which can use lots of memory and make rendering slower so the Min Detail parameter can be used to maintain balance between quality and rendering speed.
A value of 2.0 means "try to not insert points that are closer than two pixels apart." A value of 4.0 is for four pixels, etc.
For final renders you should set this value to 0. For draft renders you can try increasing it to something like 4.0 or 8.0.
Radius Factor
Controls the "area of influence" for the irradiance cache points.
During final rendering, the irradiance cache points are used to interpolate final GI lighting.
Using large numbers will make the GI lighting a slightly more blurry but also with fewer splotches.
For the majority of cases you should use a setting of 2.0. During draft renders (and with low quality threshold settings) you can try a setting of 4.0.
Using values larger than 2.0 might have some impact on memory and also final rendering performance.
Smoothing Passes
Controls the how many smoothing passes will be executed in order to help remove splotchy artifacts by blurring irradiance cache points together. A Smoothing Passes value of 0 will result in no smoothing.
The more smoothing passes the smoother the final result.
Smoothing the results will cause some loss of GI detail (shadows) and might introduce a bit of flickering in animations - but both of these issues might be acceptable during draft rendering.
Normally, in order to remove splotchy artifacts one has to increase "Rays" but a faster alternative is to use Smoothing Passes.
Usually a value of 1 is an acceptable compromise: it rarely causes issues during animations, it only causes a bit of loss of sharpness and the final results do look smoother.
Irradiance Point Cloud
Irradiance Point Cloud
Irradiance Point Cloud section is only visible when Secondary GI Engine is set to Irradiance Point Cloud
Irradiance Point Cloud (IPC) data is a view-dependent secondary GI method which means that it has to be re-generated when either the camera or any objects move. It also has to be regenerated if lights change position or intensity and if materials are adjusted.
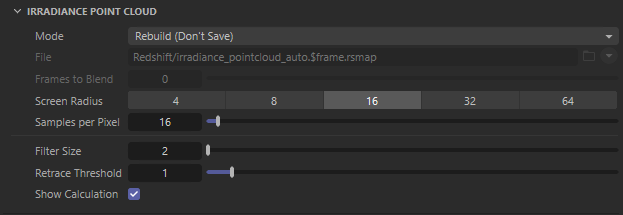
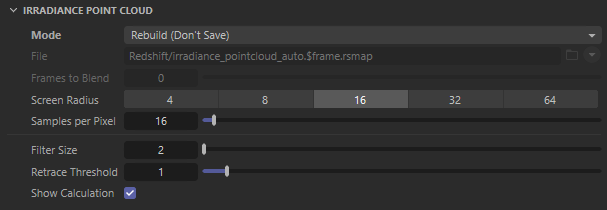
Mode
Specifies the Irradiance Point Cloud mode to be used from the following options:
- Rebuild (don't save)- Redshift will compute a new irradiance point cloud from scratch (for each frame) but will not save it to disk. The frame will be rendered to completion.
- Rebuild (prepass only) - Redshift will compute a new irradiance point cloud from scratch (for each frame) and will save it to the user-specified file. The final rendering pass will be skipped.
- Rebuild - Redshift will compute a new irradiance point cloud from scratch (for each frame) and will save it to the user-specified file. The frame will be rendered to completion.
- Load - Redshift skips the computation stage and the data is loaded from the user-specified file in the parameter below. The frame will be rendered to completion.
File
Specifies where to save or load the Irradiance Point Cloud data depending on the Irradiance Point Cloud mode as covered below.
- Rebuild (prepass only) - Save irradiance point cloud data to the user-specified file.
- Rebuild - Save irradiance point cloud data to the user-specified file.
- Load - Load irradiance point cloud data from the user-specified file.
Frames to Blend
When enabled, it allows Redshift to average the results of multiple irradiance point cloud files (one for each frame) together depending on the specified number of frames.
Only available when Irradiance Point Cloud is set to Load mode since it relies on loading preexisting irradiance point cloud data for multiple frames.
Irradiance Point Cloud frame blending can be used to improve flickering that might be present due to insufficient quality settings or difficult lighting situations.
Please refer to the Irradiance Point Cloud page for more information.
Screen Radius
Controls how far to space out the IPC points in screen space, Screen Radius values refer to pixels.
Higher "Screen Radius" values mean fewer points will be created and therefore less GPU memory will be used. However if points are too far apart due to a large Screen Radius then the primary GI engine (either Irradiance Cache or Brute Force) will not use these points as often. There lower "Screen Radius" values can actually translate into better rendering performance as it assists the primary GI engine more frequently at the cost of increased GPU memory usage
The irradiance point cloud algorithm stores points around the scene but it can't store a point for each ray that was shot from the camera because doing so would generate an extremely large number of points for high-resolution images. Instead, it uses a screen-space metric to space out these points.
Frequently a setting of 8 or 16 will work fine. If your scene is of a high resolution (2K or larger) you can try larger values such as 32 or 64.
Samples per Pixel
Controls the quality of each IPC point.
Higher values produce smoother results (in some ways, this works like "Rays" for Brute-Force or the Irradiance Cache).
Scenes that are fairly well-lit (large light sources or several of them covering most surfaces) can use values such as 8 or 16. Harder lighting scenarios (small bright light sources or lighting coming through small openings) will need higher settings such as 32 or 64.
The "Screen Radius" can also play a role in the final point quality. If you increase "Screen Radius" there are fewer points so each point will receive more rays and, hence, be smoother.
|
|
|
|---|---|
|
Samples Per Pixel: 0 The points are noisy due to the low Samples Per Pixel. |
64 With more Samples Per Pixel the IPC computation stage takes longer, but the artifacts are improved. |


Filter Size
Controls how many IPC points are used by the primary GI engine.
The Irradiance Point Cloud is used by the primary GI, either Brute-Force or Irradiance Cache. When a ray shot by Brute-Force or an Irradiance Cache point hits a surface the closest Irradiance Point Cloud points are then found and used. The "Filter Size" controls how many of these "closest points" the algorithm should use.
Larger numbers will smooth out the points but will take longer to render.
The default 2 value should work for most cases. We generally recommend smoothing out the Irradiance Point Cloud using more "Samples Per Pixel" instead of increasing "Filter Size".
Retrace Threshold
Controls how many IPC points are used in difficult scenarios like around corners and creases to help reduce splotchy artifacts and light leaks in those areas.
The higher the "Retrace Threshold" value is the more these points will not be used around corners and creases but additional rays will have to be shot instead. Shooting rays is slower but more accurate than simply using IPC points, so increasing "Retrace Threshold" can make the rendering a bit slower during the Irradiance Cache computation stage (if Irradiance Cache is selected as the primary GI engine) or during final rendering (if Brute-Force is selected as the primary GI engine).
The Irradiance Point Cloud is constructed without too much care about scene detail (creases, corners, etc). This is done to conserve memory. Not doing so would mean creating a very large number of points around corners (like the Irradiance Cache has to do).
For this reason, using the Irradiance Point Cloud as a secondary GI engine can sometimes create splotchy artifacts near corners or cause light leaks. The "Retrace Threshold" parameter prevents Brute-Force or Irradiance Cache from using points in these places.
When using Irradiance Cache as the primary GI engine: values such as 1 or 2 as usually sufficient.
When using Brute-Force as the primary GI engine: values such as 2 or 3 are usually sufficient. Brute-Force is a more accurate technique than Irradiance Cache so any artifacts would be more visible. This is why this value has to be higher for Brute-Force than the Irradiance Cache.
|
|
|
|
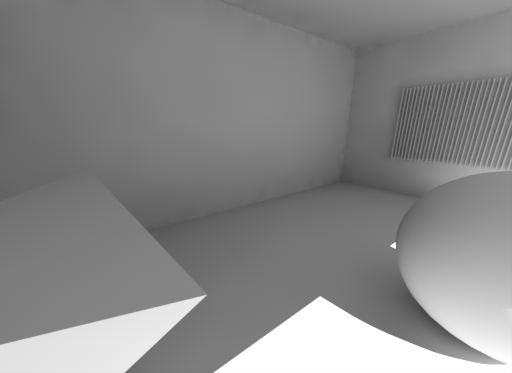
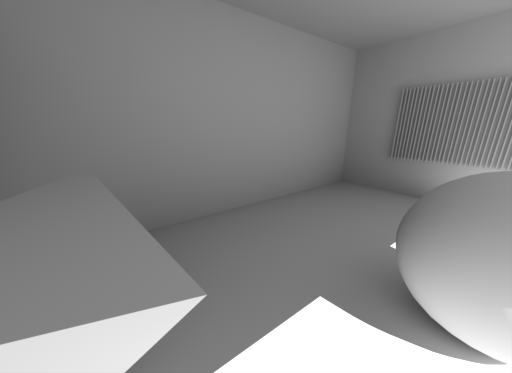
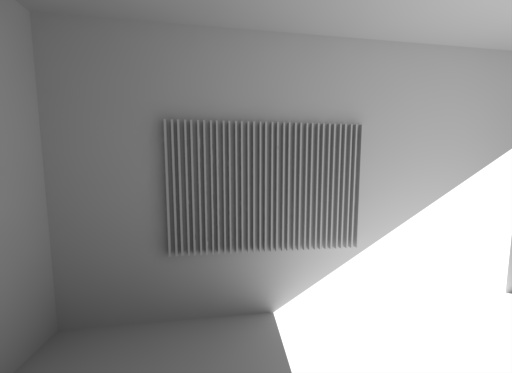
Retrace Threshold: 0 Samples Per Pixel: 8 The IPC points are noisy because the samples per pixel count is low so most of the IPC points are being used in these difficult areas because of the low Retrace Threshold so artifacts appear near corners. |
3
The final rendering is a bit slower but much smoother with a higher Retrace Threshold even though the samples per pixel count was not changed. |
Show Calculation
When enabled, it shows the color results of the rays shot from the camera during the Irradiance Point Cloud calculation in order to help better visualize the results.
For this reason, it can be mistaken for progressive rendering.
The overhead of this option can be significant on some very simple scenes so disabling "Show Calculation" can make the computation a bit faster.