Asset Browser
General
The Asset Browser is an indispensable tool when working with assets: It provides access to all assets made available by Maxon and you can also manage, organize – and above all quickly find – these and custom created assets and scenes.
What are assets?
Assets can be anything that can be part of or used by a Cinema 4D scene. This can, for example, be objects, scenes, Nodes, images, videos, and more, but also category names, keywords, Smart Searches, etc.
These assets can be saved locally on a hard drive or on a Maxon or other server. Assets are organized in databases (see The asset concept.)
The Asset Browser .has replaced the Content Browser. The Asset Browser offers easier to use functions, e.g., you no longer have to download several GB of Content Browser libraries but can only download individual elements that can be easily found using the powerful filter and search functions. What's best is that assets that have been downloaded can be accessed by other Cinema 4D releases (S24 or later), which means they don't have to be downloaded or imported again in order for the Asset Browser to find them.
If you open such a file on a different computer, textures, for example, will automatically be found and downloaded – as long as the computer has an internet connection. The same applies to custom libraries that you can share with other users.
Internally, asset libraries are basically implemented as databases – and you don't have to be a database expert to use them! They are used just as any other Manager in Cinema 4D.
Generally speaking, if you create access to an asset database (see Databases), you will no longer have issues with missing textures, for example. Of course the scene must be saved as an asset in the respective database. Databases can be saved in several ways (locally, in network folders or online) and shared.
How are assets loaded?
Assets displayed in the Asset Browser can be loaded into Cinema 4D in one of several ways:
- Double-clock on the asset. It will be loaded in the corresponding Manager, depending on the asset type (e.g., objects in the Object Manager, materials in the Material Manager, JPEGS in the Picture Viewer).
- Drag and drop the asset onto the respective Manager or field (e.g., JPEG onto the Node Editor). The cursor will show if this is possible or not.
- Right-click on an asset and select the Load, Create Node, etc. command, depending on the asset.
-
The
 Place tool can be used to place objects directly from the Asset Browser onto object surfaces in the scene.
Otherwise there are several practical functions integrated into the Asset Browser such as:
- If the same object is dragged and dropped into the Viewport, only instances – or XRefs from the very beginning – will be created from the 2nd one on.
- The powerful database makes it possible to include metadata, preview images, keywords, dependencies (e.g., JPEGS that are assigned to a material) and other elements in an asset, which makes working with the assets much easier (e.g., locating them in a huge database).
- The Asset Browser notes how often a particular asset has been used or when it was created, which makes it possible to narrow down the search for a specific asset even more precisely.
- Textures that are used multiple times only exist once in the database.
- Drag & Drop: Describing in detail all possibilities that the drag & drop functionality has to offer would exceed the scope of the documentation. Suffice it to say that it works just like the usual drag & drop functions: assets can be dragged from the Asset Browser into the respective Cinema 4D Managers – and vice-versa. You can drag materials, objects and files (from the Finder/Explorer) into the Asset Browser to define these as assets. A dialog window will open in which you can define the database and category in which the asset should be saved.
- … and much, much more – which is described in detail on the following pages!
Interface

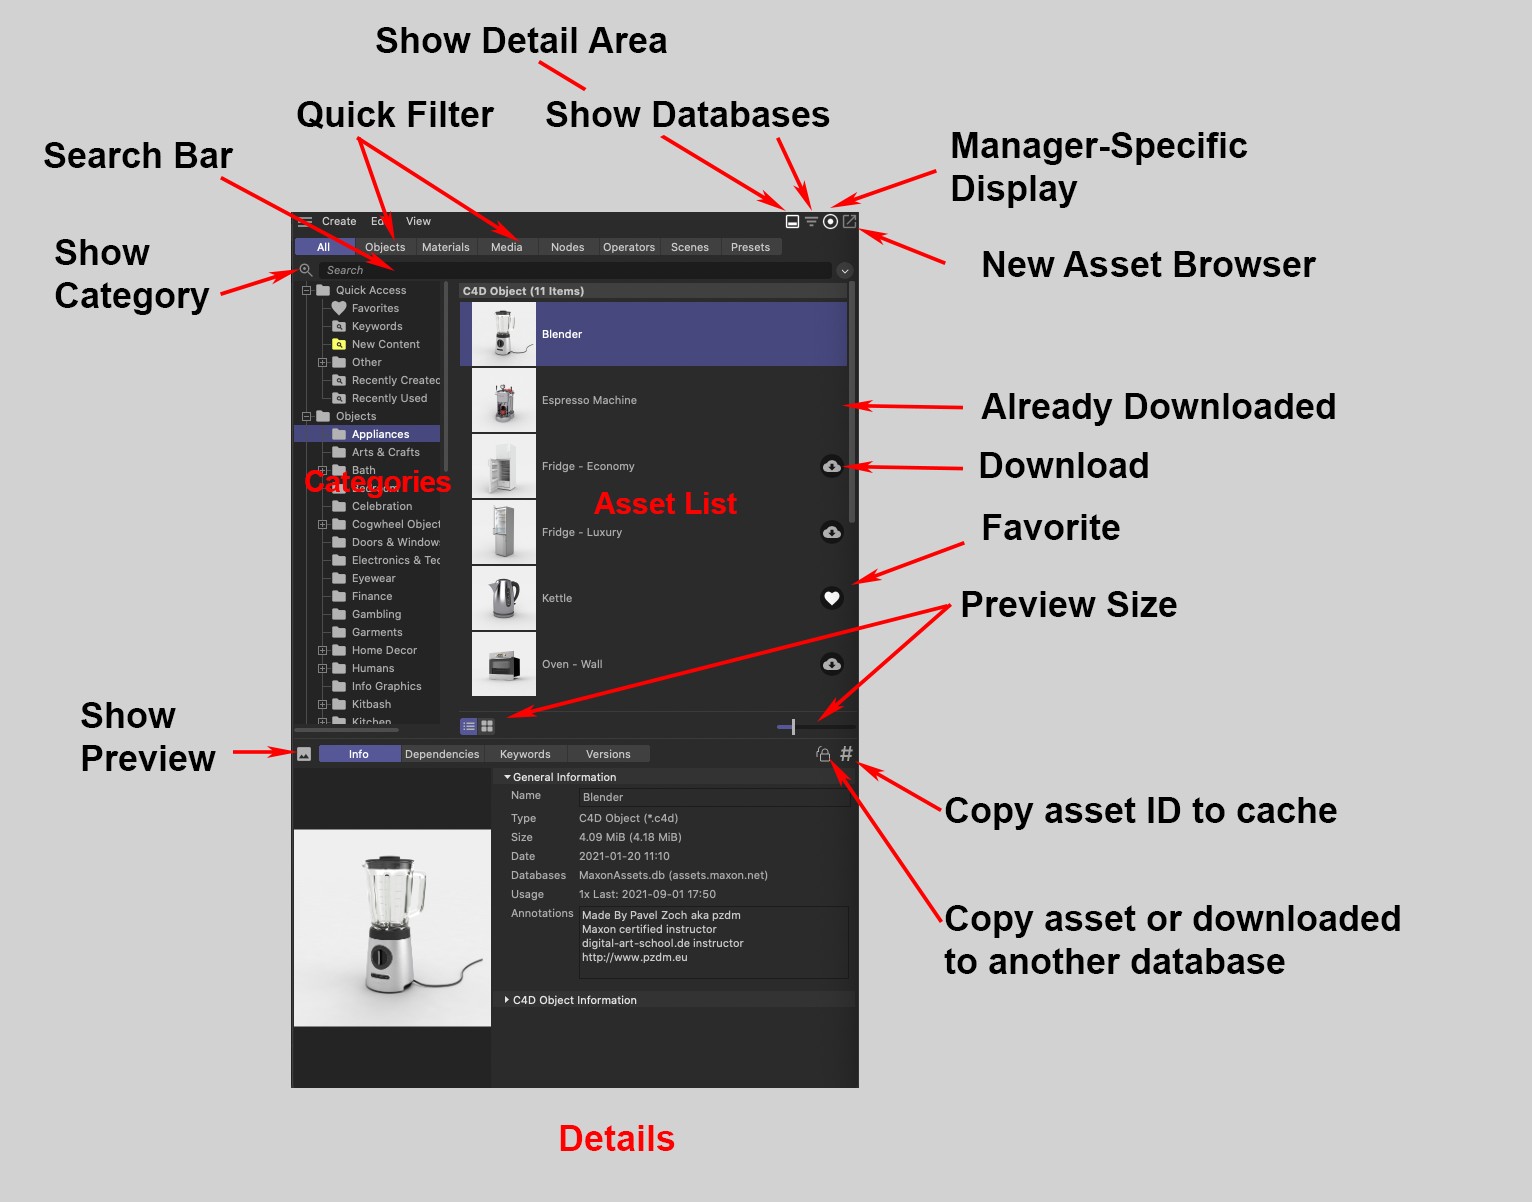
The Asset Browser is in essence made up of 3 areas that are described in the following sections:
- The Category Areain the tree view on the left. This is where the individual assets, incl. Smart Searches, keywords, etc. under Quick Search at the far top, are listed.
- The Asset List on the right shows the assets, independent of the selection made in the Category area.
- The Detail Areacan be displayed at the bottom or at the far right. This is where all kinds of information is displayed about the assets selected in the asset list. Additional functions are also available such as assigning keywords or versioning.
The 4 icons at the top right
At the top right you will see 4 icons. These have the following functions (from left to right):
Show Detail area

Shows or hides the Detail area. Right-clicking on the icon will let you define the desired location of the window (bottom or right).
Database display

Here you can display all available databases. Clicking on the eye icon at the right of a database name will hide or show all assets in that category area and the asset list. Cinema 4D will note this state, even if the connection to the database is removed and later added again.
-
Read Only: This database only offers read access (e.g., the Maxon database); you are not permitted to make changes.
-
ISaved Index: Here an index was created (see Create Database Index below).
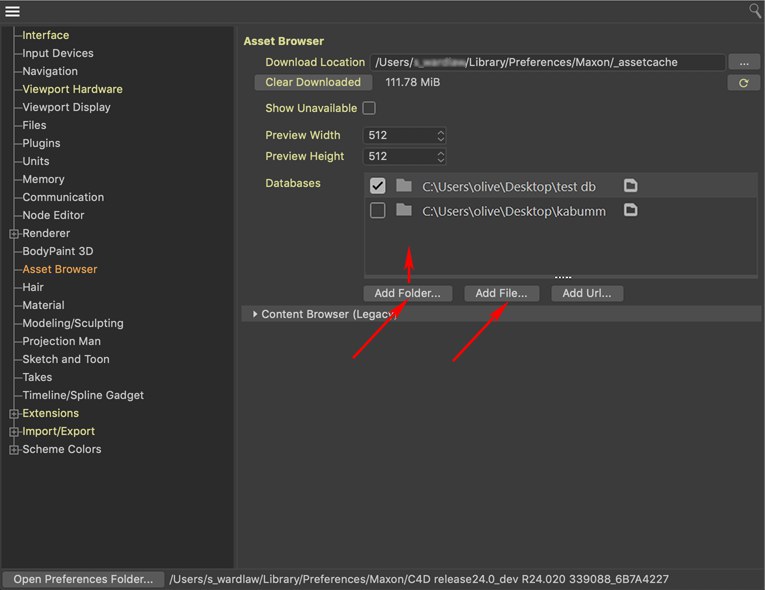
Databases can be disconnected in the Preferences settings in the Asset Browser menu.
- Ctrl: Only this database will be shown (all others will be hidden)
- Alt: Only this database will be hidden (all others will be shown)
Here you will find a range of databases that are included or connected and of course custom databases you can create and/or connect yourself (see also Databases). Note that less can be listed depending on the database you click on.
Right-clicking on the database display will make the following commands available:
This command, which opens a path dialog window, is used to create a new database where assets can be saved (you will then see a number of database-specific files in the selected directory). The directory name will also be used as the database name and will appear wherever this asset is saved, for example.
In the Preferences settings’ Asset Browser/Databases menu you will then see these databases listed.

These two commands have the same function as the Add Folder and Add File commands in the Preferences settings’ Asset Broswer menu.
You can make the asset database (unzipped in a folder or zipped as a Zip file) accessible for Cinema 4D. Assets in the databases will be visible right away.
If you're planning to create a database on a web server that should be used by other users, you first have to create one using the Create Database Index function (a directory with the name "_index" with the respective elements will be created). Other users can interact with this database as they would with the Maxon database "MaxonAssets.db".
If you modify the database, e.g., to add or delete elements, assign keywords, etc., you have to use the Delete Database Index function to delete existing elements and the Create Database Index function to add the new ones.
A custom database index can also speed up work with databases if these, for example, lie in your network. Here you should also update changes made to the database as described above.
Opens the path of the selected database in the Explorer or Finder, respectively.
Automatic switching

If this option is disabled, only those assets will be shown that can be used to activate the respective Manager. If the Object Manager is activated, for example, only objects that can be loaded into the Object Manager will be listed in the category and asset lists. Nodes, JPEGs, etc. will not be shown. Clicking in the Viewport will show everything again. If this option is enabled, all assets will be shown. Exception: Quick filters or filters are defined to show something else.
New Asset Browser

Use this command to open an additional Asset Browser. This makes it easier to move assets, for example.
If you also press the Shift key, the new window will open in simple mode.