HUD
Here you can choose which types of data information will be displayed in the HUD.
Displays the distance between the camera and the Point of Interest (see Camera Mode).
Displays the current frame.
Displays the current time.
This HUD element can be used to not only display the currently active camera but also to switch between other existing cameras, which can be selected from the list.
Displays the types of projection.
Displays the name of the active object.
Displays the name of the top most object of an object hierarchy when an object within this hierarchy is selected.
Displays the name of the Parent Object of an object selected within an object hierarchy.
Here you can activate a small Marker menu in the Viewport (at the bottom center). If you click on it, all existing Markers will be listed. If you select a Marker, the animation will jump to this point in the animation.
Displays the number of objects in the current scene.
Displays the number of selected objects.
Displays the number of points of selected objects.
Displays the number of selected points.
Displays the number of edges of selected objects.
Displays the number of selected edges.
Displays the number of polygons of selected objects.
Displays the number of selected polygons.
Displays the number of polygons of selected objects.
Displays the number of selected N-Gons.
When the animation is played or scrolled, the frame rate Frames per Second will be displayed. The more complex a scene is, the lower the frame rate will be (see also Optimizing the display speed in the Viewport).
Enabling this option will display several view statistics in the HUD (number of triangles, points, etc. Included are global grids, highlighted elements, lights, cameras, etc. You will not be supplied with information about the scene geometry itself but rather for the elements that have to be displayed by the GPU framework). These statistics are for informational purposes only and have no other function.
Displays a small menu from which the last eight tools used can be selected.
During sculpting, relevant statistics (e.g., polygon count) will be displayed in the HUD at the top right of the Viewport. Use this option to enable or disable this display.
This command can be used to display the Rasterweite in the Viewport as a HUD element.
Instead of switching to the Take Manager, this HUD element can be used to switch between existing Takes that can be selected from the list.
Like the Current Take HUD element described above, the render preferences can also be displayed and selected here (instead of doing so in the Render Settings).

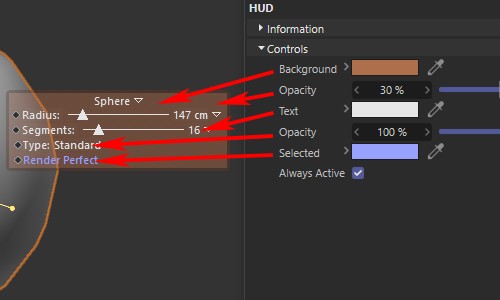
These settings allow you to adjust the look and feel of the HUD (its colors and transparency).
Use this setting to define the HUD's background color.
Use this setting to define the degree of opacity of the HUD's background.
Use this setting to define the color of text.
Use this setting to define the degree of opacity of the text.
Use this setting to define the color of text for active HUD elements.
If active, you will not be able to manipulate an object lying beneath a HUD element. Mouse actions will only affect the HUD element.
We recommend you deactivate this setting since both HUD elements and objects lying beneath the HUD can be edited. The following applies:
- Click + ALT-key: Mouse affects HUD
- with no additional keys pressed: HUD will be ignored and the mouse will only affect objects that lie beneath the HUD.
