Stereoscopic
You can define a stereoscopic display for each Viewport individually. Detailed information regarding stereoscopy can be found here.
Enables or disables the stereoscopic view. This option corresponds with the ![]() Stereoscopic option in each view's Options menu, i.e., it can also be enabled or disabled there.
Stereoscopic option in each view's Options menu, i.e., it can also be enabled or disabled there.
If enabled, the values defined in the Render Settings’ Stereoscopic menu will be applied.
The normal view mode without stereoscopy.
This is the most well known method, which has been used in movie theaters since the 50s. An image’s color information is separated using 2-color glasses (previously red-green, today most commonly red-cyan). Advantage: simple, affordable glasses. Disadvantage: color range is in part very limited.
This method requires a monitor with a polarization filter and glasses with polarized glass. Since both images are coded into a single image (e.g., left eye all even, right eye all uneven lines), the resolution is halved. Advantage: affordable glasses, good color reproduction. Disadvantage: special monitor required, reduced resolution.
The most high quality method is the use of special glasses that are synchronized with a monitor, which makes it possible for images to be displayed alternately to the left and right eye. Advantage: best quality, true color reproduction. Disadvantage: expensive (special hardware, monitor must offer 120 Hz).
Left and right images are switched and squeezed into a normal image size. Some televisions use this technique for HD 3D because the transmission band width is the same as the HD band width. The terminal device must be able to decode these double images and display them sequentially (most commonly in combination with shutter glasses). Disadvantage: reduced resolution, expensive technology (special hardware required).
If enabled, the left and right image halves will be swapped.
Additional Parallax (Pix.)[0..2147483647]
Moves the image halves by the defined value in pixels. This can be used to increase the stereoscopic effect.
The color of the stereoscopic color coding can be defined here when using the Anaglyph mode. Both colors should be the same as the lenses of the 3D anaglyph glasses you will be using. If your client does not supply you with color information, use Red-Cyan. This is the most commonly used color combination and can display numerous colors compared to the primary color combinations of red-green or red-blue.
You can use the Custom option to create your own color combination (however, it will then be difficult to find a matching pair of glasses…).
If Method is set to anything else but Full you will only be able to define the left eye color. The right eye color will automatically be set to the left eye’s complimentary color.
Here you can define the individual colors for the stereoscopic color coding (System must be set to Custom). The left color must be the same as the color of the left lens of the glasses.
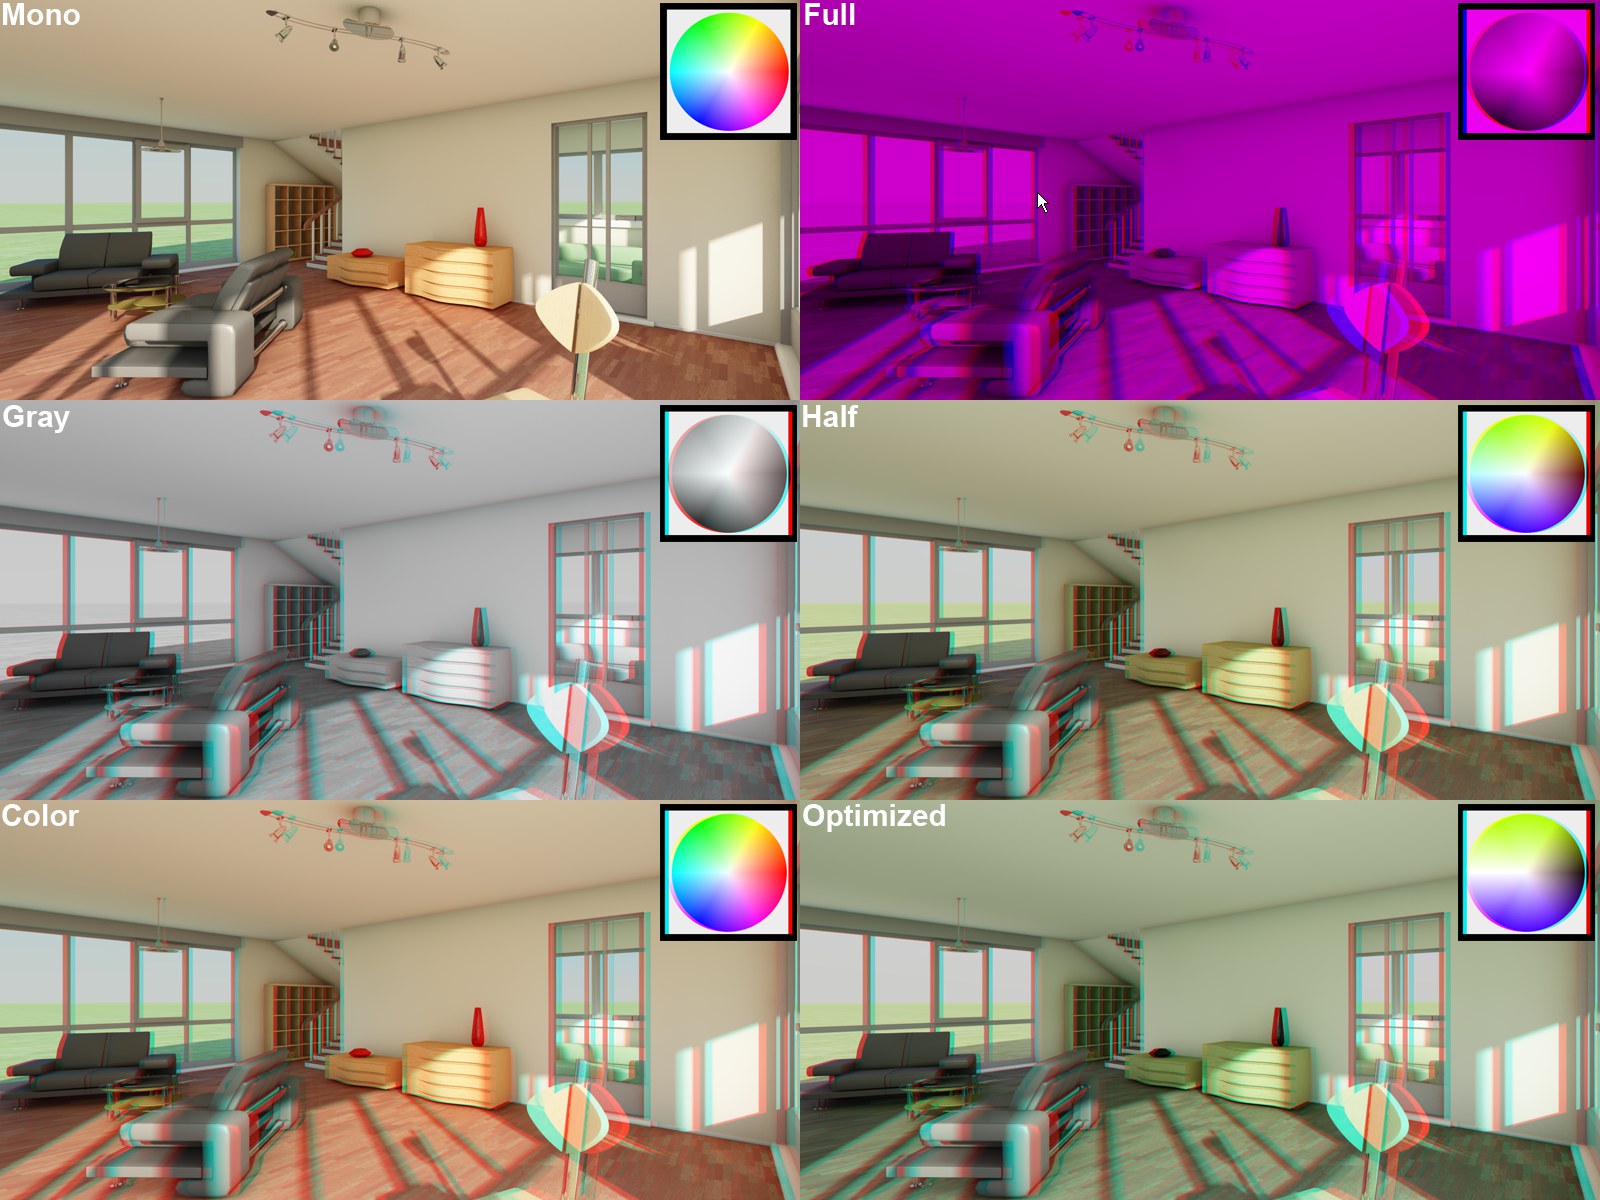
 The different available methods (Full with anaglyph colors red-blue). Models by DOSCH Design.
Using this setting’s options you can affect the color of the stereoscopic image. A problem with the anaglyph technique is the color deviation of the original scene. Some colors cannot be displayed without straining the viewer’s eyes (red when using red-cyan coding). It is suggested that Optimized be used because it offers the least strenuous "viewing experience".
Red-Blue or Red-Green should be used when Method is set to Full…
The following list is closely arranged according to the quality that can be expected from anaglyph images. The list is arranged from worst to best:
The oldest (and lowest quality) method of anaglyph display due to the fact that the display is dark and monotone. This mode is designed for use with the Red-Blue or Red-Green anaglyph techniques.
The anaglyph image will appear as a gray-scale image through the glasses (not designed for use with red-blue or red-green). For brighter images use Full.
These modes allow only a limited color reproduction compared to the previously described options. Blue, green and yellow tones can be reproduced very well when the common red-cyan code is applied. If Color is selected, "retinal rivalry" can occur, i.e., red surfaces (red-cyan) will cause the left eye to pass on maximum color intensity to the brain and the right eye will only see "black". This is irritating and strenuous for the eyes (can be observed on the red vase in the image above). This effect can be minimized by selecting Half Color. However, red will then be darkened to such a degree that it can no longer be recognized as such.
This mode is similar to the Half Color mode but it offers better color reproduction and minimizes the retinal rivalry effect (see above).
This mode defines whether or not both image parts should be arranged next to each other (horizontally or vertically).
If Mode is set to Side-by-Side you are given the option of mirroring the image halves along the X or Y axes.
If Mode is set to Interlaced, you can also define whether the coding should take place via offset lines (Horizontal) or columns (Vertical). Furthermore, there is an additional combination of both modes called Checkerboard.
Channel[-2147483648..2147483647]
If you adjust the render settings for numerous Channels you can use this setting to define the channel to be displayed for a given view.
