Object Properties
Here you can select if the simulation should be calculated using the CPU or GPU. Complex calculations (dense mesh, many collisions) should be calculated using the GPU (graphics card) and only simple scenes using the CPU.
Note also the following Limitations
Here you can define the gravitation (a force in the negative -Y axis direction). Note that the Force object ![]() Gravity (the direction of its effect can be modified) can also be applied. Both will then be added.
Gravity (the direction of its effect can be modified) can also be applied. Both will then be added.
Strange simulation behavior can occur in very small or very large scenes (see also Tips and Tricks), for example in an "explosion" scene.
This factor translates the CINEMA 4D size ratios into those of the underlying simulation engine. Follow this simple rule of thumb:
If you have objects flying around that are predominantly 100 CINEMA 4D units in size, leave Scene Scale set to "100cm". If the objects are 1000 units in size, enter "1000 cm".
You only need to change this value if strange behavior, i.e. miscalculations, occur.
This parameter is crucial for the precision of the simulation. The higher the value, the more precise the calculation will be and the more precisely the collision detection will be (with correspondingly longer calculation times).
Each animation frame is internally divided temporally with the Substeps specified here. A simulation algorithm (calculation of the constraint effect, object positions and velocity, etc.) will be run for each intermediate step.
Especially in the case of penetrations at high speeds, you should increase this value. Imagine an object traveling at high velocity that collides with a hanging cloth. Assume the object is to the left of the cloth at frame 12 and to its right at frame 13. Cinema 4D would not detect a collision (if Substeps is set to 1). With multiple Substeps that, for example, calculate image "12.2" and "12.3", the collision would be detected and calculated correctly.
This is a disadvantage: Substeps (and Iterations) have an influence on the stiffness of the clothing objects to be simulated. The larger the Substeps/Iterations, the stiffer the cloth will be (i.e., the more precise the bendiness/stretchiness will be).
Simply put: applying a large number of Substeps and iterations will produce a correspondingly more realistic result. Most often, these values have to be kept low to keep the calculation speed manageable. This means that the solver, which has to take innumerable constraints into consideration, makes shortcuts and deviates from a realistic result. These deviations can primarily be seen in a lack of stiffness (rubbery behavior) but also in imprecise collisions, etc. in some cases.
Note that very high values (e.g. 200) may cause paradoxical behavior: instead of precision increasing, it decreases. The reason for this is the 32-bit precision of the GPU Try instead increasing the following Iteration setting of Substeps. See also Tips and Tricks for additional measures that can be taken.
Internally, an iterative algorithm is used that approaches the mathematically(!) optimal final result (= all constraints are met) as closely as possible. Iterations define how often the numerous constraints are calculated per Intermediate Step.
The practical impact, for example, on clothing behavior is: the fabric becomes stiffer - because constraints hold better.
Higher values can help to avoid dot jitter.
See also previous parameter Substeps, both settings are closely linked and have similar effects.
Avoiding jitter.
The following two settings are primarily used to reduce jitter that occurs in small areas.
In general, it can also help reduce Substeps and increase Iterations.
The internal point calculations due to the various constraints "tugging" on them can result in large point deviations, which can give the impression that additional, sudden impulses are occurring.
With smoothing iterations > 0, additional averaging calculations are performed, whereby this effect loses its effect, i.e. there is less jitter.
Only use this parameter if it is necessary, as it can result in side effects such as changing stiffness.
If you notice that there is a frame delay of 1 frame (i.e. the generator is 1 frame ahead in time) when playing a simulation with a Generator, you can activate the option here, which should improve the situation. The disadvantage, however, is that for internal reasons 1-frame delays can occur in other areas (e.g., animations). In this case you can cache the simulation and, for example, offset the animation by 1 frame.
Using this setting, velocity / energy can be removed from the system. Smaller values of up to 3% are recommended. Higher values will make the simulation look correspondingly more like it were under water.
Simulations tend to "explode" occasionally, this can be countered by carefully increasing this value.
Improve the collision detection
Collision detection is immensely important; firstly, it looks bad when penetrations occur and secondly, once this has happened, the penetrated areas adhere tenaciously to each other and are difficult to separate. This is why there is a series of separate settings (below) that only affect collision and can be calculated faster than if Substeps and Iterations values were increased, which requires a lot of calculation time and also modifies important properties such as the stiffness of the cloth.
These collision settings refer to internal calculation processes and sound complicated in the description - and in principle they are, we've tried to keep it as simple as possible. Generally speaking, the values should be increased carefully if collisions are problematic.
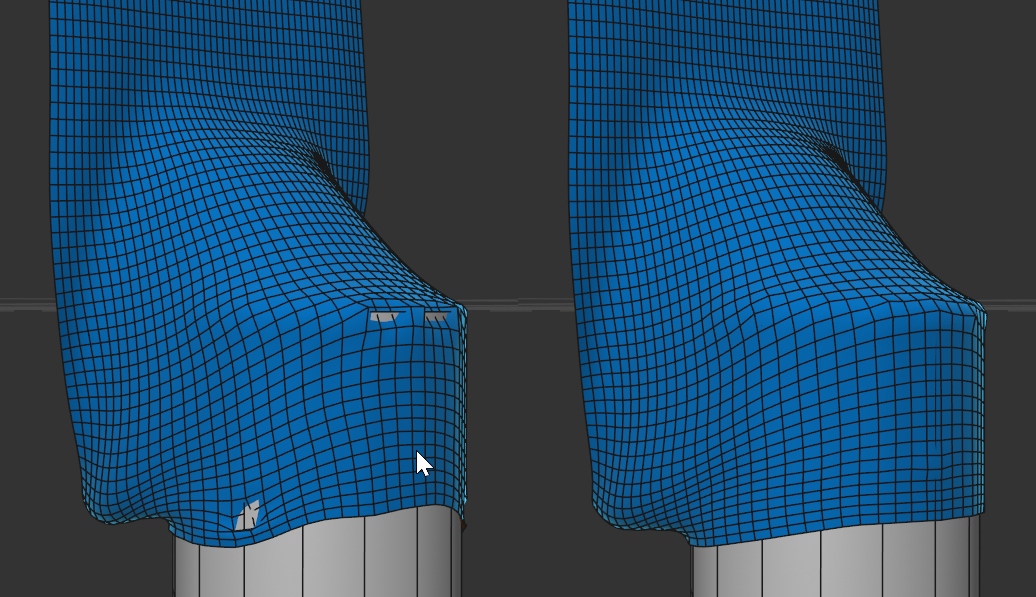 A fast-moving textile collides with a cylinder. With collision passes set 0 there are penetrations on the left side; on the right side with a value of 5 there are no penetrations.
Here you can define how often per animation frame collision detection should take place. If a collision is detected, dynamic and temporary collision constraints (whose precision can be controlled using the following 3 settings) are created that ensure that the object to which the tag is assigned can't penetrate other - or its own - collision geometry.
If you define a value of 1 here, a collision detection is performed at the temporal beginning of the simulation image. Any collision constraints that are created will be maintained until the next collision detection and will be taken into consideration and evaluated for each Intermediate Step.
Especially for fast, rapidly rotating or generally non-linearly moving geometry, increasing this value can be advantageous. For just about any penetration, increasing the Collision Passes can be helpful.
Make sure that the Substeps value is not smaller than Collision Passes, otherwise nothing will happen.
This setting inserts additional collision queries at the temporal end of the simulation image, where actually all new point positions have already been calculated. This should prevent existing penetrations (that the algorithm initially oversaw) being present when the next simulation image is calculated, which could be problematic for the simulation. For each process, the newly discovered collision constraints will be calculated multiple times (as often as is defined under Iterations).
Note that only small values between 1-3 are useful.
Alternatively You could significantly increase the Collision Passes setting but Post Collision Passes is usually faster.
Especially for moving collision objects, increasing the Post Collision Passes value (and also the Polish Iterations value) will produce better results.
With this parameter, additional iterations are performed only for the collision constraints found before by Collision Passes and Post Collision Passes. This also helps prevent collisions.
Make sure that before you increase the Collision Passes, Post Collision Passes and/or Substeps value, try applying Polish Iteration values of 5 or 10 first. This may be the solution. Polish Collision Passes is calculated relatively quickly.
Other settings
If this option is enabled, the simulation always runs over the entire preview image area as defined using Preview Min and Preview: max (or interactively in the Animation palette). Disable this option to individually define the simulation length using the following two settings.
Start Frame[-2147483648..2147483647]
End Frame[-2147483648..2147483647]
Disable the previous option to define an individual simulation duration here. This is, for example, very useful if a swinging rope should collide with a character at a specific frame - at which point the simulation will begin.
The following applies to the Simulation Project Settings: All tags and objects relevant for a simulation end up here when they are created (i.e. they initially take effect scene-wide). If you assign these to a specific Simulation Scene object at a later time it will be removed from the list.
For the Simulation Scene object: Drag all simulation tags and objects that should work exclusively for this simulation scene object into this list (see also previous paragraph). The button on the right can disable these.