Parameter
Into this box, drag the object that should emit the particles. This must be a polygon object. If you want to use a primitive or Generator object instead, you must first convert it to polygons.
Here you can restrict the emission of particles to specific polygons. Create a Polygon Selection tag and in it store a selection for the polygons that you want to emit particles. Drag & drop the Polygon Selection tag into this box.
If you want to control the particle emission using a texture, the object must have a UVW tag. If the object has only one UVW tag, you can leave this box empty (the sole UVW tag will be used automatically). If on the other hand the object has multiple UVW tags, Drag & drop the UVW tag that you want to use into this box.
In this mode, particles will only be emitted from parts of the surface that are covered by the UVW map.
In this mode, particles can be generated from anywhere on the object, even if the picture covers only part of the surface.
If you want lights to control the particle emission, drag the lights from the Object Manager and drop them into this box.
Particle Creation
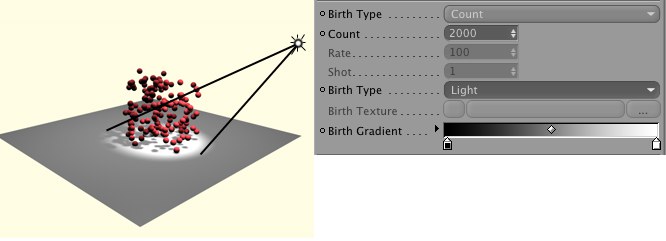
In this part of the dialog you will find settings that control how many particles are emitted and where they are born.
This mode is used to define the maximum number of particles that are visible at once. This value works closely with the setting for the particle lifespan. If you have a defined particle lifespan of five frames, for example, and a count of 100, the number of particles from one frame to the next will increase to 100 until the first particles die. At this point, the same number of new particles will be created as the number that die. The number of particles will remain constant.
This value controls the birth rate per particle per second. You should be familiar with this mode from the Cinema 4D emitters. A fixed number of particles will be created per second of animaton. You have no control over the actual number of particles in your scene but can create a continuous stream of particles.
This represents the number of particles created per frame of animation. This is very useful, for example, if you need a specific number of particles from one frame of animation to the next. The P MatterWaves emitter will create a very consistent stream of particles in this mode.
In this mode, the Count value defines the maximum number of particles that may exist at any one time. The Count value works closely together with the Life value. For example, if Life is set to 5 and Count is set to 100 particles, the number of particles will increase steadily to 100. As particles continue to die, new particles are emitted to keep the count at 100.
In Rate mode, the Rate value defines the number of particles that are born per second of the animation — the total number of particles will therefore be affected by the frame rate.
In Shot mode, Shot defines the number of particles created per frame of the animation.
The particles will be emitted at a constant rate from anywhere on the object.
This mode enables you to control particle emission using a picture or 2D shader. To load a picture, click the three dots button and use the dialog that opens to locate and load the picture. To load a 2D shader, click the triangle button next to the Birth Texture box and choose the shader from the menu that opens.
Note that it is the brightness of the picture or shader that will control the emission rate. Color plays no part, therefore you can use grayscale pictures if you wish.
The picture or shader will be fitted to the object's surface using the chosen UVW coordinates. Parts of the surface that receive a white color from the picture or shader will emit particles at the maximum rate, while parts of the surface that receive a black color will emit no particles at all.
Parts of the object that are fully lit by this light will emit particles at the maximum rate, while parts of the object that receive little or no illumination from this light will emit no particles.
As with the Texture mode, you can use a gradient to adjust how intermediate brightness values affect the emission rate.
In this mode, you can use lights and a picture or shader to control the emission rate. A surface will then only emit particles at the maximum rate if it is fully illuminated by the lights and receives a white color from the texture or shader.
The Birth Gradient enables you to control how the birth of particles is affected by brightness values between the two extremes of black and white. The left edge of the gradient represents the parts of the picture or shader that are black, while the right edge represents the parts that are white. With the default gradient, a gray value will cause particles to be emitted at a rate that is relative to its brightness. For example, a gray color with 70% brightness will cause particles to be emitted at 70% of the maximum rate.
You can adjust the gradient by adding new knots or by moving the existing ones or both.
For example, if you drag the black knot to the right until all of the gradient is black except for a small, white band on the right, the particles will only be emitted in those areas where the color value is very close to the maximum white tone.
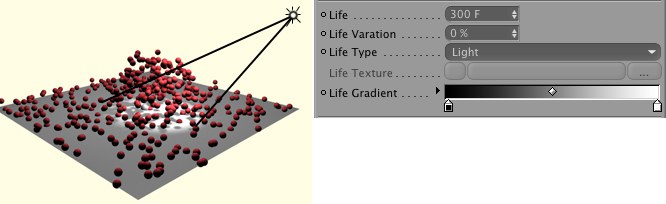 In this part of the settings you can specify how long the particles should live for.
Here enter how long the particles should live for, in frames.
This value enables you to vary the lifetime of the particles that are emitted (all of the node's variation values are based on the Random Seed value).
The lifetime of the particles will NOT be affected by lights or textures.
This mode enables you to control the lifetime of the particles using a picture or 2D shader. To load a picture, click the three dots button and use the dialog that opens to locate and load the picture. To load a 2D shader, click the triangle button next to the Life Texture box and choose the shader from the menu that opens.
Note that it is the brightness of the picture or shader that will control the lifetime. Color plays no part, therefore you can use grayscale pictures if you wish.
The picture or shader will be fitted to the object's surface using the chosen UVW coordinates. Parts of the surface that receive a white color from the picture or shader will emit particles that live for the maximum lifetime, while parts of the surface that receive a black color will emit particles that die immediately.
You can control the lifetime of particles using one or more light sources.
Parts of the object that are fully lit by this light will emit particles that have the maximum lifetime, while parts of the object that receive little or no illumination from this light will emit particles that die immediately.
As with the Texture mode, you can use a gradient to adjust how intermediate brightness values affect the lifetime.
In this mode, you can use lights and a picture or shader to control the lifetime. A surface will then only emit particles that live for the maximum lifetime if it is fully illuminated by the lights and receives a white color from the texture or shader.
The Life Gradient enables you to control how the lifetime of the particles is affected by brightness values between the two extremes of black and white. The left edge of the gradient represents parts of the picture or shader that are black, while the right edge represents the parts that are white. With the default gradient, a gray value will give particles a lifetime that is relative to its brightness.
You can adjust the gradient by adding new knots or moving the existing ones or both.
For example, if you drag the black knot to the right until all of the gradient is black except for a small, white band on the right, the particles will die almost immediately except in those areas where the color value is very close to the maximum white tone.
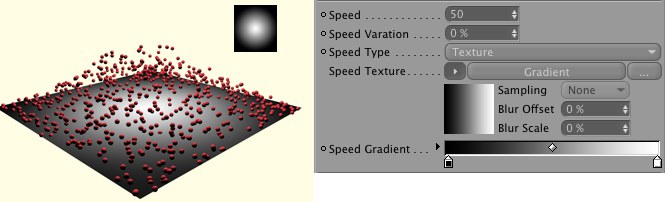 These settings relate to the speed of the particles.
Here you can set the speed of the particles.
This value enables you to vary the speed of the particles that are emitted (all of the node's variation values are based on the Random Seed value).
The speed of the particles is independent of lights and textures.
This mode enables you to control the speed of the particles using a picture or 2D shader. To load a picture, click the three dots button and use the dialog that opens to locate and load the picture. To load a 2D shader, click the triangle button next to the Speed Texture box and choose the shader from the menu that opens.
Note that it is the brightness of the picture or shader that will control the speed. Color plays no part, therefore you can use grayscale pictures if you wish.
The picture or shader will be fitted to the object's surface using the chosen UVW coordinates. Parts of the surface that receive a white color from the picture or shader will emit particles that travel with the maximum speed, while parts of the surface that receive a black color will emit particles with zero speed.
You can control the speed of particles using one or more light sources.
Parts of the object that are fully lit by this light will emit particles that have the maximum speed, while parts of the object that receive little or no illumination from this light will emit particles that have zero speed.
As with the Texture mode, you can use a gradient to adjust how intermediate brightness values affect the speed.
In this mode, you can use lights and a picture or shader to control the speed. A surface will then only emit particles that are travelling at full speed if it is fully illuminated by the lights and receives a white color from the texture or shader.
The Speed Gradient enables you to control how the speed of the particles is affected by brightness values between the two extremes of black and white. The left edge of the gradient represents the parts of the picture or shader that are black, while the right edge represents the parts that are white. With the default gradient, a gray value will give particles a speed that is relative to its brightness.
You can adjust the gradient by adding new knots and moving existing ones.
For example, if you drag the black knot to the right until all of the gradient is black except for a small white band on the right, the particles will have no speed unless emitted from areas where the color is close to the maximum white tone.
Particle Size
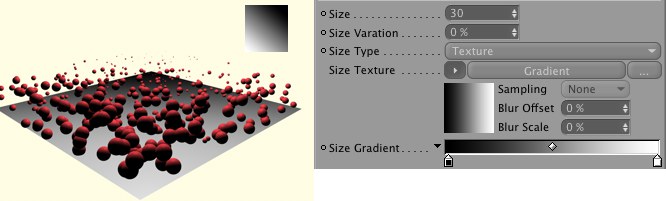 You will find settings to control various aspects of particle size in this part of the page.
Defines the size of the particles.
This value enables you to vary the size of the particles emitted (all of the node's variation values are based on the Random Seed value).
The size of the particles is independent of lights and textures.
This mode enables you to control the size of the particles using a picture or 2D shader. To load a picture, click the three dots button and use the dialog that opens to locate and load the picture. To load a 2D shader, click the triangle button next to the Size Texture box and choose the shader from the menu that opens.
Note that it is the brightness of the picture or shader that will control the size. Color plays no part, therefore you can use grayscale pictures if you wish.
The picture or shader will be fitted to the object's surface using the chosen UVW coordinates. Parts of the surface that receive a white color from the picture or shader will emit particles of the maximum size, while parts of the surface that receive a black color will emit particles of zero size.
You can control the size of particles using one or more light sources.
Parts of the object that are fully lit by this light will emit particles that are the maximum size, while parts of the object that receive little or no illumination from this light will emit particles that have zero size.
As with the Texture mode, you can use a gradient to adjust how intermediate brightness values affect the size.
In this mode, you can use lights and a picture or shader to control the size. A surface will then only emit particles that are of the maximum size if it is fully illuminated by the lights and receives a white color from the texture or shader.
The Size Gradient enables you to control how the size of the particles is affected by brightness values between the two extremes of black and white. The left edge of the gradient represents the parts of the picture or shader that are black, while the right edge represents the parts that are white. With the default gradient, a gray value will give particles a size that is relative to its brightness.
You can adjust the gradient by adding new knots or moving the existing ones or both.
For example, if you drag the black knot to the right until all of the gradient is black except for a small, white band on the right, the particles will be of zero size unless emitted from areas where the color value is very close to the maximum white tone.
Particle Distance from Object
 How far away from the object surface should the particles be born? In this part of the dialog, that's exactly what you can control.
Here enter how far away particles should be born from the object's surface. This distance is measured in the direction of the surface Normals.
This value enables you to vary the distance from the object's surface at which the particles are born (the node's variation values are based on the Random Seed value).
The distance from the surface at which the particles are emitted is independent of lights and textures.
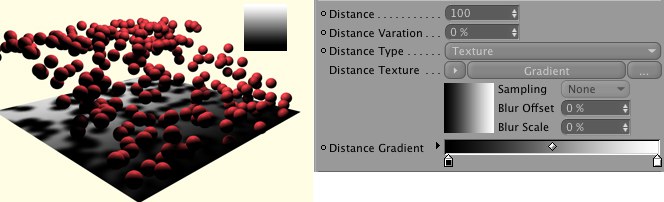
This mode enables you to control the distance of the particles from the object using a picture or 2D shader. To load a picture, click the three dots button and use the dialog that opens to locate and load the picture. To load a 2D shader, click the triangle button next to the Distance Texture box and choose the shader from the menu that opens.
Note that it is the brightness of the picture or shader that will control the distance. Color plays no part, therefore you can use grayscale pictures if you wish.
The picture or shader will be fitted to the object's surface using the chosen UVW coordinates. Parts of the surface that receive a white color from the picture or shader will emit particles at the maximum distance from the surface, while parts of the surface that receive a black color will emit particles directly from the surface.
You can control the distance using one or more light sources.
Parts of the object that are fully lit by this light will emit particles that are the maximum distance from the surface, while parts of the object that receive little or no illumination from this light will emit particles directly from their surface.
As with the Texture mode, you can use a gradient to adjust how intermediate brightness values affect the distance.
In this mode, you can use lights and a picture or shader to control the distance. A surface will then only emit particles from the maximum distance away if it is fully illuminated by the lights and receives a white color from the texture or shader.
The Distance Gradient enables you to control how the distance of the particles from the object is affected by brightness values between the two extremes of black and white. The left edge of the gradient represents the parts of the picture or shader that are black, while the right edge represents the parts that are white. With the default gradient, the gray tones will emit particles whose distance from the surface is relative to the tone's position between the two color extremes.
You can adjust the gradient by adding new knots or moving the existing ones or both.
For example, if you drag the black knot to the right until all of the gradient is black except for a small, white band on the right, the particles will only be a reasonable distance from the surface if emitted from areas where the color value is very close to the maximum white tone. Particles emitted from other areas will be emitted very close to or directly from the surface.
Particle Direction
 Use these settings if you want to use light or texture to control the direction of particles as they leave the object surface.
This value will only be used if you are using a texture or light to define the direction of the particles as they leave the surface of the object. The Direction value will then be used as a type of multiplier in order to determine the influence of the texture or light.
This value enables you to vary the direction of the particles (all of the node's variation values are based on the Random Seed value).
The direction of the particles is independent of lights and textures. The particles will travel in the direction of the surface Normals.
This mode enables you to control the particles using a picture or 2D shader. To load a picture, click the three dots button and use the dialog that opens to locate and load the picture. To load a 2D shader, click the triangle button next to the Direction Texture box and choose the shader from the menu that opens.
Note that it is the brightness of the picture or shader that will control the particles. Color plays no part, therefore you can use grayscale pictures if you wish.
The picture or shader will be fitted to the object's surface using the chosen UVW coordinates. For the calculation of the direction vector, in each case the neighboring brightness values of the point considered will be analyzed. This corresponds to the process that is used to calculate bump effects. Therefore the direction of a particle will only differ from the direction of the normal if different brightness values are next to each other.
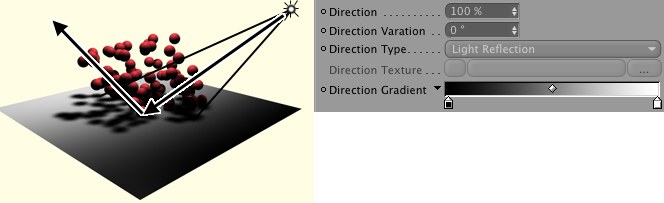
You can use the direction of the light to control the particles. Drag the lights that you want to use into the Lights box.
In this mode, the direction of the light reflected by the object is calculated. As with the Light Direction mode, drag the lights that you want to use into the Lights box.
The Direction Gradient enables you to control how the particles are affected by brightness values between the two extremes of black and white. The left edge of the gradient represents the parts of the picture or shader that are black, while the right edge represents the parts that are white.
Input ports
The On input port takes a Boole value that enables (True) or disables (False) the node. The node is enabled automatically if you do not add this port.
Since the node's parameters can be keyframe animated, by default the Cinema 4D time is used internally to ensure that the values are interpolated correctly. However, you can pass your own time value to this port. This should be of the data type Time, which is a Real number in the simplest case. If no value is passed, Cinema 4D's time is used.
Output ports
Outputs the number of the last particle born at the current frame.
Birth Count[-2147483648..2147483647]
Outputs all the particles born at the current frame. If you want to access all particles and not just the newly created ones, use a PPass node instead.
Birth Num[-2147483648..2147483647]
Outputs the number of particles born at the current frame.
Outputs the UVW coordinates used for each particle born, as a vector.
Has no function.