Shader Properties
The Sampling value is described here.
The File box displays the name of the texture and, if used, the absolute path to the texture as well.
This option lets you show or hide layers or alpha channels when working with textures in Photoshop/b3d format. This saves you from having to constantly return to an external application to display or hide layers as needed.
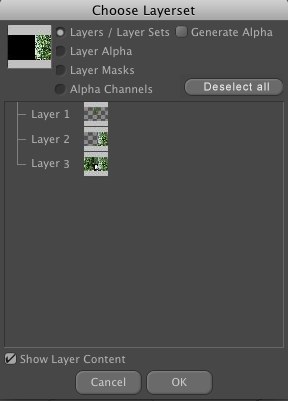
Clicking on the Select … button will open the following dialog window:

The top-most selection menu is active when multiple image files are loaded (also called Multi-Page; these are files that contain multiple images; these also include OpenEXR stereo images). You can then select which images should be displayed.
Use the 5 available options to select the type of layers/layer sets or alpha channels should be displayed in the field below. All layers/layer sets and alpha channels that were saved in Photoshop/BodyPaint 3D will be shown in the display field and can be displayed by double clicking on the image (use the Shift key to make multiple selections). At the top left of the dialog window a composite of all selected layers is displayed - including all mix modes.
What's meant by … the first 5 options … ?
- Layers/Layersets: The various layers or layer sets that make up an image.
- Layer Alpha: The selected layers will be converted to an alpha channel: Layer content will be white, transparent areas will be marked in black.
- Layer Masks: An alpha channel belonging to a given layer.
- Alpha Channels: An alpha channel that affects the entire image.
-
Generate Alpha: This option is only relevant if using a bitmap in a layer shader. The shader will be viewed internally as an alpha channel. This lets you layer the shader over other layers. Set the bitmap's MIP interpolation to 0, otherwise color seams may result.
Caution: The selected alpha channels will be displayed as grayscale images and have no effect on the RGB value of the texture (don't mask anything out). Only the following can be extracted: color, masks or alpha channels. - Show Layer Content: Use this option to define whether or not the layers or alpha channels visible in the display field should be included in the preview.
Deselect All
All selected layers, channels and layer sets (incl. their layers) will be deselected.
The following four settings are for fine-tuning loaded textures. The original bitmap will not be altered.
The previously described function also works in conjunction with videos and image sequences.
Here you will find information regarding Color Management.
Generally speaking, the menu (see Input Color Profile) defines how loaded textures will be managed with regard to their embedded color profiles. These settings also affect the settings here. For example, Color Profile will be grayed out here if Color Management is disabled in the menu.
This can be defined individually at texture level.
You can select from the following options:
This is the recommended setting. The color profile embedded in the texture will be evaluated. If none is present, sRGB or Linear will be used, depending on the Input Color Profile setting.
The texture's color profile will be read as linear (forced).
The texture's color profile will be read as sRGB (forced).
If this option is enabled you can define arbitrary color profiles using the following settings.
Clicking on the button on the right will make the following menu available:
Color Management Disabled
No color profile will be selected.
Load/Save
Here you can load a color profile (or re-save a loaded profile). These files end with the suffix .icc. The color profile of the image loaded here will be used.
Load from Monitor
Here you can use monitor profiles, which is not necessarily recommended since your monitor's color profile will most likely not match that of another monitor.
sRGB
Loads the image using the sRGB color profile. In most cases, this will be the correct color profile.
Linear
This mode interprets the image as lying within the linear color space.
Use this setting to adjust the brightness of HDRI as well as normal images.
Use this setting to define a textures gamma value. A texture's gamma value defines how it will be analyzed with regard to the defined brightness value. For example, 2 pixels within the texture with brightness values of 50% and 75%, respectively, will not necessarily be displayed as such on the monitor or calculated as such when analyzed by the Material Manager. This will be dependent upon the defined gamma value. In most cases, though, you will not have to change the gamma value setting.
These points define the darkest and brightest points, respectively and save this information to a histogram. If one of these points is subsequently moved, the dark and light levels will be scaled accordingly.
Clicking this button will reset the values for exposure, gamma, black point and white point to default values (0, 2.2, 0 and 1, respectively).