The Cineware Effects Settings
Overview
Working with the Cineware effect in After Effects
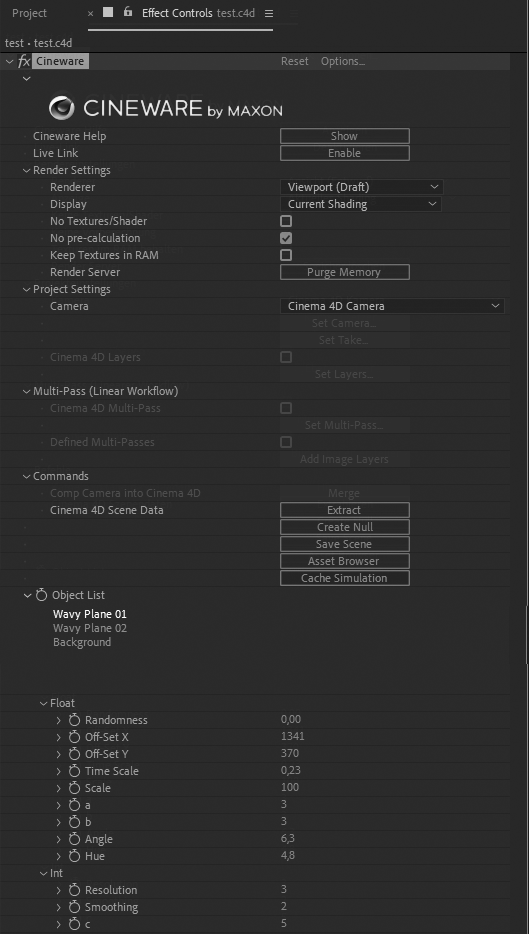
The Cineware effect provides some important parameters for evaluating and rendering the Cinema 4D scene in After Effects. If you use a Cinema 4D layer multiple times in the composition, the Cineware settings can be set for each layer individually or also synchronized between layers automatically. We will take a look at the individual Cineware settings:
Options ...
This link in the header of the effect takes you to the basic Cineware setting that defines the connection to Cinema 4D. The Cinema 4D version displayed here will be used to open and edit Cinema 4D files in conjunction with Cineware. If Cinema 4D Lite was used to edit scenes, no settings should have to be adjusted here, normally.
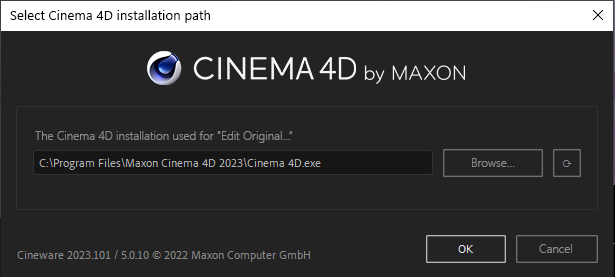
After Effects remembers the currently used Cinema 4D directory (if available) directly during installation, e.g. to be able to open and edit loaded Cinema 4D projects directly via After Effects. This applies both if you install Cinema 4D directly via the After Effects installer and if you leave the option to install Cinema 4D switched off, e.g. because you have already installed Cinema 4D separately.
This saved Cinema 4D directory can be viewed by calling up the Options within the Cineware settings and can also be adjusted there if necessary, e.g. if you have several Cinema 4D installations available. However, caution is advised here!
If the name of the Cinema 4D directory saved in the After Effects preferences will be changed, moved to another location or even deleted, After Effects will no longer be able to access it and will issue corresponding error messages (error code 25::16). This also prevents Cineware by Maxon from being used at all. As a result, the Cineware options for defining a new Cinema 4D directory will no longer be available. Ultimately, this means that Cineware can no longer be used in After Effects!
If you are in such a situation, the only thing that can help is to restore the originally defined Cinema 4D directory so that After Effects can find it again. It is currently not possible to replace the saved Cinema 4D directory, for example, by deleting the After Effects presets or by reinstalling After Effects.
Cineware help
Clicking this button opens the Cinema 4D Help in your web browser and displays the Cineware and After Effects help page.
Live Link
This feature connects the Cinema 4D timeline to the After Effects timeline. Note that the Activate Live Link on Start option in Cinema 4D must first be disabled. This option can be found in the Preferences menu under Extensions>After Effects.
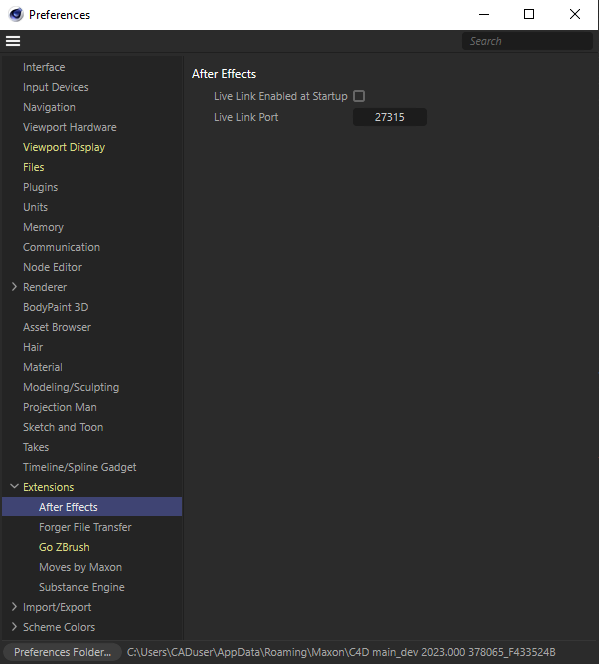
If this preset is not yet active, you must first exit Cinema 4D after switching on the option and reopen it. Cinema 4D then provides a network connection to After Effects via the defined Live Link port. You will probably not need to change this Port Setting. Only if another application is using the same port for communication will you have to make a corresponding modification.
If Live Link has been enabled in Cinema 4D and also in Cineware Effect, changing the time in Cinema 4D results in a corresponding change in the time in the After Effects timeline, so that the same animation image is always displayed in both programs.
This connection of the Timelines can be disconnected at any time in Cinema 4D under Extensions>AE Live Link and in After Effects with the Live Link Disable button.
When using simulations in Cinema 4D, please note that these should be baked or calculated as a cache before using the Live Link. You will also find the Cache Simulation button directly in the Cineware effect settings in After Effects, which can also be used to trigger a cache calculation of the simulations. This is the only way to navigate freely within the span of a simulation scene.
Synchronize AE Layer
This option is only visible if there are at least two Cinema 4D layers in the composition that belong to the same Cinema 4D scene. In this case, this option ensures that the render and display settings of this layer are automatically passed to the other layers. These defaults for the display and render quality are explained below.
Render Settings
In this section you select the display quality and display type of the layer in the composition. Note that these settings can be automatically synchronized between all existing layers of this Cinema 4D scene if the Synchronize AE Layers option is enabled. The render quality defined will in this case always be defined for all layers.
Renderer
Here you can choose between two display modes:
- Viewport (Draft): This is the simplest display mode. For Viewport (Draft), the display quality in the Cinema 4D Viewport will, for example, resemble Quick Shading or Gouraud Shading. Furthermore, all help and grid lines are visible in the scene. This mode can be displayed very quickly and is often sufficient, e.g, for orientation when editing the camera. For the View setting, no help lines will be displayed and the display of materials and surface is of better quality compared to Viewport (Draft). Nevertheless, no special effects such as realistic-looking reflections or transparencies will be displayed here either. In both display modes, the display can also be adjusted via the Display setting.
- Current (Draft): Here the render settings of the Cinema 4D scene will be evaluated and can result in very high-quality displays, as you know them from native Cinema 4D renderings. The time required for calculating an image will increase accordingly. Both modes deliver comparable results but Current (Draft) will automatically render a reduced resolution. This bears the advantage that you may not have a perfect edge smoothing but the final surfaces, lighting and rendering effects can be evaluated without having to wait as long as if using Current mode.

When using reduced resolutions or auto-resolution in After Effects, keep in mind that Cinema 4D results are also rendered at reduced resolutions.
Display
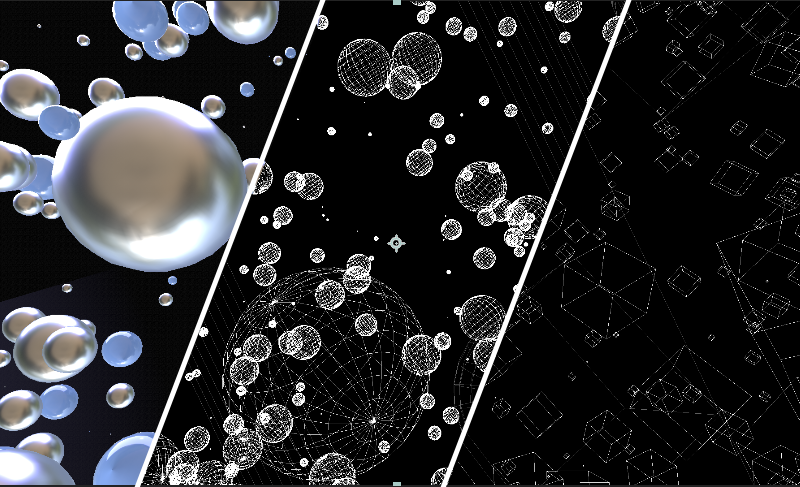
These settings are only available if the Renderer View or Viewport (Draft) are activated. This can then be used to influence the representations of objects:
- Current Shading: After Effects will assume the currently selected display quality of the Viewport in Cinema 4D. There you can choose e.g. Gouraud Shading, Quick Shading or also Constant Shading.
- Wireframe: There is no longer any representation of the materials and surfaces. Instead, only the edges of all polygons will be displayed.
- Quads: In this mode, the objects are no longer displayed at all. Instead, only Quads will be outlined by their position and size. This mode is often only then suitable if the scene contains multiple objects and you want to get the most out of all options for speeding up the Viewport refresh. Despite a strong abstraction, the simple quad is often sufficient for navigating with the camera or orienting yourself in the scene.
No textures/shaders
This option is available only when you combine the Renderer View or View (Draft) with Current Shading Display. When turned on, no more textures or shaders are then evaluated in the assigned materials. This can, for example, be helpful if you want to evaluate the lighting of a specific object.
No precalculation
When calculating simulations in Cinema 4D, it is often the case that jumps in time require recalculation in order to display a correct result. If your Cinema 4D scene does not contain a simulation, this option should be enabled to save time for the recalculation. If the scene contains simulations, these should be baked in Cinema 4D. When baked, the shape or position of the objects involved in a simulation will be calculated frame per frame and saved in the file. Playing the animation and jumping to a location in the animation can then be done without a continuous recalculation of the simulation. Here you will, for example, find information about baking Bullet Dynamics and about Cloth simulations.
Keep textures in RAM
Without this option, textures contained in the materials would be reloaded at each update. Since the textures are saved they don't have to be reloaded, which can speed up the recalculation of frames. Therefore, if enough memory is available, this option should be disabled.
Render Server
The Cinema 4D Render Server, connected to After Effects, creates various caches for efficient computation of scenes. In time, these caches can become so large that it can affect the computer's performance. In such cases, the Clear Memory function helps. This can also be helpful for After Effects to be able to use more memory and thus increase the time span for previewing complex scenes.
Project settings
In this section you will mainly find choices for the camera to use and the optional use of the Cinema 4D layer system.
Camera
Here you can select the camera needed for navigation or image calculation. As a rule it make sense to create one or more cameras in Cinema 4D that can be used directly in After Effects. Alternatively, Cinema 4D cameras can be converted to After Effects comp cameras. This can be helpful because the position of the axis systems in Cinema 4D and After Effects differ, which can bake it more difficult to navigate in After Effects. The following options are available:
- Cinema 4D Camera: The camera selected in the Cinema 4D scene for rendering is used.
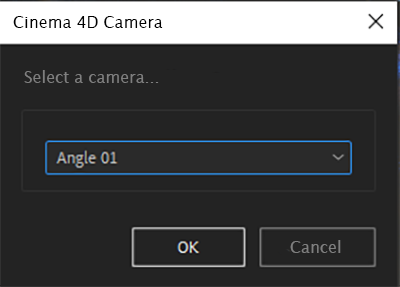
- Select Cinema 4D Camera: This unlocks the Set Camera ... button, which opens a selection dialog. There you will find a drop-down menu in which the names of all cameras are listed that are contained in the Cinema 4D scene. This lets you select an alternative camera for the calculation of the scene in After Effects, which was not originally activated for rendering.
- Centered comp camera: As mentioned earlier, After Effects and Cinema 4D use different reference systems for 3D coordinates. This can result in objects appearing to be moved in After Effects. Enable this option to convert the Cinema 4D coordinates and to use an After Effects camera that is pointed to the origin of the Cinema 4D coordinate system. In this way, the objects typically placed around the coordinate origin in Cinema 4D will also be displayed centered with the After Effects camera. An After Effects camera can be created via Layer>New>Camera.
- Comp Camera: This uses an After Effects camera for the image calculation of the Cinema 4D scene. A native After Effects camera much, however, be present in the scene, which you can, for example, be created via Layer>New>Camera. If the After Effects camera should assume the angle of view of the Cinema 4D camera you can convert the Cinema 4D camera to a new After Effects camera by clicking on Cinema 4D Scene Data Extrude and then activating Comp Cameramode.
Set Take ...
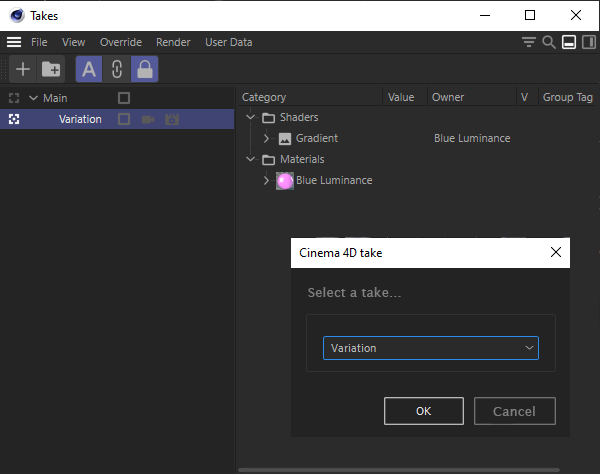
Cinema 4D scenes can have different takes and use them to manage material variations, alternative lighting situations, or camera angles within a scene, for example. Here you can find out more about the Take System.
If the linked Cinema 4D scene contains such Takes you can select the desired Take via Set Takes.... If no Takes are in the scene, the function will remain grayed out.
Cinema 4D layers
Objects and also materials can be assigned to layers in Cinema 4D. This property can be found in theBasic menu of the Attribute Manager. Here you can find out more about using layers.
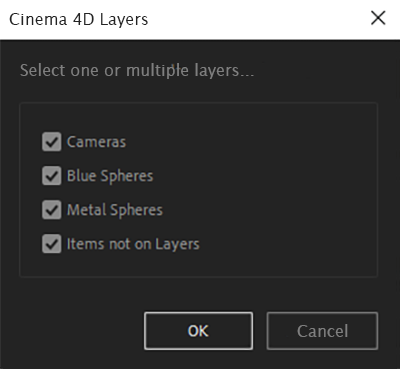
Assigned layers can also be evaluated in After Effects if you enable Cinema 4D Layers and then click the Set Layers ... button. A list with available layers will open that can be enabled or disabled there. Only those elements that lie in the active layers will be displayed in this Cinema 4D layer. Note that the arrangement of layers in Cinema 4D will not be inherited. Cloner objects on layers will therefore not assume this characteristic. Layers are therefore suited more for individual objects in a scene and not for object copies created by Generators.
Since objects do not have to be assigned to a layer, you can use Items not on Layers in After Effects to access all objects that are not assigned to a layer.
Multi-Pass (Linear Workflow)
Cinema 4D Multi-Pass
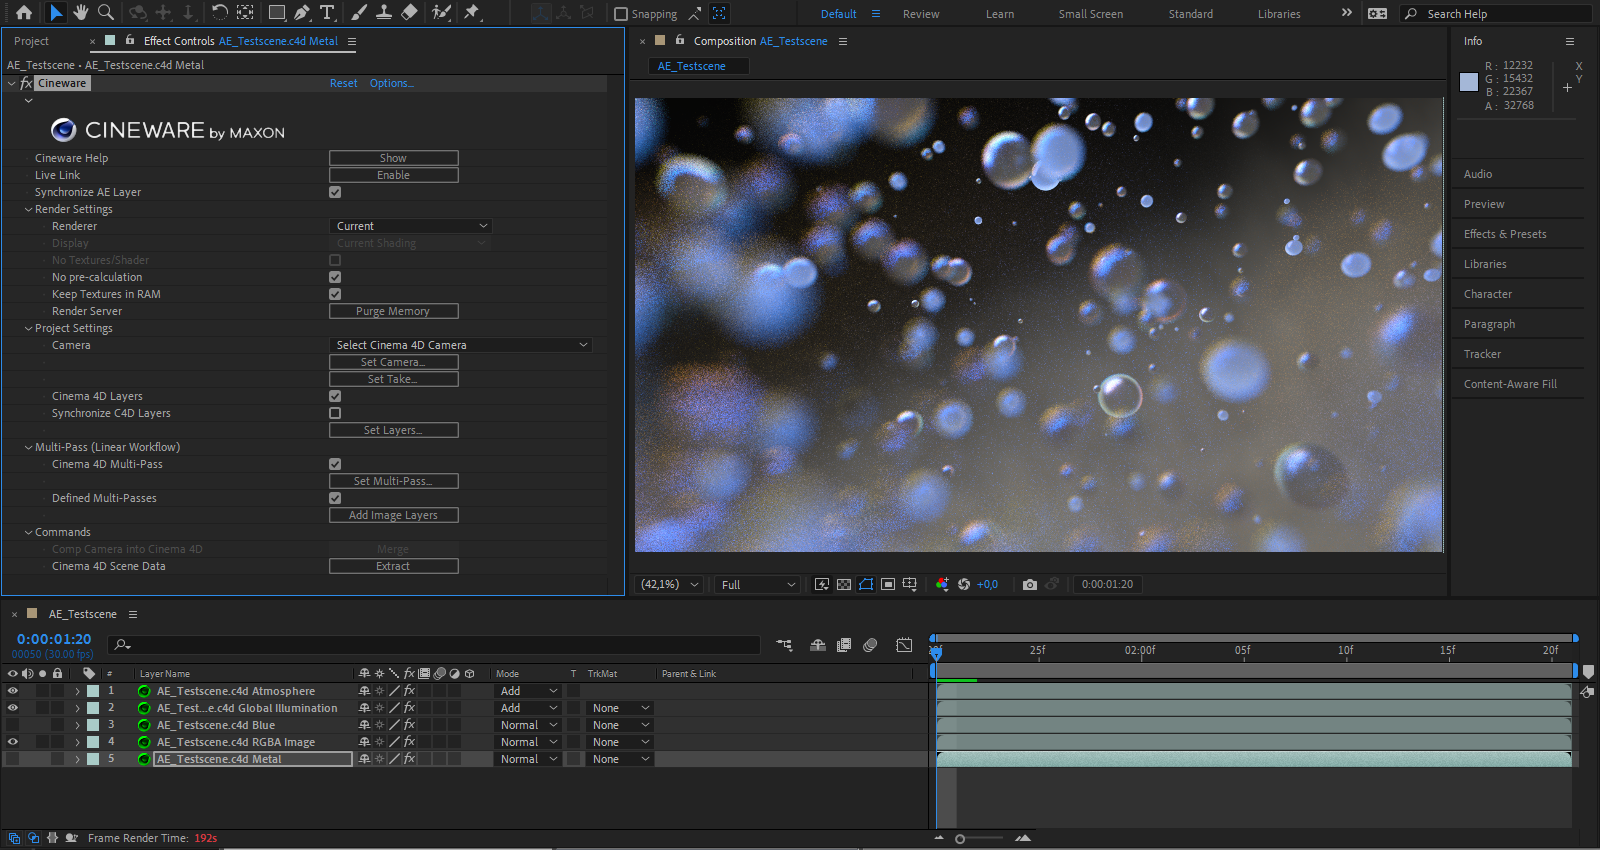
These settings are only available when using the Current or Current (Draft) renderers. You then have the possibility to open a selection dialog via Set Multi-Pass ... where you can select the desired Multi-Pass. At the top of the list you will see the Multi-Psses that are already activated in the scene. Below this, additional standard Multi-Passes are displayed. You have to make the fitting selection yourself in order to recreated the complete image from the overlapping Multi-Passes The image below shows an example of this. Here, the RGBA pass was also output, which always contains the entire image. In Blend Multi-Pass (Mixed Channels), Global Illumination and Atmosphere are disabled. These elements must therefore be enhanced as separate Multi-Passes so the image is again complete when passed on.
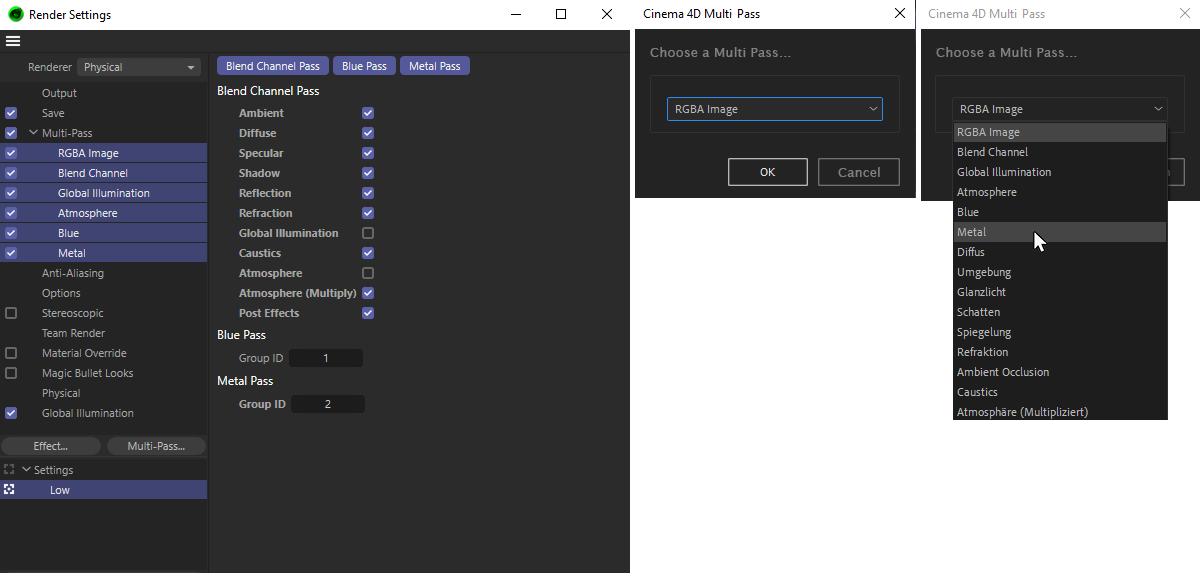
The figure above shows the familiar Cinema 4D Render Settings on the left. Several Multi-Passes were already activated there together with two Object ID Masks named "Blue" and "Metal". The After Effects menu can be seen next to it where these layers can now be selected. The Cinema 4D layer will then only render and display this one Multi-Pass. To reconstruct an original image using several Multi-Passes, multiple layers in After Effects must be stacked whereby each layer contains a different Multi-Pass.
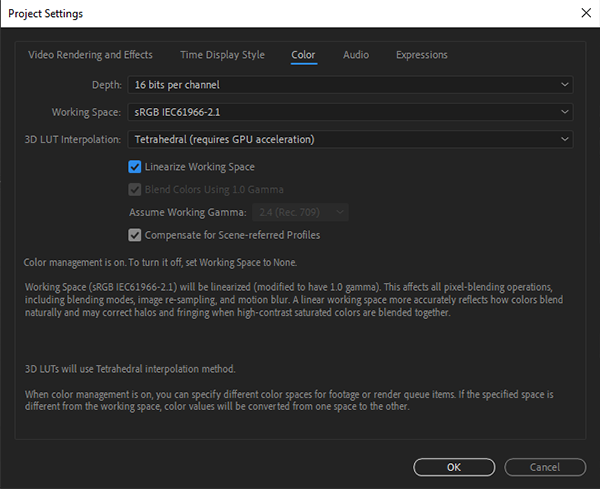
The majority of image Multi-Passes must be added to the base layer. To prevent visible jumps in color or brightness gradients, Multi-Pass layers should be used in a linear color space. For this, you can linearize the color space via File>Preferences.
Defined Multi-Passes
This option allows you to use the Create Image Layers button, which automatically creates new Cinema 4D layers in the composition. These will be configured so that they reflect the Multi-Passes created in Cinema 4D. You can use all Multi-Passes as individual layers with a single click. The Blend modes of these layers will be defined correctly automatically. The only exception are the Multi-Passes that contain masks. You must configure these layers yourself, e.g. as luma masks for your composition, in order to achieve the desired cropping, for example.
Note that creating image layers does not remove existing Cinema 4D layers. In this case you have to make sure that only the required image layers are contained in the composition.
Commands
In this area you will find two buttons that allow you to extract cameras and light sources from a Cinema 4D scene, or even write data edited in After Effects back into the Cinema 4D scene.
Load camera in Cinema 4D
As described earlier, a comp camera can also be used in After Effects to navigate the 3D scene and render the image layers. In order to also use this camera in Cinema 4D the Comp Camera in After Effects can be passed to Cinema 4D. The scene may then have to be reloaded in Cinema 4D (File>Legacy Project Version...) in order to make the camera visible in Cinema 4D.
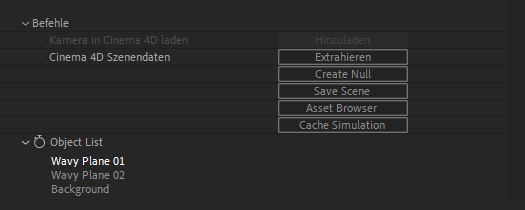
Extract Cinema 4D scene data
This command reads the cameras and light sources from the Cinema 4D scene and creates new layers in the composition for them. In addition, all objects marked with Cineware tags (or External Composition tags) will be interpreted as color layers.
Create zero
This feature is very useful when you want to manipulate the positions, sizes, or rotations of 3D objects of the Cinema 4D scene directly in After Effects. For this purpose, you will find an object list in the lower part of the Cineware settings, in which all loaded 3D objects are listed individually. There, select the object you want to modify directly in After Effects.
A separate sequence is created for the new Null object in the After Effects timeline. By changing the Position or Orientation properties of this sequence, for example, the corresponding object can be moved or rotated directly in After Effects. Just keep in mind that the axis systems in Cinema 4D and After Effects are not identically oriented. Moving the null system in the positive X direction moves the associated Cinema 4D object in the positive Z direction. A displacement in positive Z direction causes a displacement of the 3D object in negative X direction.
Save scene
Changes made to objects in After Effects, such as moving or rotating over a Null object created in After Effect, can also be written back to the Cinema 4D scene. To do this, use this Save Scene button. In order to see this update of the scene in Cinema 4D, it may be necessary to reload the scene there.
Asset Browser
The Asset Browser provides numerous ready-made objects that can be used directly in Cinema 4D and also in After Effects. The operation corresponds to that of the Asset Browser in Cinema 4D.
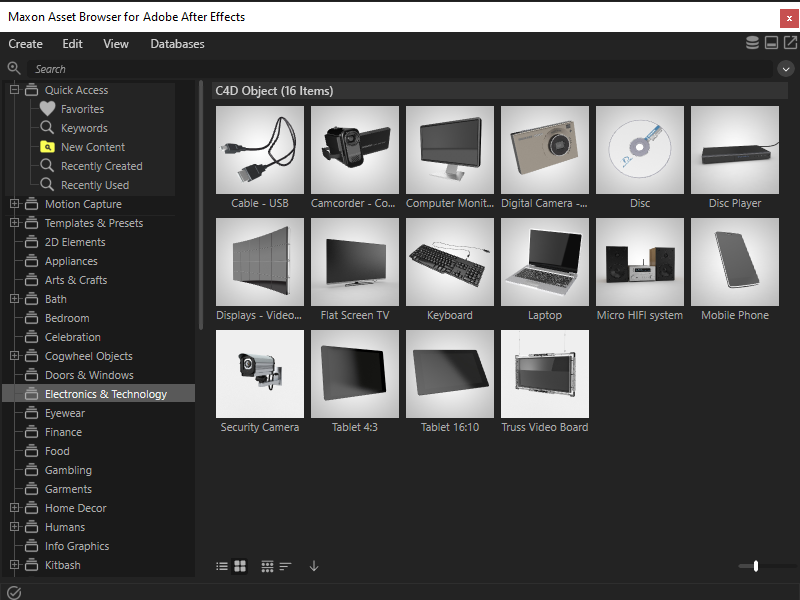
The functions of the Asset Browser in Cineware in After Effects are the same as those of the Asset Browser in Cinema 4D. You automatically have access to all models and scenes available in your Cinema 4D installation. In the left column, various categories are available in which all objects are stored. In addition, a search line is available in the upper area, which you can use to search all available objects.
Double-clicking one of these objects in the Asset Browser adds it to the current composition.
Here you can find a detailed explanation of all Asset Browser functions.
Cache Simulation
If the Cinema 4D scene contains simulations, such as Rigid Bodies or Soft Bodies, you can trigger a cache calculation of all contained simulations directly from After Effects using this button. A small status window will be displayed showing the progress of the simulation calculation. Once this calculation is complete, you can move freely in time within After Effects and the correct image of the Cinema 4D simulation scene will always be displayed.
Object List
In this area you will find a list of all object groups in the selected Cinema 4D layer. Only the object entries on the highest hierarchy level are displayed. If you want to see other objects deeper in the hierarchy here, they must be tagged with Cineware tags in Cinema 4D. It will then also be possible to display user data from these objects in After Affects, for example (see the following section).
Some of the commands already explained, such as Create Null, do not work until an entry has been selected in this object list. In addition, it is also possible to access user data of objects selected here and thus control any properties of objects directly in After Effects without having to switch to Cinema 4D.
User Data
User data can be simple numerical values, vectors or, for example, color values for which you yourself have provided input options on objects. These input options are carried over into After Effects and allow you to make direct value entries there as well. This user data can be used in Cinema 4D for any purpose, e.g. to edit the dimensions of parametric objects. This section explains how to create user data in Cinema 4D and use it to control properties.