General information about Coordinates
Rotation sequence
This selection menu is only of interest to the animators among you. It can minimize the effects of the dreaded Gimbal Lock.
Consider the following problem:
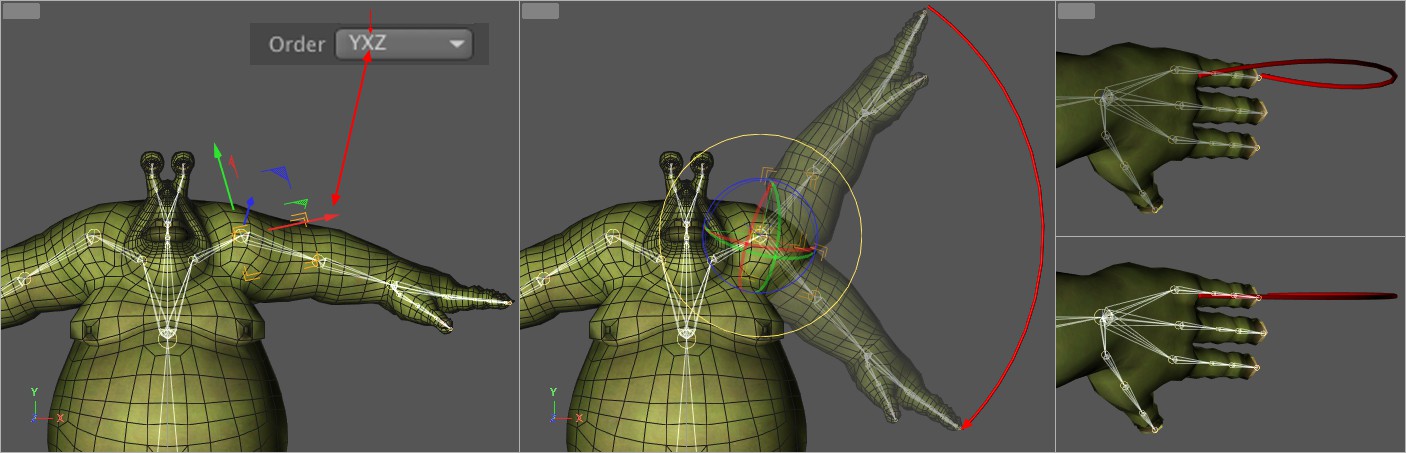
Here you have a character prepared for animation with complex hierarchies. Now imagine you want to animate the shoulder joint of the right arm in the front view with a supposedly simple rotation from top to bottom. So you create keys for one fingertip up and one fingertip down. If you now play the animation and look at the animation from above, you will see a swerve instead of the expected exclusively vertical rotation (top right in the image). This is the Gimbal Lock effect; relatively weak here, but it can lead to completely abnormal, corkscrew-like movements in extreme cases.
How can the Rotation Order help minimize this effect? All you have to do is take a look at the joint axes BEFORE the animation and determine which of the joint axes will be rotated the least during the planned animation. In this case, this is the X-axis marked on the left. Under Rotation Order, select one of the options where the X-axis is in 2nd position. If you now animate again, you will get a movement as shown in the bottom-right of the image. Although there is still a minimal, barely noticeable swerve, the result is now much better than before.
Another tool for deciding which Rotation Order to select is the Gimbal Rotation option. Activate this and activate the Rotate tool:
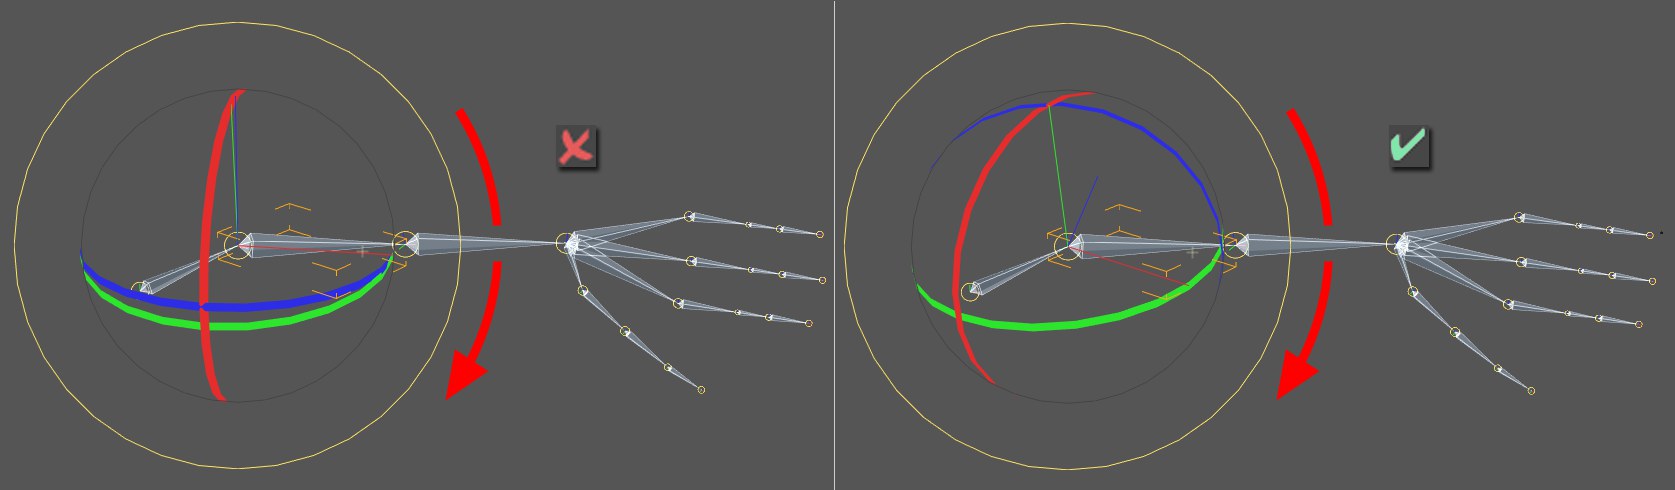
Here you can see directly from the rotation bands (BEFORE an animation) whether the planned animation will be correct in a certain direction of rotation or not. In the image on the left, you can see the red, green and blue rotation bands arranged in such a way that rotation (red arrow) does not seem possible (none of the bands are in the plane of rotation). This animation will have problems with gimbal lock.
Simply change the Rotation Order until one of the belts is approximately on the rotation plane (right-hand image: blue) or as close to it as possible. If you then animate, you will have few problems with gimbal lock.
A few more comments on how Gimbal Lock came about:
It always becomes risky if, depending on the rotation sequence, you bring the 2nd, i.e. middle value (from the marking below) close to 90° (or 270°):
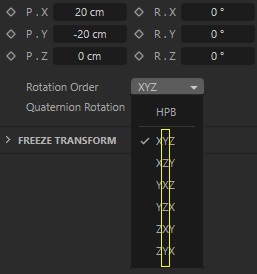
Ideally, the corresponding parameter should always have a minimum value close to or equal to 0°.
Traditionally, these problems can also be avoided by animating a child Null object. The frozen selections further down in the dialog can also be helpful.
Quaternion rotation
Prior to Cinema 4D R18, there was the Quaternion Tag (this only appears when loading old scenes and can no longer be recreated), the functionality of which has now been implemented as an object property.
General
You've probably heard of the dreaded gimbal lock in connection with character animation, for example, or even worse: you've already had to deal with it!
Gimbal lock occurs when the angle value P is +/- 90°, because then heading and banking, i.e. H and B, have the same effect. The result is that one dimension is lost and large angular jumps are generated even with small rotations.
The quaternion functionality, which incidentally only affects rotation animations, offers a remedy!
By default, Cinema 4D uses Euler angles to interpolate the rotation of objects (Euler: gyro system for decoupled angles (HPB), interpolation in Euclidean (right-angled) 3D space).
The individual components of the Euler angles are interpolated independently of each other, i.e. the mean value of HPB (0,0,0) and HPB (60,60,60) would be HPB (30,30,30), for example. You can try out for yourself in the Viewport that the swing from 0,0,0 via 30,30,30 to 60,60,60 is not necessarily the shortest possible.
So what we are looking for is an interpolation that takes the SHORTEST path from A to B, which is what the user would do manually.
Quaternions fulfill precisely this boundary condition. So a quaternion ranges from 0,0,0 to 60,60,60 via 35.104 °,22.83 °,35.104 °!
This means that a quaternion does not make any unnecessary swerves and, in other words, the gimbal lock will be avoided.
Now you're probably wondering why not give ALL objects a quaternion animation as a matter of principle. Quite simply - where there are advantages, there are often disadvantages - and this is also the case with quaternion interpolation. As long as the changes in a rotation are less than 180°, Quaternion can work perfectly, beyond that you will have problems because, as already mentioned, the Quaternion looks for the shortest path.
The shortest path for a quaternion expression is always the one on a 3D sphere. You can imagine that a quaternion interpolation corresponds to a rotation around a fixed axis. This is the axis around which the smallest angle must be rotated. This usually has nothing to do with the object axes and is different for each interpolation.
Example
Let's take a look at the following example:
- An object is to be rotated around an axis by more than 180°.
- To do this, you would set a key for the initial situation, set the Timeslider to the position at which the rotation should end, then take the object using the tried and tested method, set the corresponding rotation and set another key. So far so good. First of all, regardless of whether you have used the quaternion functionality or not, absolutely nothing changes in the two states, i.e. the initial and final situation! Both interpolation methods only take different routes to the target.
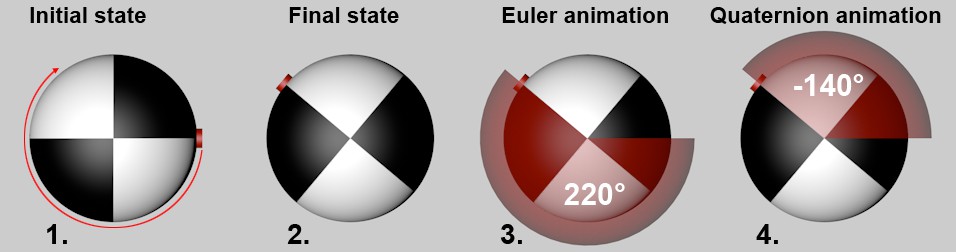
- Let's first take a look at the traditional Cinema 4D method of rotation using Euler angles:
You have rotated the object by 220° using the key (e.g. B, Bank), so our object rotates 220° clockwise as seen from the camera position: - Now to the behavior per quaternion. As already defined, this interpolation method always looks for the shortest route to the destination. However, the shortest path here is not the clockwise rotation of 220° (as seen from the observer's perspective), but rather the exact opposite rotation of only 140°:
By activating the Quaternion Rotation option, you switch on the quaternion animation for the corresponding object (the key values remain identical Euler values, only the interpolation between them changes). If this option is deactivated, the familiar Euler animation will be used.
Please note that quaternion interpolation only affects local angle tracks and not any existing frozen coordinates.
There is a separate option in the key properties Quaternion interpolation, which you can use to influence the temporal interpolation.
There are the following differences to the Euler animation:
- In the Timeline, the names of the three angle tracks are each supplemented by an appended "(Q)", e.g. "Angle.P (Q)".
- In the Timeline, the three angle tracks ("Angle.H/P/B (Q)") are regarded as a unit, i.e. if one key is shifted in time (or created/deleted), the other two follow.
- Key tangents are not supported by quaternions.
- The representation of quaternions as F-curves is often not technically feasible (especially for animations over 180° between 2 keys) and is therefore of limited informative value.
When should you use Quaternion animations and when not?
Make use of Quaternion animations in the following cases:
- If you have problems with gimbal lock and jumping axes.
When to NOT use Quaternion animations:
- If the angle difference between 2 keys exceeds 180° (it will always be rotated along the shortest path).
- If you want to fine-tune F-curves (i.e. change the "timing").