AOV Tutorial
This tutorial shows how to use the various AOV options to generate a set of AOVs and then re-compose them back into the original beauty pass using Nuke.
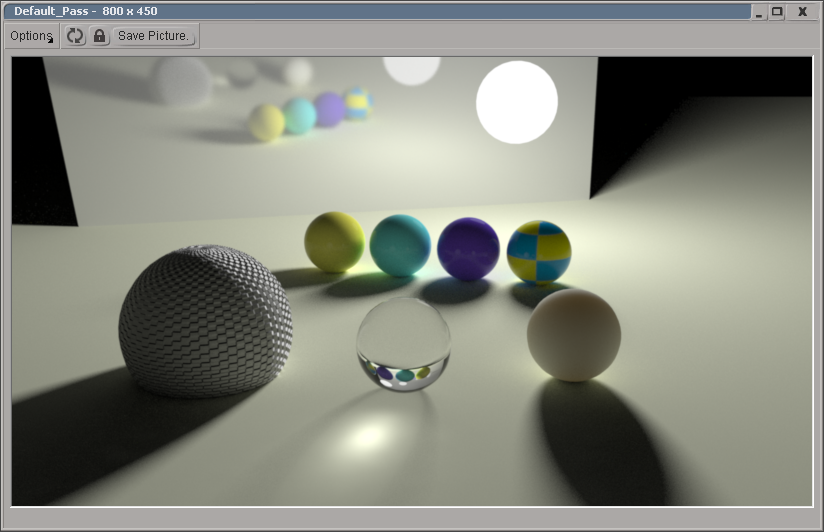
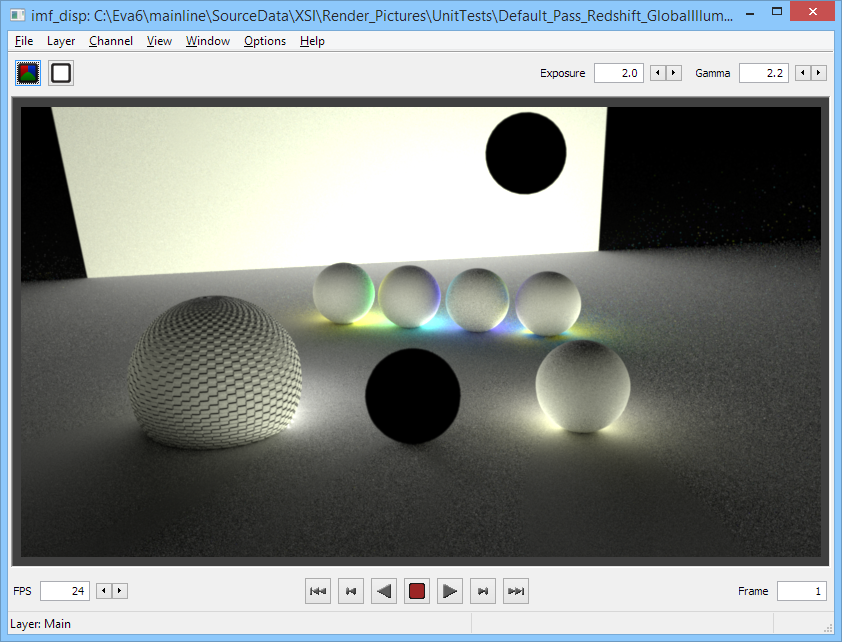
For this tutorial, we'll use a simple scene which is similar to the one used for the AOV document. This scene uses a combination of features such as diffuse lighting and GI, reflections, refractions, caustics, subsurface scattering and incandescence, so it covers all the shading-related AOVs.
Gamma Settings
For this tutorial, we desire gamma-corrected results. For this reason Redshift's gamma settings are as follows:
- Display Gamma: 2.2
- File Gamma: "Automatic"
- Sampling Gamma: "Use Display Gamma"
As will be explained below, we'll use 16-bit OpenEXR files. As explained in this document, when the file gamma setting is set to "Automatic", any data written to a floating-point image file format (like EXR) will be written in Gamma 1.0 (linear) space. This simplifies the workflow of most compositing applications.
8-bit formats versus 16-/32-bit (half/float) image formats
For maximum precision, we recommend that users prefer 16/32 bit (i.e. half/float) image formats over 8-bit ones. While 8-bit formats can also work, the lower numerical precision means that adjustments in a comp package can produce color banding and other types of visual artifacts. Furthermore, inconsistencies between compositing applications means that some 8-bit formats like PNG and TGA might not work the same between applications.
For most purposes, a half-precision 16-bit format such as OpenEXR is typically sufficient and provides a good balance between numerical precision and file size.
For this tutorial, we'll use the following AOVs, all of which are configured to use the 16-bit (half) OpenEXR file format:
- Diffuse Filter
- Diffuse Lighting Raw
- Global Illumination Raw
- Subsurface Scattering Raw
- Specular Lighting
- Reflections
- Refractions
- Emission
- Caustics
How the AOVs should be recombined
Once we have rendered the above AOV image files, the final beauty pass can be recombined with the following equation:
Beauty = [ Diffuse Lighting + Global Illumination + Specular + Reflections + Refractions + Subsurface Scattering + Emission + Background + Caustics ] * Volume Tint + Volume Emission + Volume Lighting
Please note that if we were using "Caustics Raw" instead of "Caustics", these would have to also be multiplied by "Diffuse Filter".
In Nuke
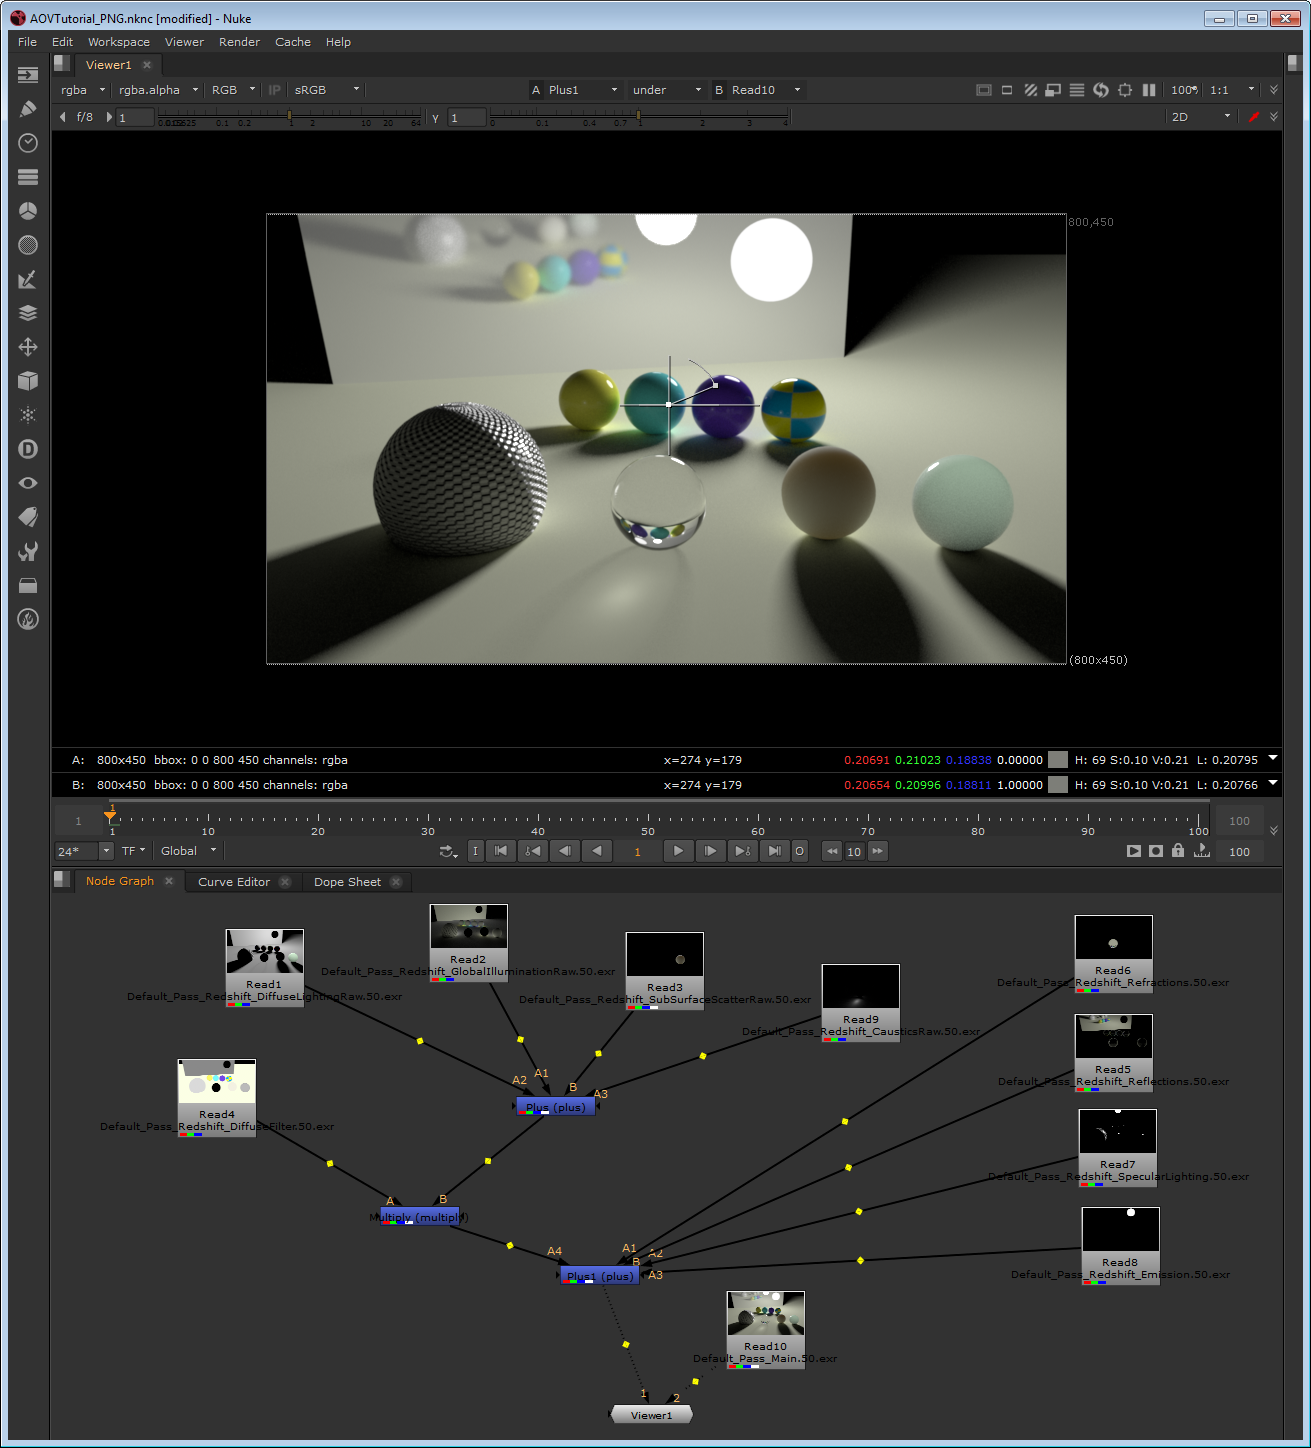
All the EXR images were brought in Nuke. By default, Nuke uses a "linear" color space for EXRs – this is desirable. Using the correct color space is important, as an incorrect color space will produce wrong composition results!
As can be seen in the next image, the DiffuseFilter AOV is multiplied by DiffuseLighingRaw (leftmost), GlobalIlluminationRaw (middle) and SubsurfaceScatteringRaw(rightmost). These three multiplications, along with the remaining AOVs are all added together using a Merge (plus) node.
We've also connected the original beauty pass (also a linear EXR) to the viewer node. Using Nuke's "wipe" tool we can compare it to our final comp and verify that the nodes are setup correctly.
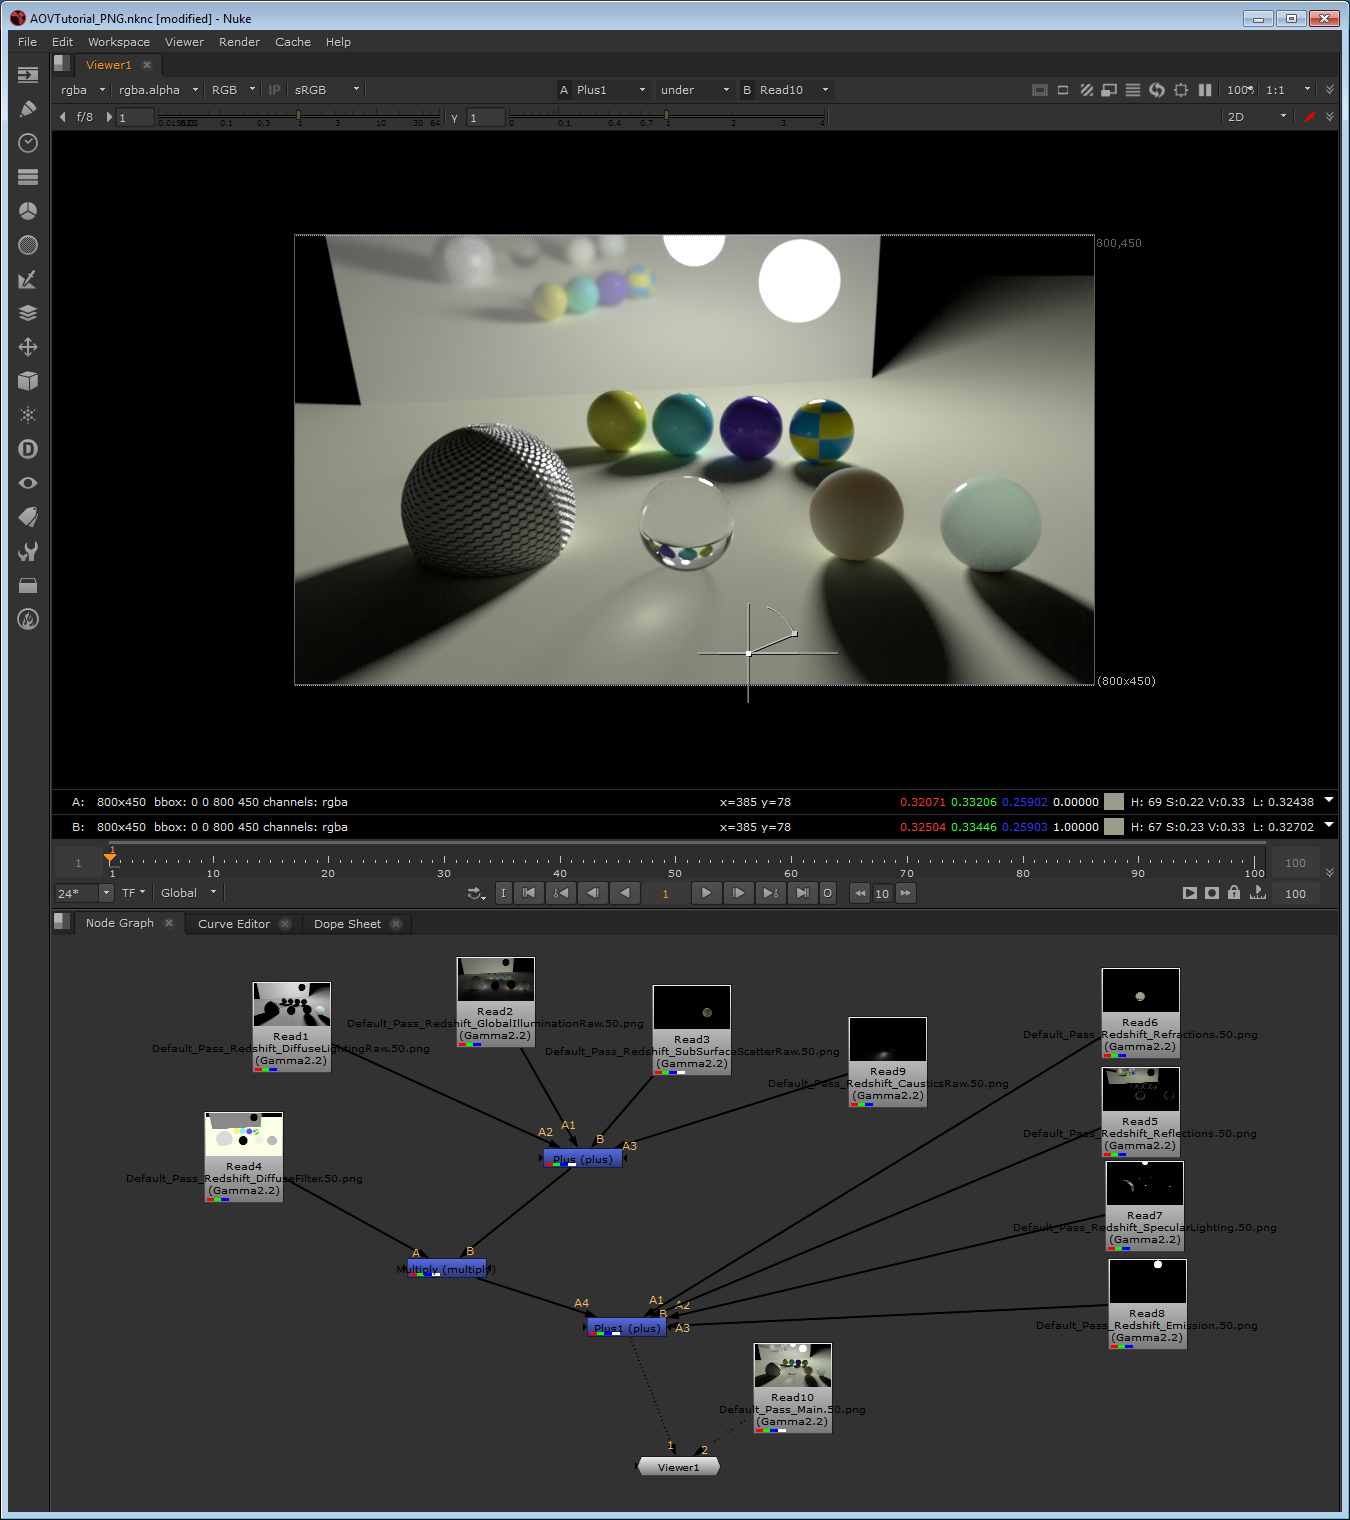
So, what if we had used PNGs instead of EXRs?
Well, the combination math is identical. The only difference is the color space we have to choose for each imported image. By default, Nuke assumes that all PNGs are using the sRGB color space. But, because we rendered these PNG images with a gamma of 2.2, the correct color space is "Gamma 2.2". Please note that the Gamma 2.2 color space looks very similar to the sRGB color space. In fact, they can look nearly identical to the naked eye, but there are some differences between them. Selecting an sRGB color space instead of Gamma 2.2 will mean some subtle errors in the math which will produce an image slightly (or not so slightly, depending on the case) different to the beauty image.
From that point onwards, it's possible to adjust the individual AOVs and tune the look. Or, alternatively, use one or more of Redshift's Puzzle Matte AOVs to mask parts of the image and perform per object (or per object group) or per-material adjustments.
Jagged Edges ("Aliasing") in the AOVs
Some AOVs have options to disable antialiasing, such as then using "center sample" for depth or world position or disabling filtering for the motion vectors. However, most AOVs are generated with filtering (antialiasing) enabled by default.
Antialiasing in Redshift happens in an adaptive manner through unified sampling. In a nutshell, Redshift looks at the beauty pass colors and if it detects that a pixel is near a sudden color edge or around excessive noise, it refines that pixel by shooting more rays which, in turn, 'cleans' that pixel.
Since Redshift uses the beauty pass to do refinement, this can create the following problem: a pixel might be 'clean' for the beauty pass but it might not be for an AOV and, because it won't get refined, it might look jagged or noisy in the AOV.
Examples of where the beauty is considered 'clean' by the adaptive refinement algorithm include areas with very dark lighting or no lighting at all (as in the following examples) or meshes using flat shaders such as "constant" or "incandescent".
The solution to this problem is to use enough unified "min samples". Unified sampling settings like "min samples: 4, max samples: 256" should be avoided. "Min samples" settings like 32 or above should work for most cases.
The following images demonstrate the above points.

Our example scene is lit by a single area light. This is the Depth AOV with "Full" filtering enabled. The unified sampling settings are min samples:2, max samples:128. The Depth AOV in this case is clean because the beauty pass has enough contrast around the edges to force the adaptive antialiasing to refine.

However, once the area light multiplier is set to zero the beauty pass becomes totally black. This makes the adaptive antialiasing algorithm terminate early which affects the quality for the Depth AOV, producing jagged edges
Increasing the unified "min samples" to 32, improves the Depth AOV quality.
'Halo' Artifacts When Using Raw AOVs
'Raw' AOVs consist of raw lighting results that exclude any tint/albedo 'filter' information that will have been applied for the surface materials. Raw AOVs are useful for tweaking lighting colors without affecting material albedo properties. To get full lighting results, one has to multiply the Raw AOV result by the equivalent Filter result.
To illustrate the above statement, the images below show a comparison in Nuke between computing the full lighting result of reflection and refraction using raw and filter AOVs, vs using pre-computed full reflection and refraction AOV results:
|
|
|
|
Using Raw AOVs |
Using pre-computed full lighting results |
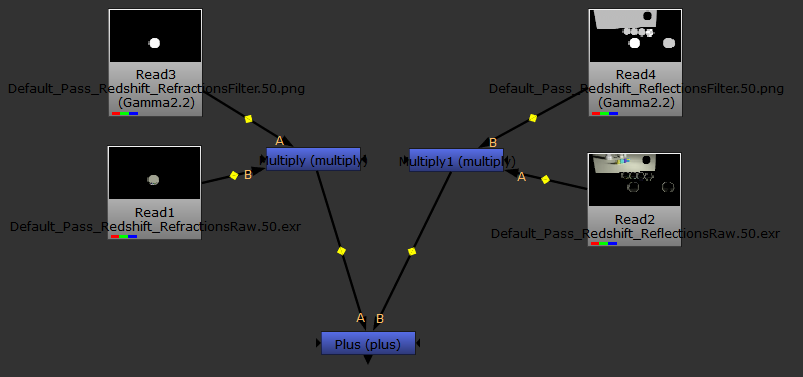
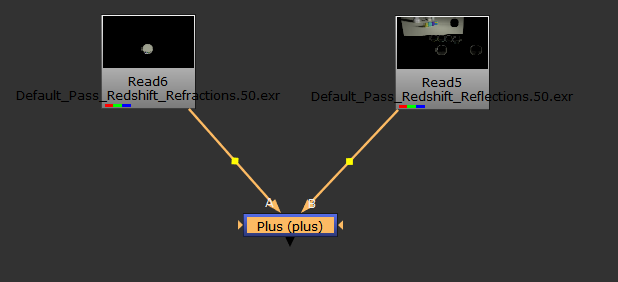
With unified sampling filtering, the edges of high-contrast image data in the AOVs becomes softer and less jagged, producing images that are more pleasing to the eye. Mathematically, however, because of the multiply step in the composite this means that when using raw AOV results vs non-raw full lighting results you might see darkening or 'halo'-type artifacts around these high-contrast edge images. Depending on the severity, these 'halo' artifacts can result in a final composite image that does not match the beauty, particularly around high-frequency images such as hair.
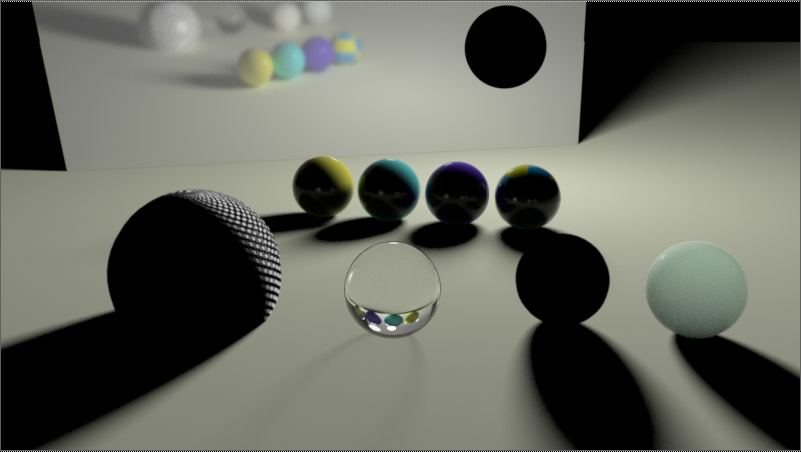
The images below show a comparison of the resultant images using Raw AOVs vs full lighting AOVs. In the raw result composite, against the diffuse background you can see a dark halo around the refractive sphere in the middle of the image:
|
|
|
|
Using Raw AOVs |
Using pre-computed full lighting results |

To fix this problem, Redshift 2.0 introduced a new option called 'Adjust Raw AOVs to Fix Halo Artifacts'. This option is enabled by default to ensure final composite matches beauty.
This option works by adjusting the Raw AOV results based on the appropriate Filter AOV results in order to ensure the resultant composite will match the beauty. Because of this adjustment, you may see unexpected colors around the high-contrast edge images in the Raw AOVs – while this may look strange, mathematically it ensures the correct beauty results when multiplied with the appropriate albedo Filter AOV.
Noise In The AOVs
When Redshift generates the AOVs, it applies certain sampling optimizations that are based on how important that AOV is to the final image. For example, if a reflection is very dim, Redshift uses fewer rays to compute it.
While this is perfectly fine for beauty renders, it means that AOVs can appear to be noisy when viewed on their own. If you intend on brightening up an AOV in a comp application, that noise can become particularly visible and ruin your final comp.
The images below show an example of this.
While the final rendered scene shown in the images above appears to be pretty 'clean' in terms of noise, if one looked at the GloballIlluminationRaw AOV by itself, they'd be able to see some noise:
Increasing the exposure of that AOV to 2 stops (i.e. 4 times brighter) makes the noise even more visible:
The noise has now become more visible and, even worse, it's not consistent throughout the image! Certain parts of the image were able to be cleaned faster than others by Redshift's adaptive algorithms. As an example, look around the shadow area of the rightmost sphere. In this example, any place in the image that was most lit by direct lighting meant that indirect lighting (GI) didn't have to work as hard, because in the grand scheme of things it wasn't as important. Shadowed areas, on the other hand, have no strong direct lighting in them so GI is more visible and has to be cleaned more. This is the reason why areas under shadow appear to have cleaner GI.
This 'noisy AOV' issue can be solved by disabling certain optimizations:
- Make the unified sampling min and max samples the same. This disables unified adaptive sampling.
- In the Output tab, under "AOV Processing" enable the "Disable Importance-Based Optimizations" option. This ensures that reflection/refraction AOVs are not going to be noisy because the mirror/glass was dark.
Unfortunately disabling these optimizations does mean longer render times!
Please note that even if an AOV appears to be noisy by itself, this doesn't necessarily mean that the noise will be visible on your final comp. AOV noise is typically an issue if something that used to be dark in the beauty was made significantly brighter in comp – as shown in the example above. This means that, in certain cases, you can get away without having to disable the above optimizations.
AOV Intensity Clamping
Redshift supports intensity clamping for primary rays ("Max Subsample Intensity") as well as secondary rays such as reflection/refraction/GI rays ("Max Secondary Ray Intensity"). These two controls limit the maximum allowed brightness of rays which helps with situations where very bright light sources produce visual artifacts known as 'fireflies' and excessive noise. Please refer to this documentation page for more information about these controls.
By default, the 'max subsample intensity' clamp is only applied on the beauty pass. For Softimage and 3dsMax, the intensity clamping controls can be found in the "AOV Processing" parameter group in Redshift's "Output" tab. In Maya, the controls are in Redshift's "AOV" tab.
The following example demonstrates the effect of AOV clamping and its importance in matching the beauty pass, assuming that the beauty pass is also using clamping, of course.
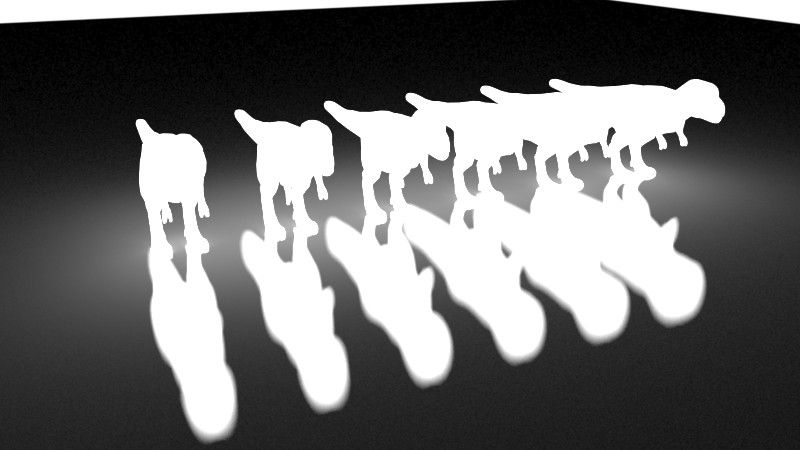
The scene contains a series of self-illuminated dinosaur models on top of a plane using a glossy reflection shader.
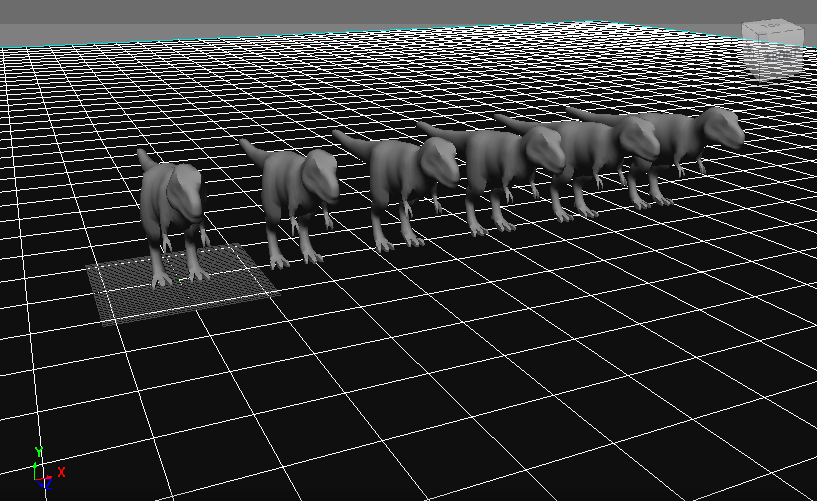
The test scene
For this test, we assume that we want to use a 'max subsample intensity' of 1.0 for our beauty pass.
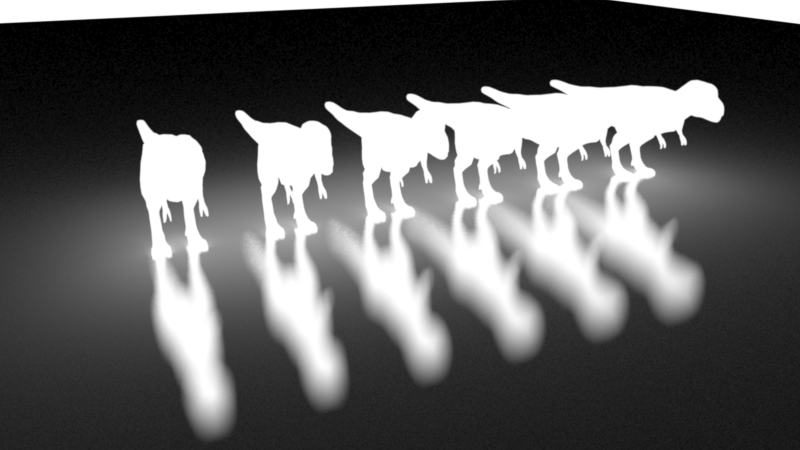
Scene rendered with a 'max subsample intensity' of 1.0
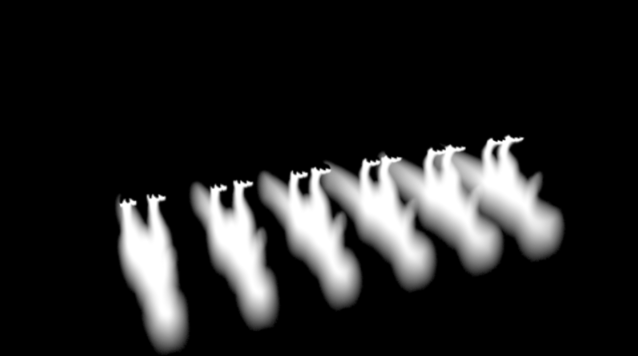
The Reflection AOV rendered with AOV clamping disabled. Notice how the reflections appear harder than our beauty image above.
If we were to use the unclamped reflection AOV, the final comp wouldn't match the beauty pass.
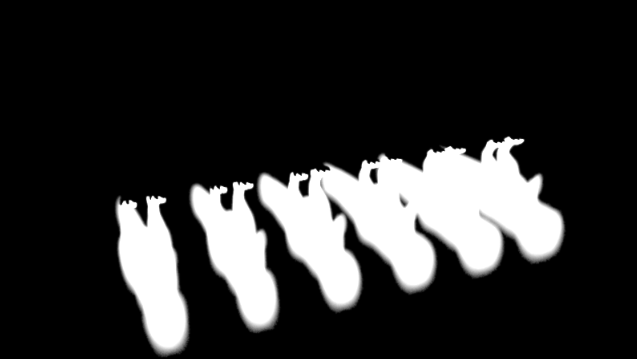
Reflection AOV rendered with AOV clamping enabled. Notice how the reflections now match the beauty's look.
Please be aware that intensity clamping either on the beauty or AOVs can produce discrepancies between the two. The reason is that intensity clamping on the beauty pass is applied on the final pixel, while AOV intensity clamping happens on each AOV individually. As a result, when the AOVs are recombined in a comp package, they can produce a result that differs in intensity compared to the beauty pass. Depending on the lighting scenario, this discrepancy can be small or large.
Hair Min Pixel Width and AOVs
The Hair Min Pixel Width (aka MPW) feature reduces aliasing artifacts on fine hair strands by automatically making the strands partially transparent within a certain pixel width threshold. When this feature is enabled, primary ray 'MPW' hair is not treated as transparent as far as AOVs are concerned and thus will not write the shading results to the 'Refraction' AOV. Instead, 'MPW' hair shading results will be written directly to the 'DiffuseLighting', SpecularLighting' etc AOV channels.
In order to generate correct 'MPW' AOVs, all 'raw' AOVs will be disabled when 'MPW' is enabled. You should use the equivalent compound AOVs when MPW is enabled instead, for example:
DiffuseLighting should be used instead of DiffuseFilter * DiffuseLightingRaw Reflections should be used instead of ReflectionsFilter * ReflectionsRaw