Overview
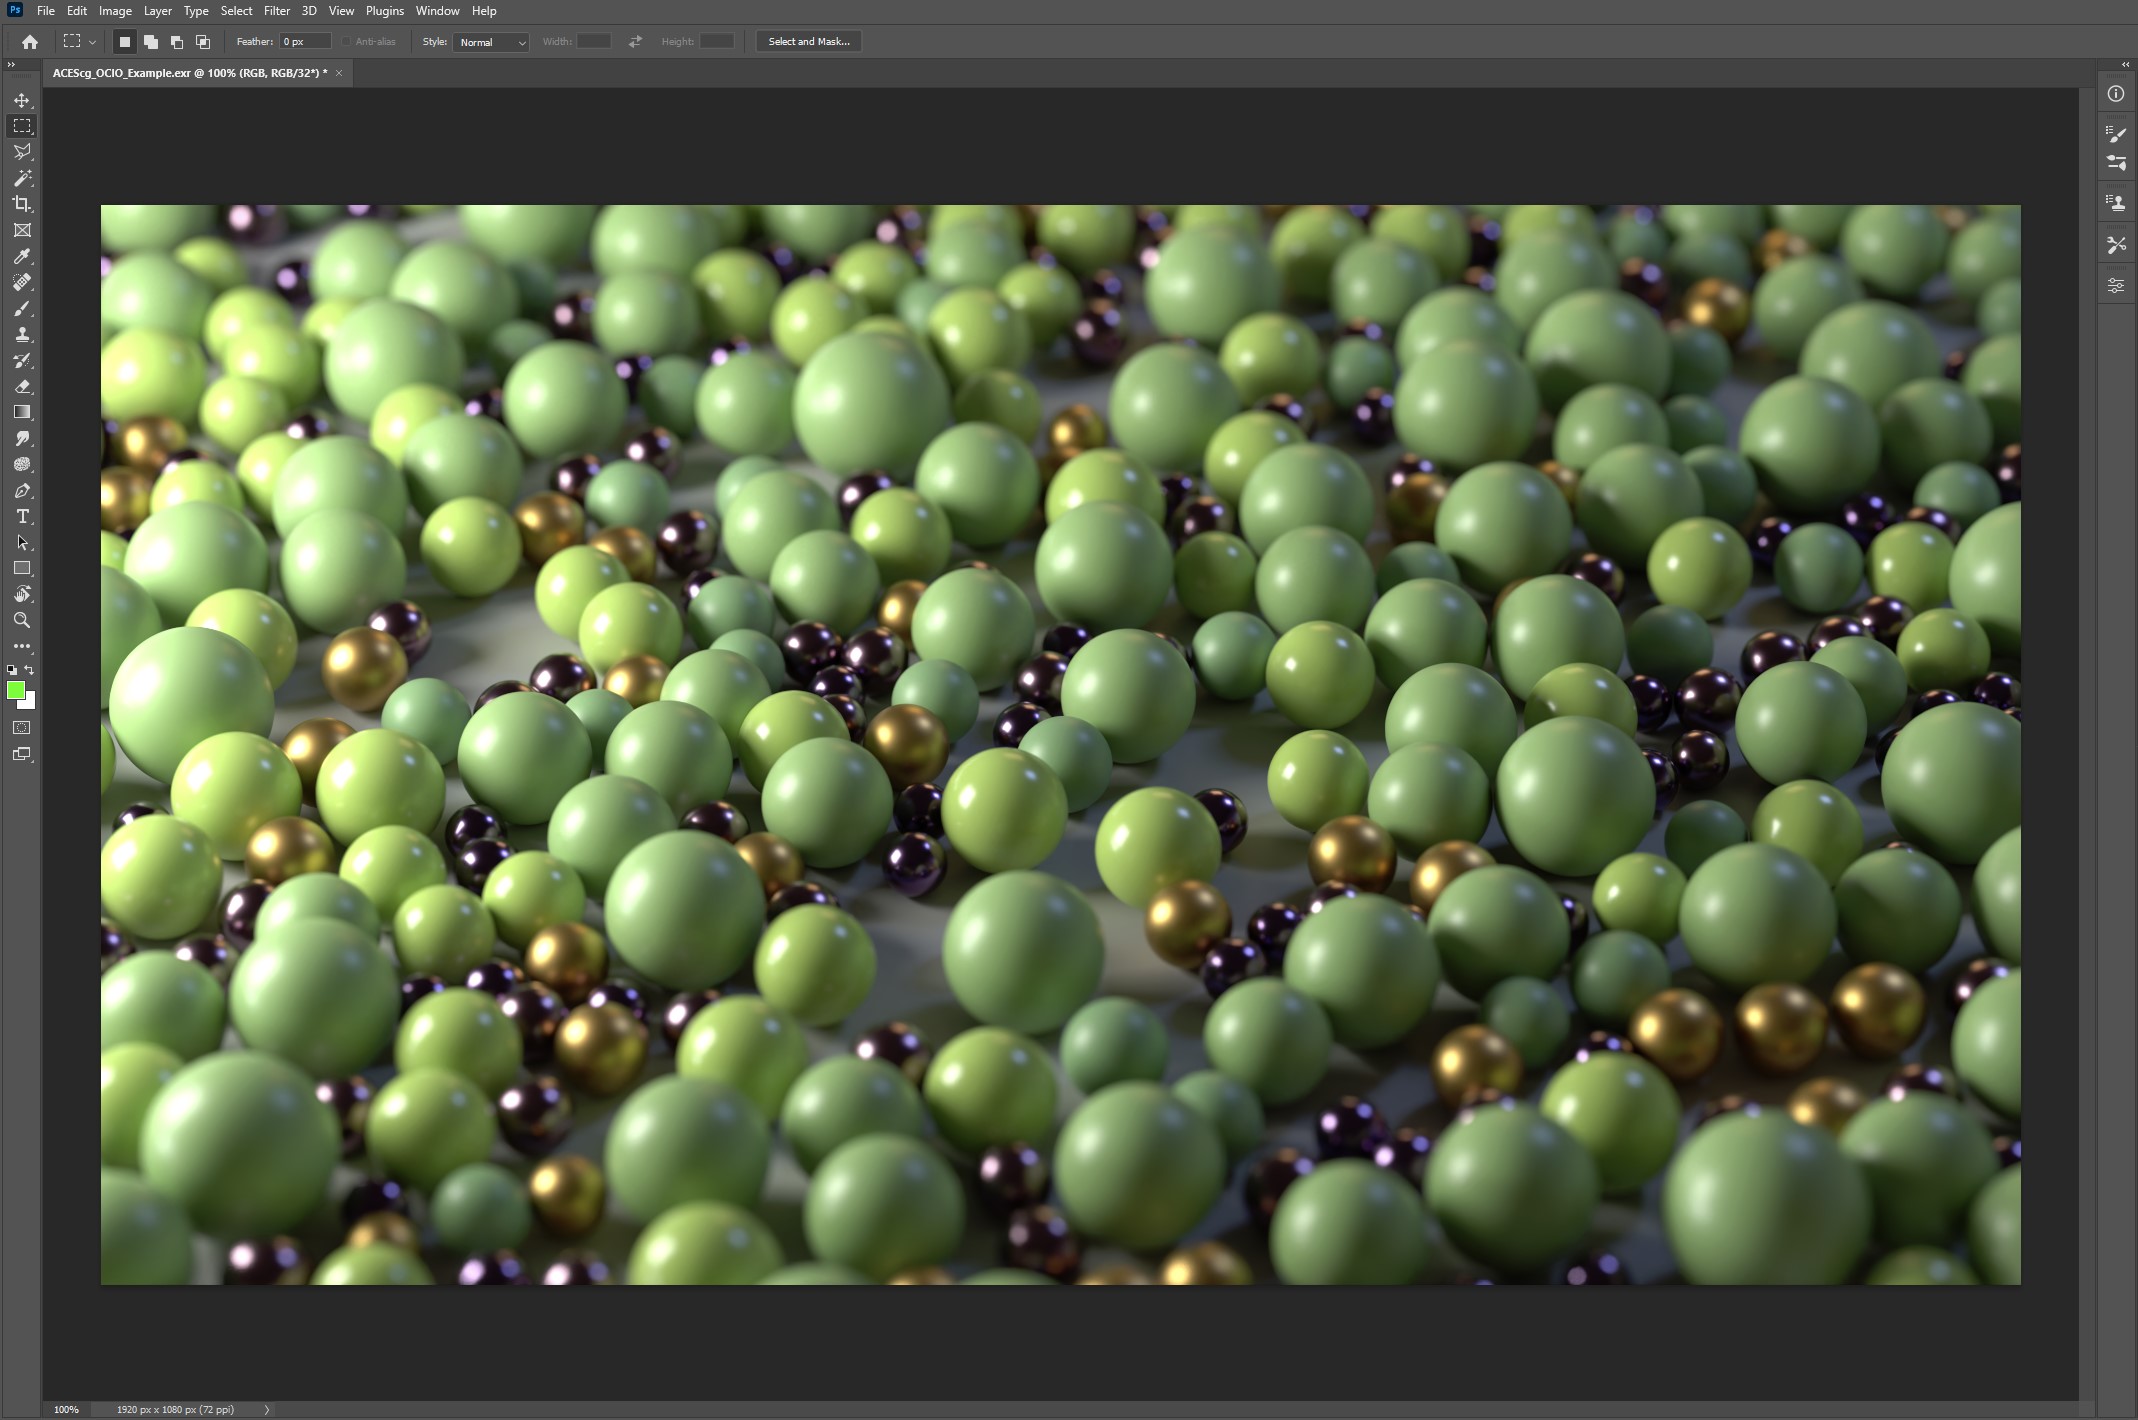
Example image provided by Saul Espinosa can be downloaded below.
Compositing_with_ACES_Example.zip
Contents:
- ACEScg_OCIO_Example.exr - Primary example image to be used in ACEScg compositing workflow.
- Output Example JPEGs - Example JPGs provided as both correct and incorrect output results to compare with your own results.
ACES in Photoshop
There are multiple ways to add an ACES transform to footage in Photoshop, the most common methods are covered below.
ACES via native OCIO in Photoshop (version 26+)
Step 1
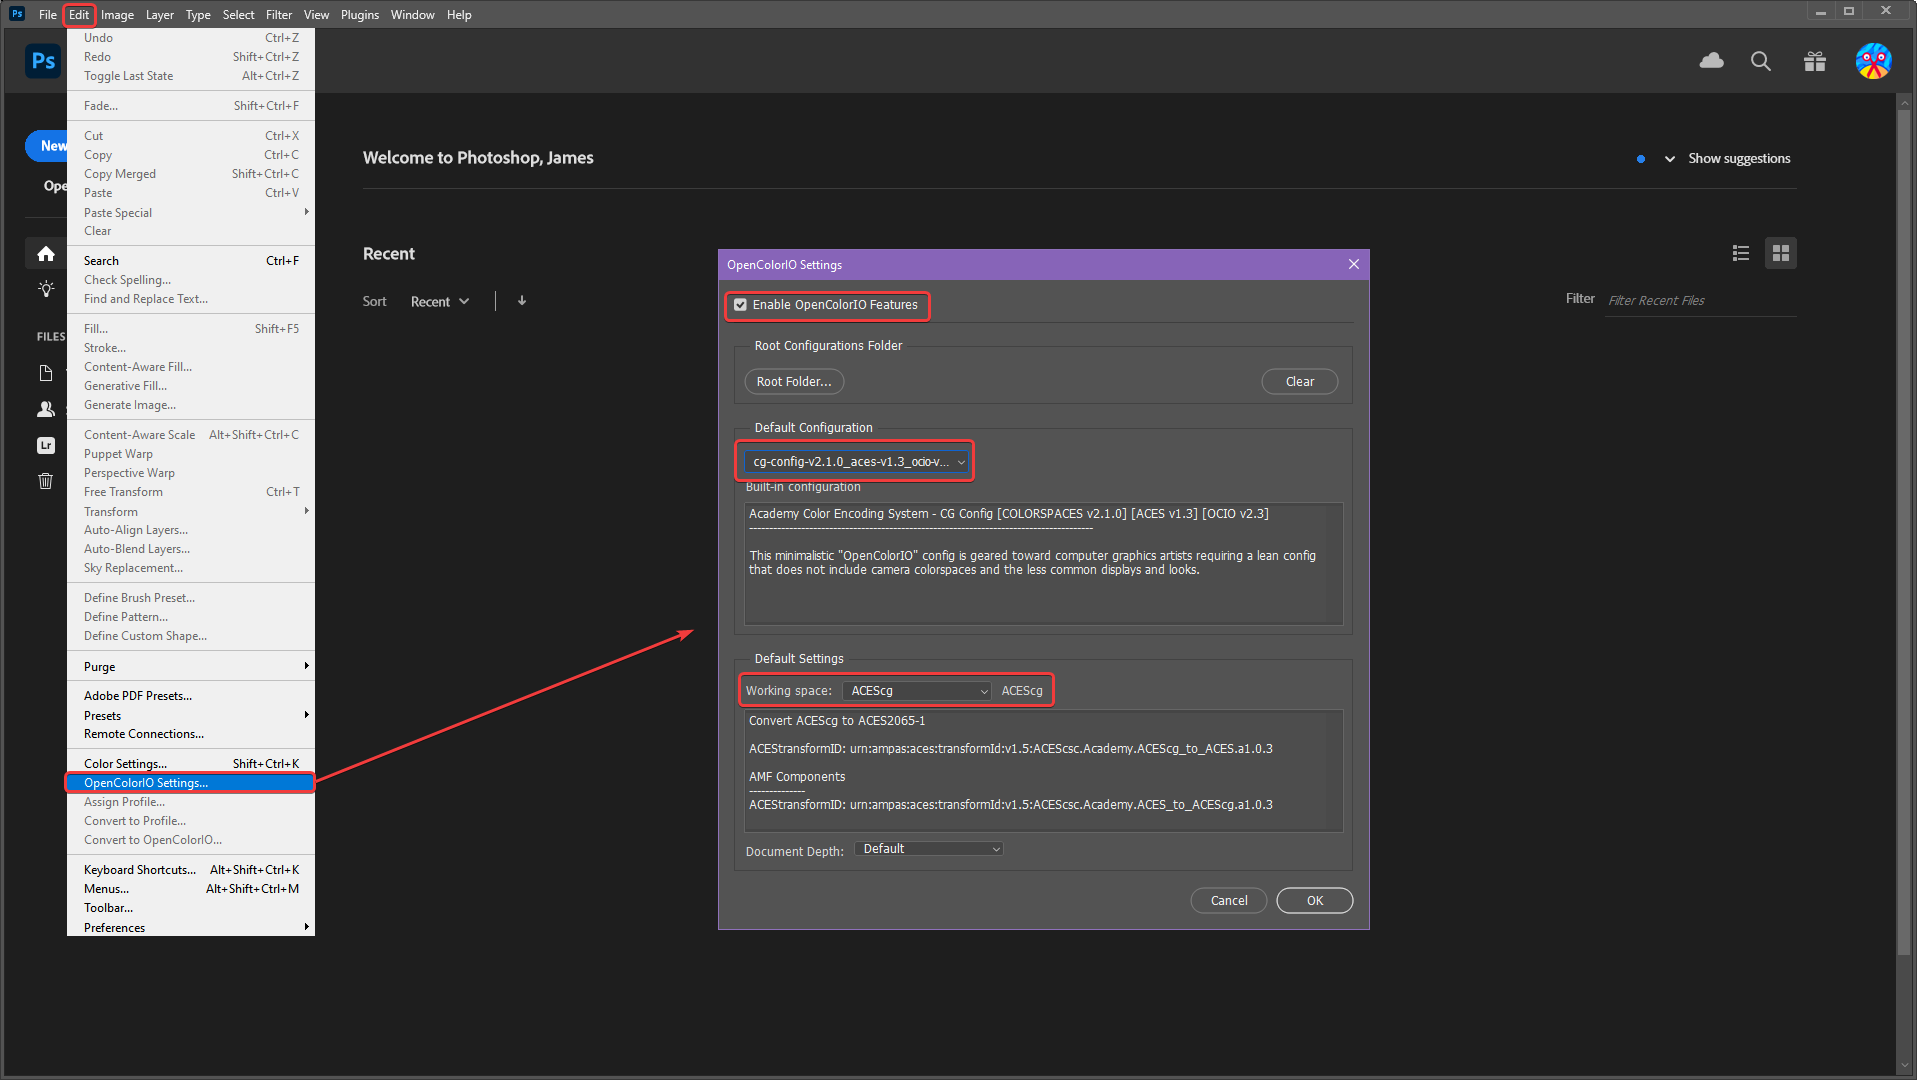
First set up OCIO in Photoshop as pictured below by clicking on "OpenColorIO Settings" in the Edit menu. Then use the following settings:
- "Enable OpenColorIO Features"
- Set the Default Configuration to "cg-config..."
- Set the Default Settings "Working Space" to "ACEScg" and click on "Ok" to continue.
|
Step 2
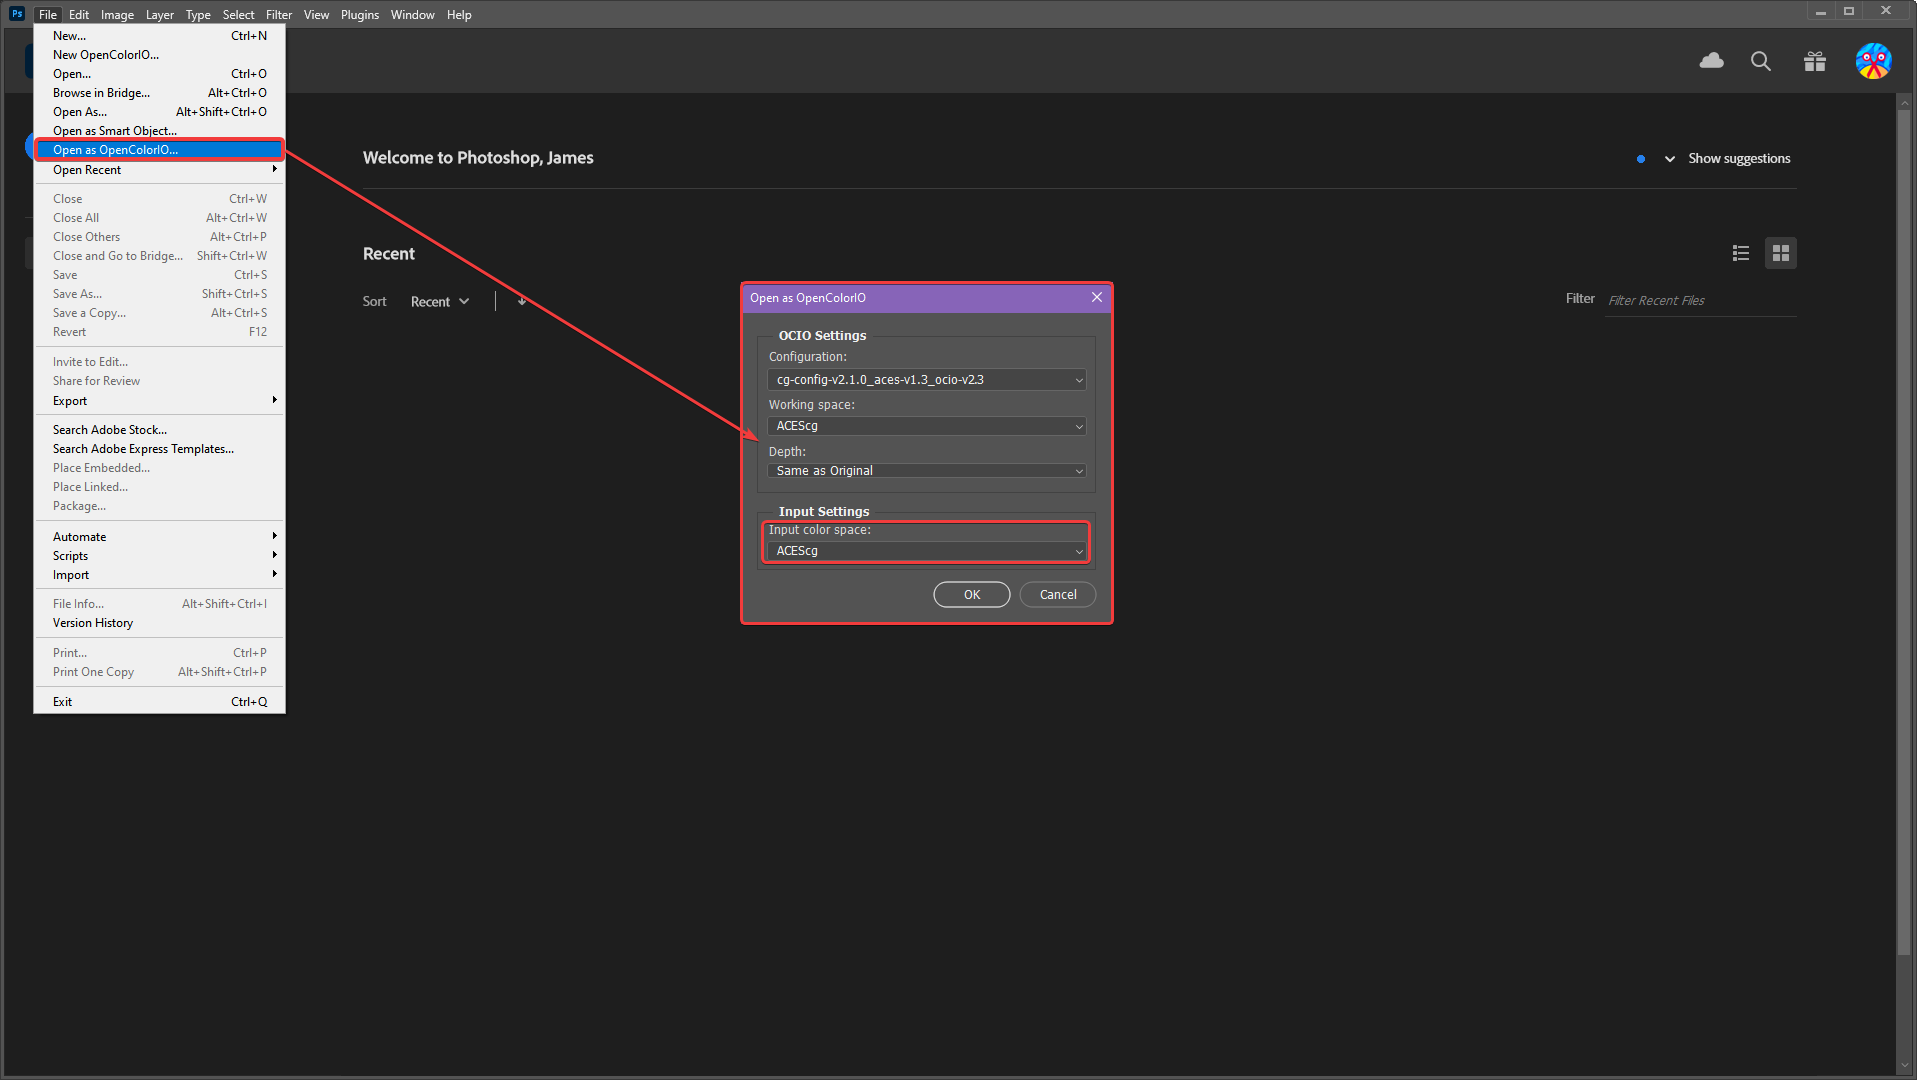
Next open your rendered image using the "Open as OpenColorIO" option in the File menu. In the option box set the Input Color Space to "ACEScg."
|
Step 3
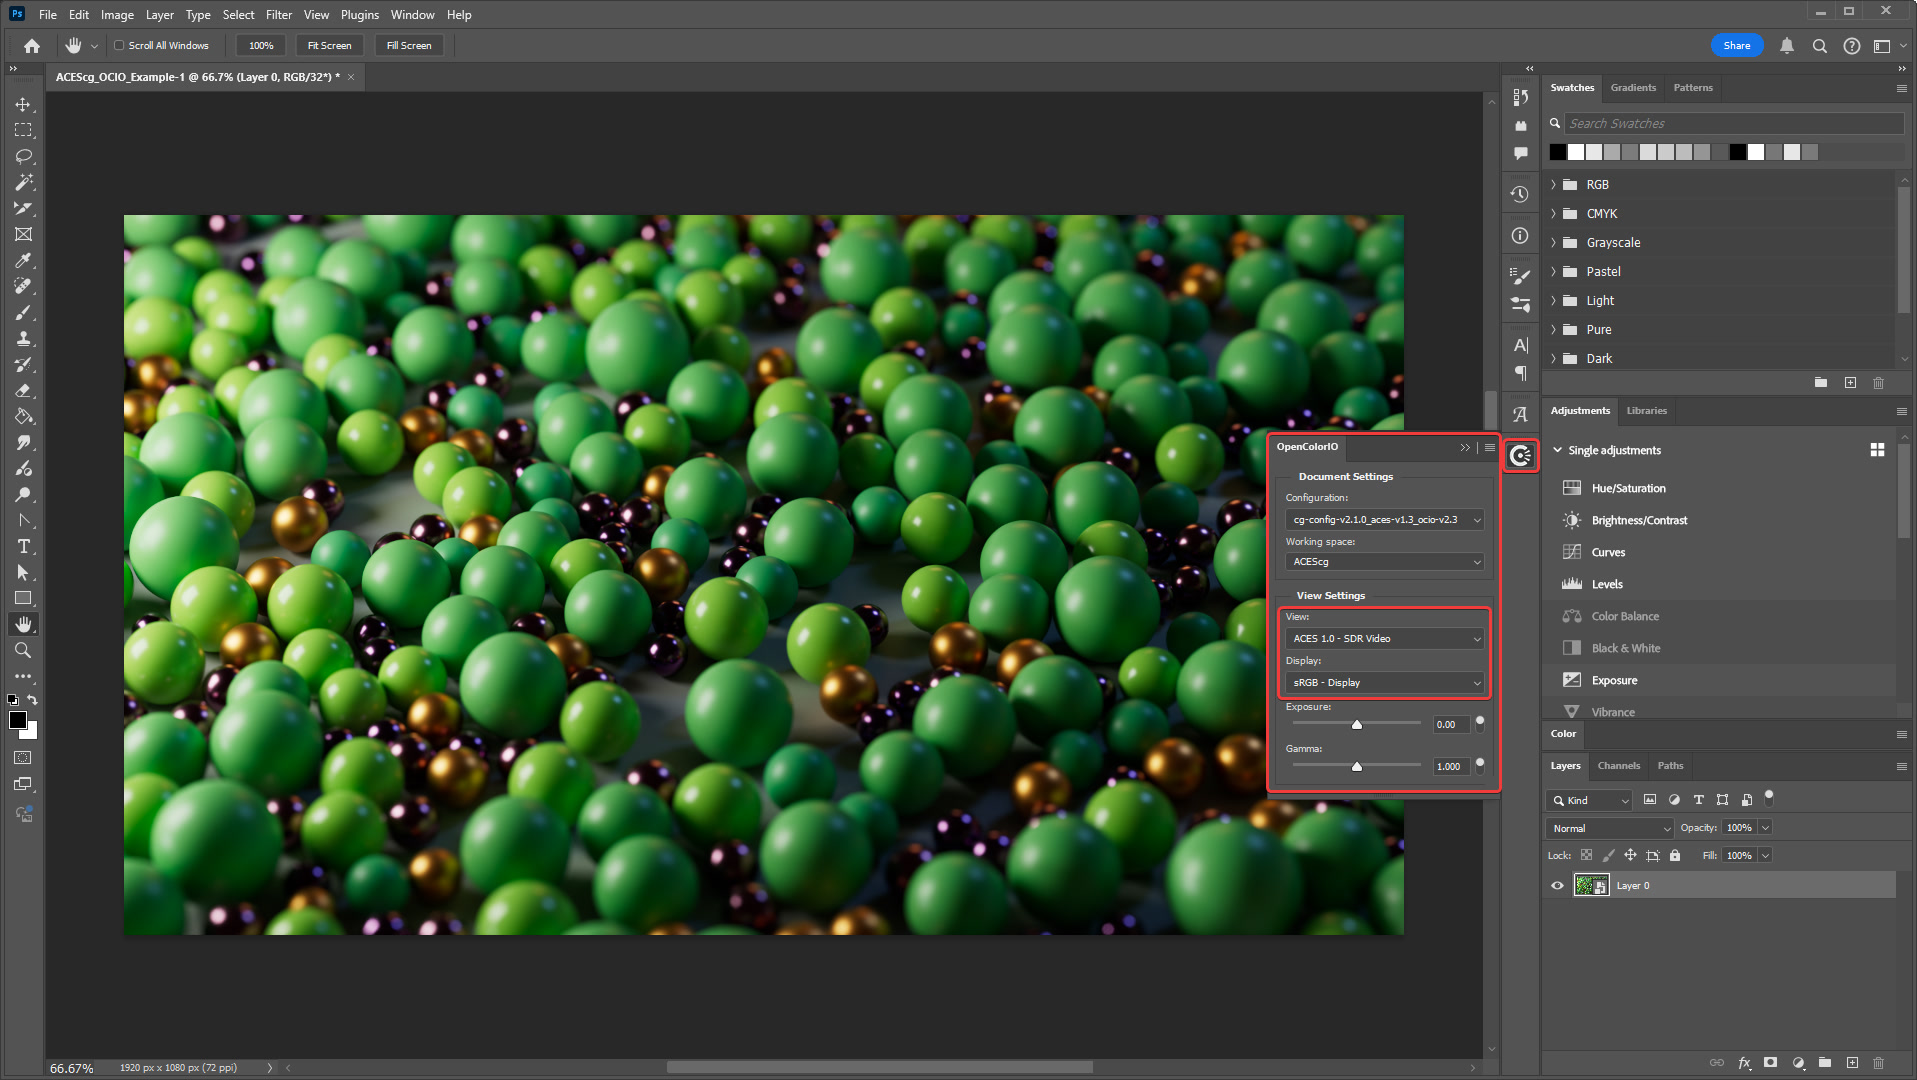
Immediately your render should perfectly match what was seen in the Redshift render view. This is because it should be using the exact same color space and view transform used by default in Redshift.
The current view transform can be seen by clicking on the OCIO button outlined in the image below. The "View" should be set to "ACES 1.0 - SDR Video" and the "Display" should be set to sRGB - Display."
|
Step 4
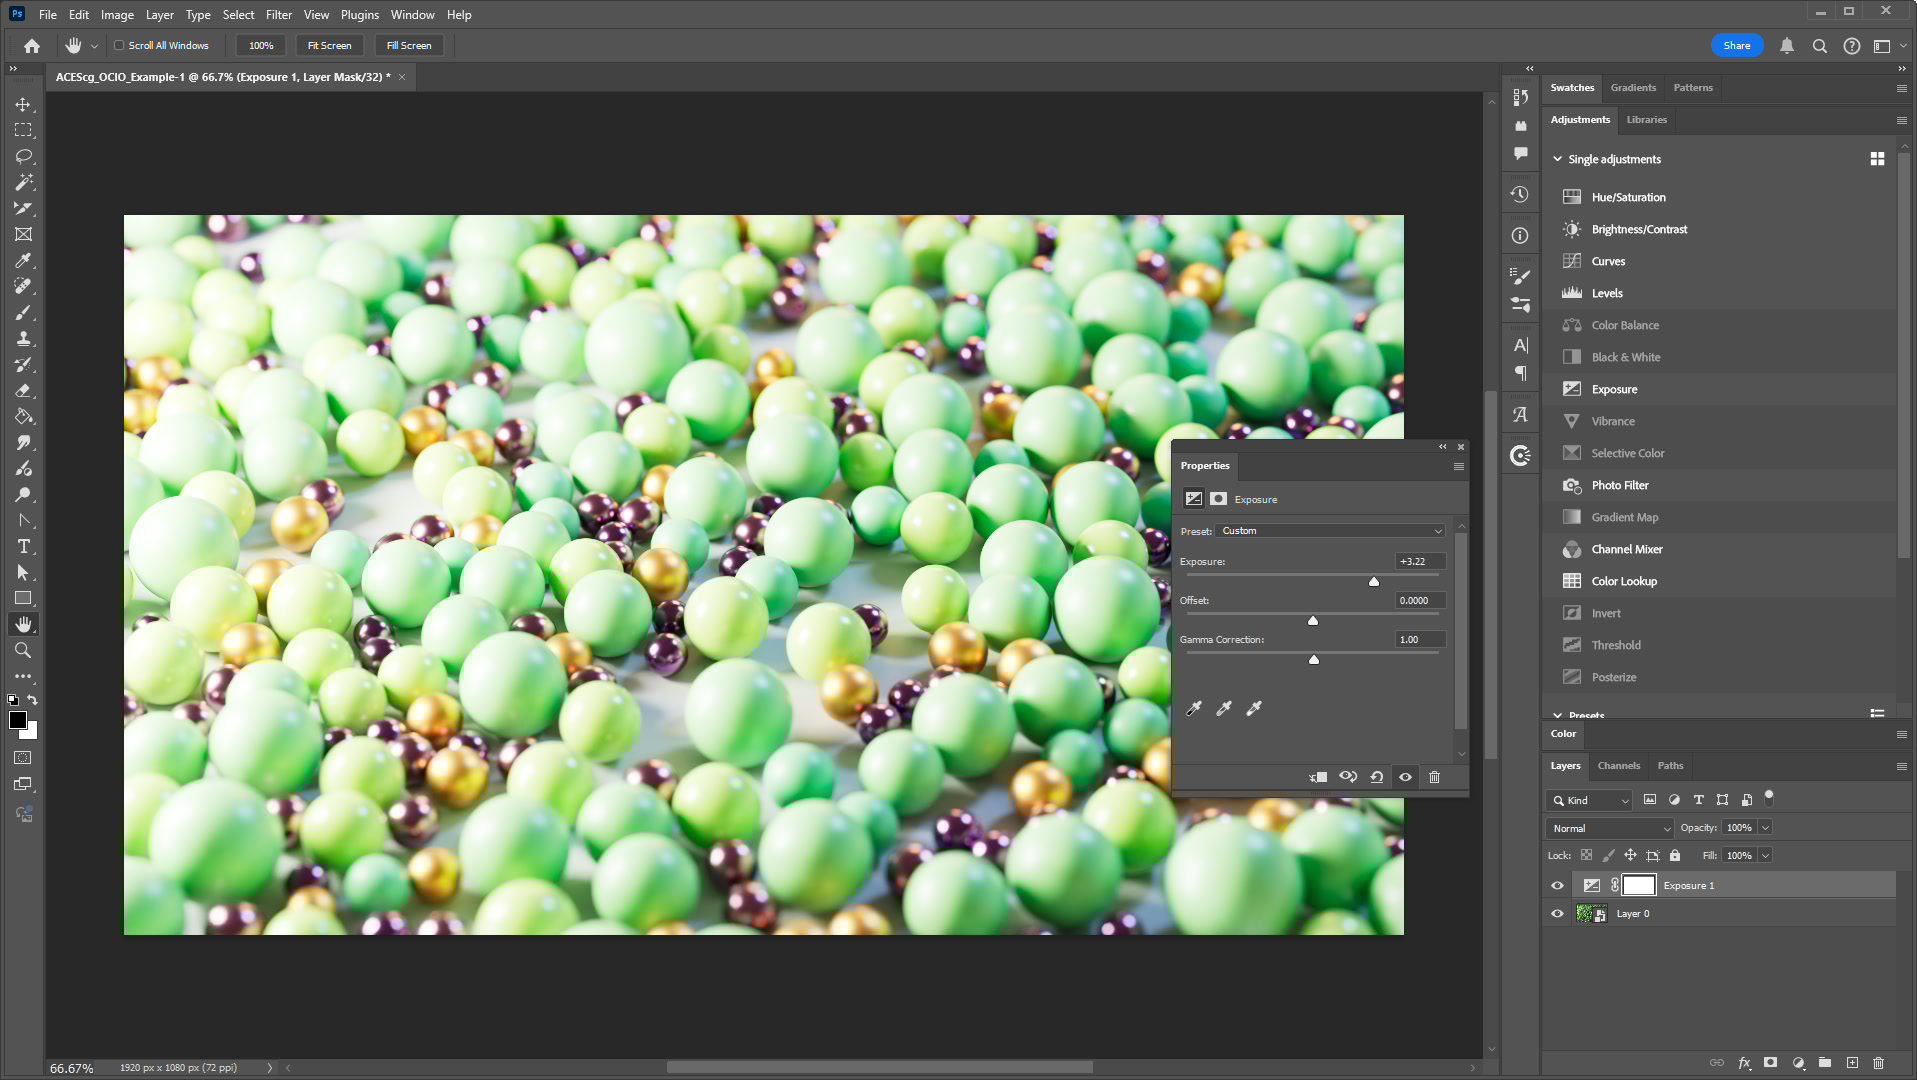
In this state your image is fully ready to be edited in the linear ACEScg working space and viewed with the ACES 1.0 - SDR Video view transform. This ensures that making changes like increasing the exposure behave as they would in Redshift, allowing you much more control and flexibility than editing without OCIO in a non-linear space.
|
Step 5
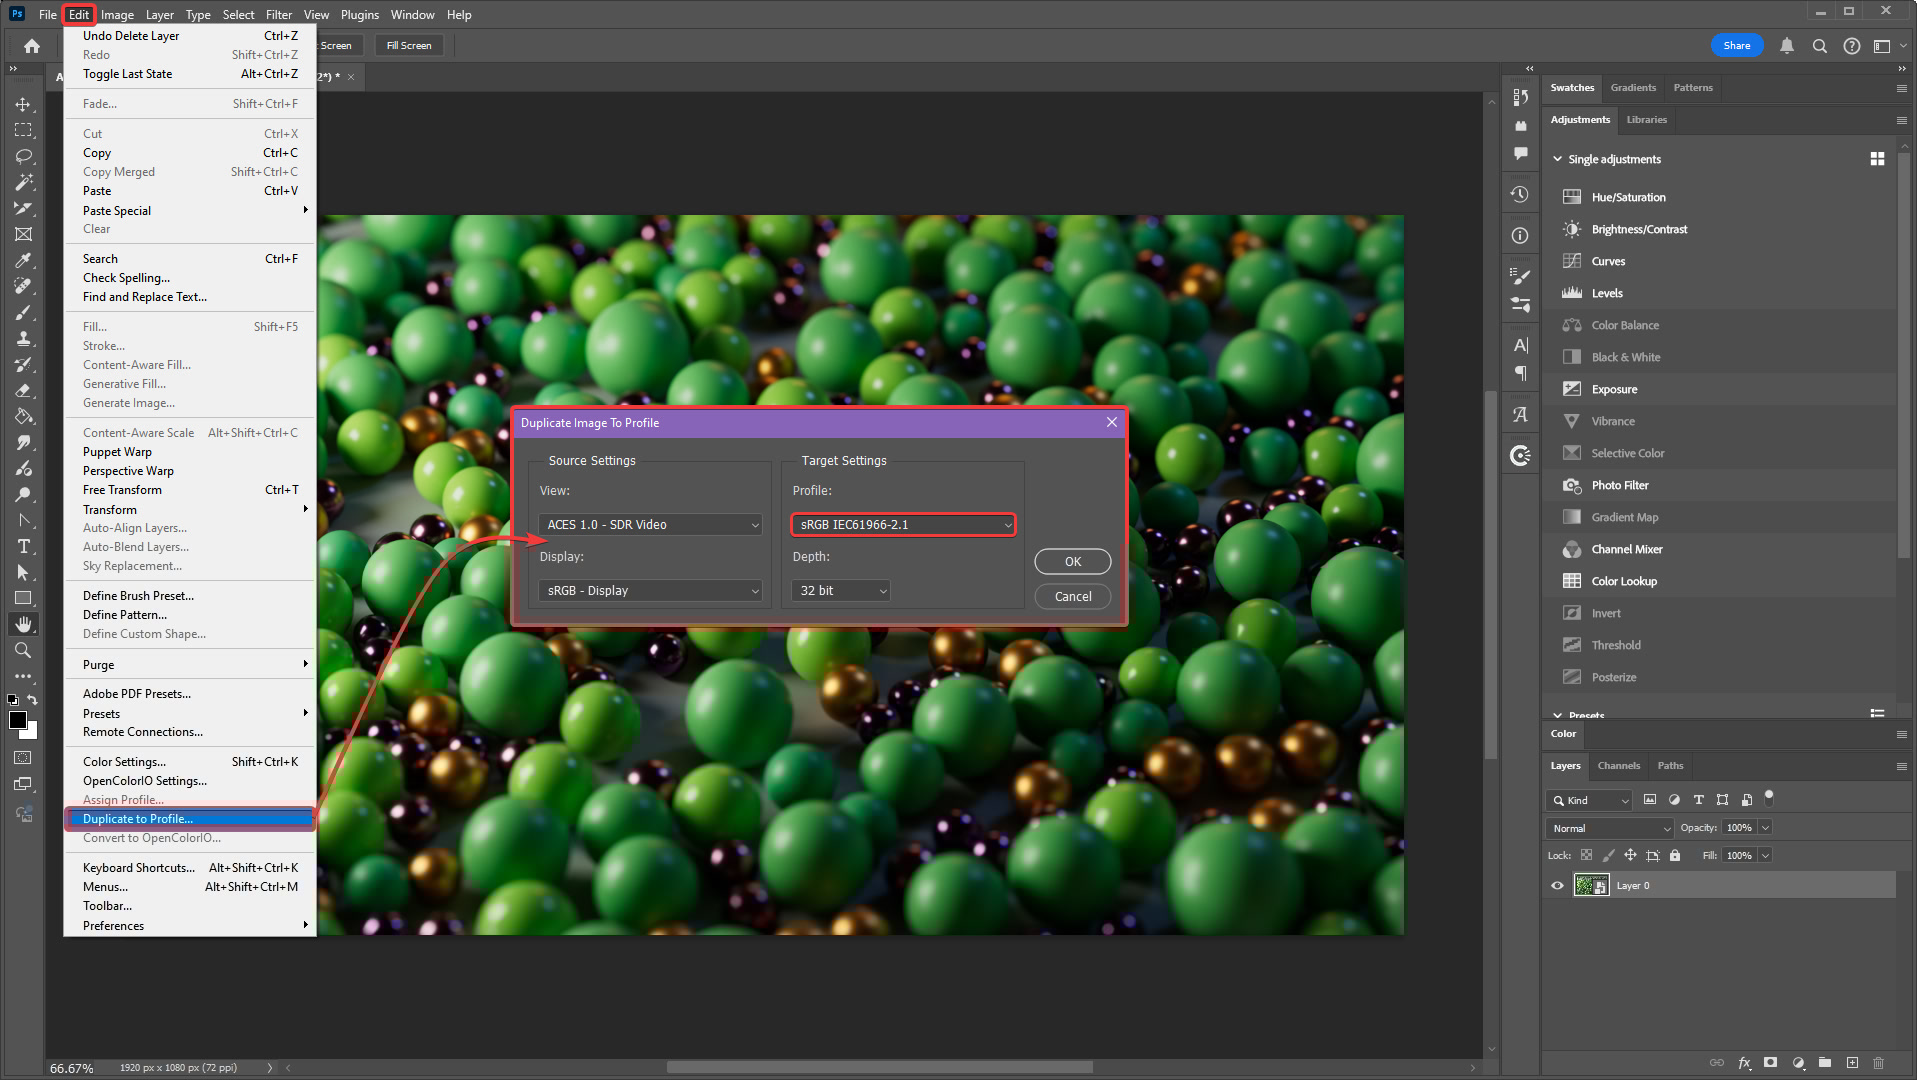
After you're done editing your image you need to convert it to a non-linear color space before exporting as a PNG, JPG, or other file format. To convert your image, use the "Duplicate to Profile" option in the Edit menu as demonstrated below. This opens an option box with a critical step to perform, by default Photoshop is set to use the color space "Adobe RGB (1998)" for the Target Settings "Profile," however this is the wrong color space to use when the image has been previewed using the sRGB - Display view transform.
Instead change the Profile to "sRGB IEC61966-2.1" and click "Ok." After this your image is copied to a new regular Photoshop file — a non-OCIO file — with the correct view transform baked in and is ready for export using the same methods you are used to like Export and Save for Web.
|
Adobe RGB vs sRGB
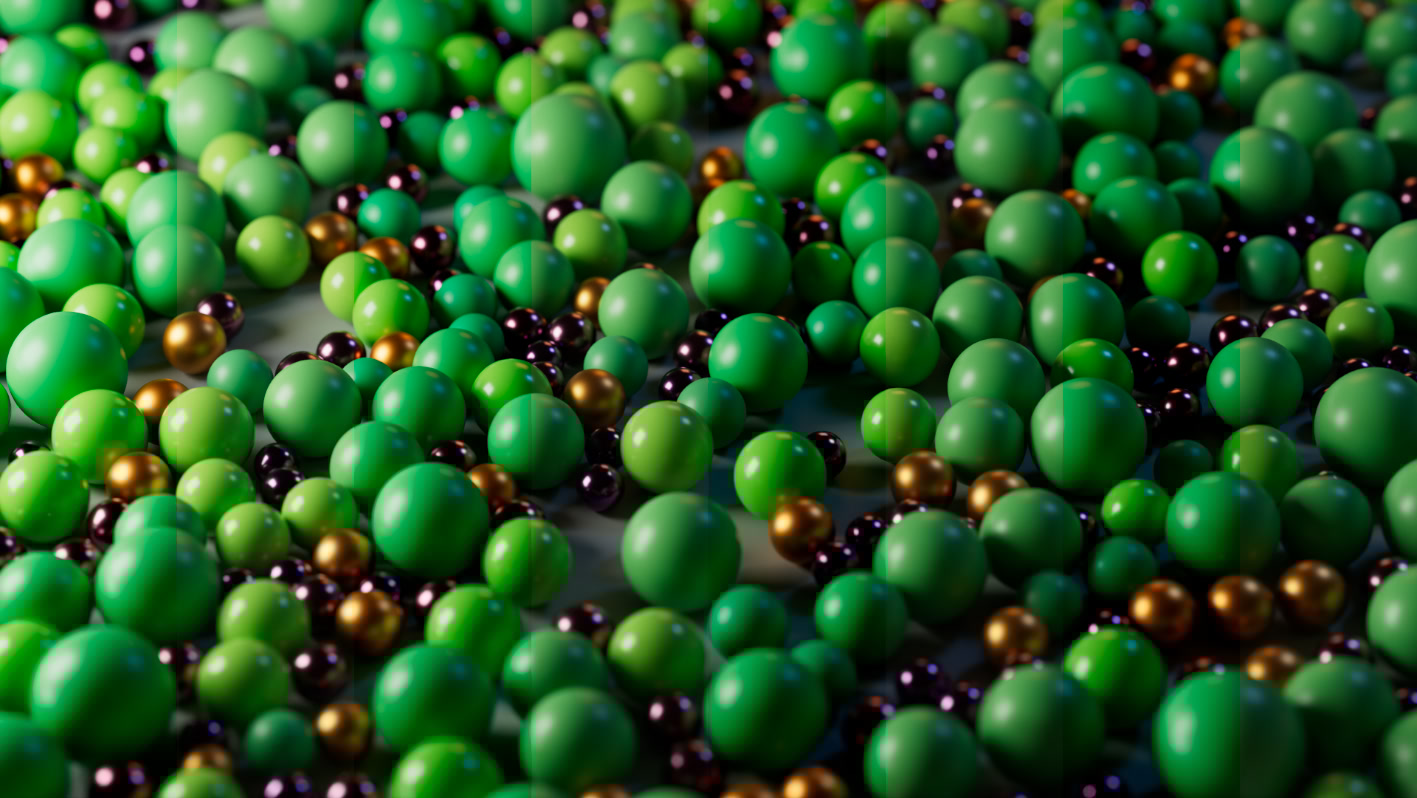
As an example, if you use Adobe RGB instead of sRGB in the last step the image might look similar but it will not be correct for the default Redshift render settings. Adobe RGB has a wider color gamut than sRGB and results in more saturated colors.
In the example below the sRGB and Adobe RGB versions are masked using a stripe pattern for comparison. The more saturated areas, starting on the left, use the Adobe RGB conversion while the stripe starting on the right uses sRGB — the correct color space for this example.
|
ACES via fnord OCIO Plugin for Photoshop (Legacy)
Step 1
In older versions of Photoshop the best way to use ACES is to download and make use of the fnord plugin OpenColorIO for Photoshop.
Step 2
First open your ACEScg footage in Photoshop.
Step 3
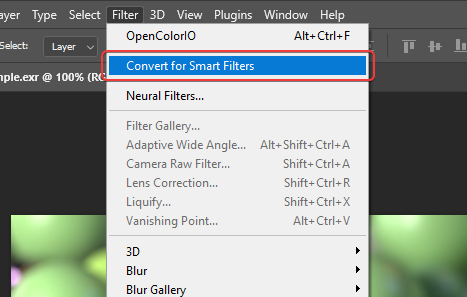
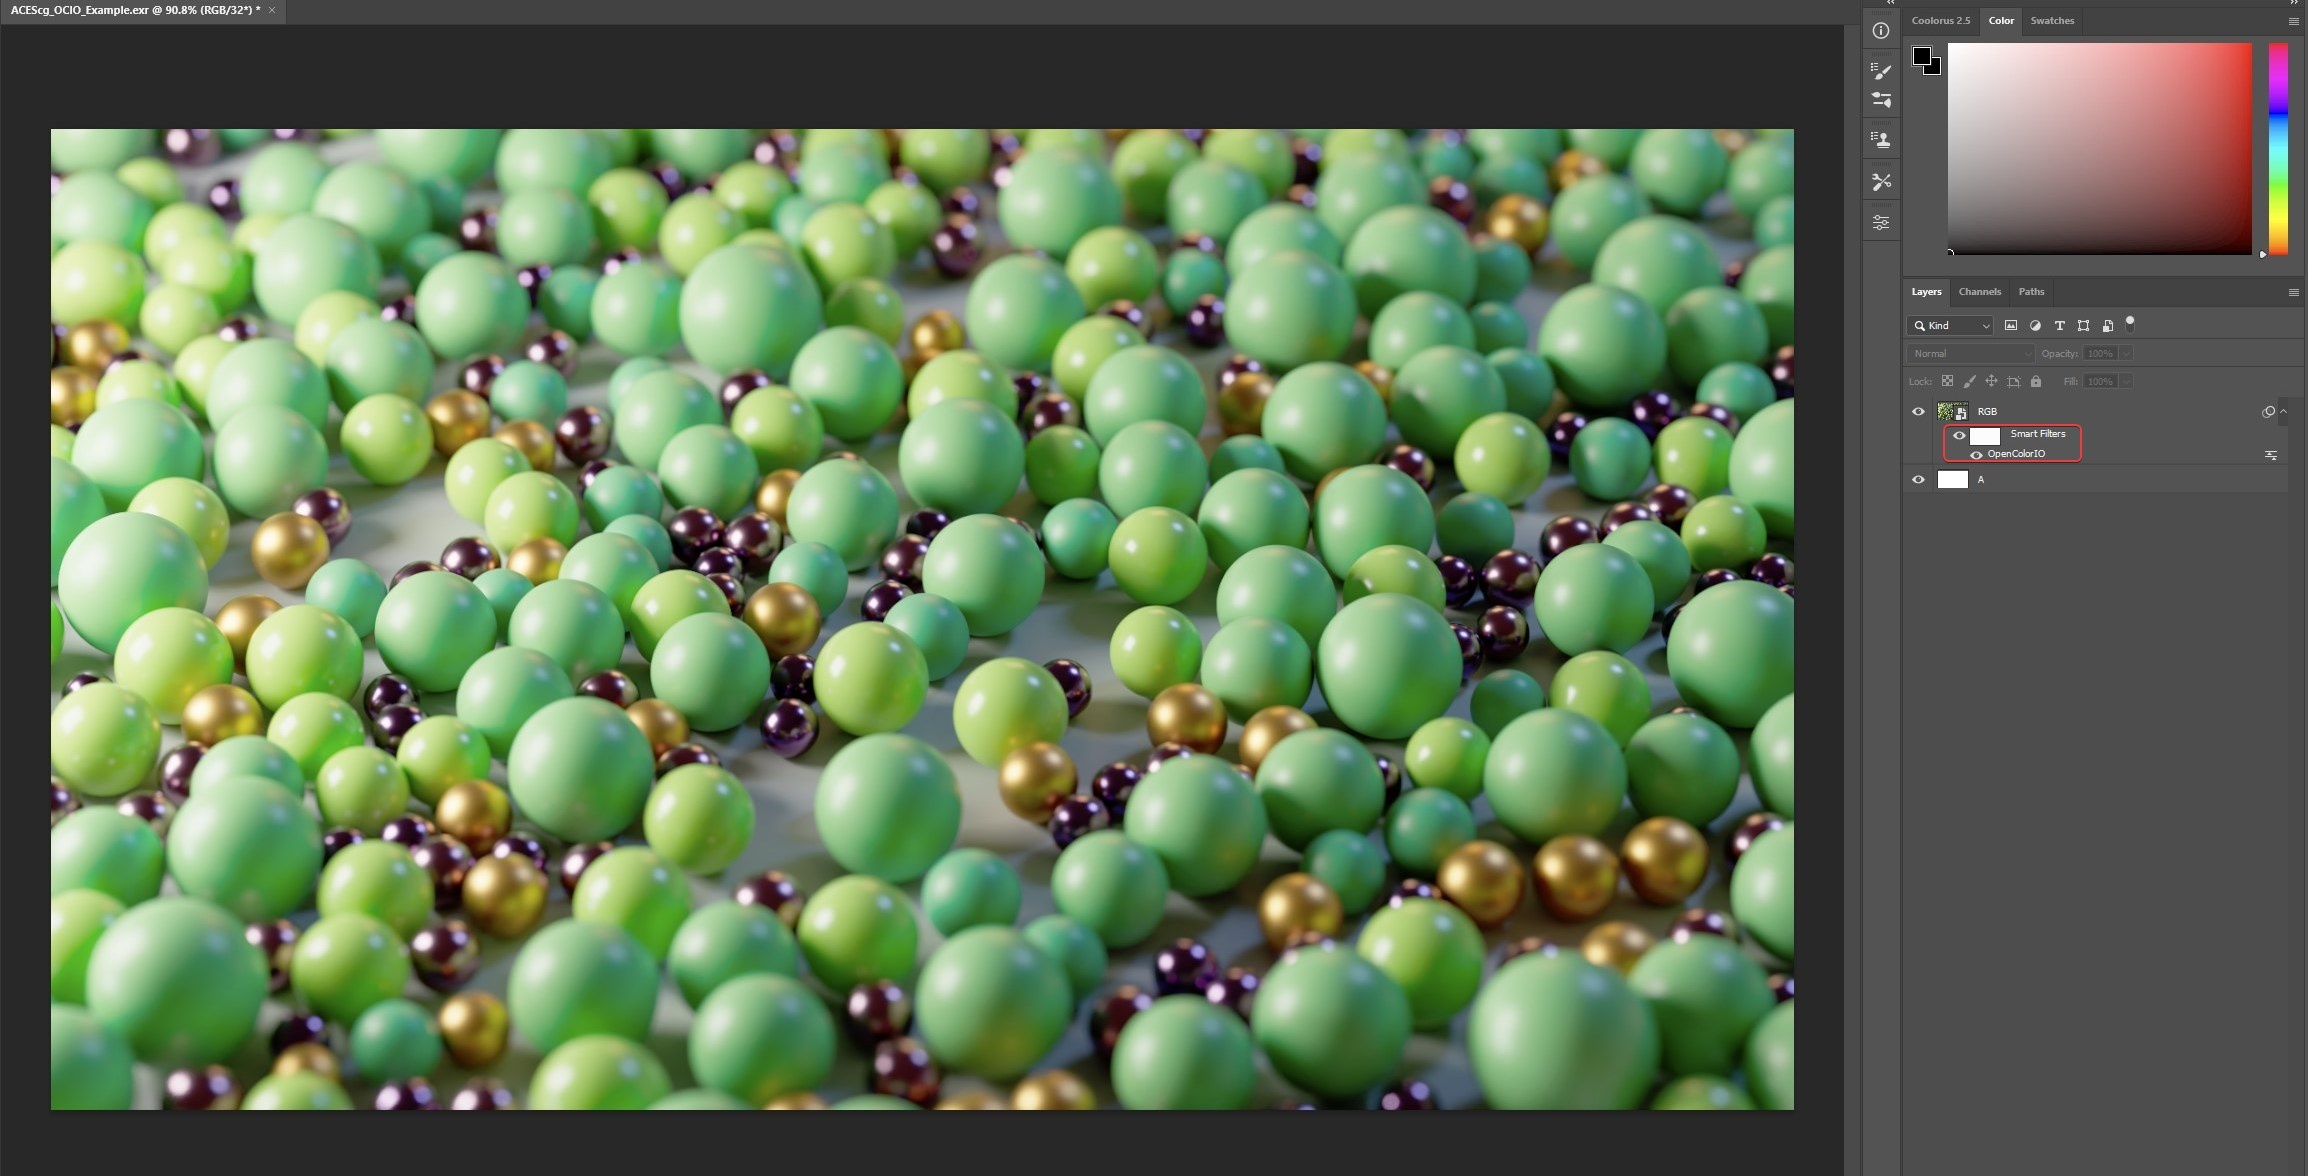
Then convert your ACEScg layer to a smart object.
This is a very important step if you will be doing any editing. All adjustments must occur inside of the ACEScg smart object itself in order to properly make use of the ACES workflow.
Step 4
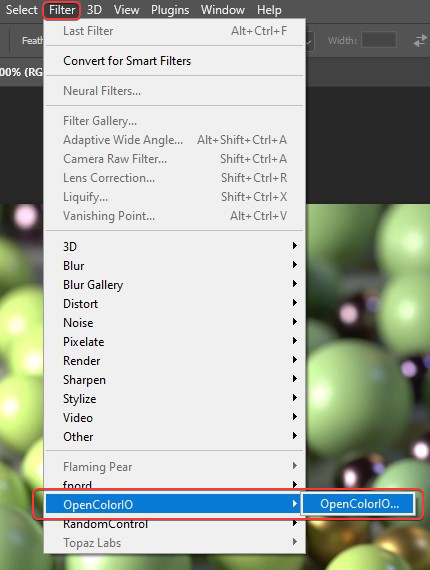
Then apply the OpenColorIO plugin as a smart filter to your ACEScg footage layer.
Step 5
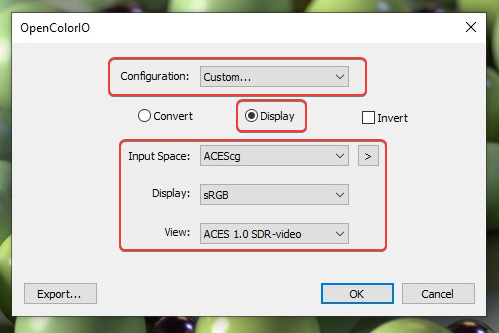
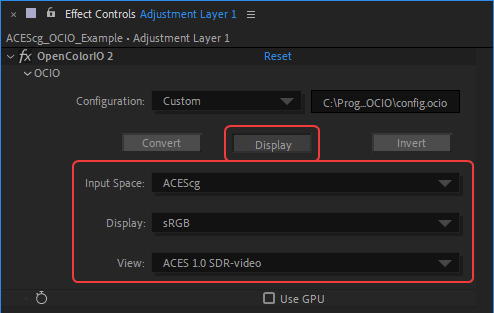
Then set your OCIO config file path.
Set the mode to "Display"
Input Space: ACEScg
Display: sRGB (or your own monitor's display color space)
View: ACES 1.0 SDR-video (or the same View transform you were using in Redshift)
Step 6
Now the ACEScg footage is being previewed with the correct ODT but it still does not look correct in Photoshop, this is due to an extra gamma correction that Photoshop is applying.
Step 7
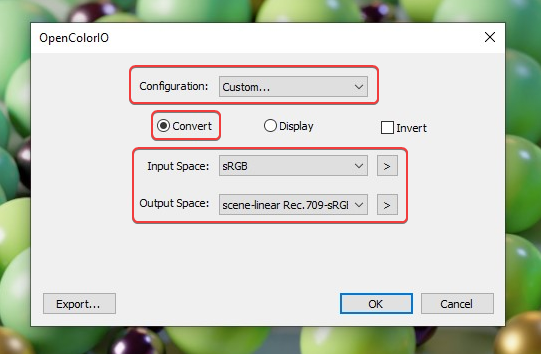
To counteract this gamma correction issue apply another OpenColorIO smart filter to the ACEScg footage, but this time with different settings.
Use the same configuration file used last time.
Set the mode to "Convert"
Input Space: sRGB
Output Space: scene-linear Rec.709-sRGB
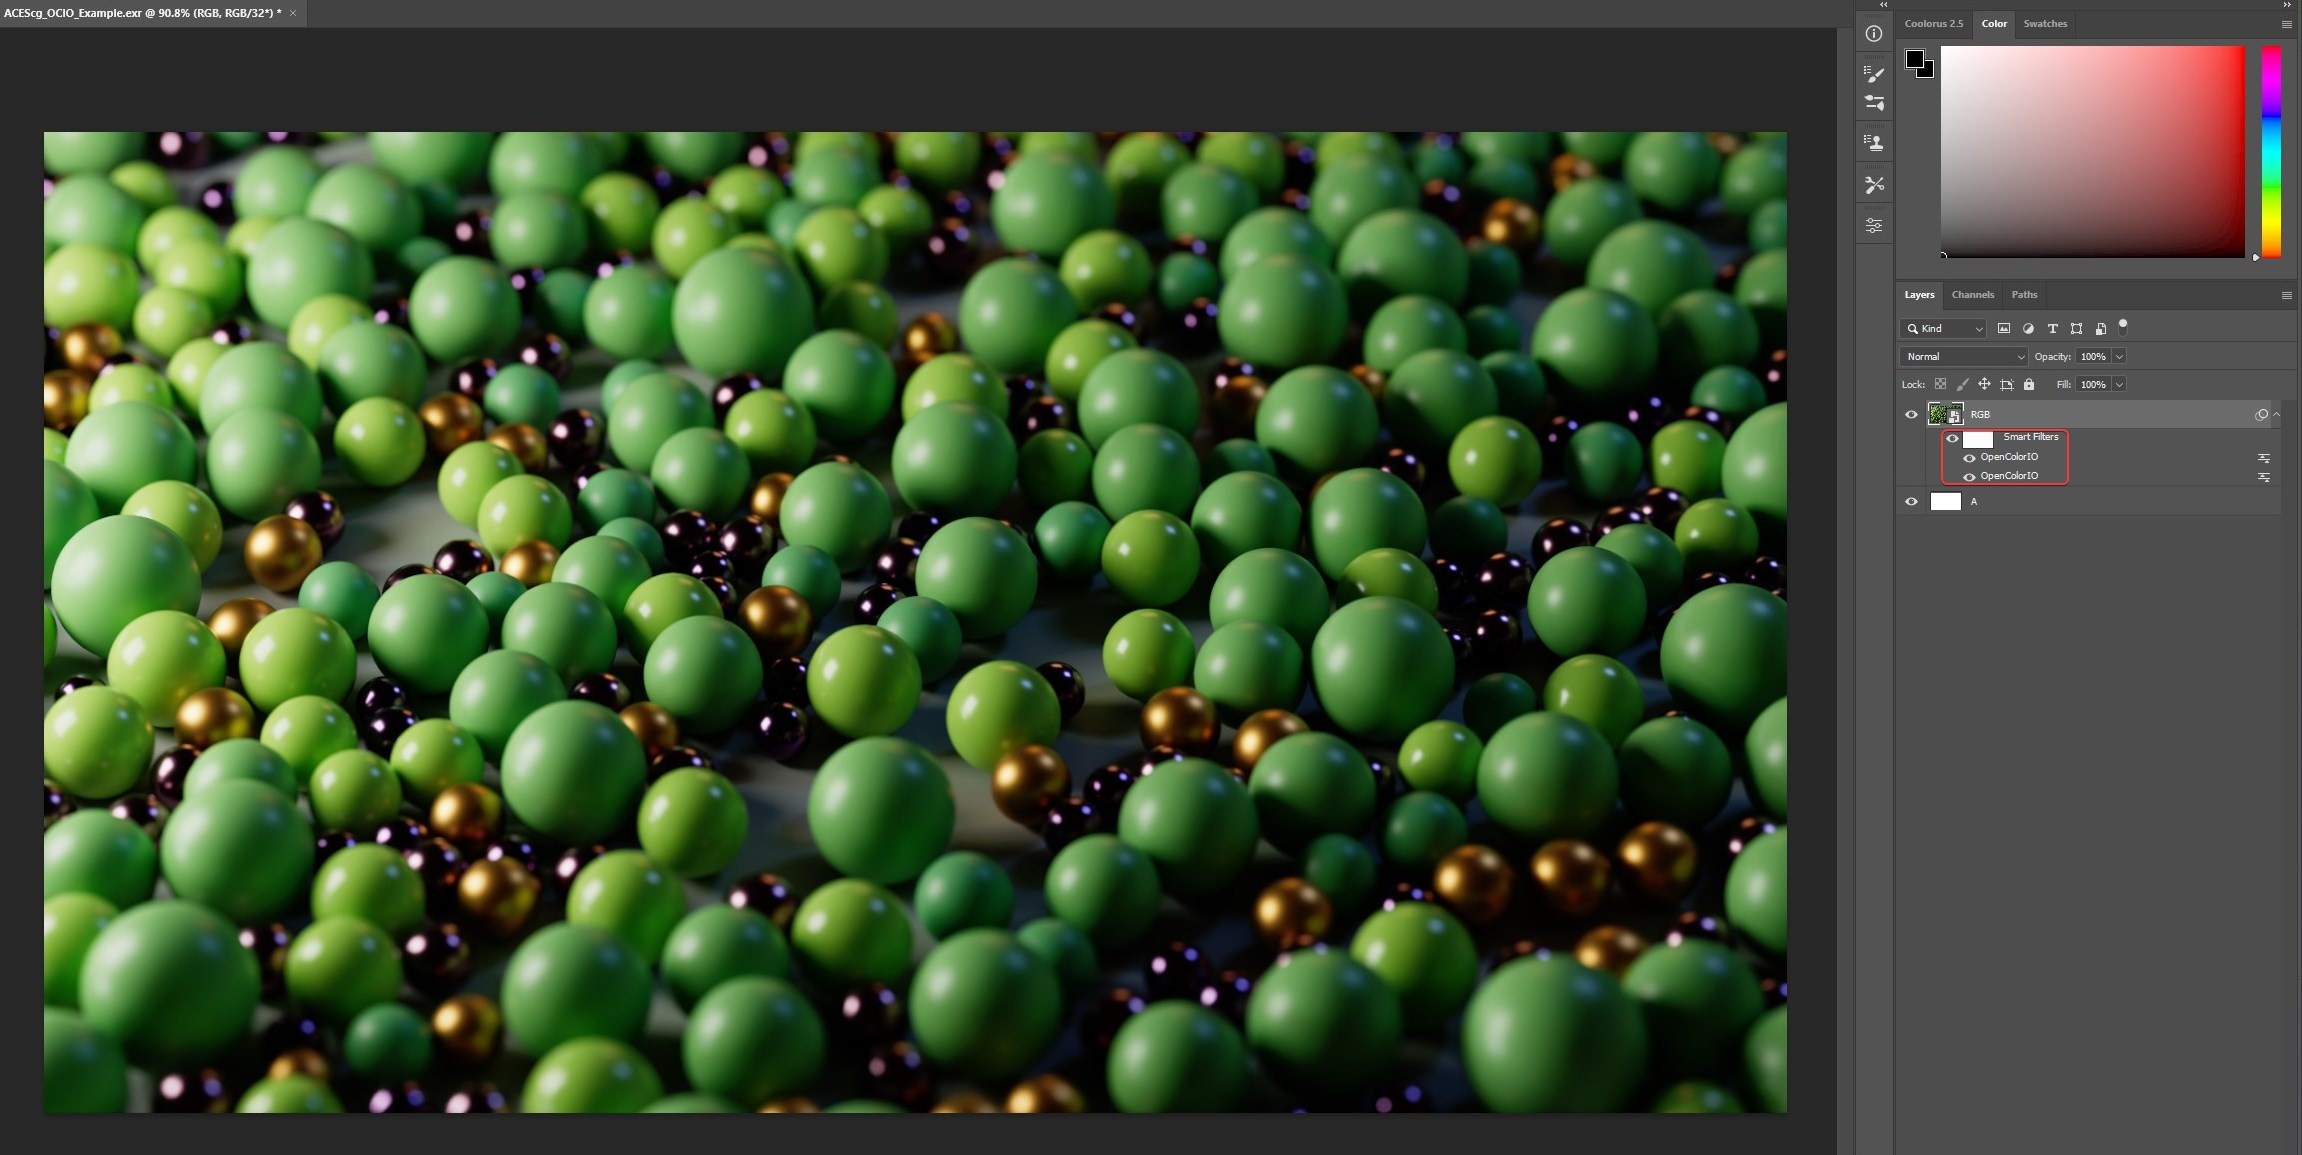
Step 8
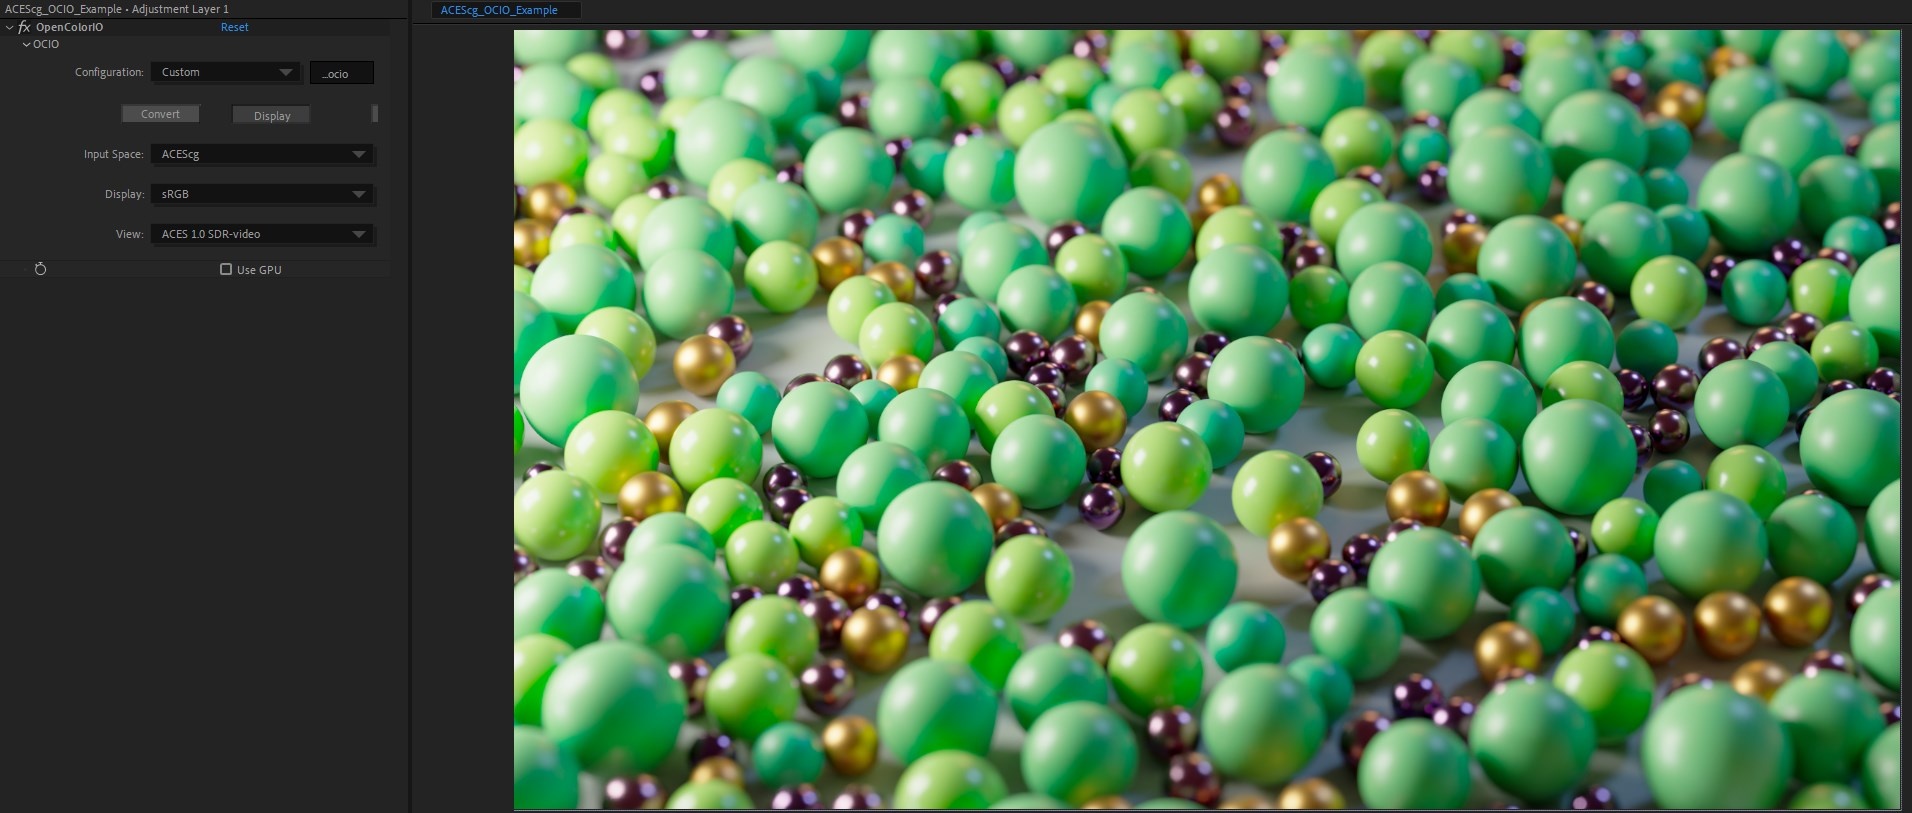
Now the ACEScg footage looks correct and is working properly with its two OpenColorIO transforms.
Reminder
The correct way to adjust ACEScg footage with the Photoshop workflow above is only possible inside the smart object itself as demonstrated in the video below.
ACES via a LUT in Photoshop (Legacy)
This method will only work with an sRGB output space and when Photoshop is in 32bits/Channel mode.
Required download: Photoshop LUT
Credit to Alex Fry for this method and the LUT used.
You will need to download the following LUT to use this method:
ACEScg_Photoshop_SceneLinear_to_DisplayLinear_Transform_DimSurround.csp
For more information please see this post on ACES Central.
Step 1
First open your ACEScg footage in Photoshop.
Step 2
Next go to Edit > Assign Profile.
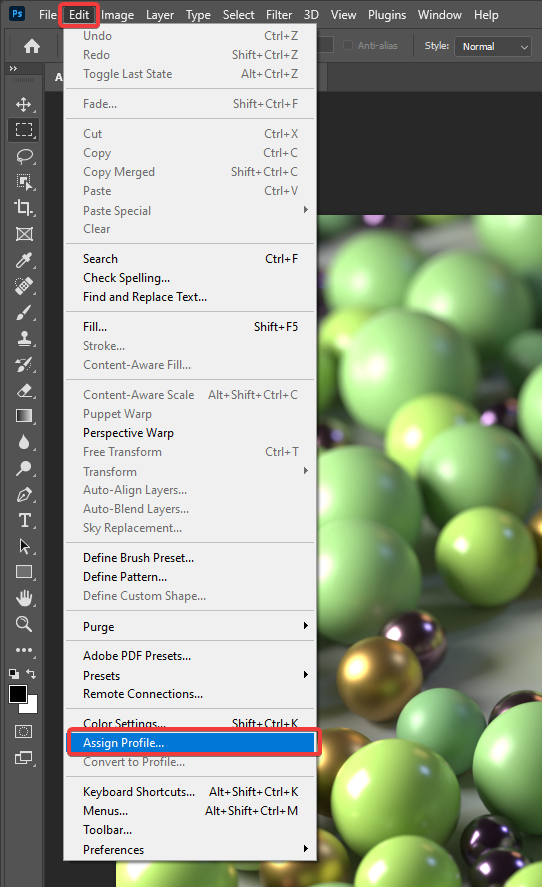
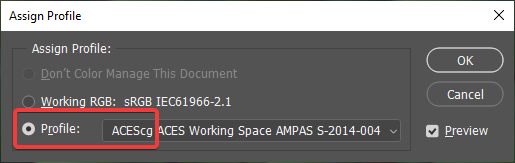
Step 3
Set the Profile to ACEScg.
Now your image will probably look a whole lot nicer and more saturated but we're still not quite there yet, most noticeably the highlights are clipping much more harshly than we would expect and in general the whole image might be brighter.
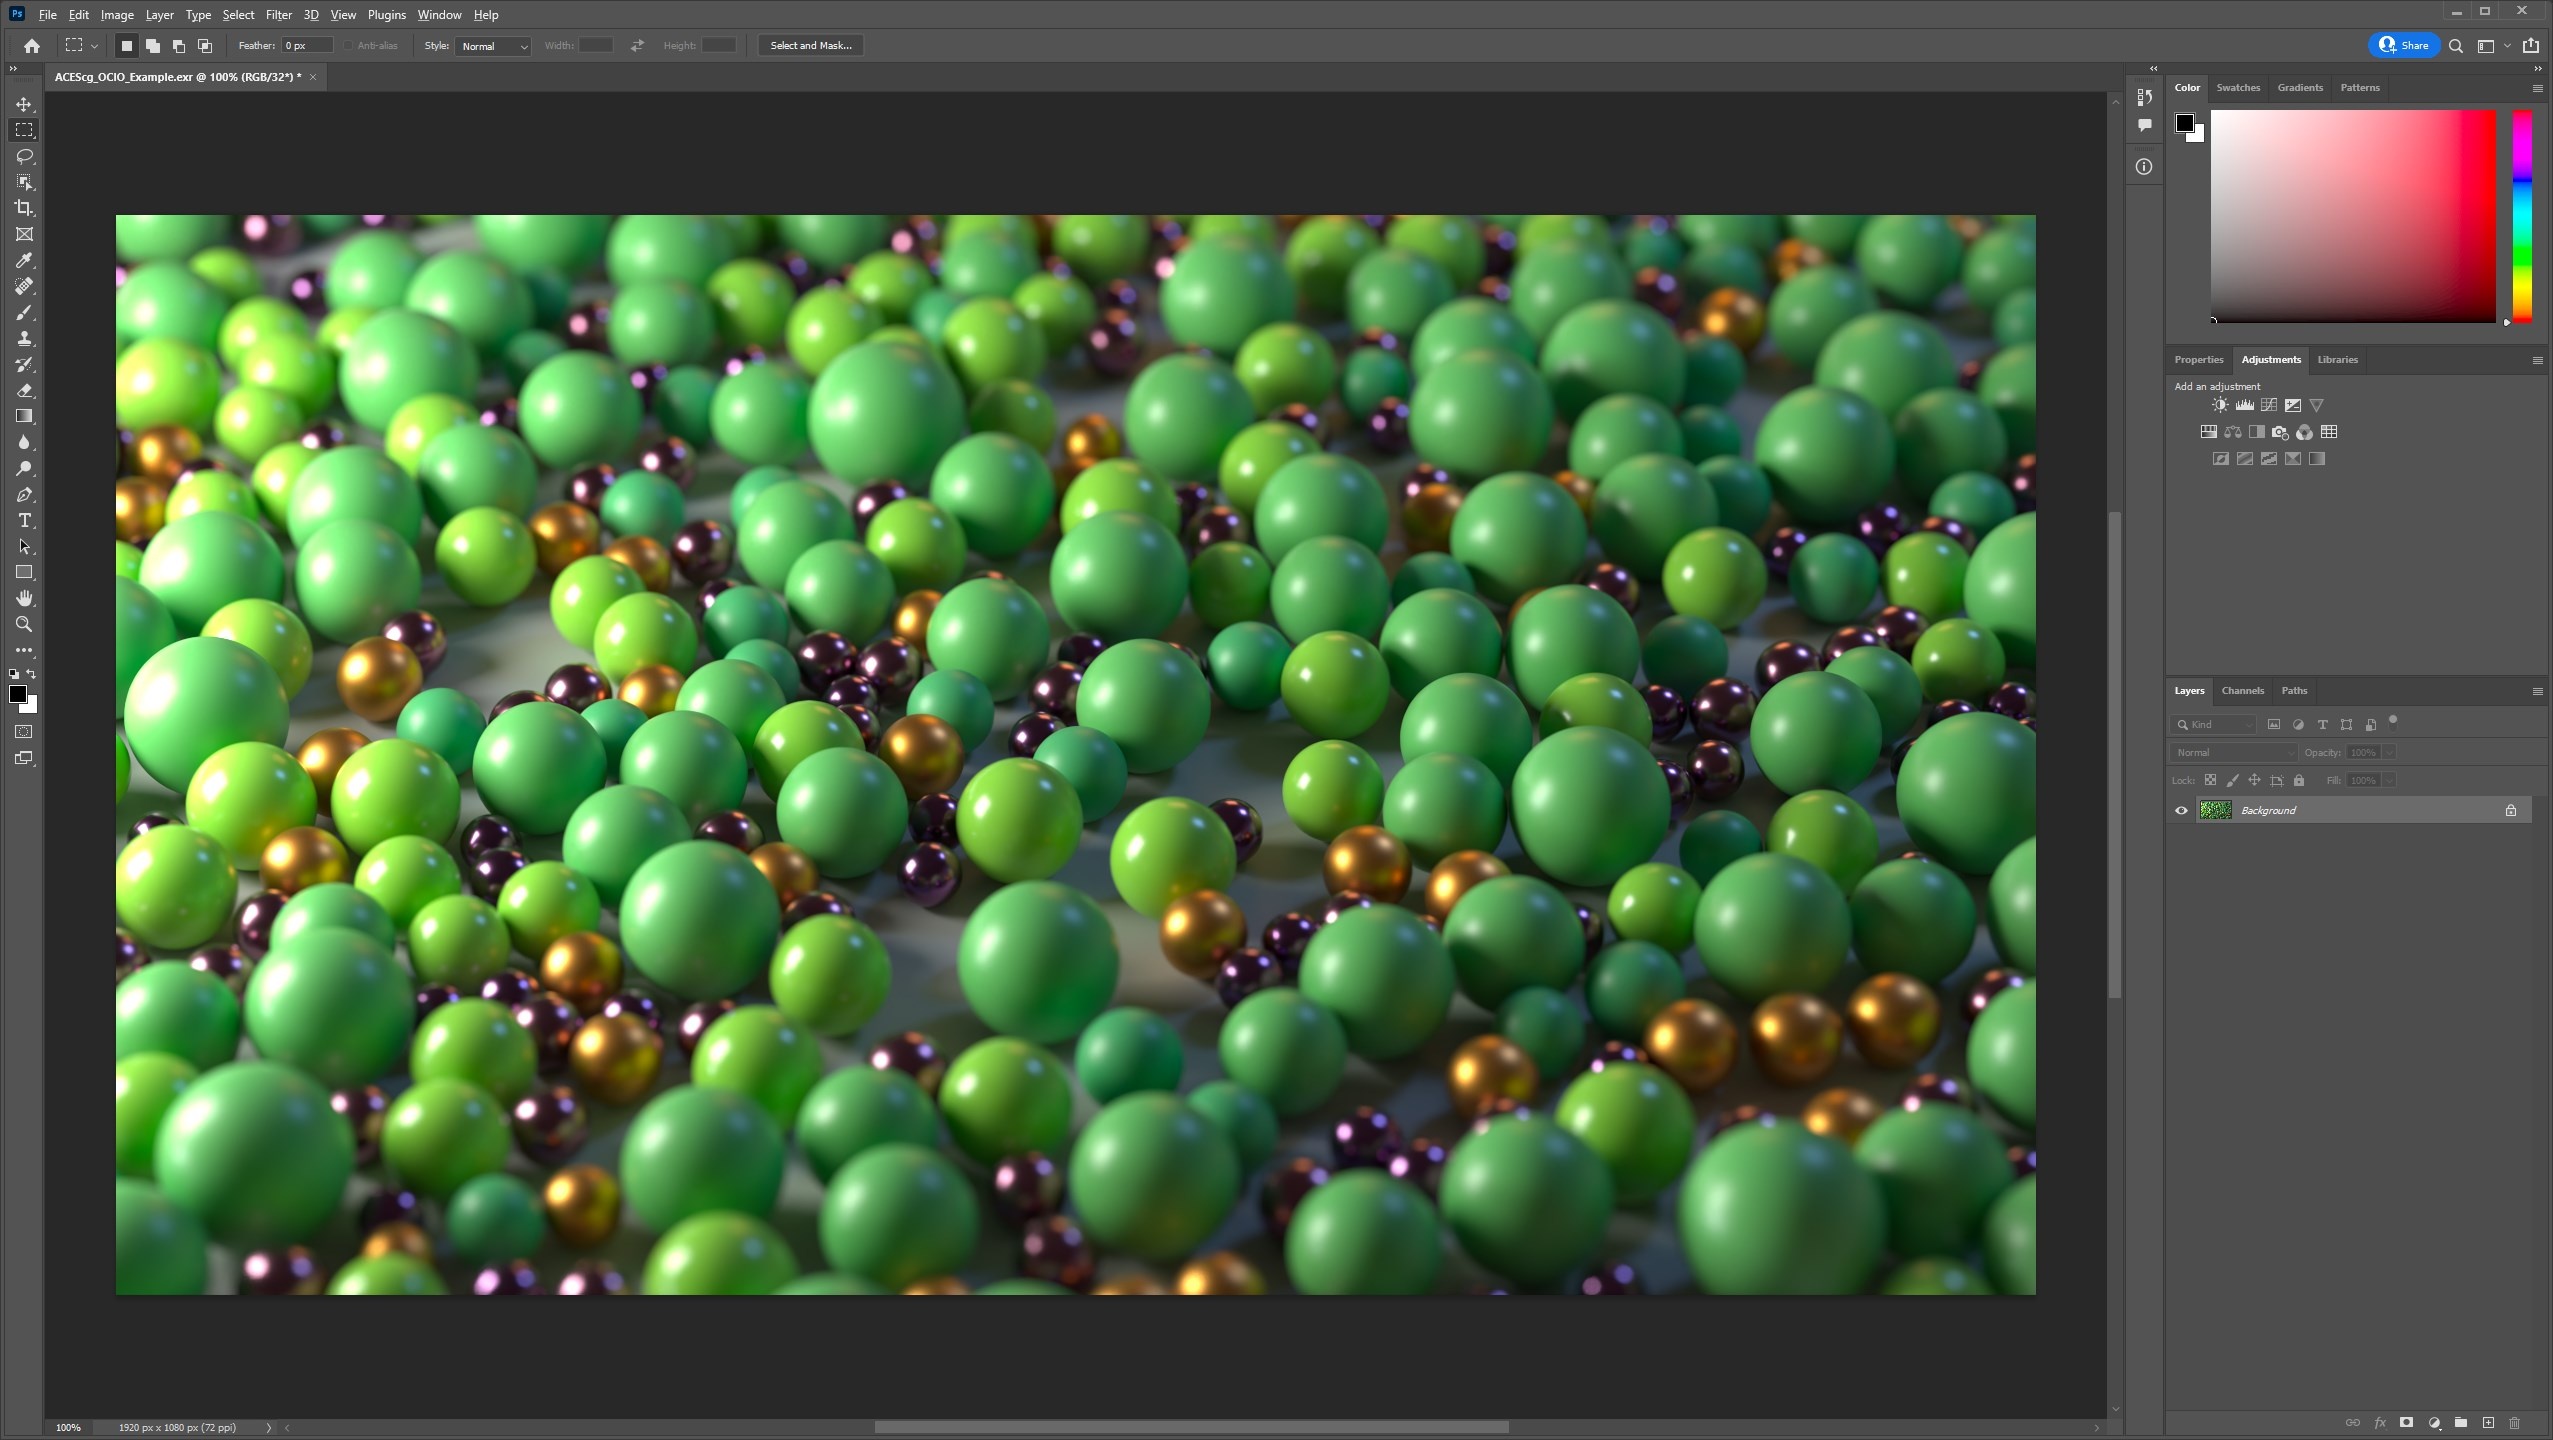
In-progress result after assigning the ACEScg color profile
Step 4
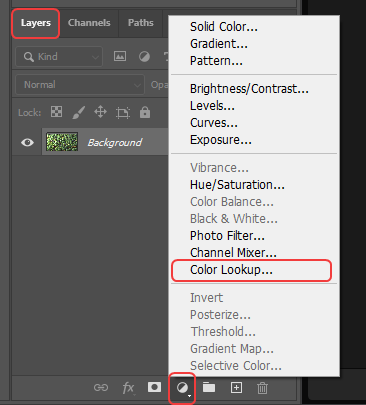
Next, from the Layers panel, create a new Adjustment Layer > Color Lookup.
Step 5
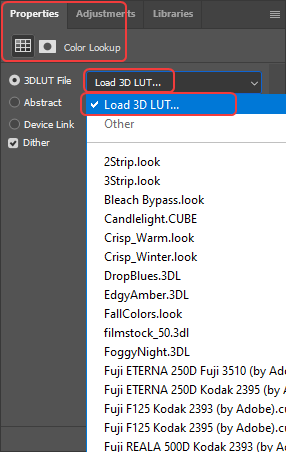
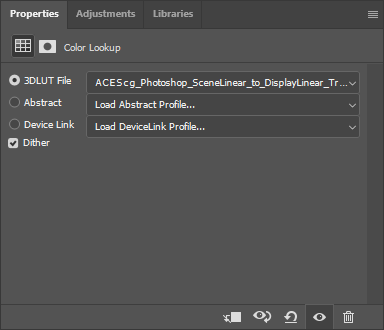
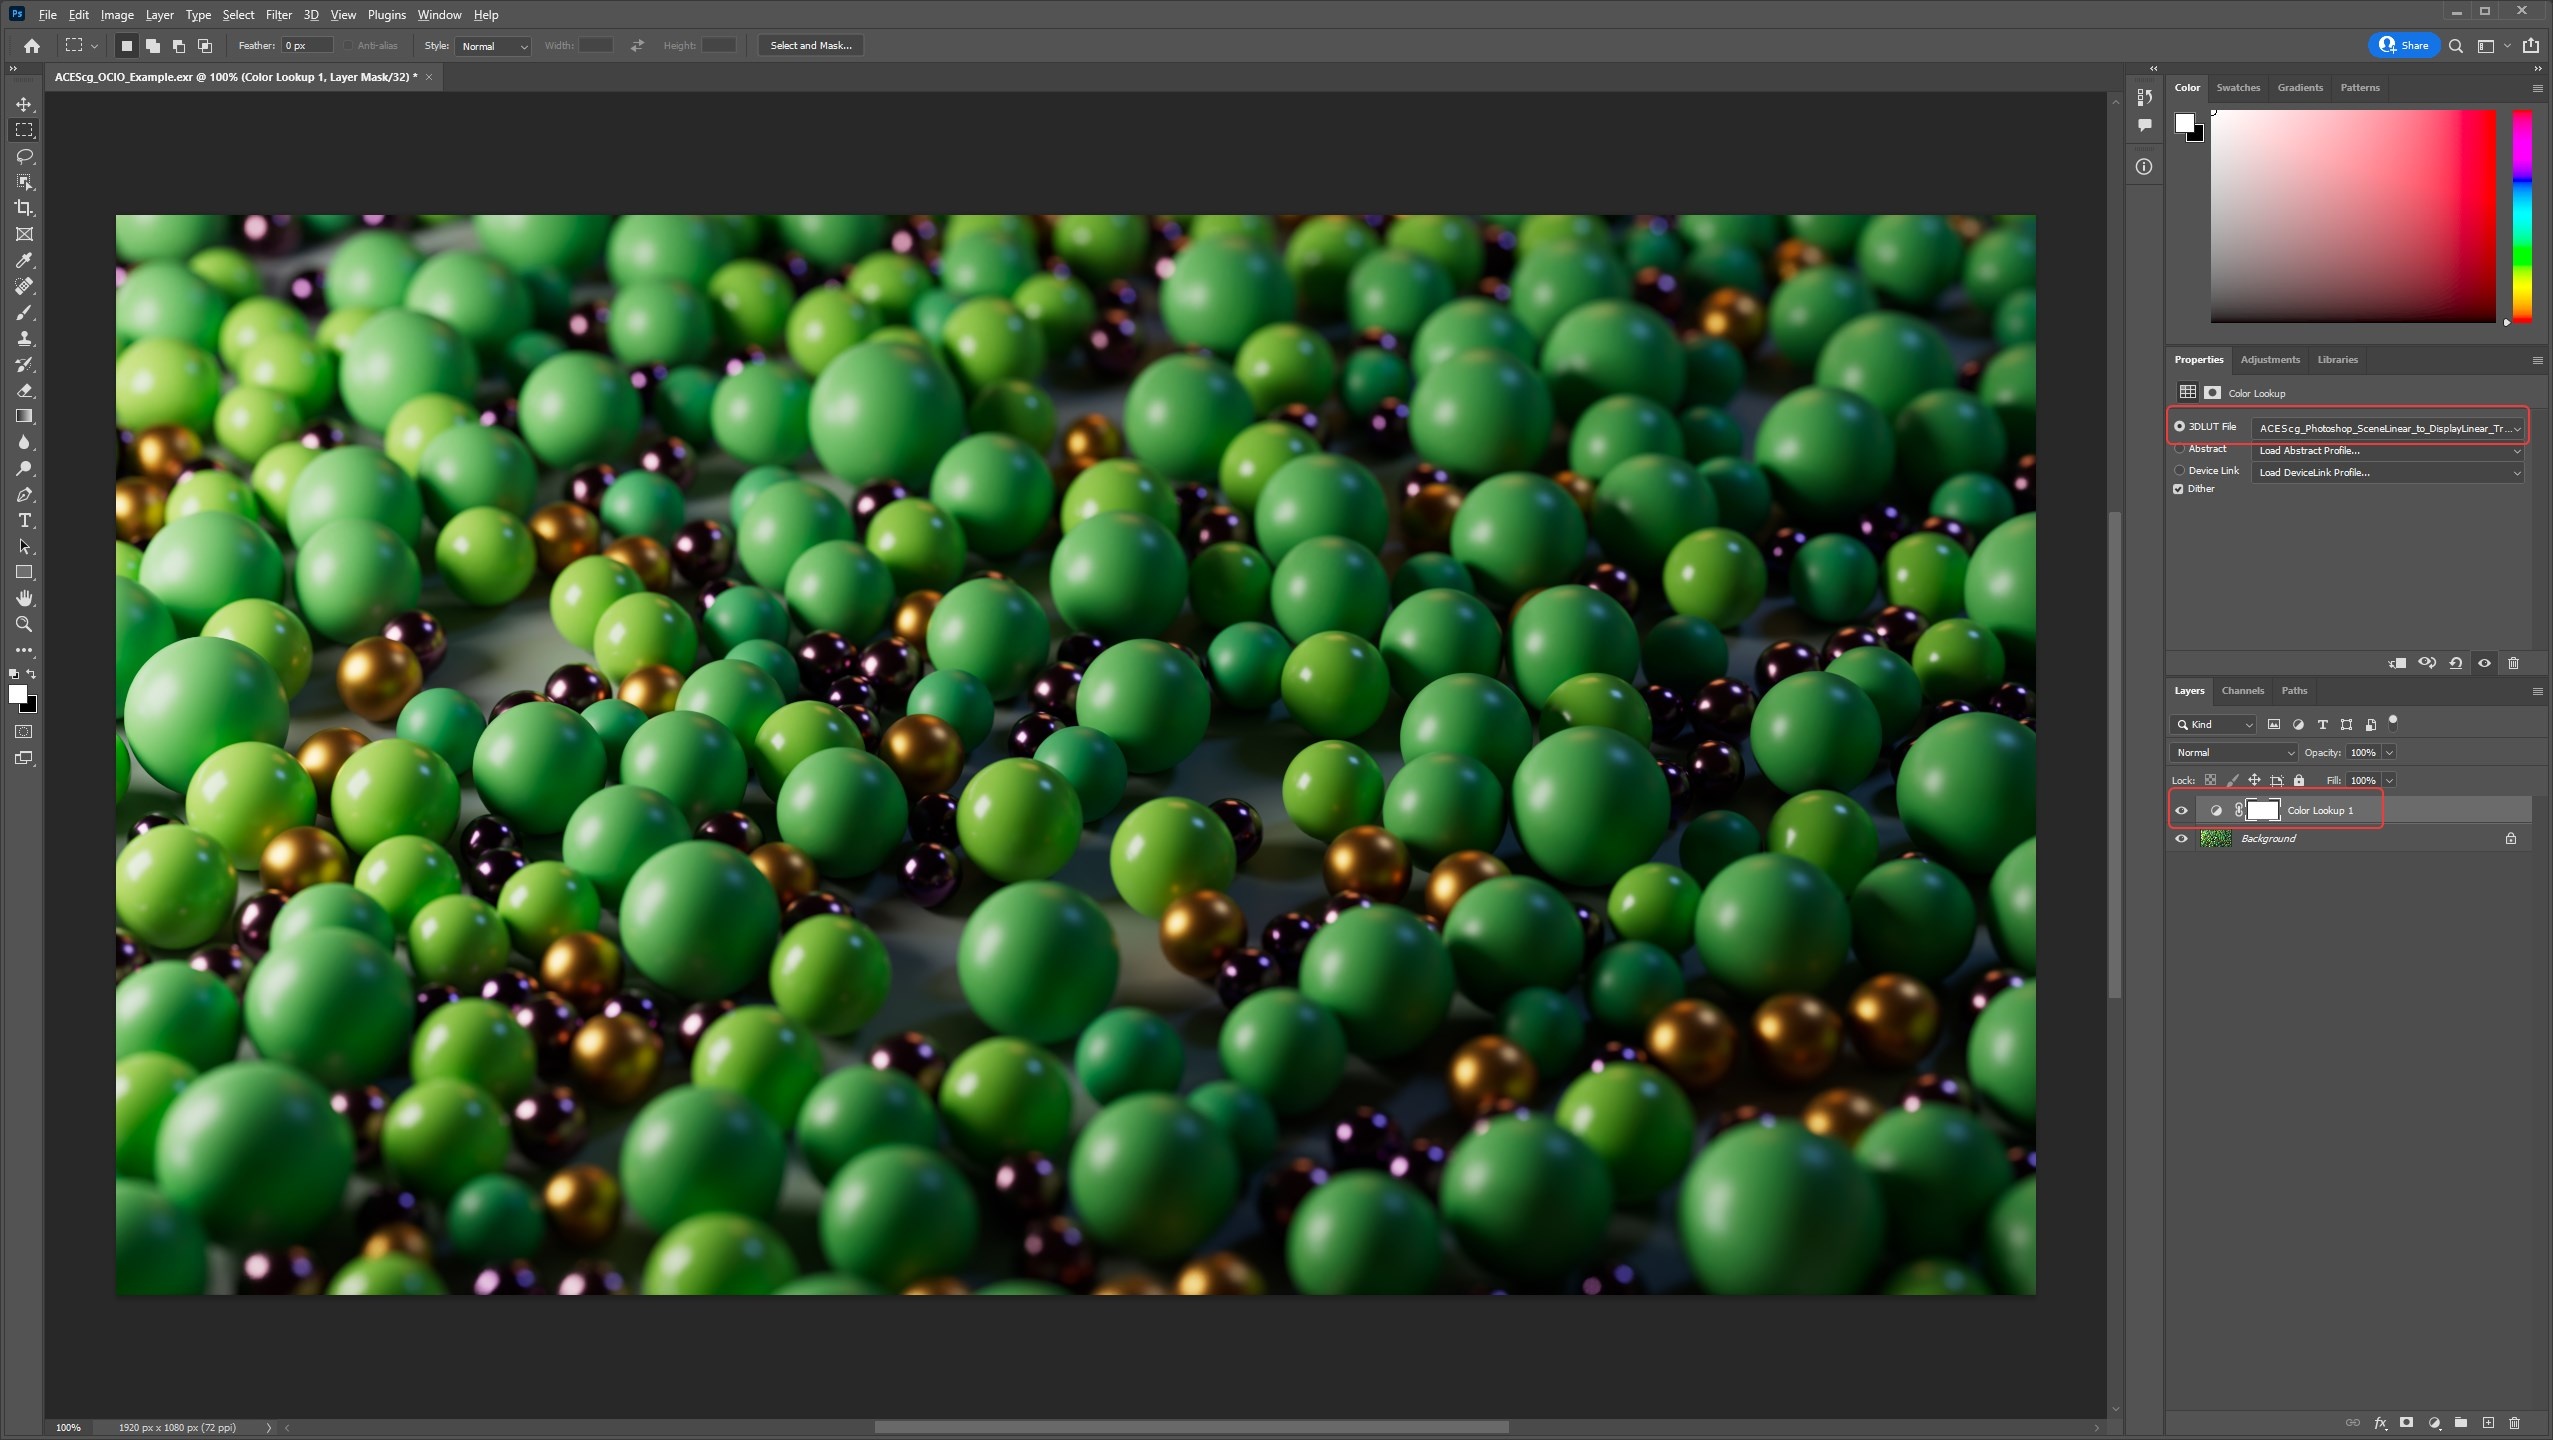
Next you must load the appropriate LUT from the Color Lookup's Properties panel seen below.
Click on the "Load 3D LUT" drop down and then click on the "Load 3D LUT..." text to bring up a file open dialog.
Step 6
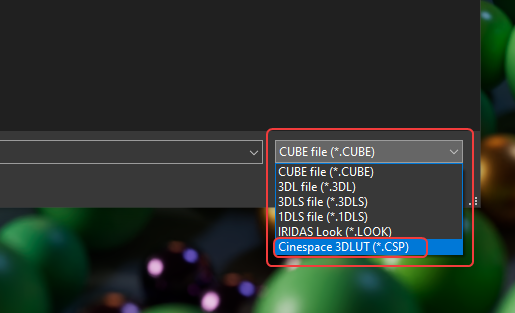
Navigate to where you saved the downloaded LUT file:
ACEScg_Photoshop_SceneLinear_to_DisplayLinear_Transform_DimSurround.csp and select it, your Color Lookup properties should look like the image below when set up correctly.
You may need to select the CSP file type in order to be able to see and select the LUT from the file browser as seen in the image below.
Step 7
Now the ACEScg footage looks great and is working as expected with the properly setup Color Lookup Adjustment Layer.
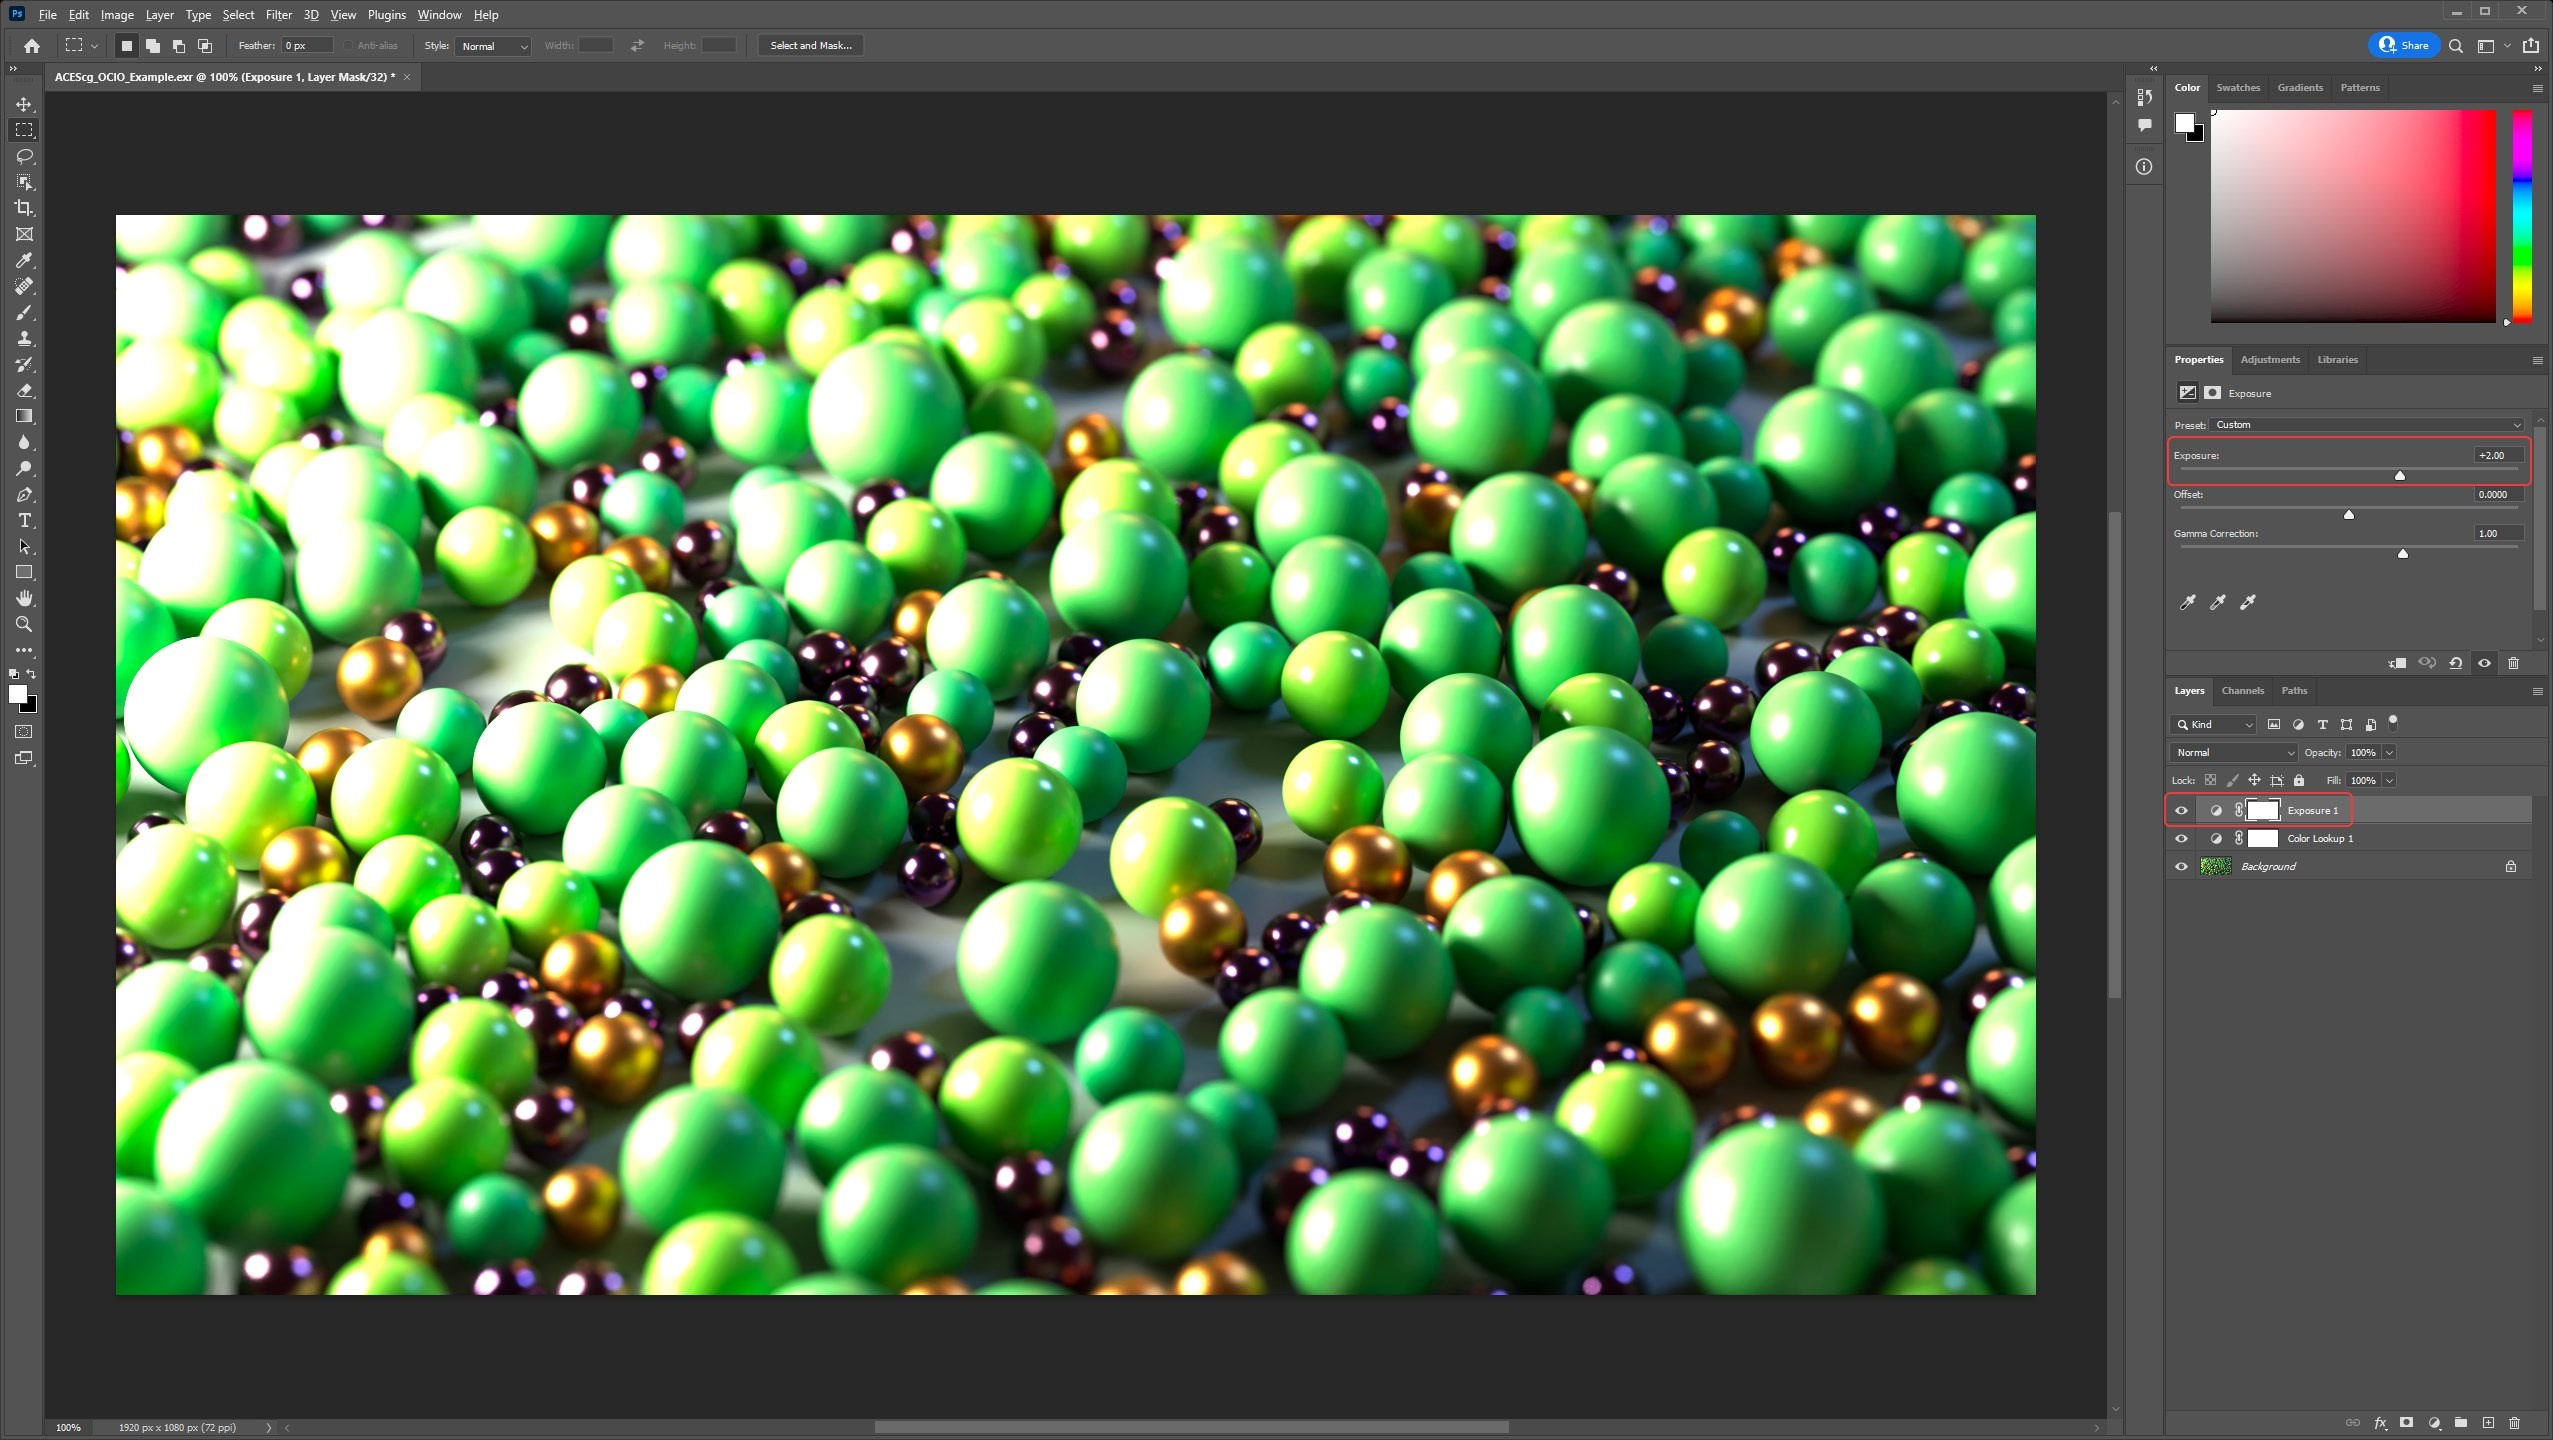
Reminder
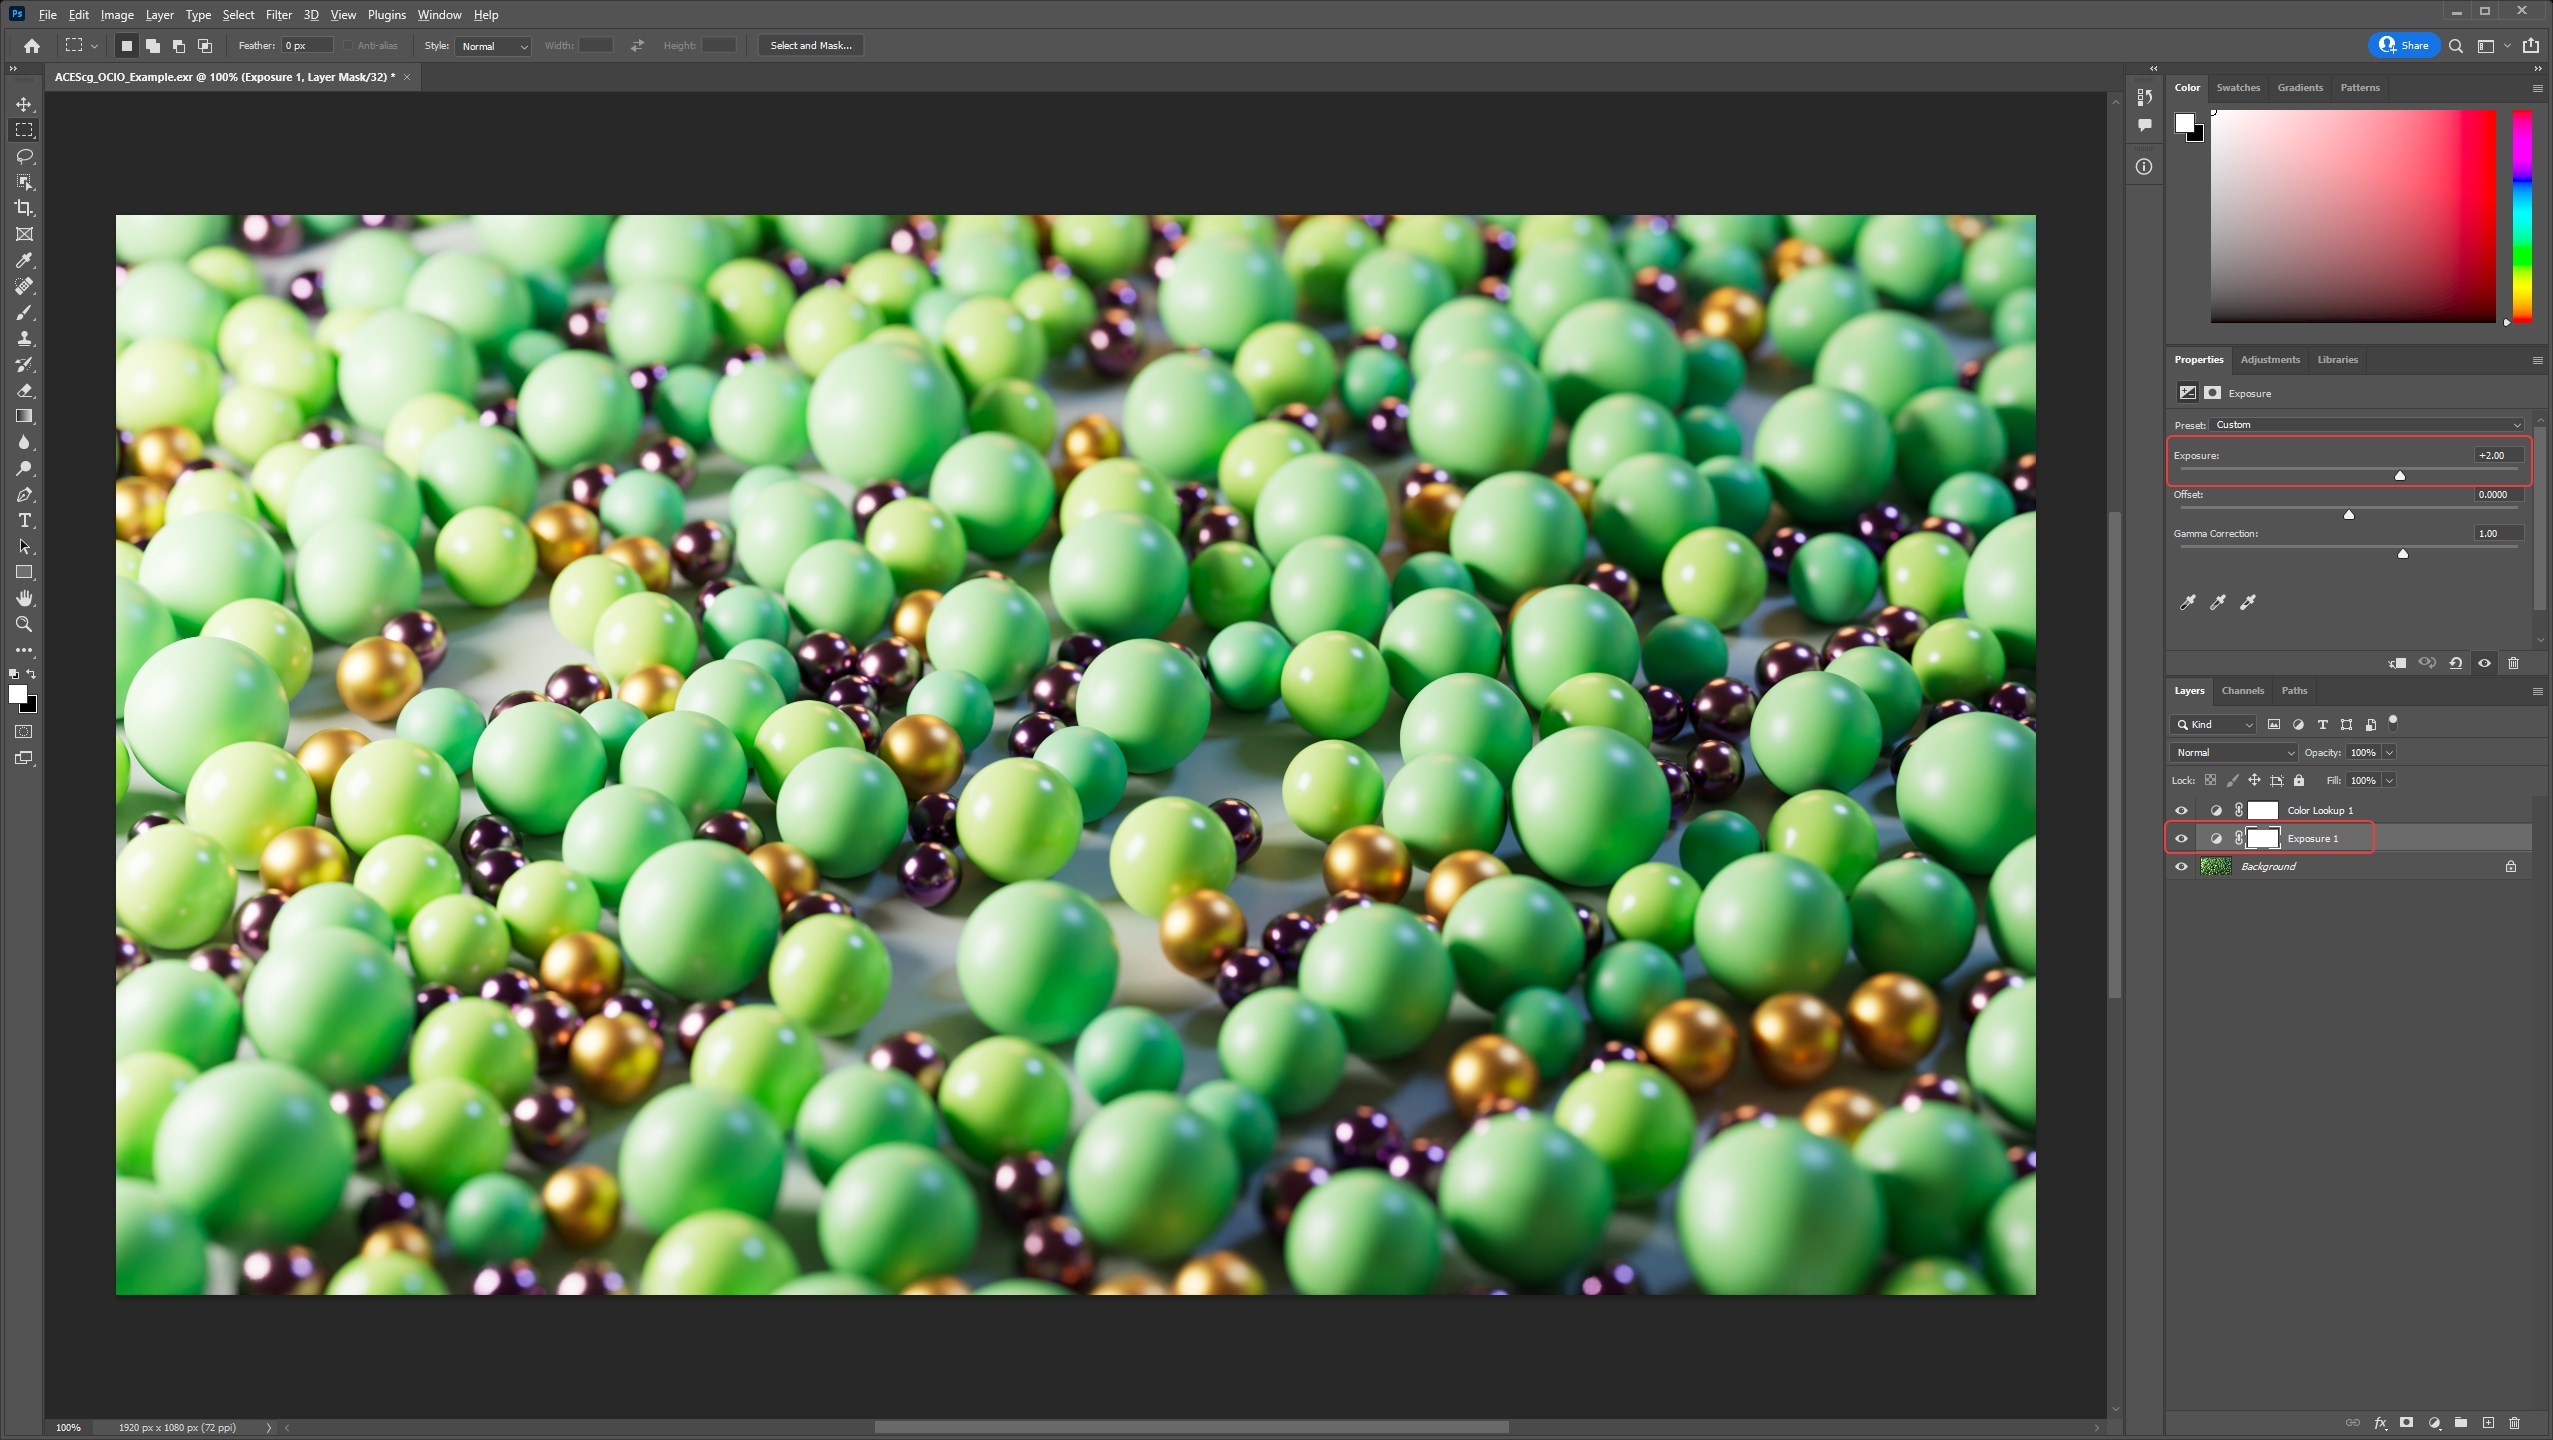
The correct way to adjust ACEScg footage with this Photoshop workflow is above your ACEScg footage but below the Color Lookup adjustment layer. This is demonstrated below with an Exposure effect being applied to an adjustment layer titled "Exposure 1" in between the two layers. The reason for this is that you want to apply any color corrections to the ACEScg footage when it is still linear so it must be done before the ODT conversion that converts your image to non-linear via the Color Lookup. This also means that you can composite multiple ACEScg openEXRs render layers all under the same one Color Lookup adjustment layer.
|
|
| Correct color correction result and layer order | Incorrect color correction result and layer order |
ACES in After Effects
ACES via native OCIO in After Effects (version 23.2+)
Step 1
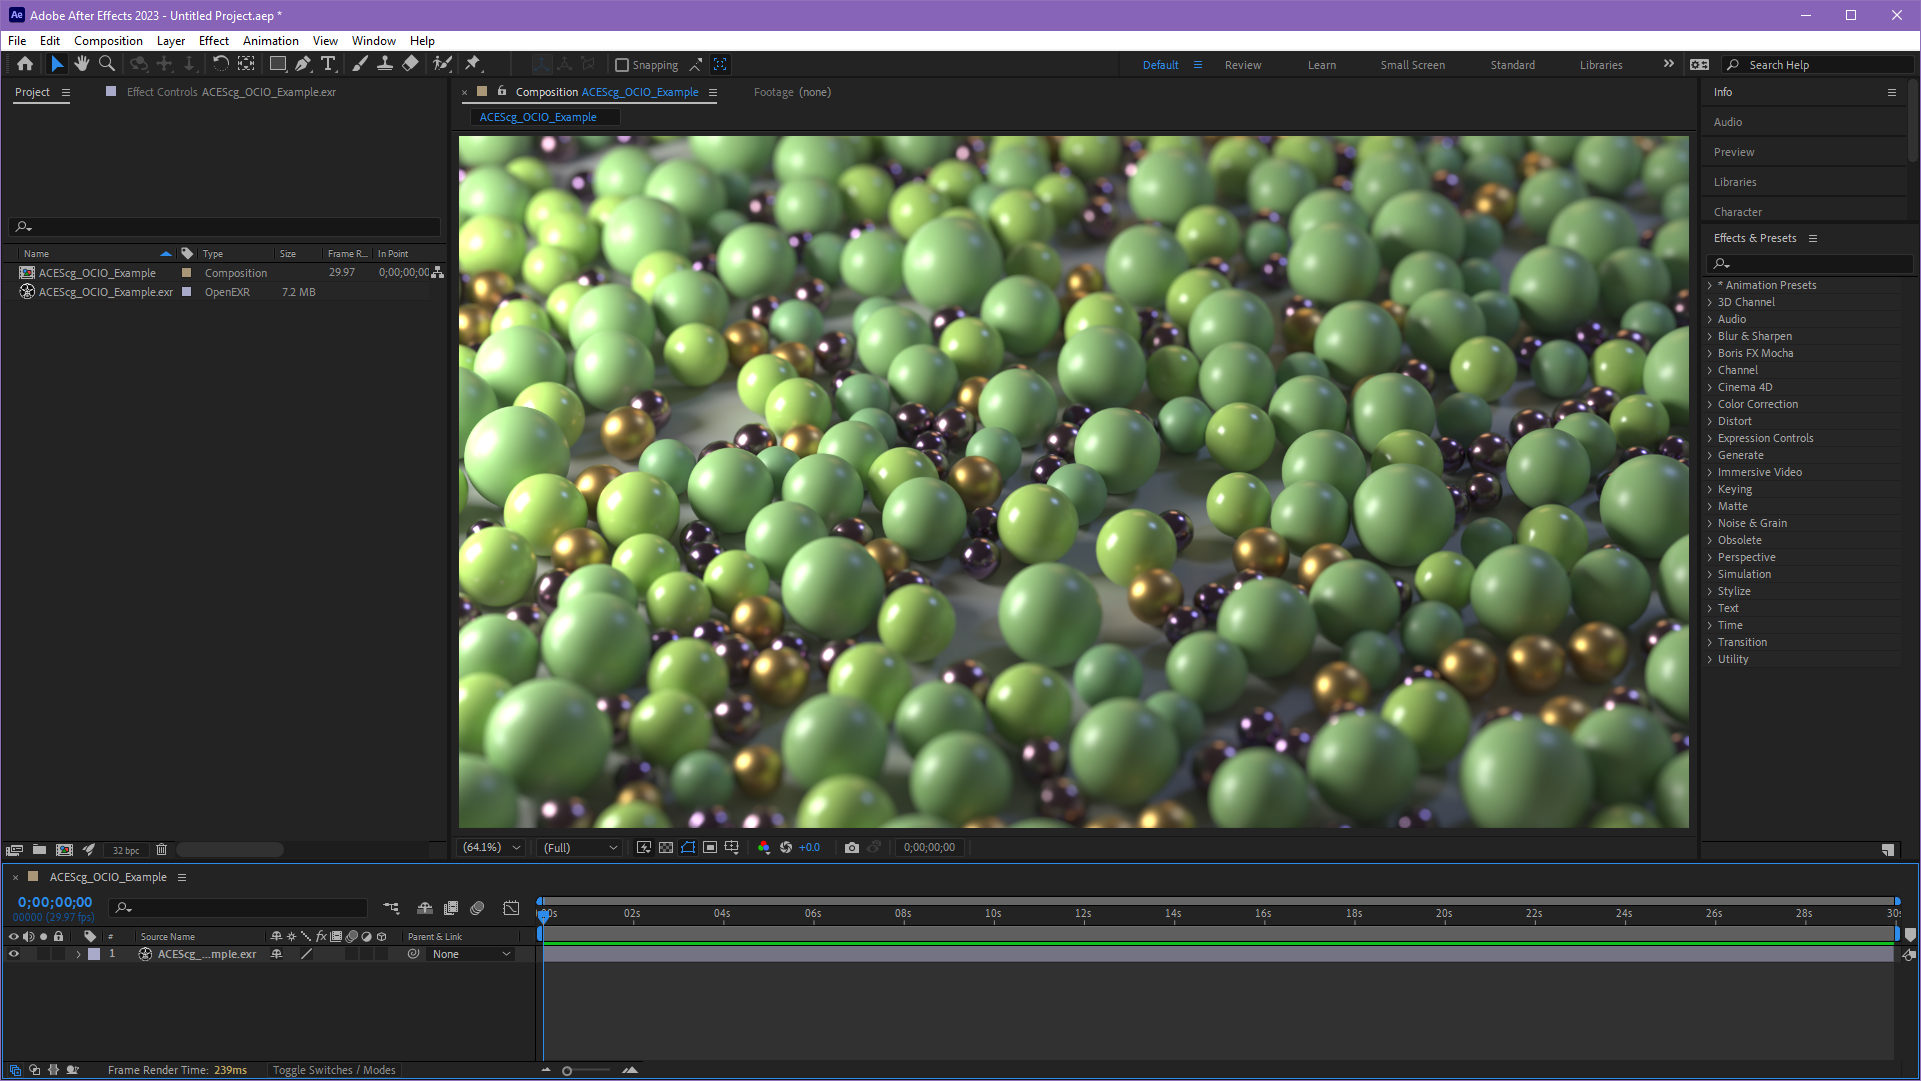
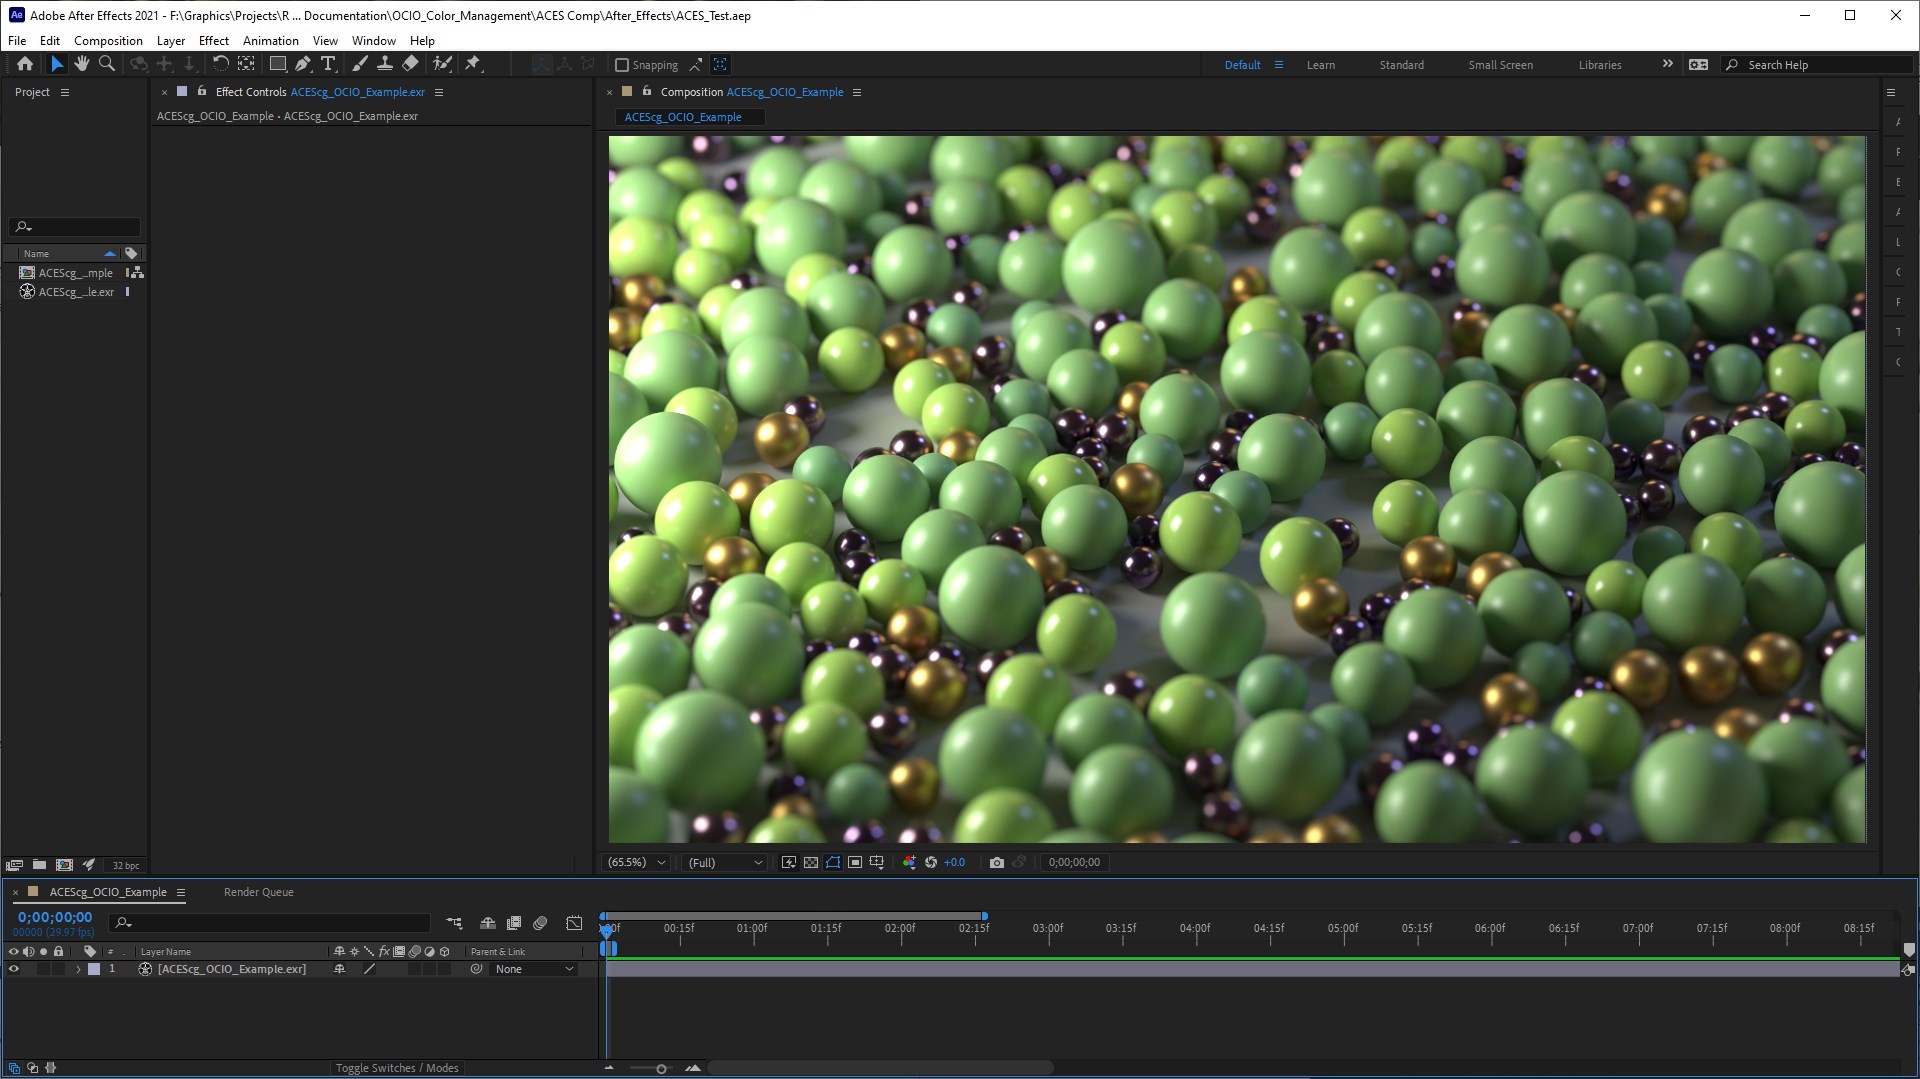
First import your ACEScg footage into After Effects and place it in a new composition, by default you will find your render probably looks wrong and washed out as seen in the example image below.
|
Step 2
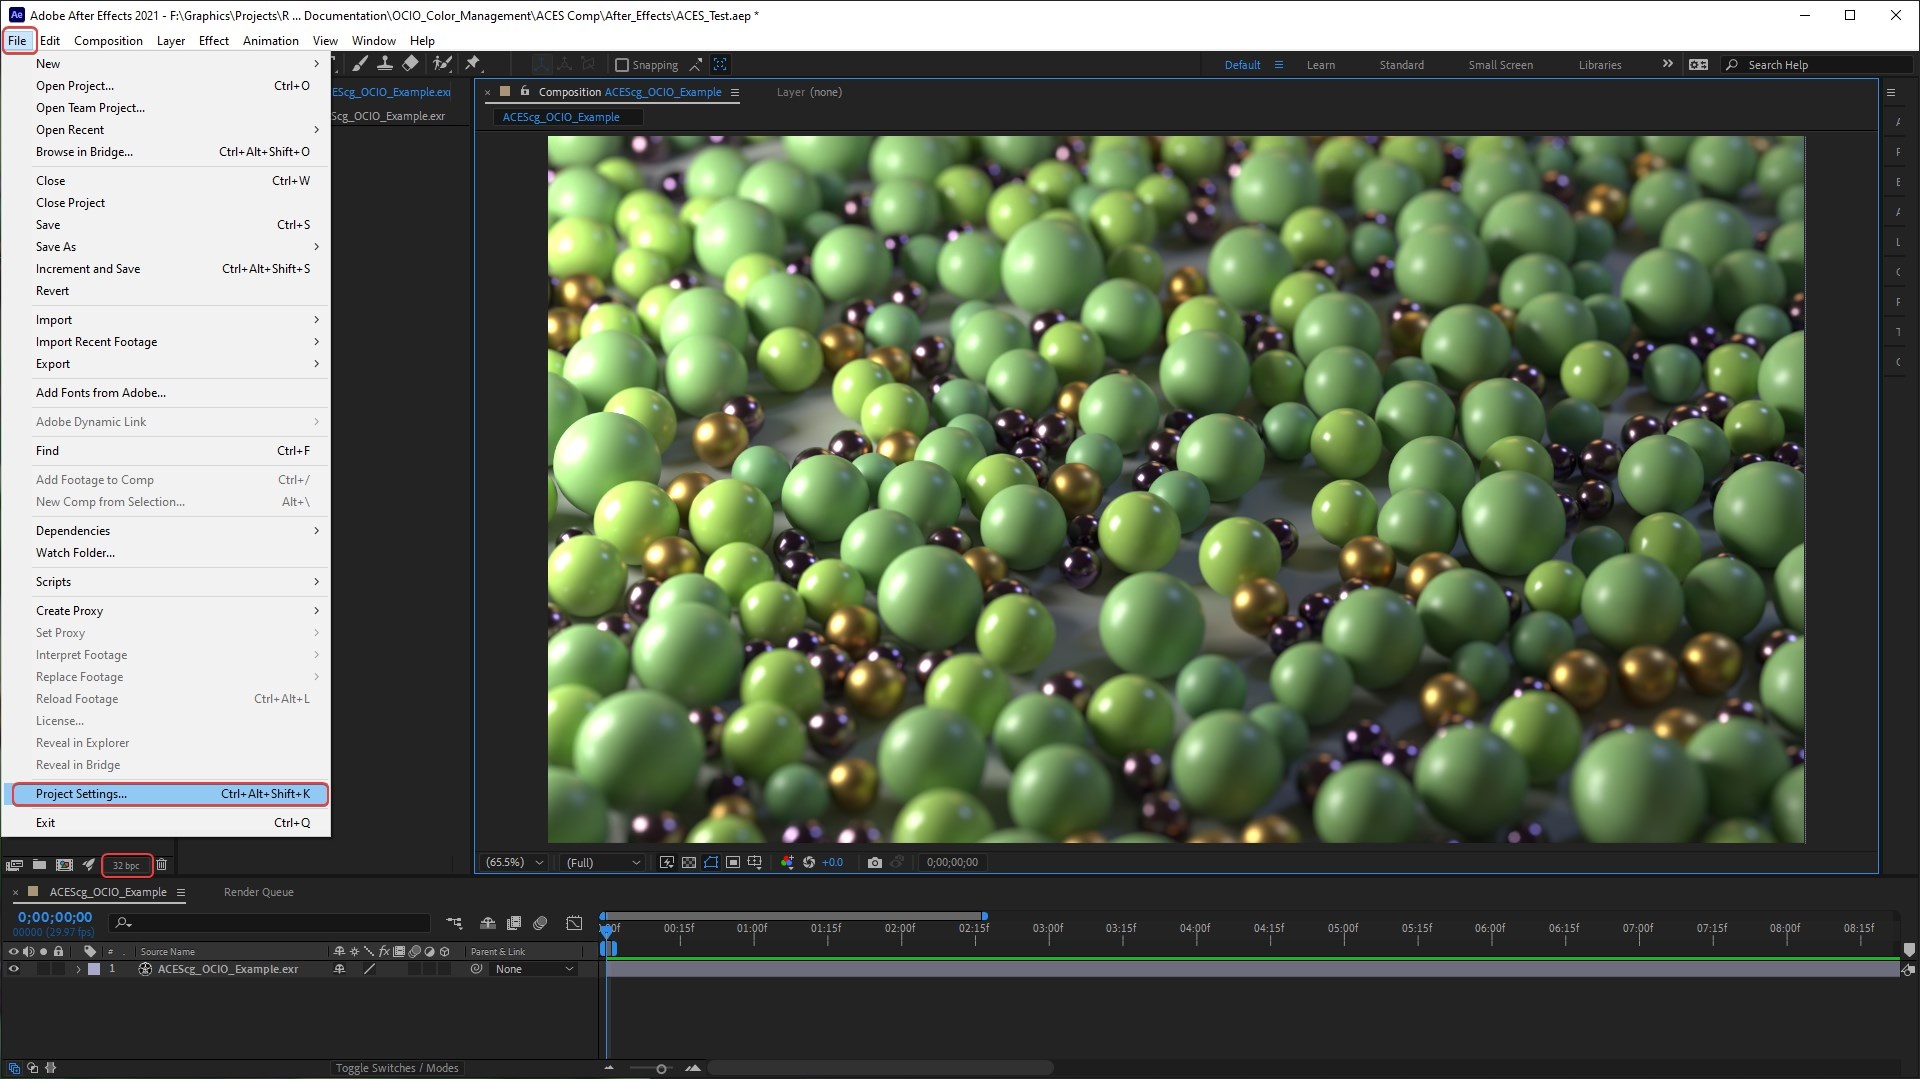
Now set up your Project Settings. This can be found either by clicking the small button at the bottom of the Project panel circled in the image below or going to File > Project Settings.

|
Step 3
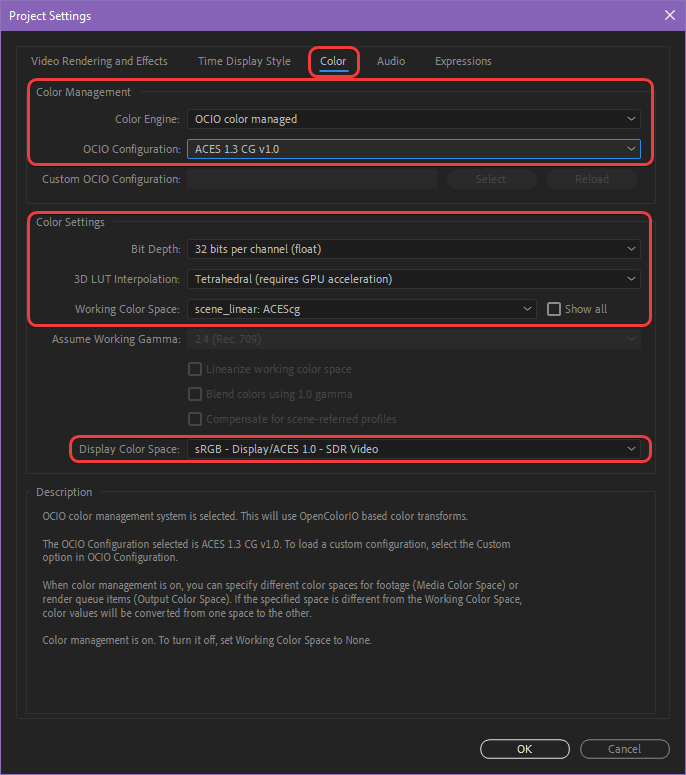
Under the Color tab's Color Management section set the following settings:
Color Engine: OCIO color managed
OCIO Configuration: ACES 1.3 CG v1.0
By default the Color Settings should be set up correctly with the following settings:
Bit Depth: 32 bits per channel (float)
Working Color Space: scene_linear: ACEScg
Display Color Space: sRGB - Display/ACES 1.0 - SDR Video
If you were using a different Display Color Space (ODT) to preview your renders in Redshift you must match that here in After Effects. For example, if you were using an un-tone-mapped view transform in Redshift.
|
Step 4
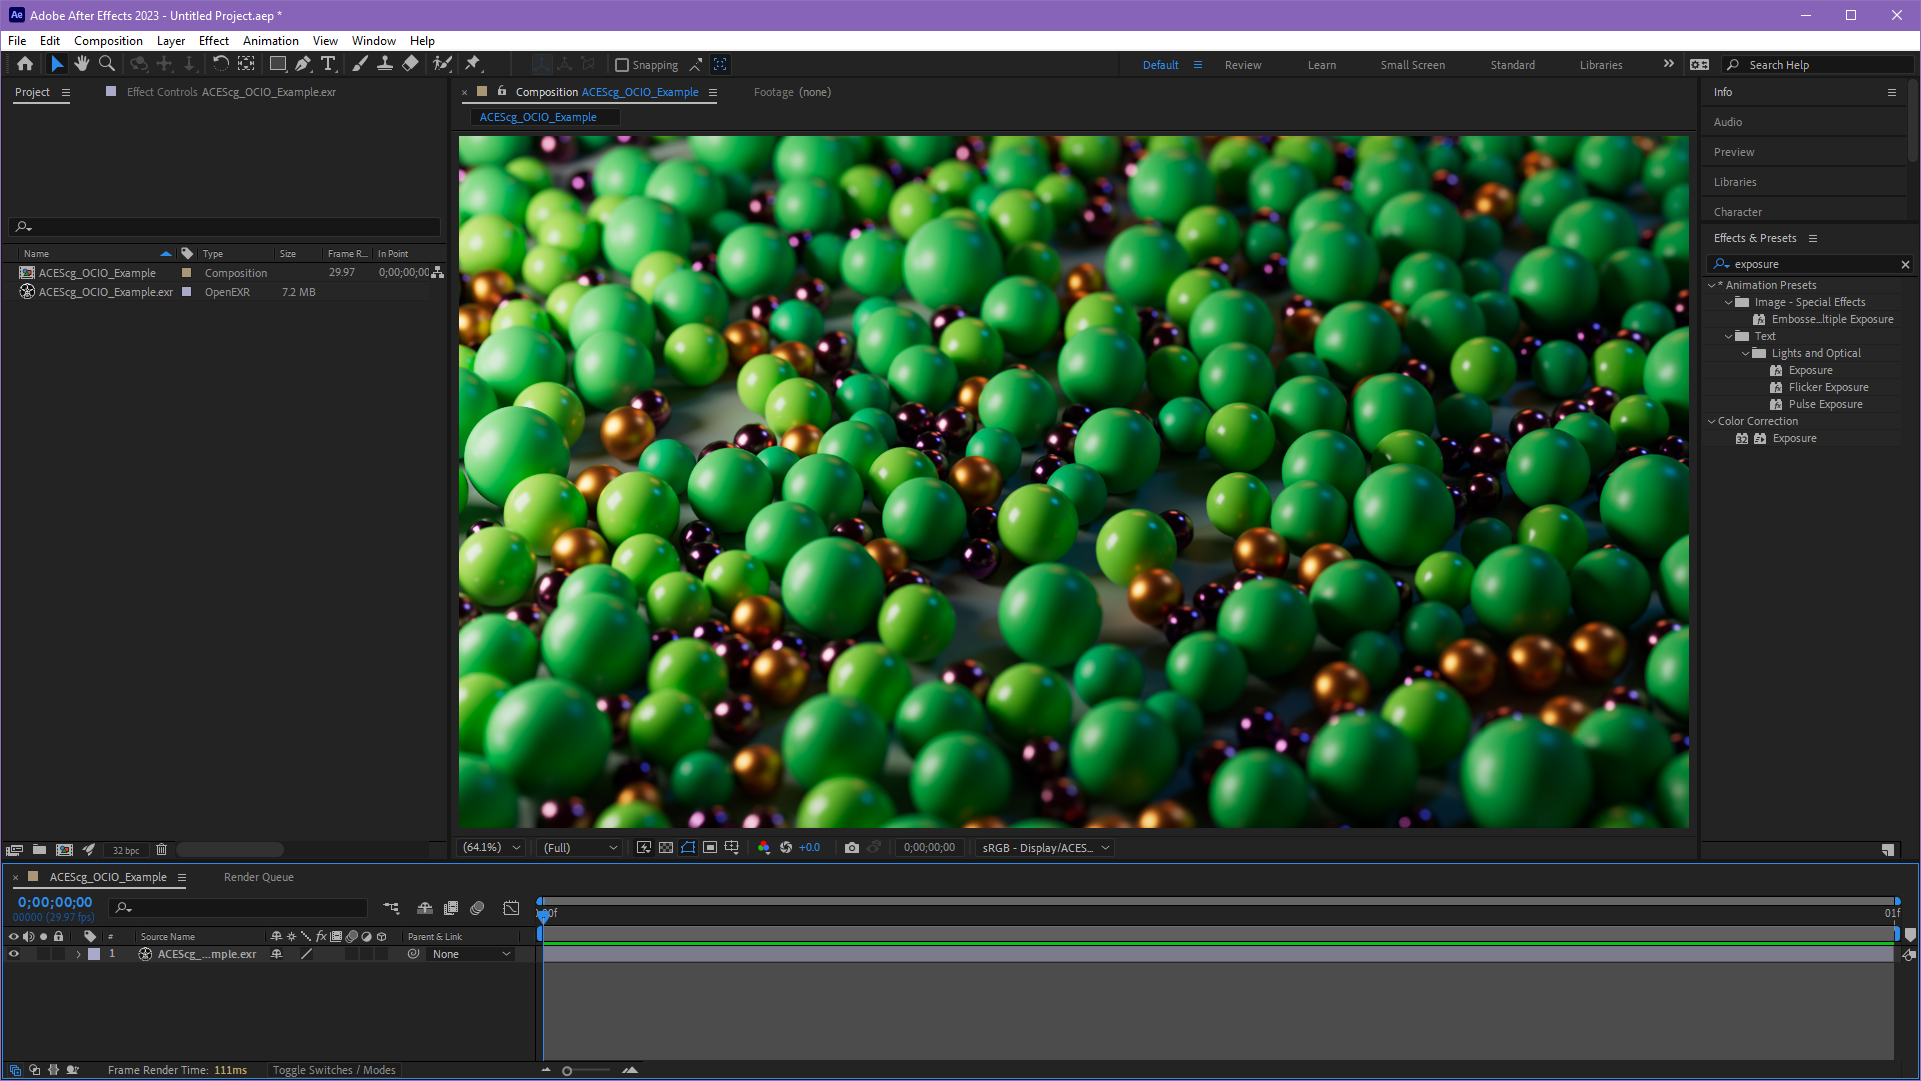
Now the ACEScg footage is being previewed with the correct ACES ODT in the composition viewer and can be worked on in a proper ACES workflow but there is a possibility that your imported footage is being interpreted incorrectly and the colors may appear more saturated than they should be.
|
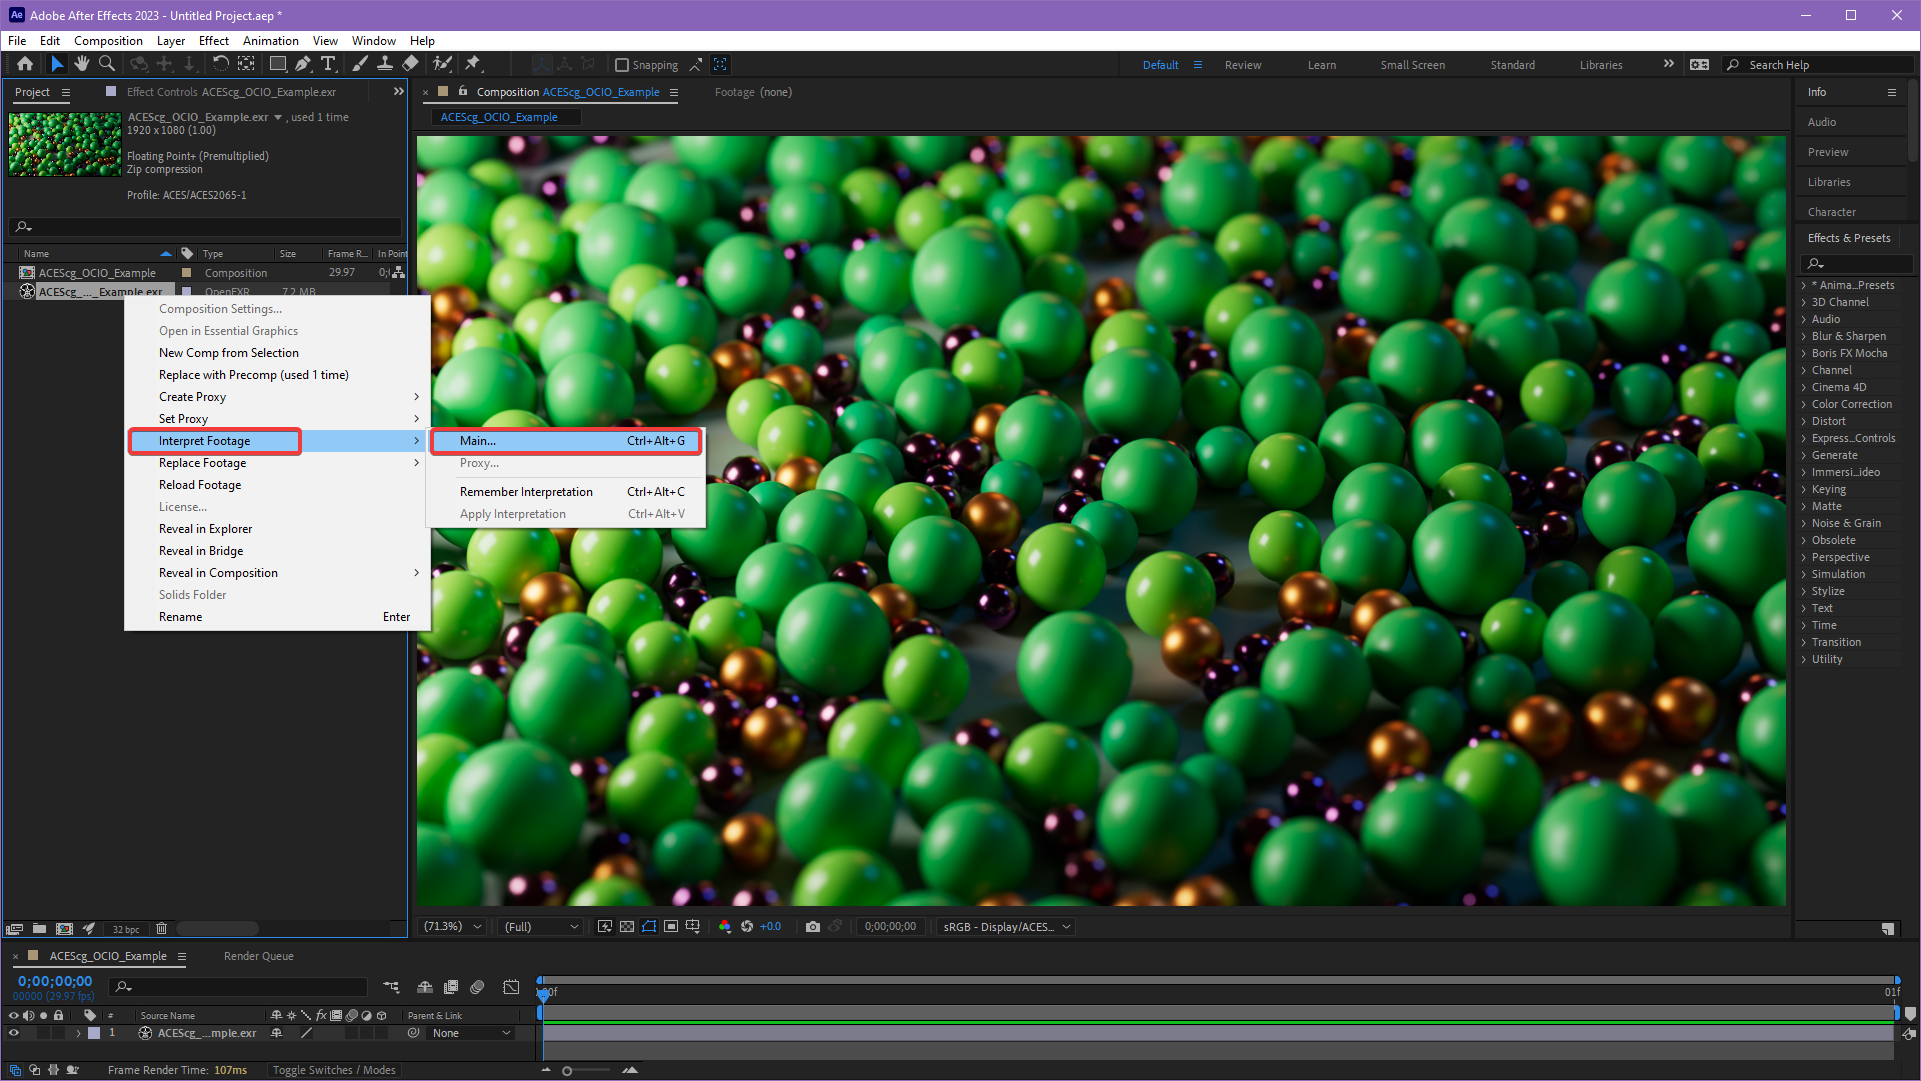
Step 5
To fix this, it is a good idea to make certain that your renders are being correctly interpreted as "ACEScg" color space rather than "ACES2065."
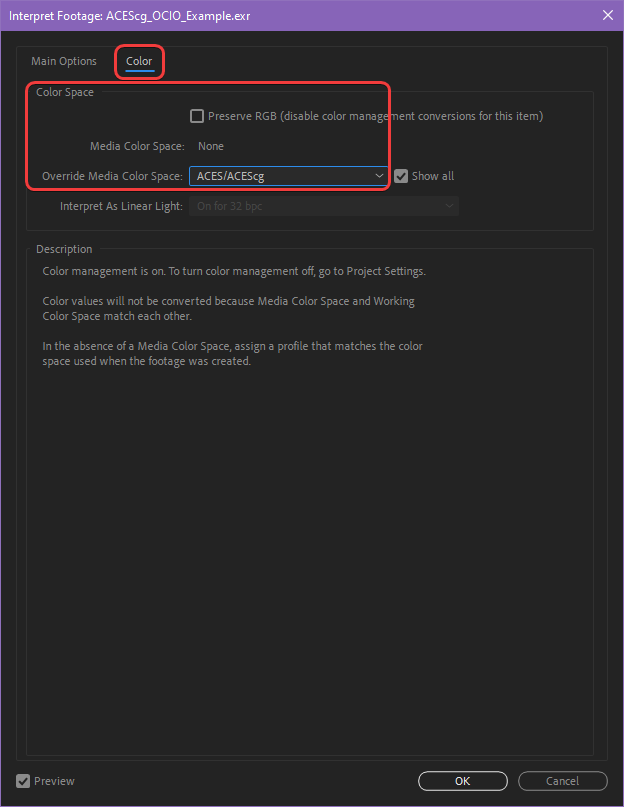
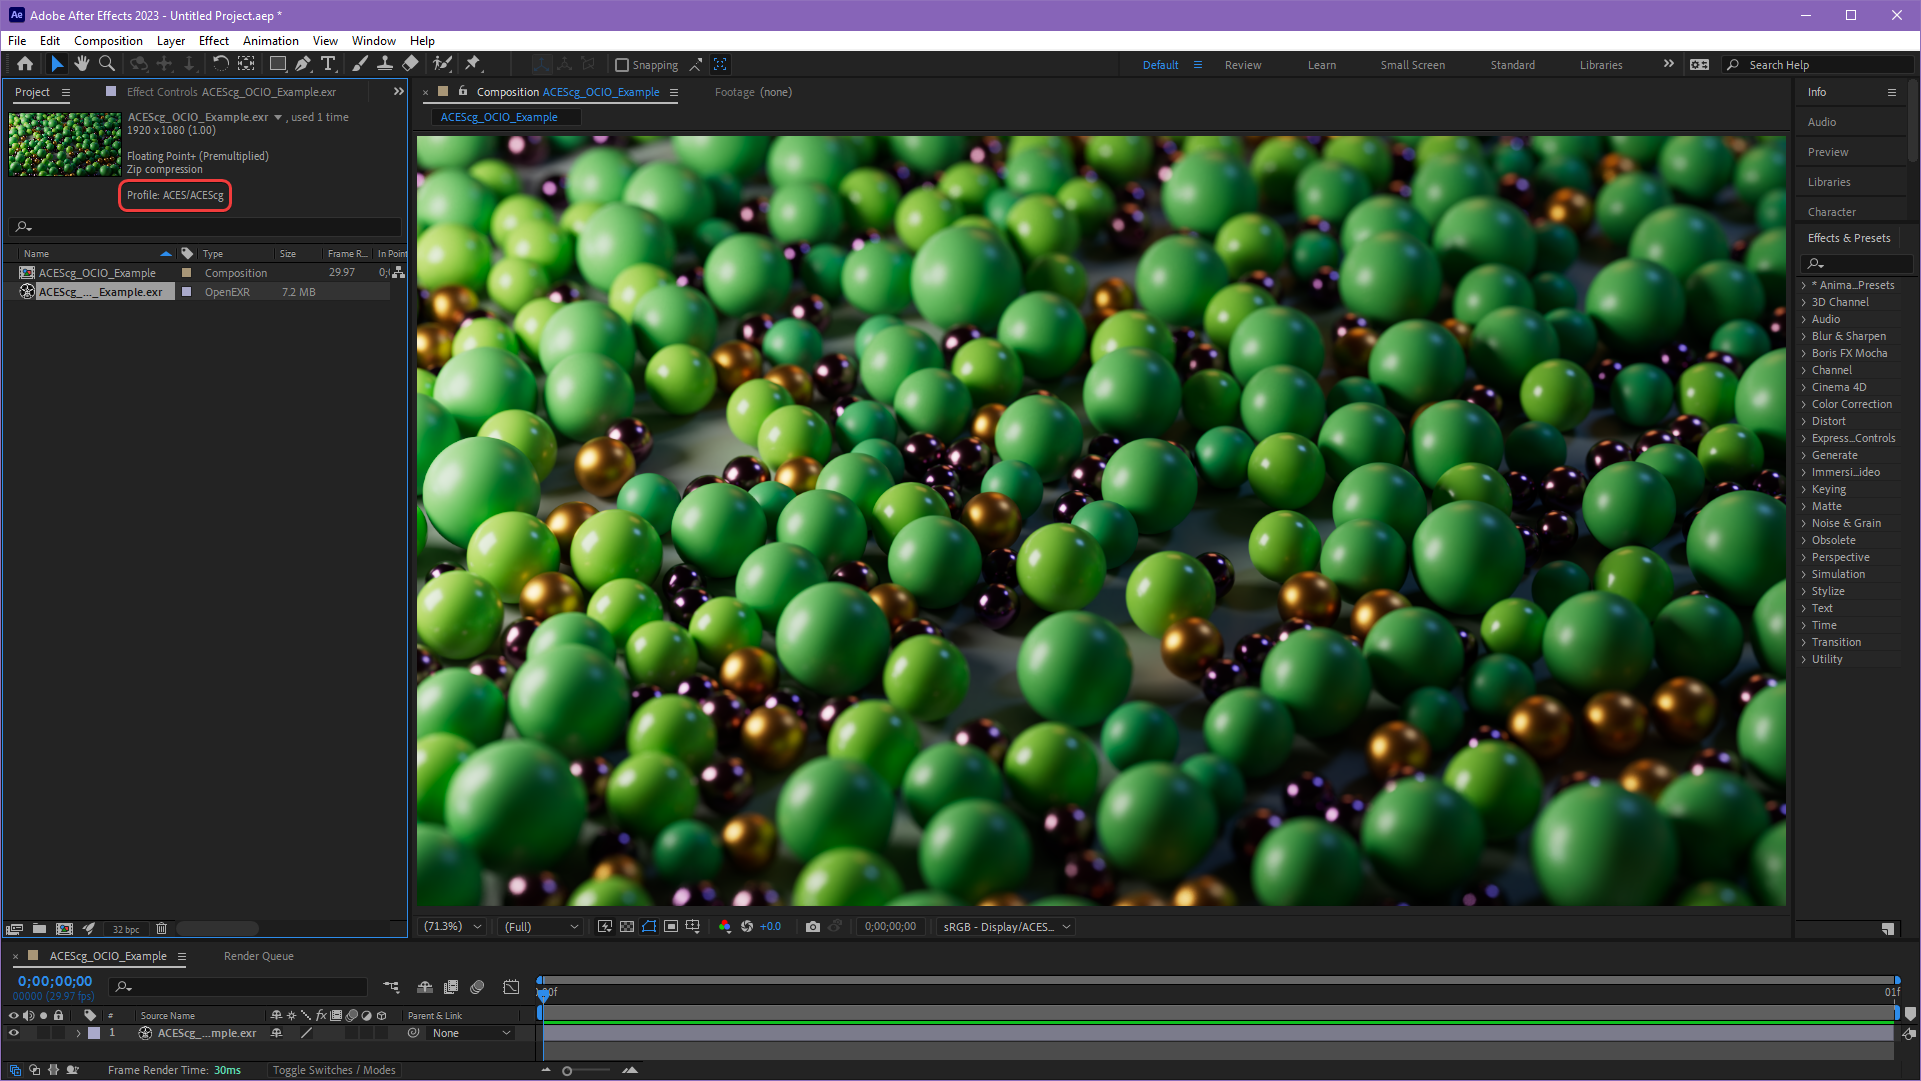
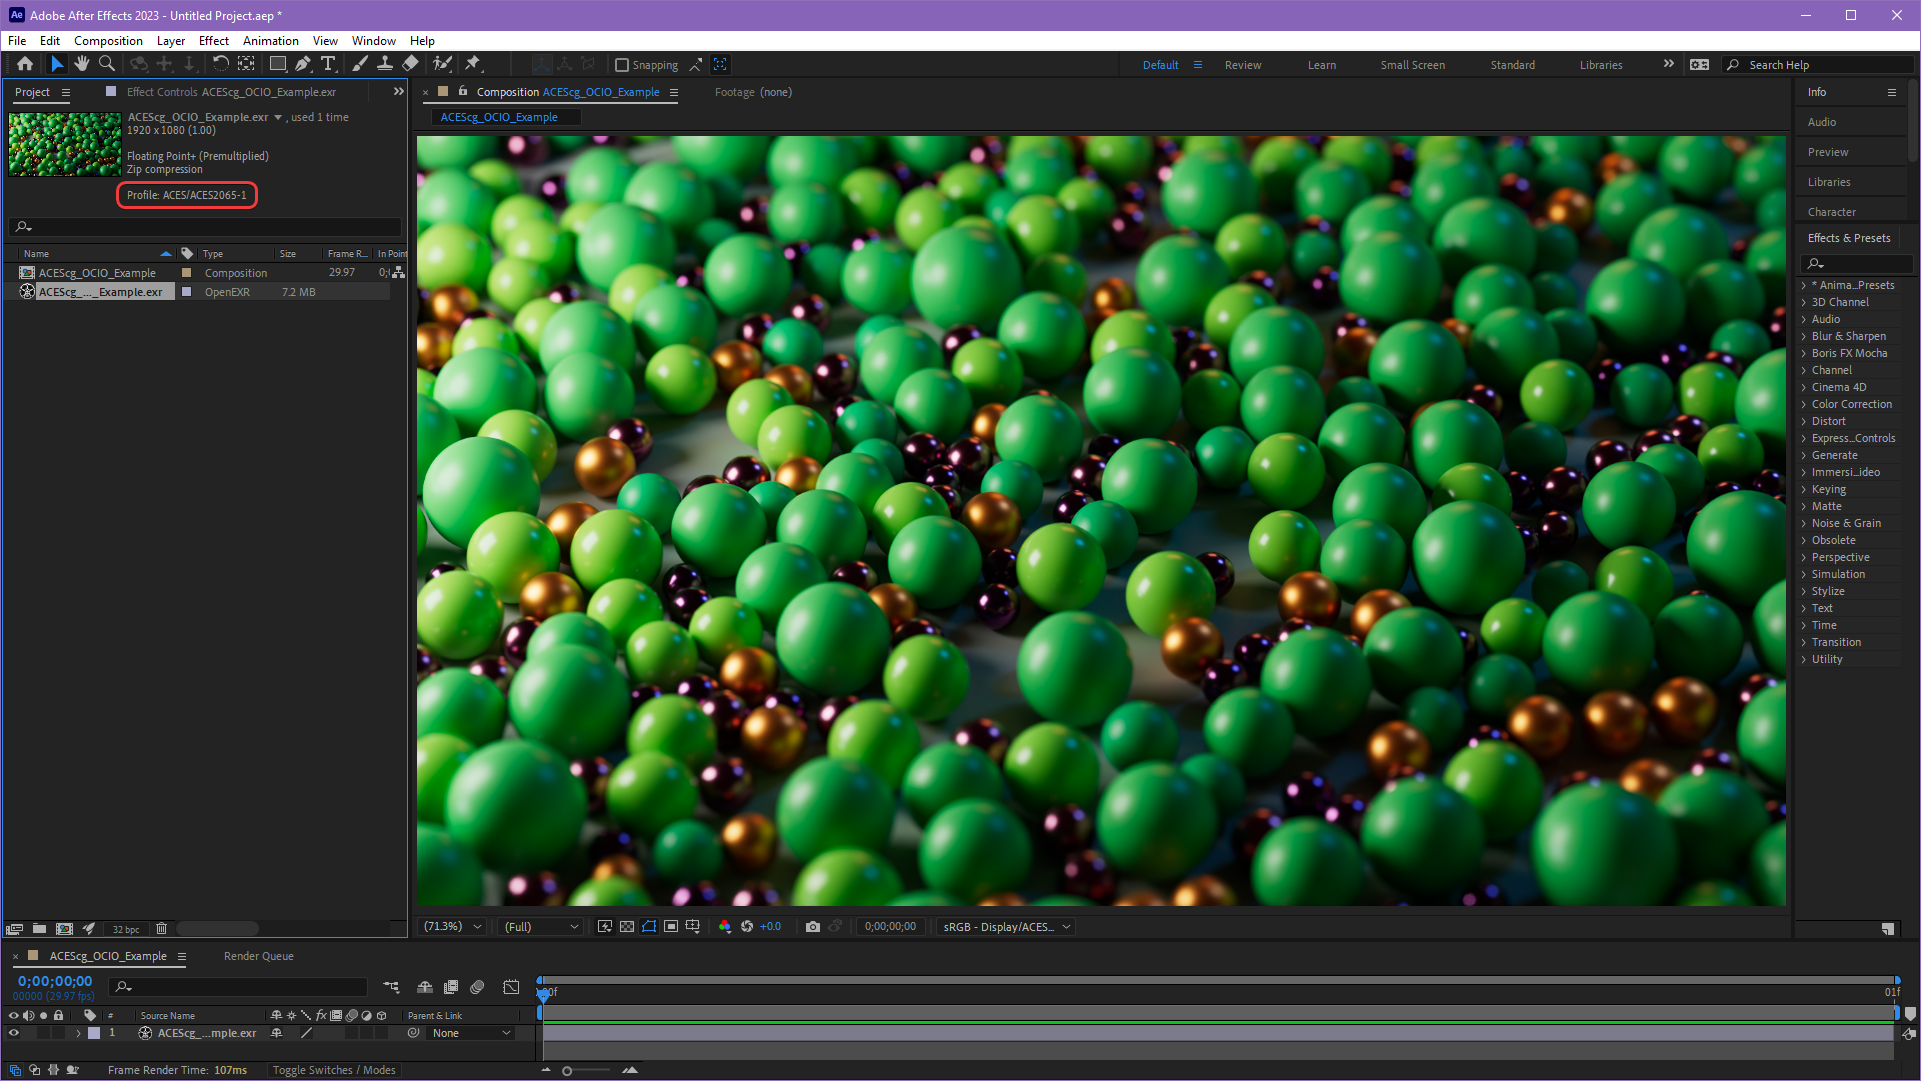
Right click your imported footage and navigate to Interpret Footage > Main and set the Override Media Color Space to ACES/ACEScg under the Color tab as pictured below.
|
|
| Opening the Interpret Footage panel | Interpret Footage in ACEScg color space |
|
|
| Correct: ACEScg color profile | Incorrect: ACES2065 color profile |
Step 6
Now your ACEScg footage should match what was seen in the Redshift render view and can be edited in an ACES workflow but there is one more key step to consider before rendering - you must match the Output Color Space with the Display Color Space (ODT) that you have been using to preview your footage in the viewer.
To do this, add a composition to the Render Queue and click on the blue text to the right of the Output Module as pictured below.
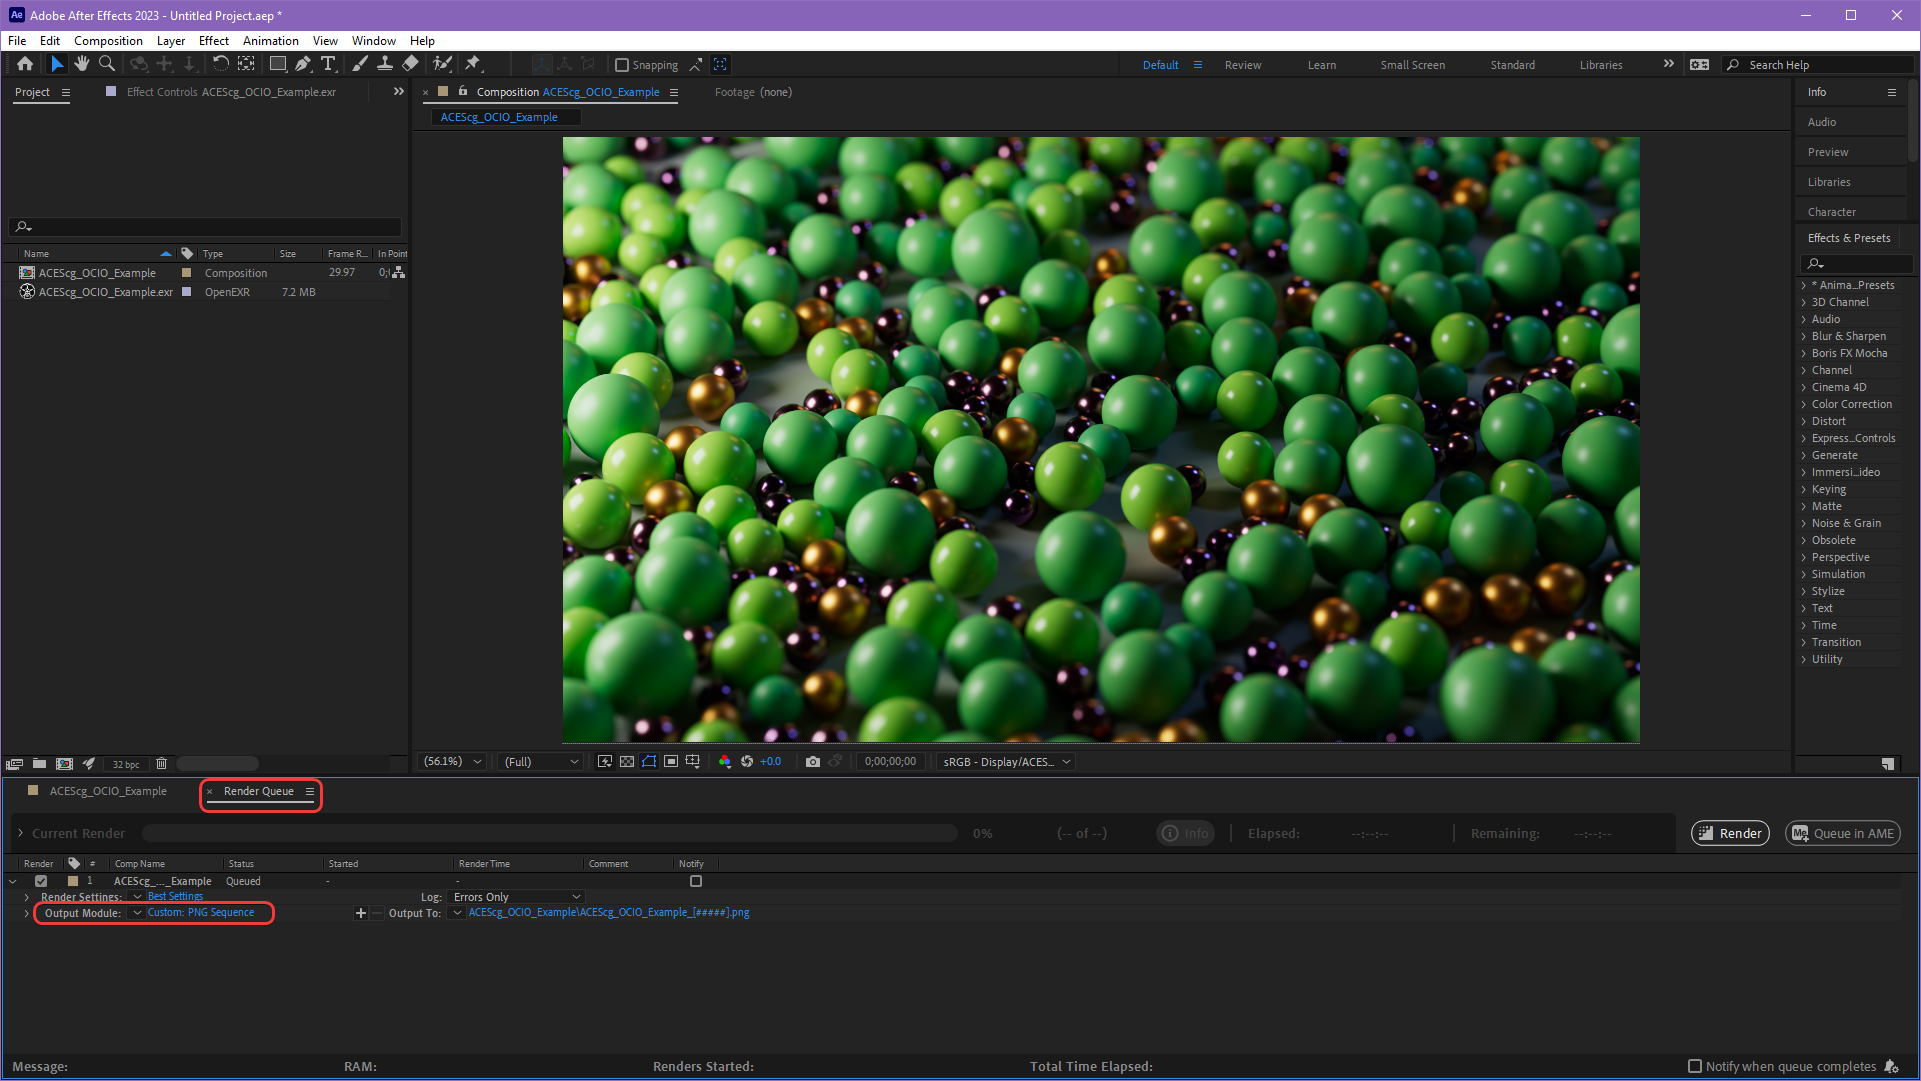
|
Step 7
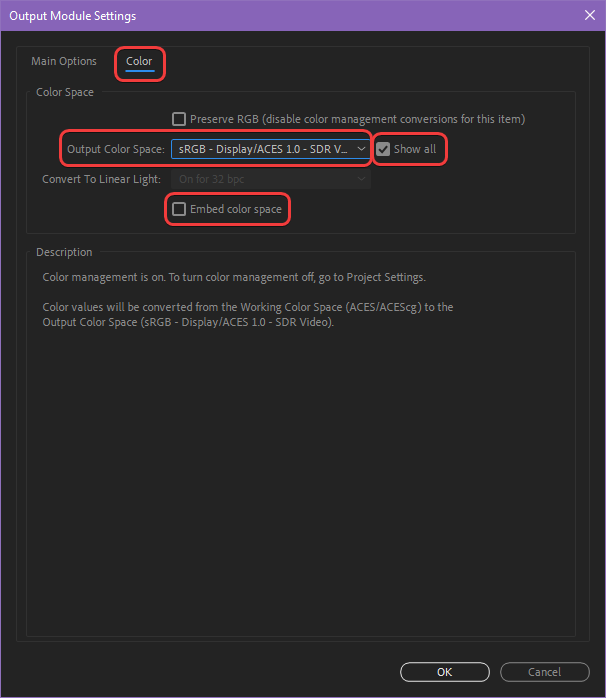
In the Output Module Settings panel under the Color tab enable the "Show All" option and set the Output Color Space to the same Display Color Space that you have been using (sRGB - Display/ACES 1.0 - SDR Video by default) and disable the Embed color space option as pictured below. Now your renders should look the same in final output as they did in the Redshift render view and After Effects composition viewer.
|
For more information, please see Adobe's help on the OCIO and ACES Color Management page.
ACES via plugins in After Effects (versions before 23.2)
Step 1
The best way to use ACES in After Effects versions before 23.2 is to download and make use of the
fnord plugin OpenColorIO for After Effects.
fnord OCIO Plugin Version
Make sure you have fnord OCIO version 2.1.1 or later which was released in December 2021 for OCIO v2 support in order to be able to use the same OCIO config file that ships with Redshift.
Step 2
First import your ACEScg footage into After Effects and place it in a new composition.
Step 3
Now set up your Project Settings. This can be found either by clicking the small button at the bottom of the Project panel circled in the image below or going to File > Project Settings.
Step 4
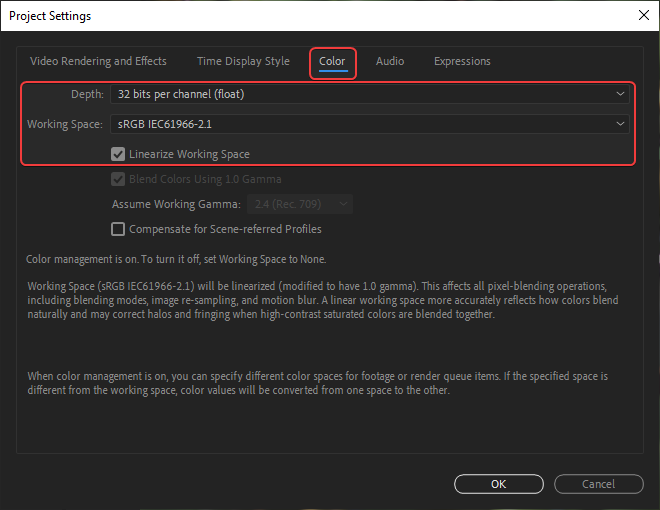
Under the Color tab set the following settings:
Depth: 32 bits per channel (float)
Working Space: sRGB IEC61966-2.1
Linearize Working Space: Enabled
Step 5
Next create a new adjustment layer above your ACEScg footage in the composition. We will name this adjustment layer and refer to it as " ACEScg to sRGB."
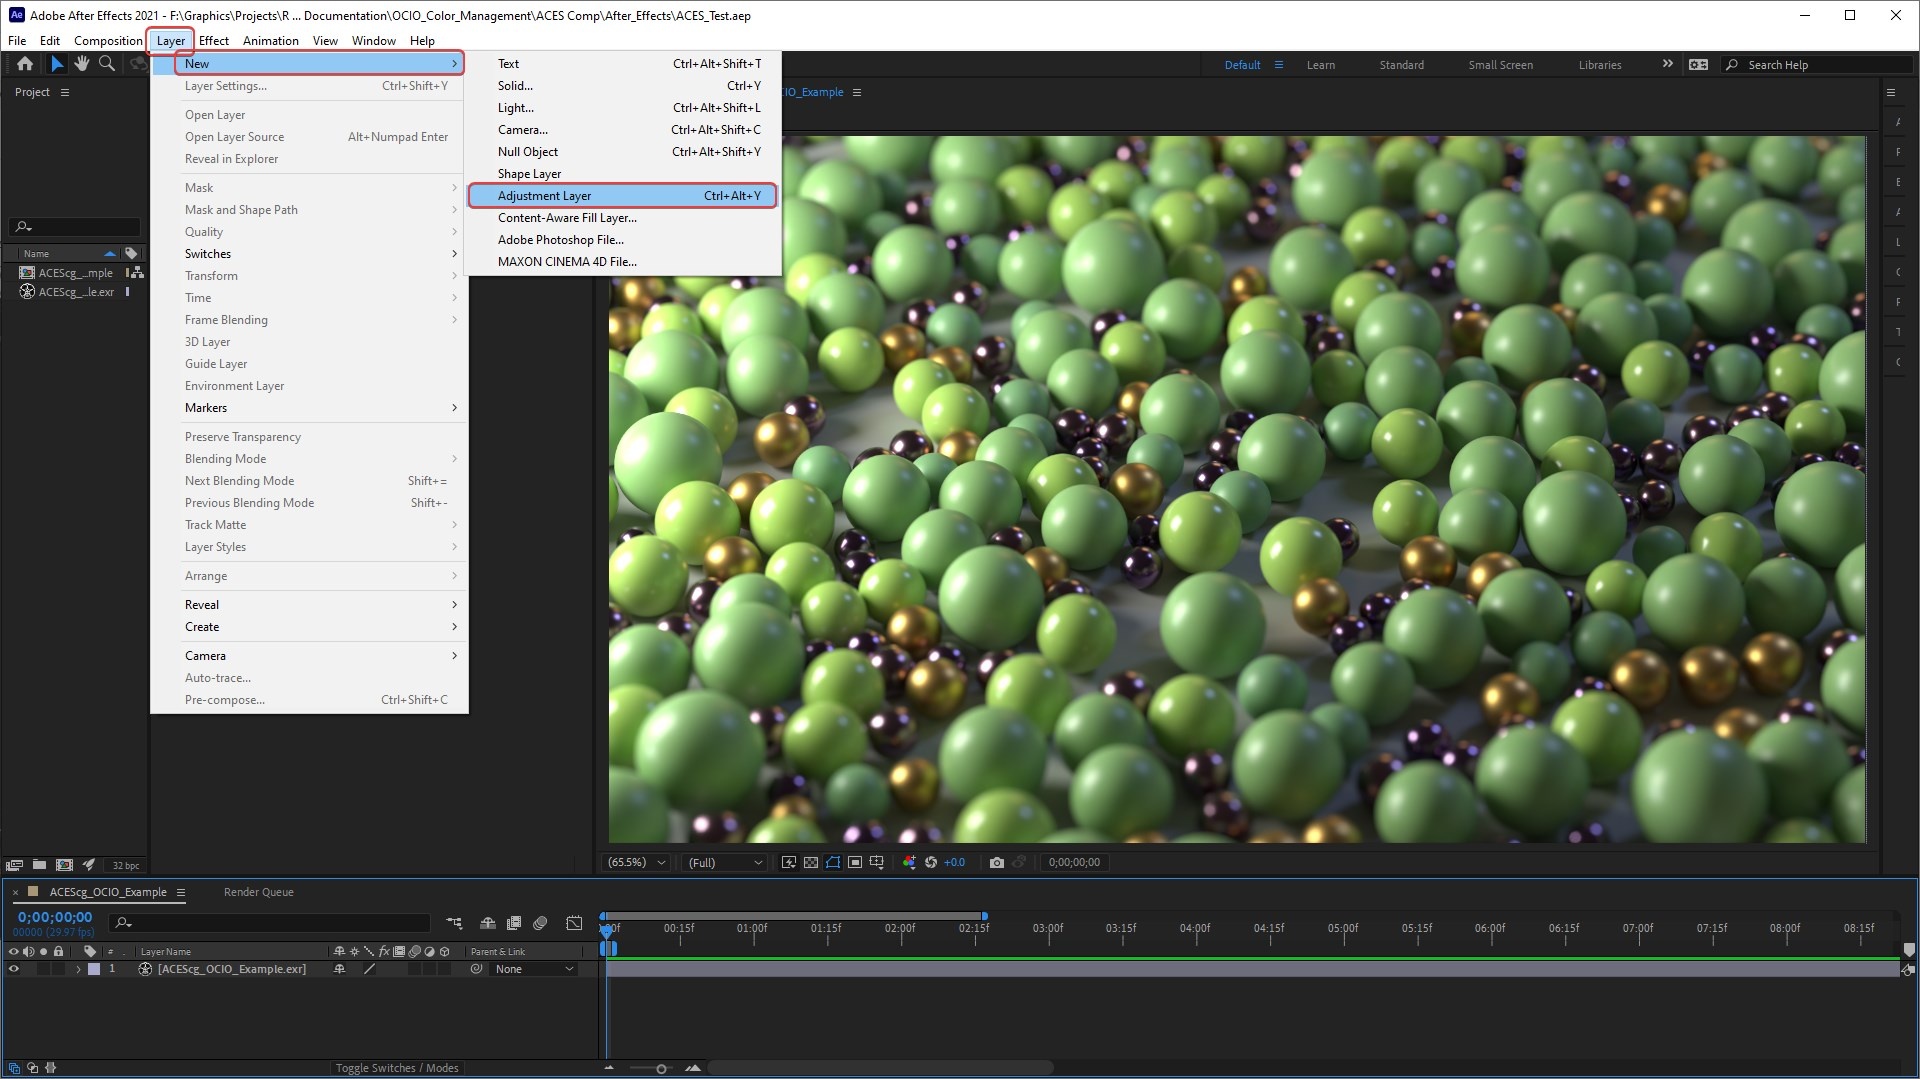
Step 6
Then add an OpenColorIO effect to the "ACEScg to sRGB" adjustment layer. This effect is found under Effects > Utility > OpenColorIO.
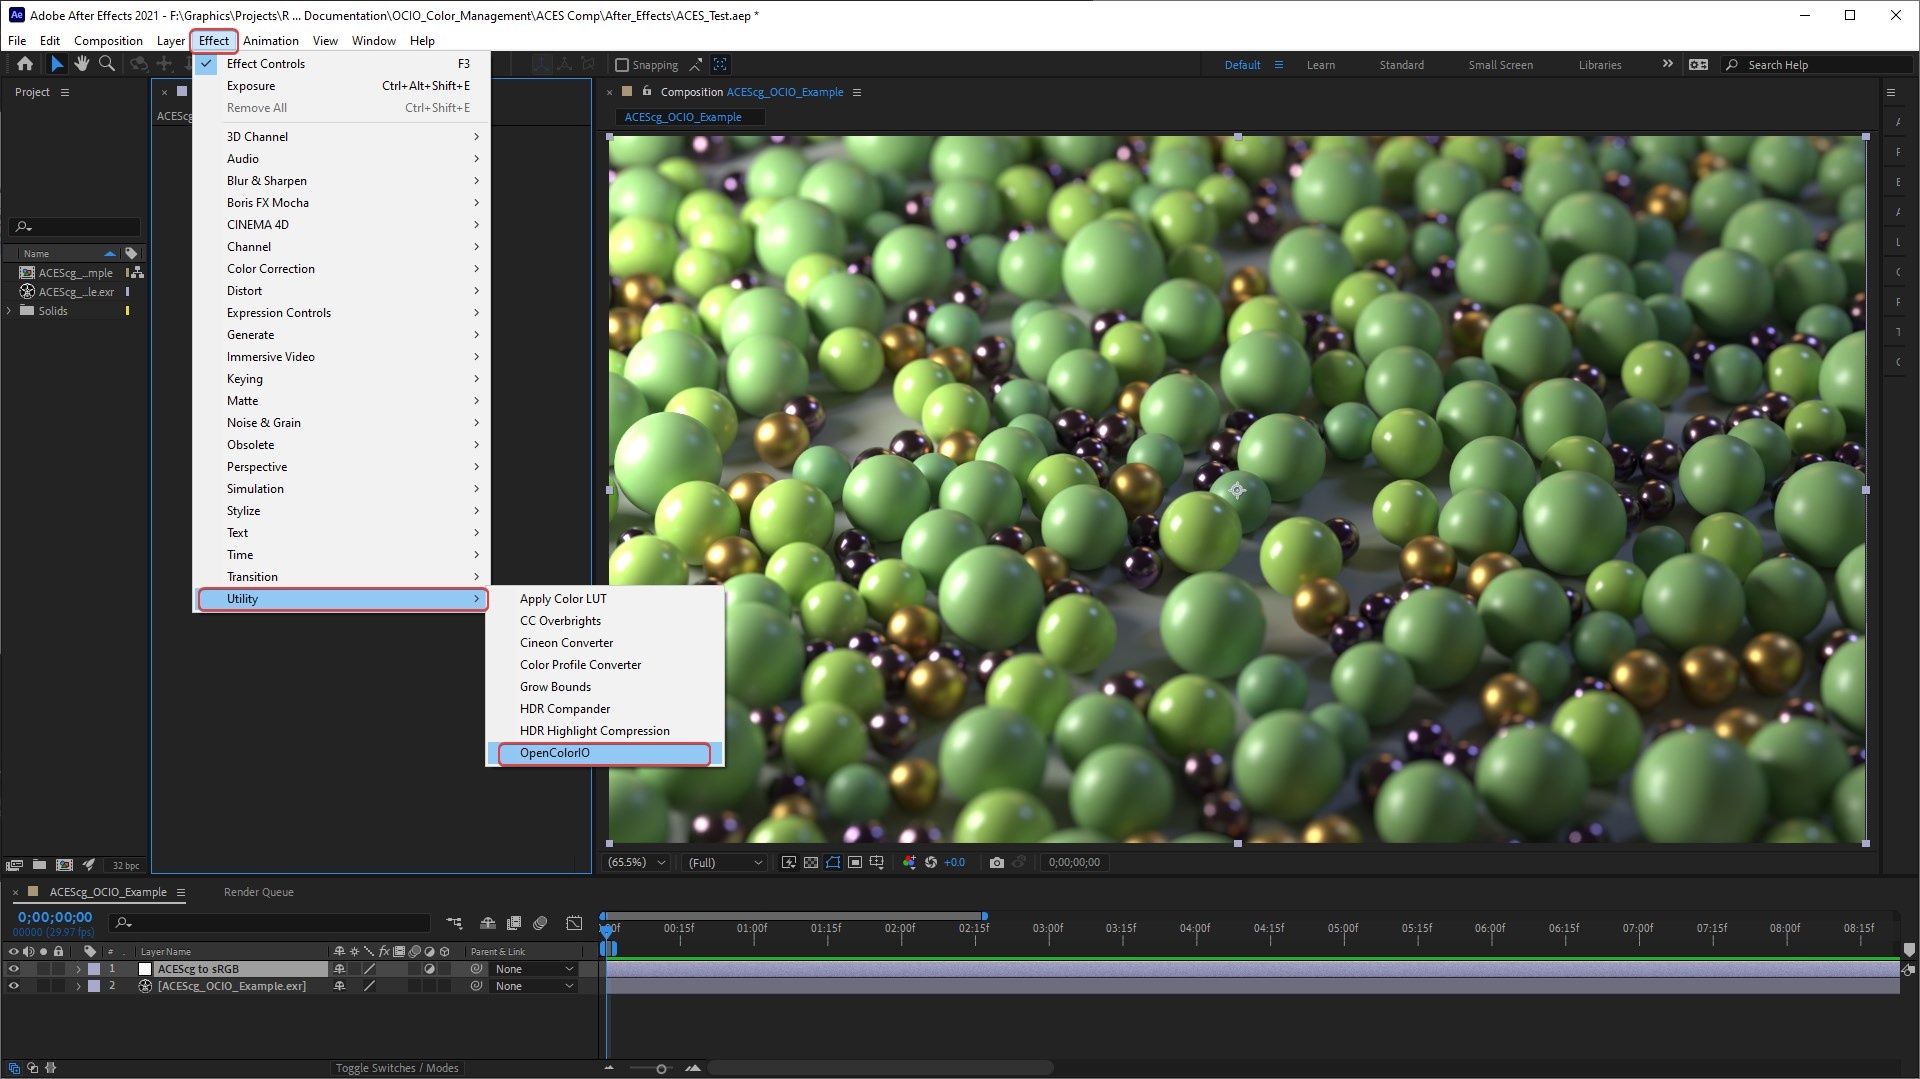
Step 7
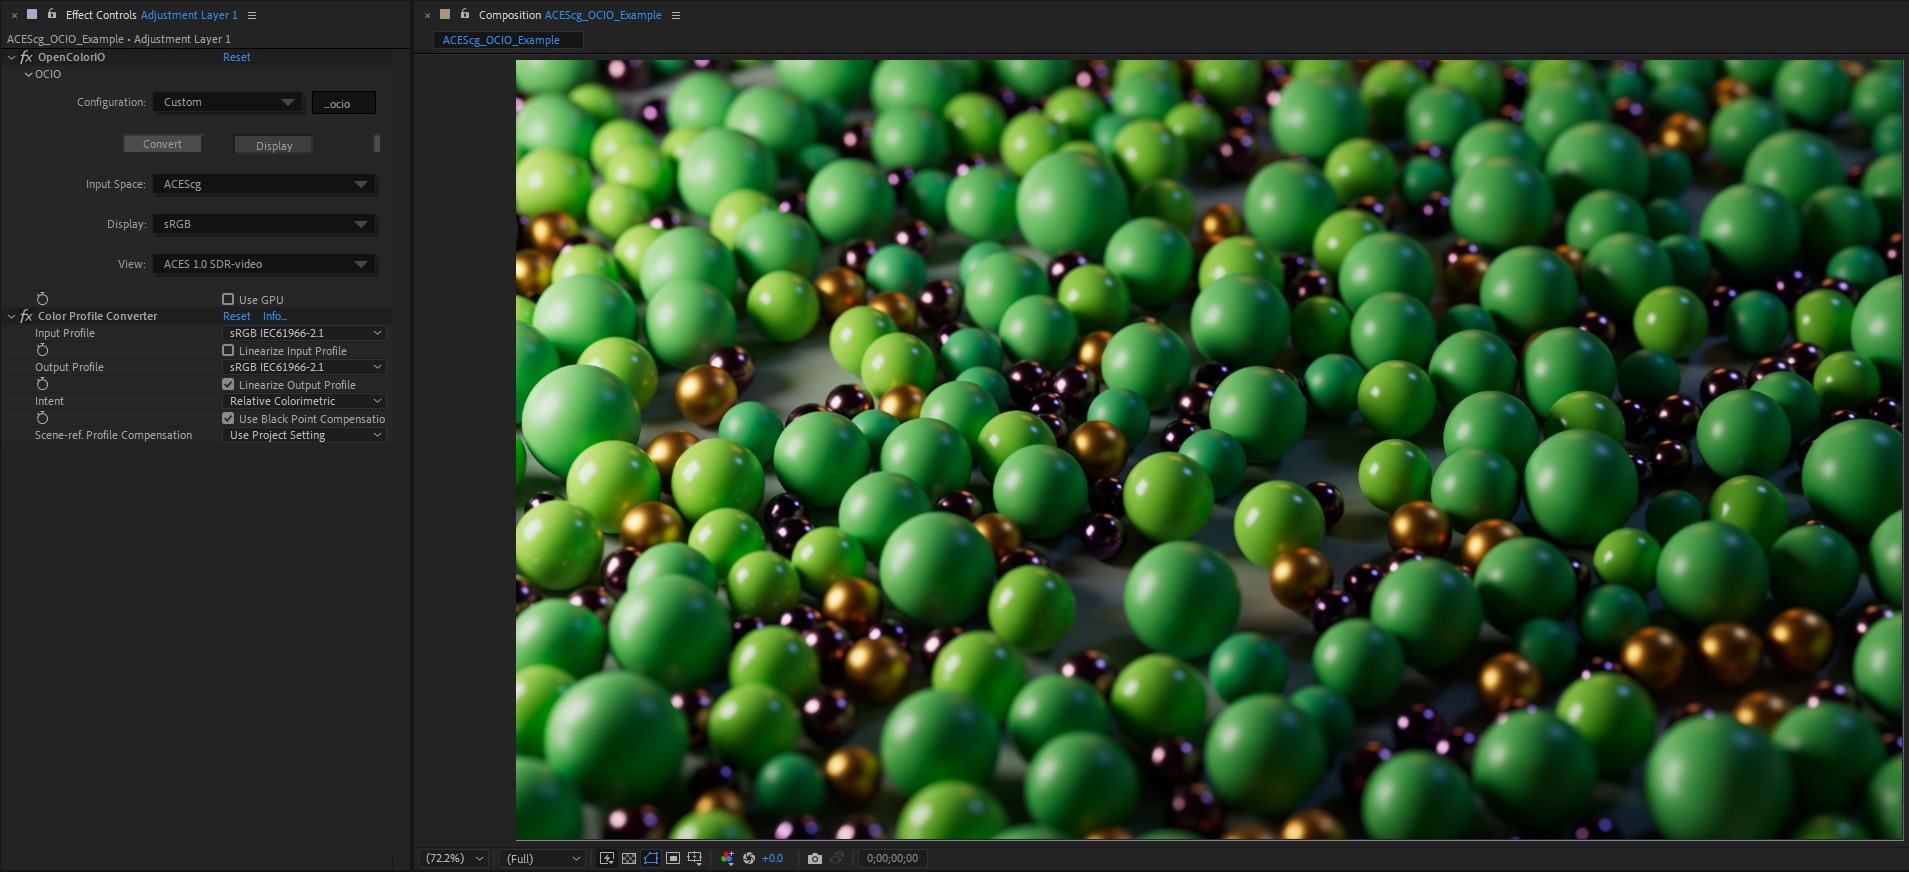
Now set your OCIO config location for the OpenColorIO effect.
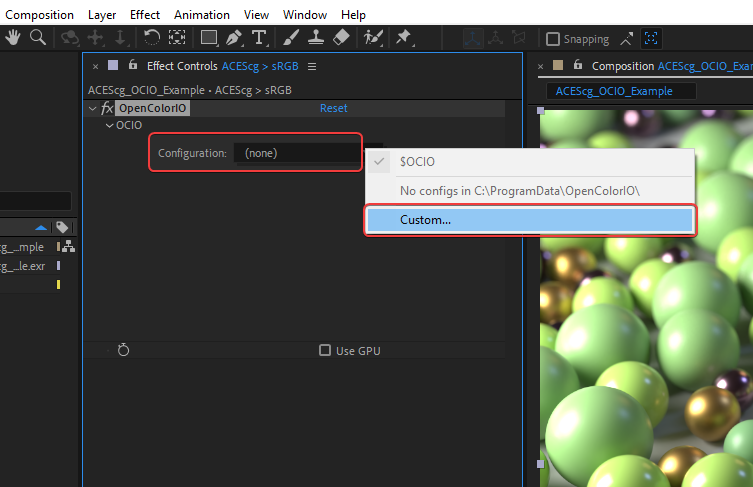
Step 8
Use the following settings:
Set the mode to "Display"
Input Space: ACEScg
Output Space: sRGB
View: ACES 1.0 SDR-video
Step 9
Now the ACEScg footage is being previewed with the correct ACES ODT but it still does not actually look correct in After Effects, this is due to an extra gamma correction that After Effects color management is applying.
Step 10
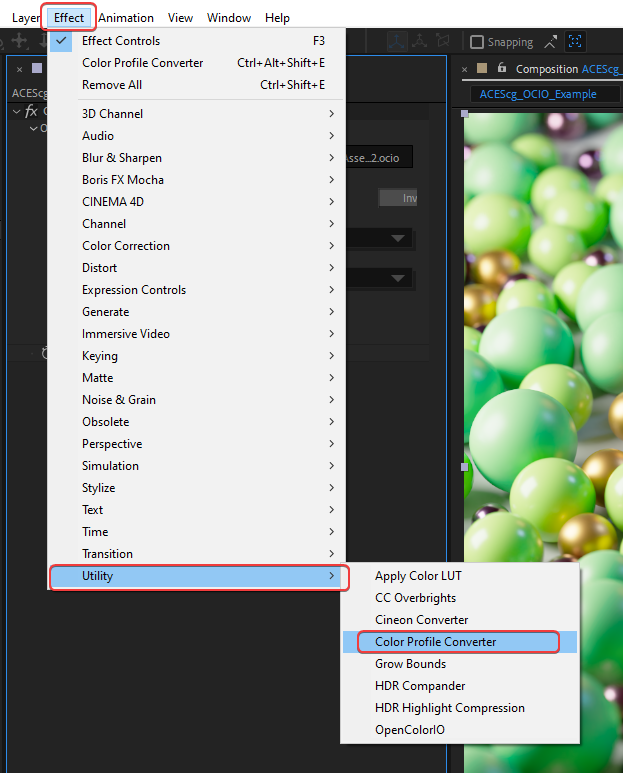
To counteract this gamma correction issue add a Color Profile Converter effect beneath the existing OpenColorIO effect, this can be found under Effects > Utility > Color Profile Converter.
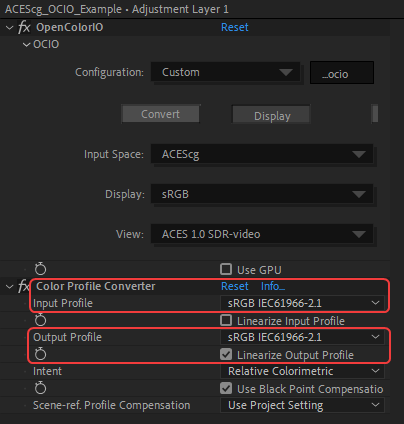
Step 11
Use the following settings for the Color Profile Converter:
Input Profile: sRGB IEC61966-2.1
Output Profile: sRGB IEC61966-2.1
Linearize Output Profile: Enabled
Step 12
Now the ACEScg footage looks correct and will render out properly.
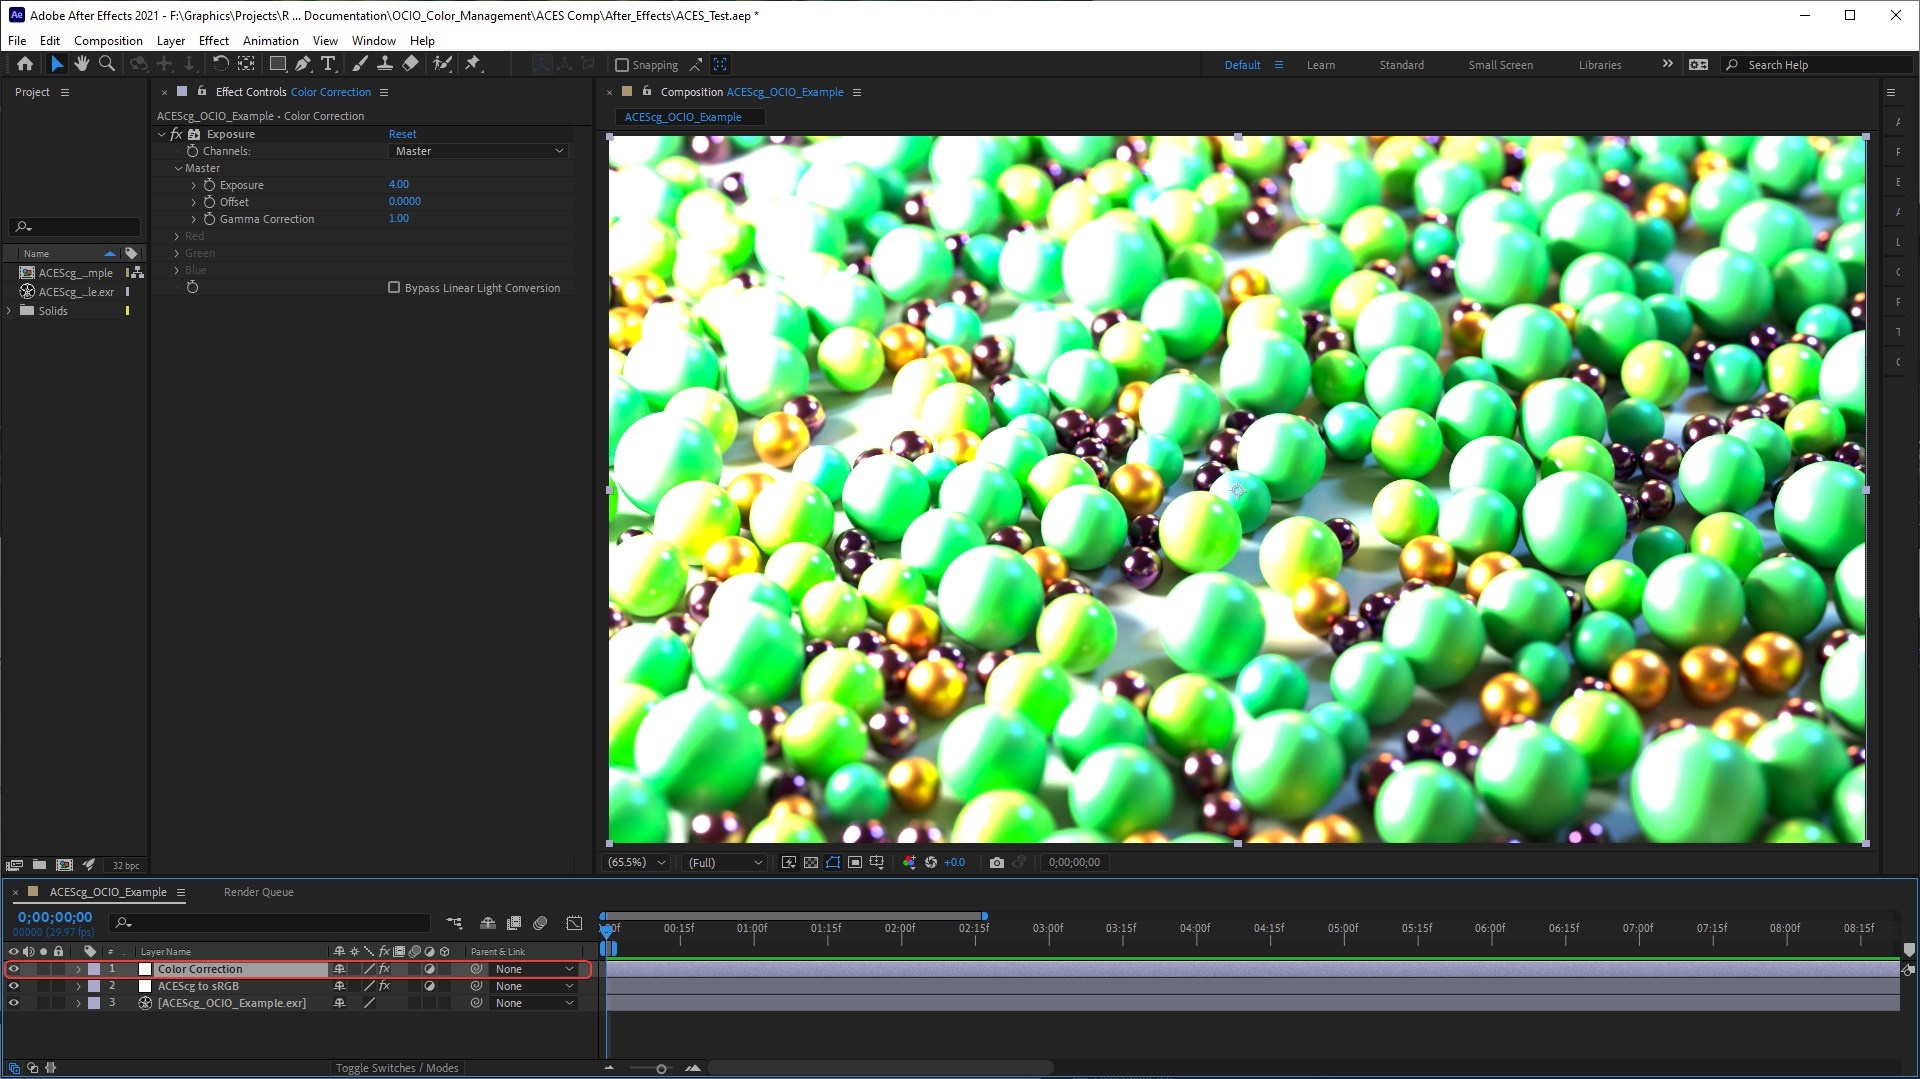
Reminder
The correct way to adjust ACEScg footage with this After Effects workflow should be done above your ACEScg footage but below the "ACEScg to sRGB" adjustment layer. This is demonstrated below with an Exposure effect being applied to an adjustment layer titled " Color Correction" in between the two layers. You want to apply any color corrections first to the ACEScg footage when still linear so it must be done in this order before the ODT conversion that converts your image to non-linear. This also means that you can composite multiple ACEScg openEXRs render layers all under the same one "ACEScg to sRGB" adjustment layer.
|
|
|
| Correct color correction result and layer order | Incorrect color correction result and layer order |

ACES in Nuke
Step 1
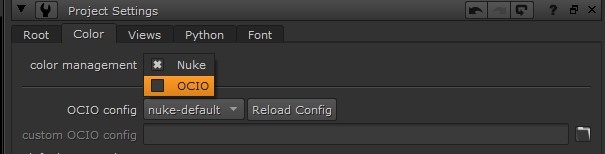
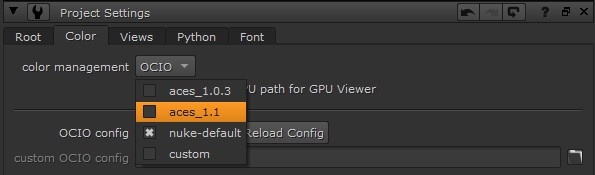
Navigate to the Color tab of your Nuke Project settings.
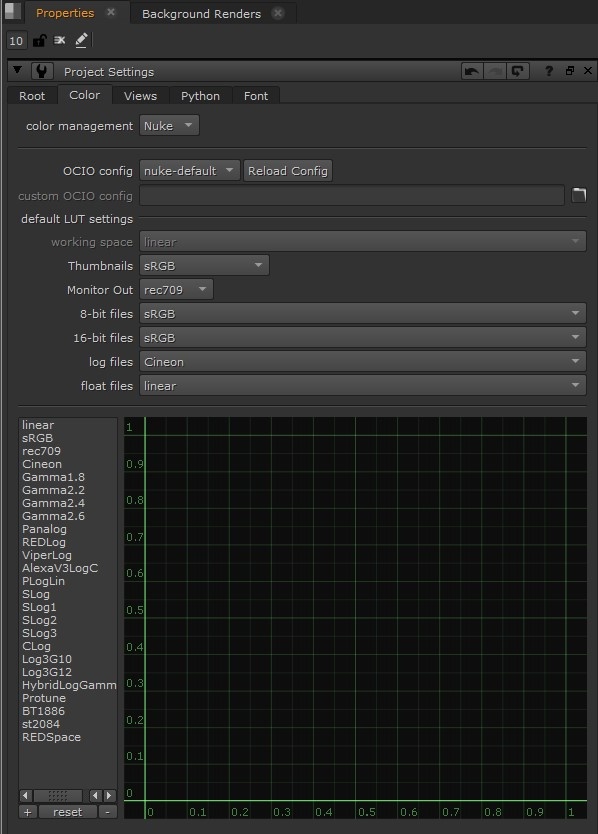
Step 2
Set your "Color Management" to OCIO.
Step 3
Set the "OCIO config" to an ACES configuration or provide the path of your own custom OCIO config.
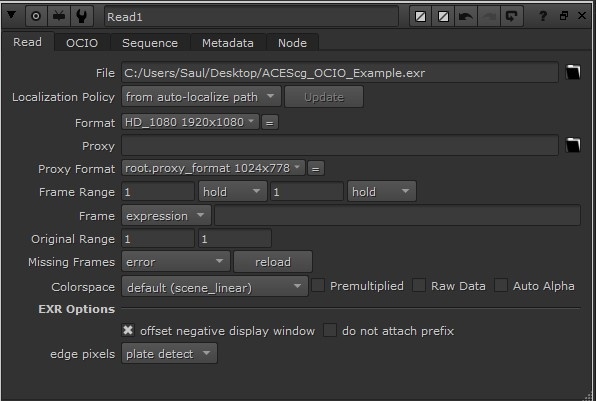
Step 4
Your Read nodes for ACES footage should already be set up with the correct color space of scene linear as pictured below.
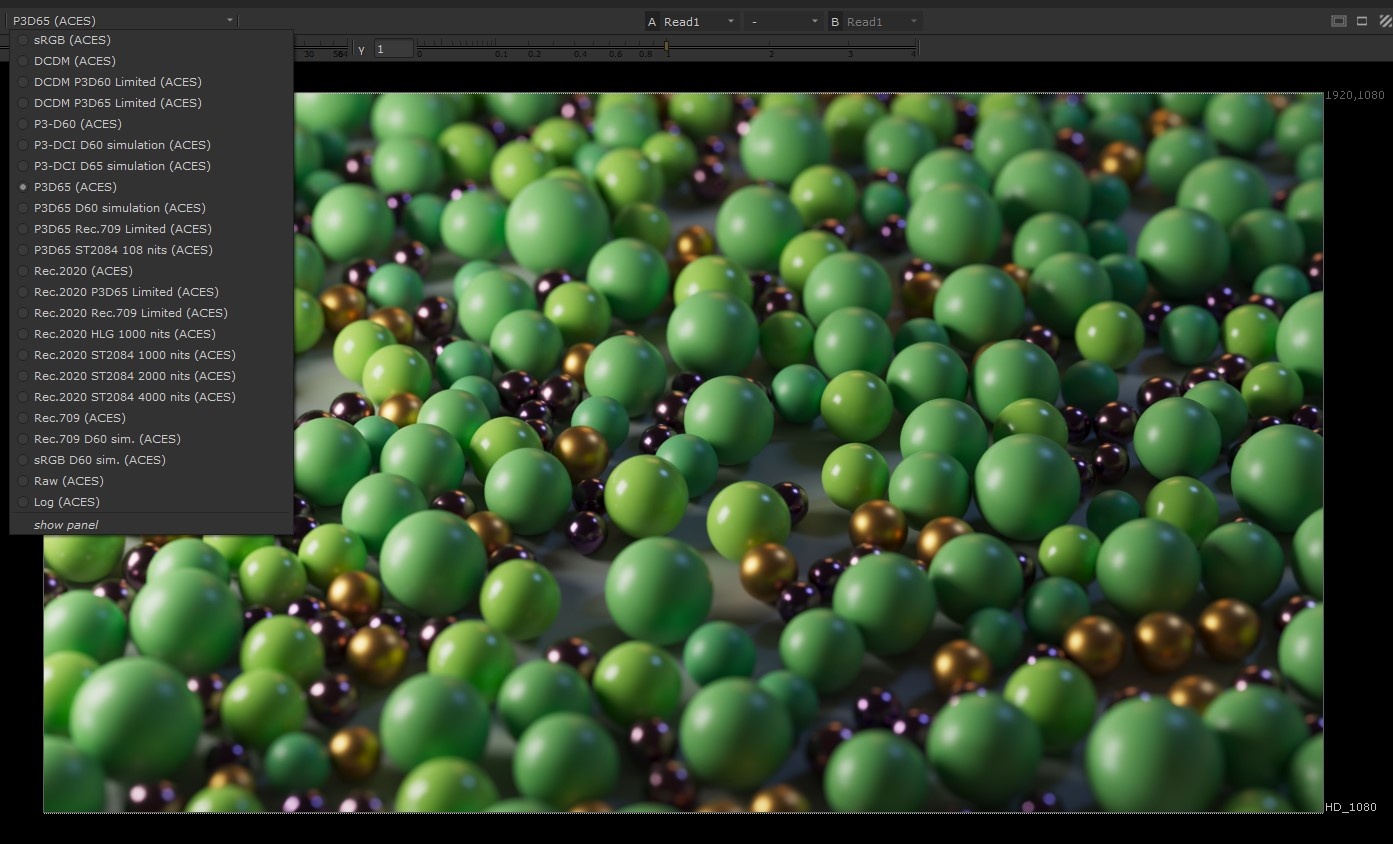
Step 5
Set your Viewer to the correct output display transform that corresponds with the display you are using to view your work on.
ACES in Resolve
There are multiple ways to add an ACES transform to footage in Resolve, the most common methods are covered below.
ACES via Project Settings in Resolve
Step 1
To make the results of your settings changes more apparent start by adding your ACES footage to a timeline.
Step 2
Then open your "Project Settings" which is found in the File menu.
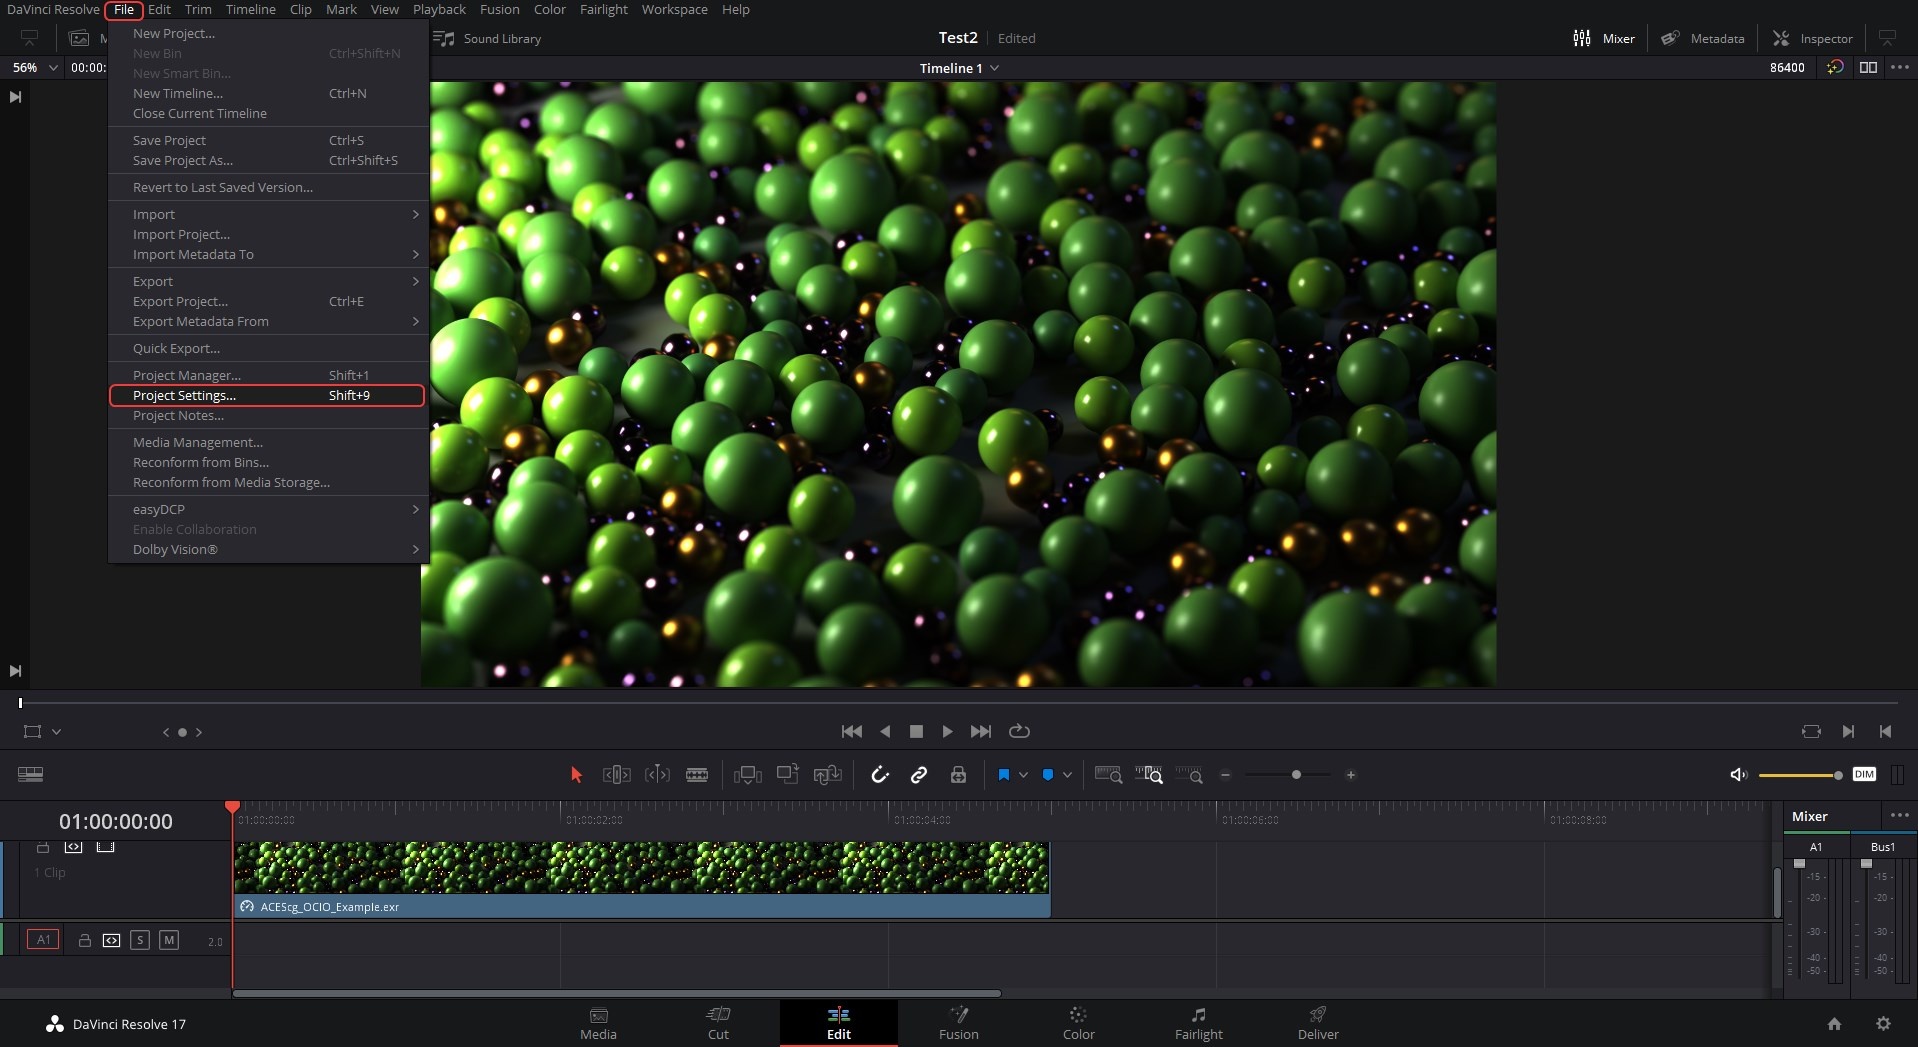
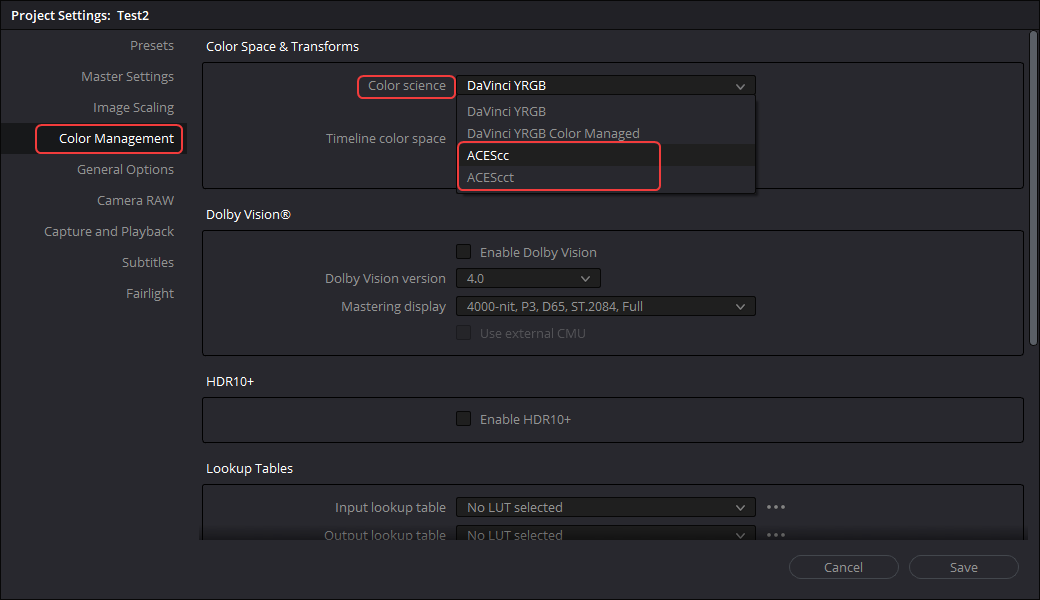
Step 3
Next select the "Color Management" section on the left side of the Project Settings panel and then change your "Color science" to ACEScc or ACEScct.
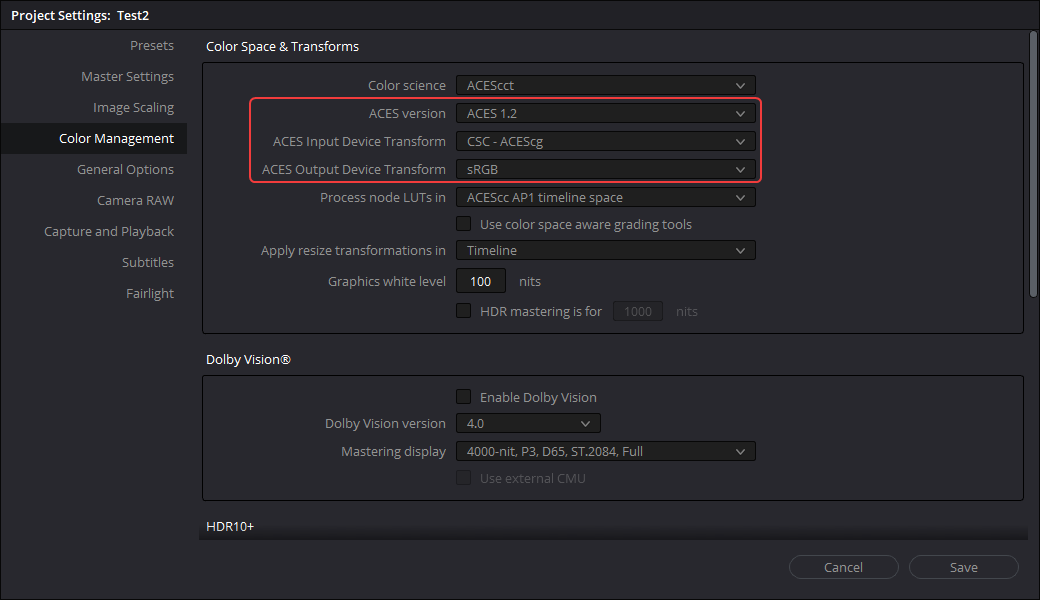
Step 4
Then set your ACES version, Input Device Transform to " CSC - ACEScg" and Output Device Transform to the color space corresponding to the monitor you are working on, in most cases sRGB.
Step 5
Now your ACES footage is set up properly.
|
|
|
| Default Resolve Color science (without ACES Transform) | ACES Color science (with ACES Transform) |

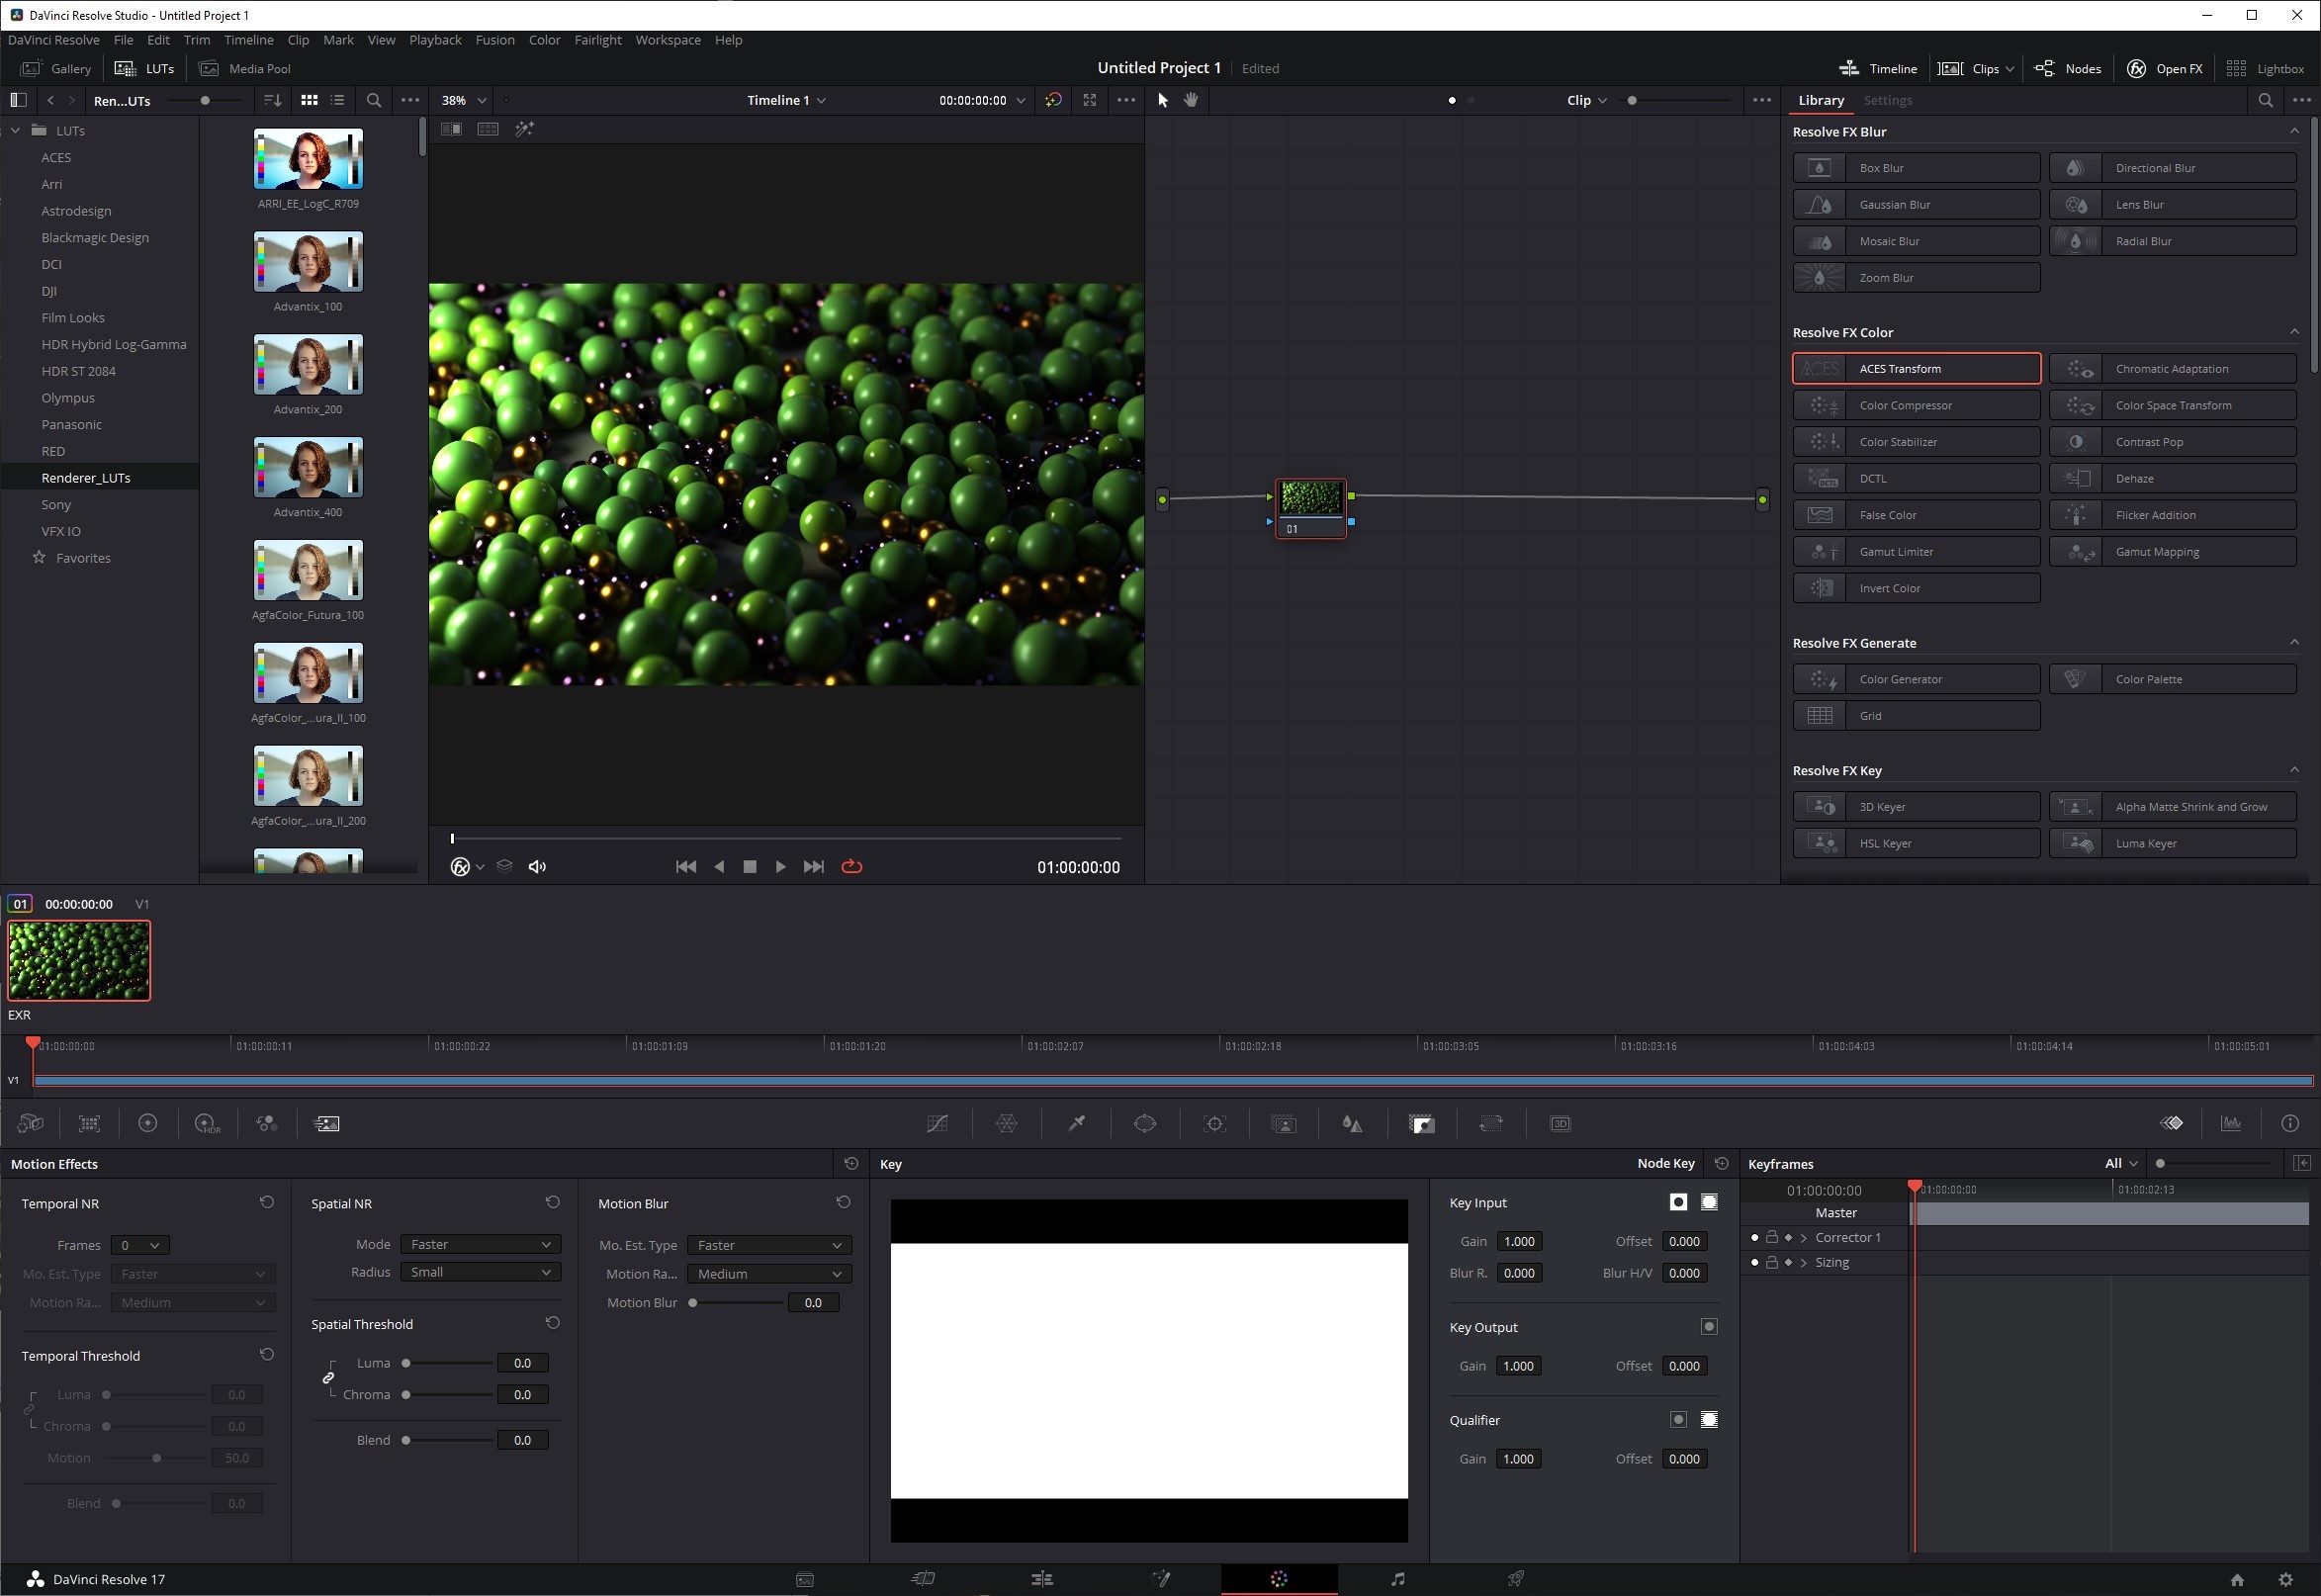
ACES via Edit Page in Resolve
Step 1
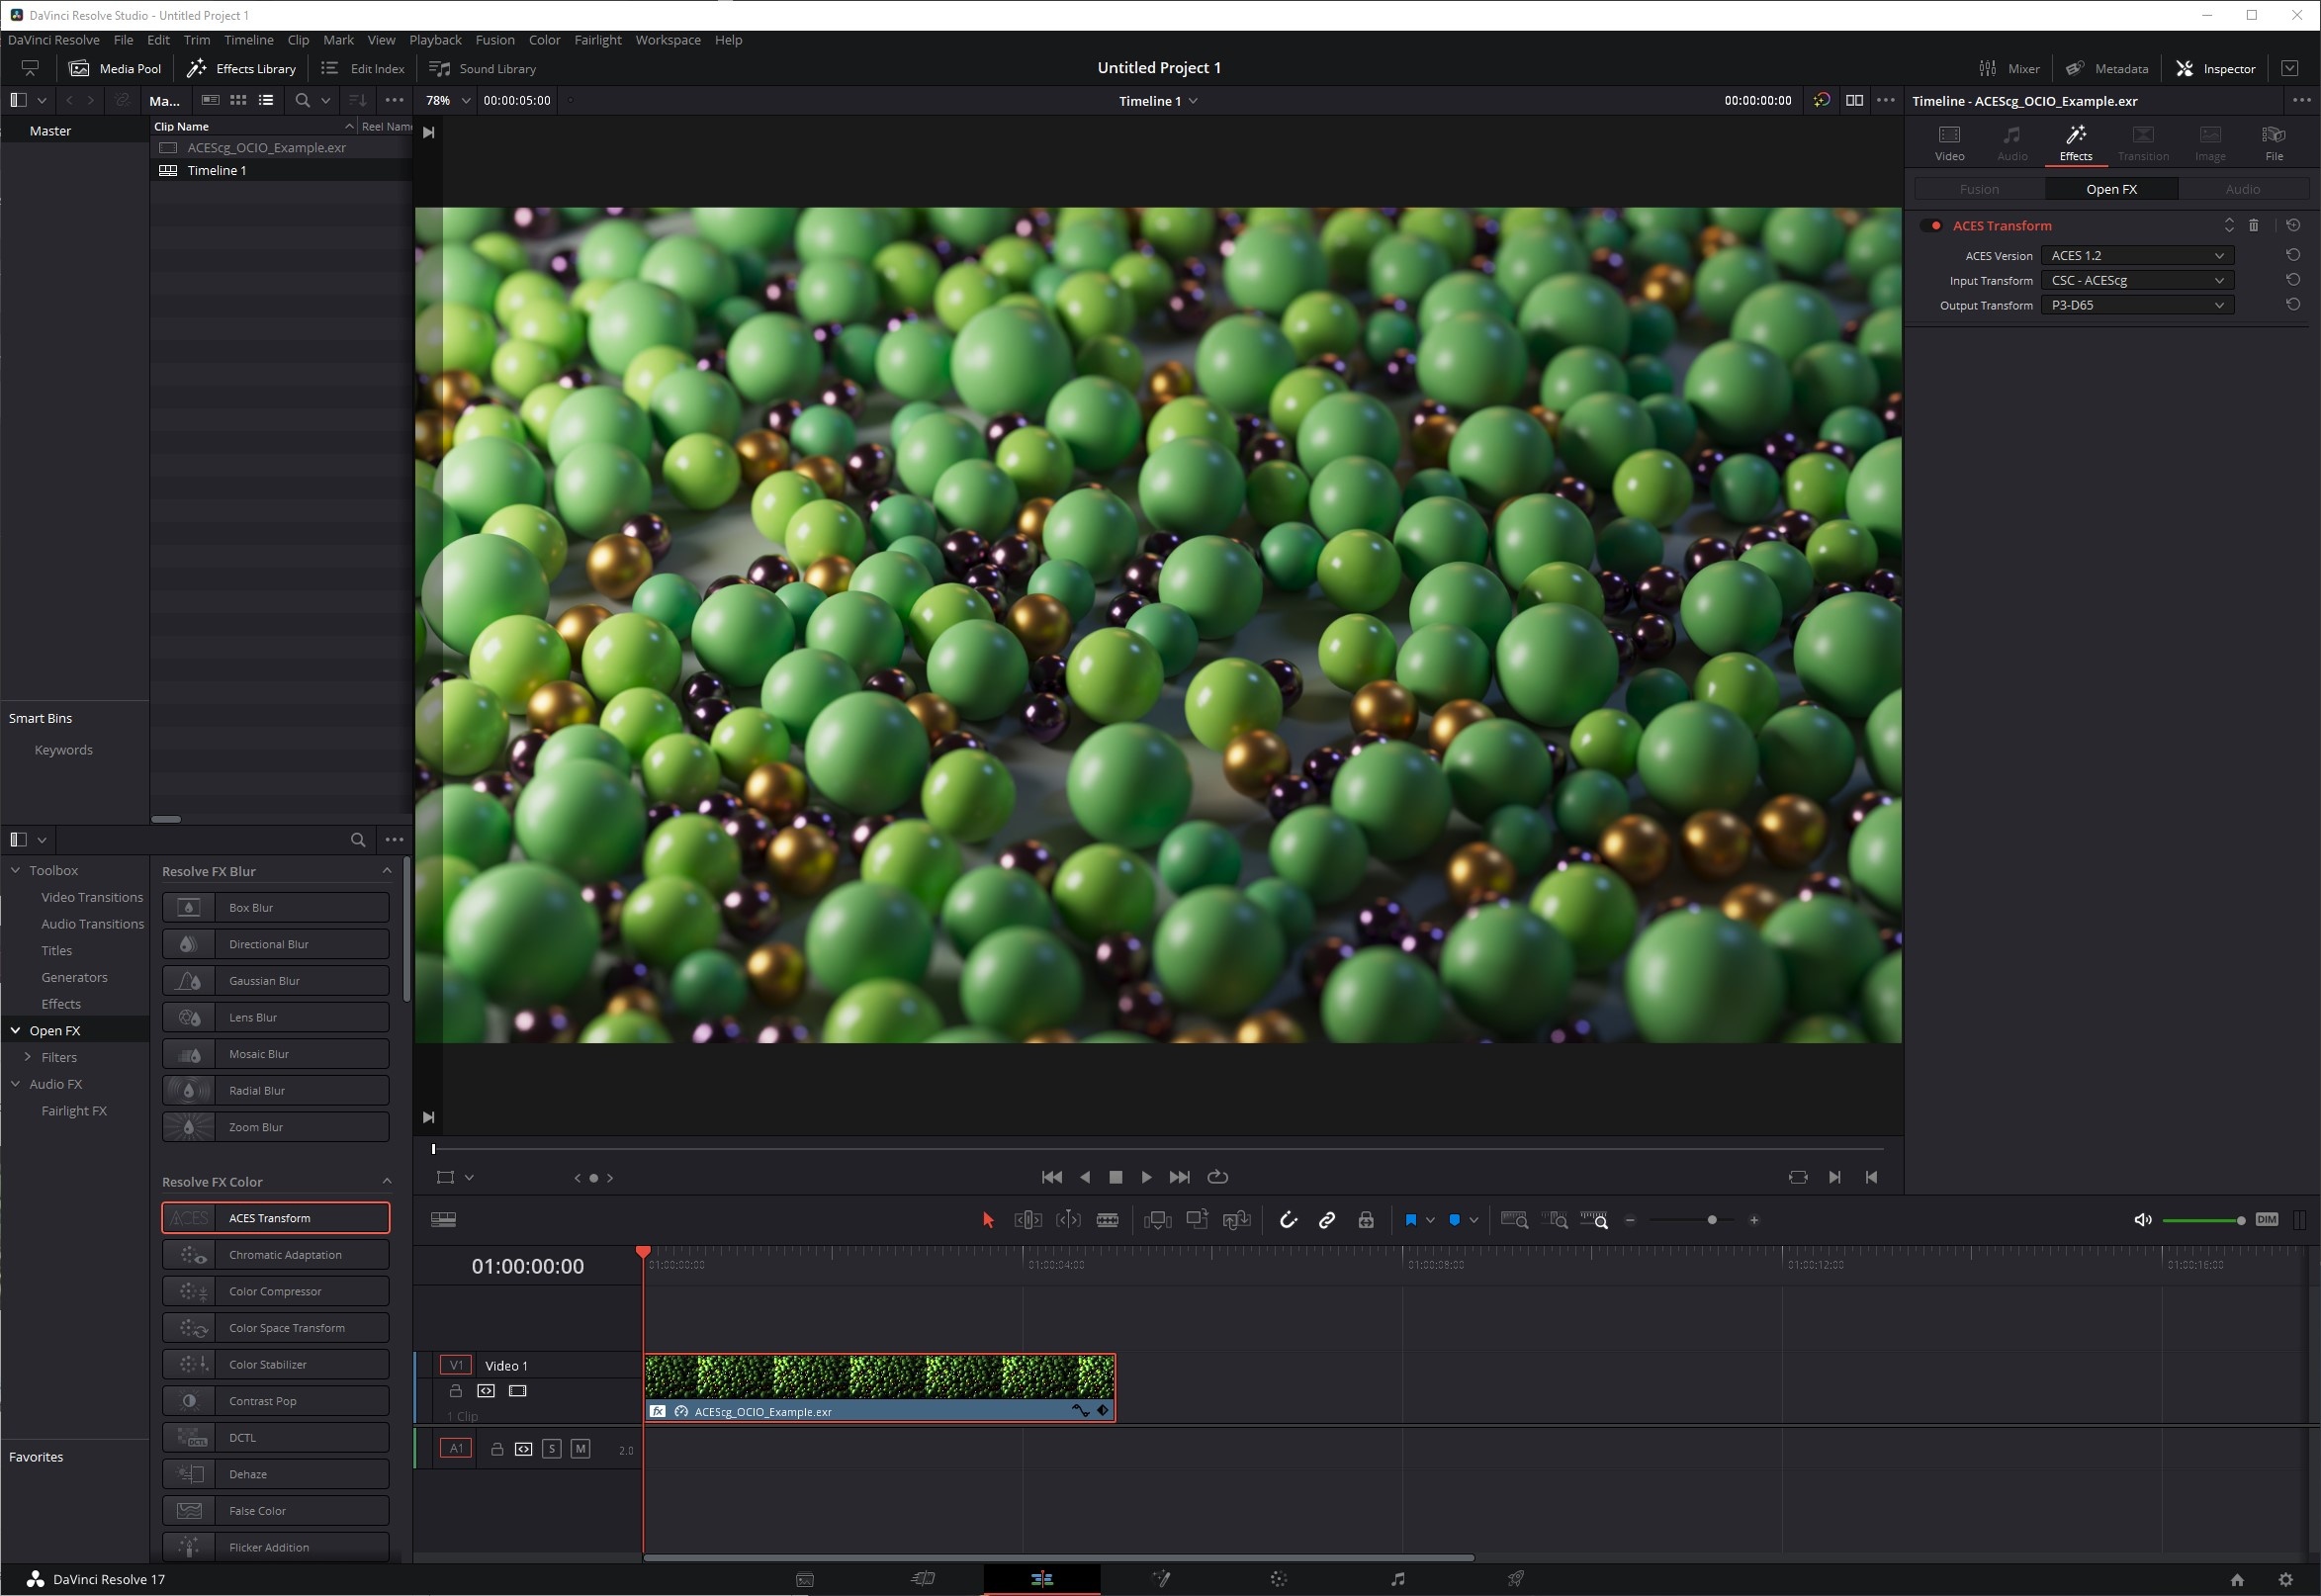
Start by adding your ACES footage to a timeline and switching to the Edit page.
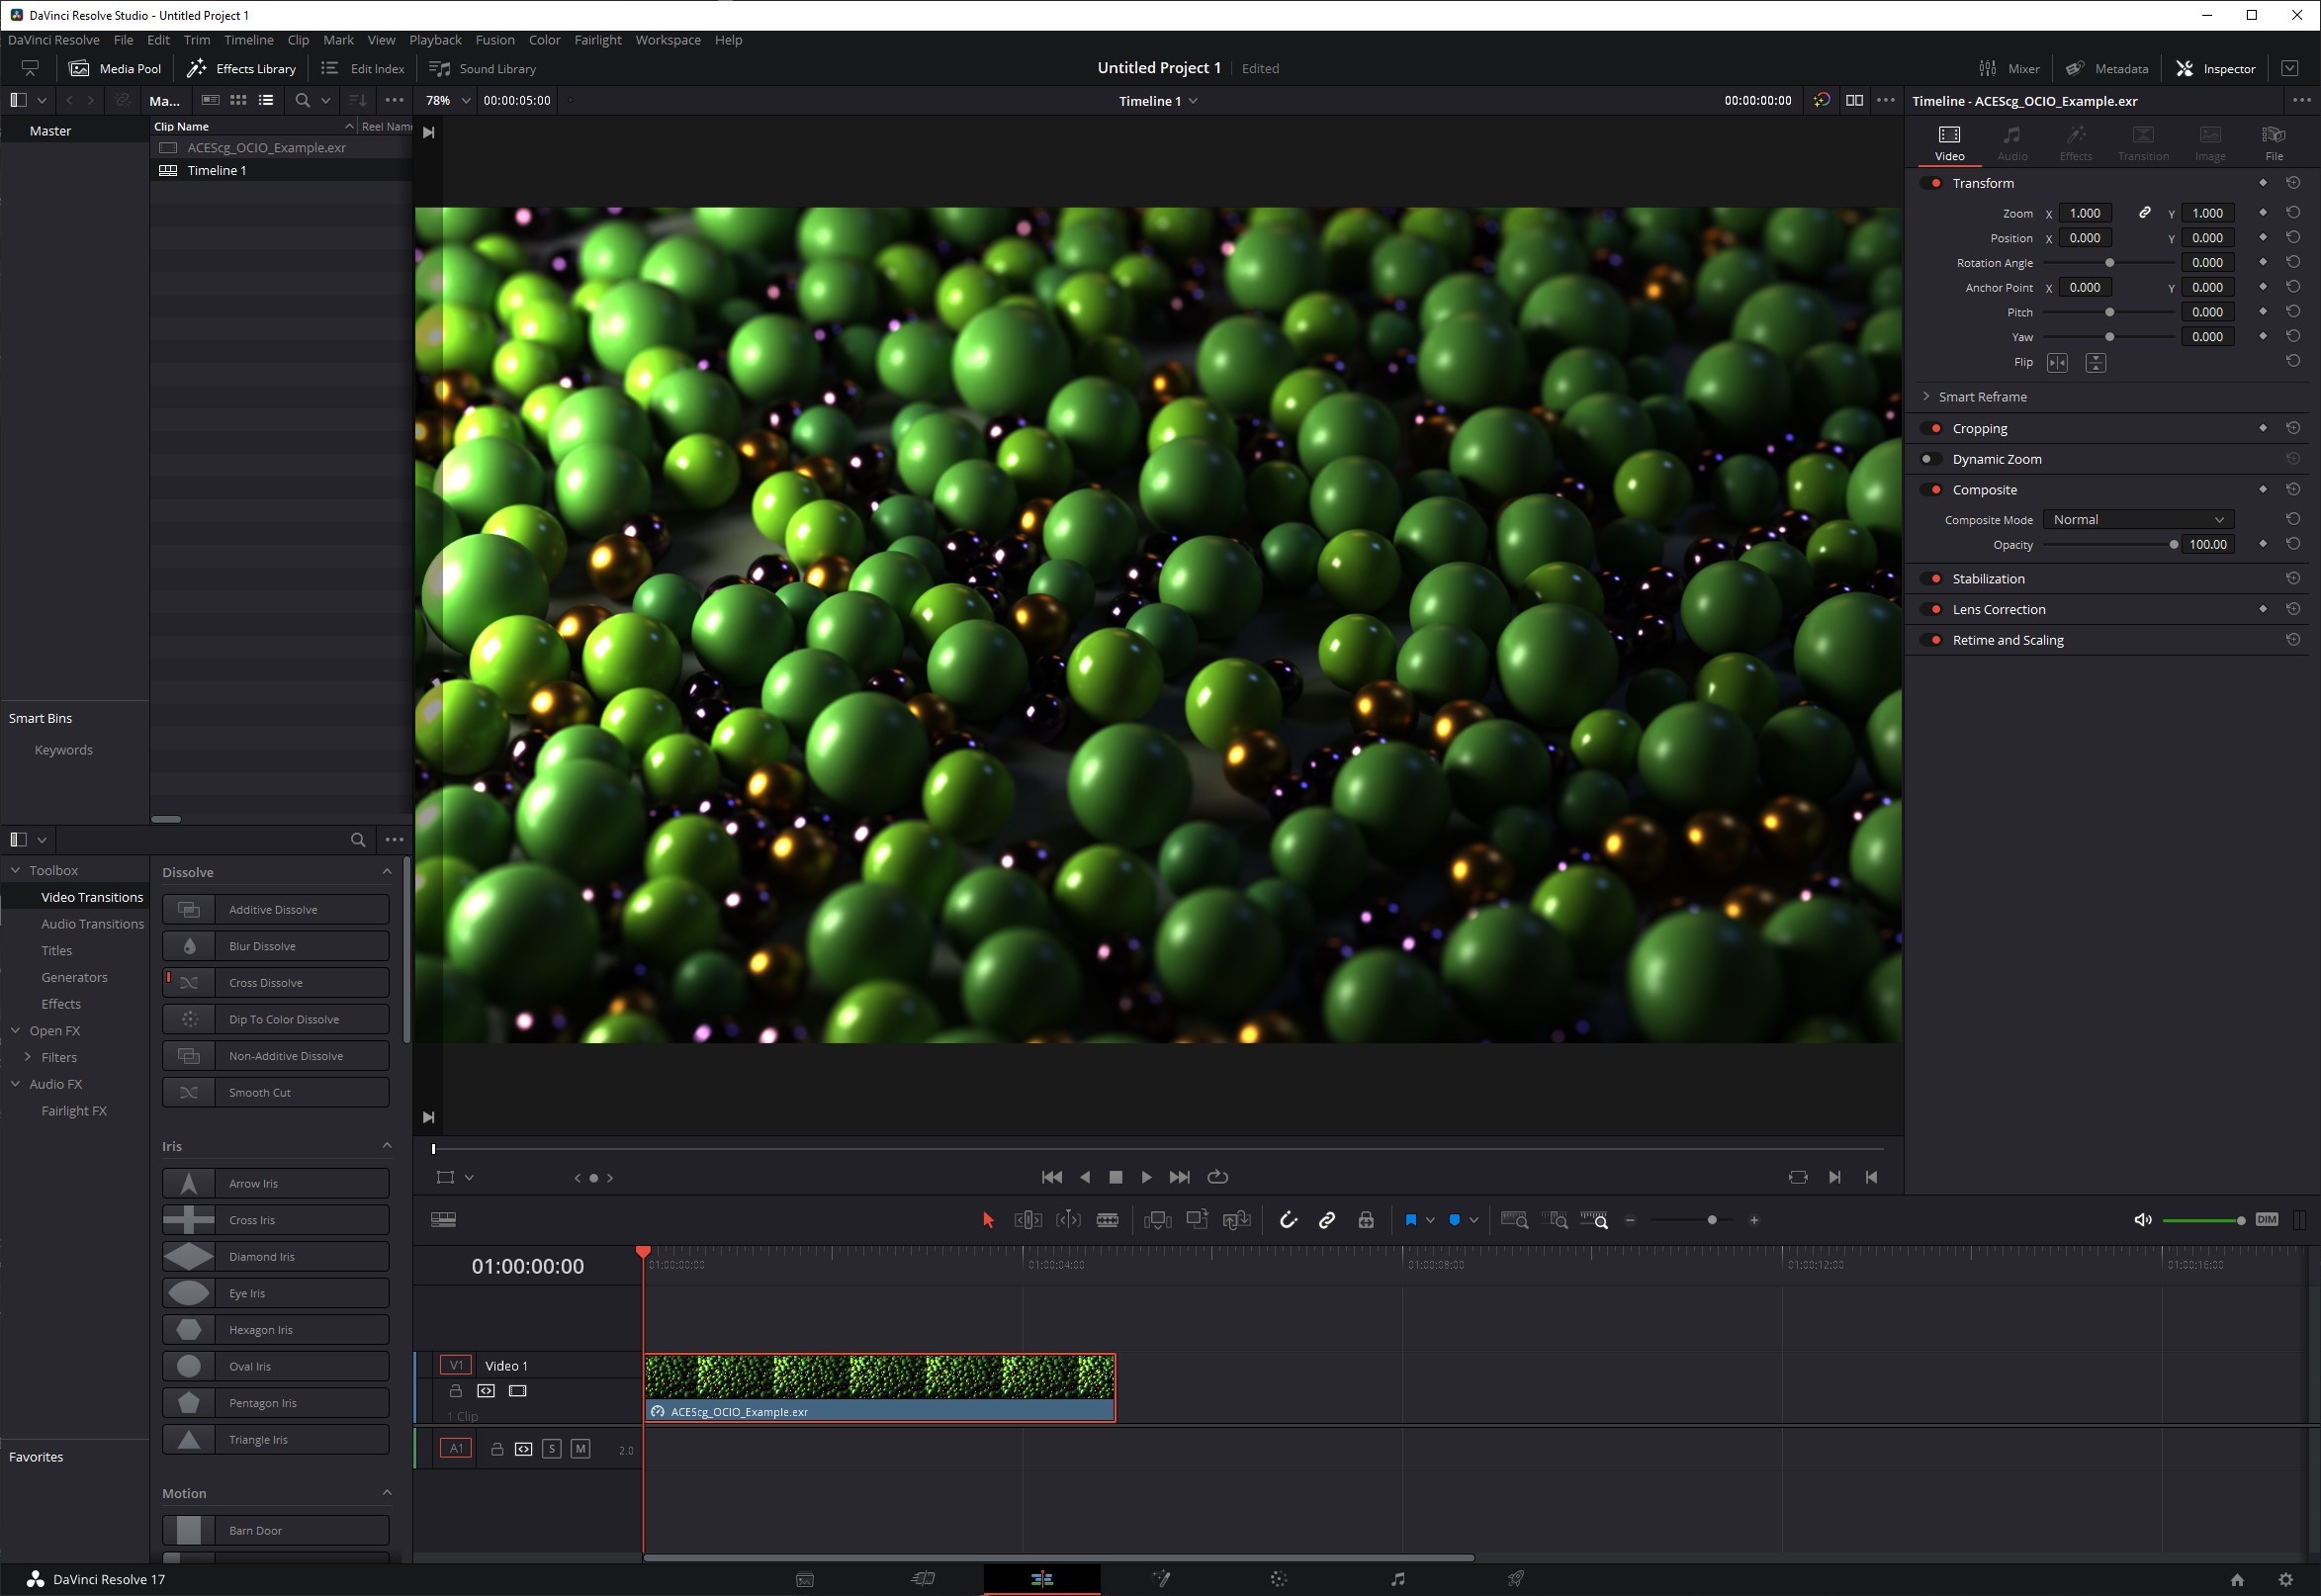
Step 2
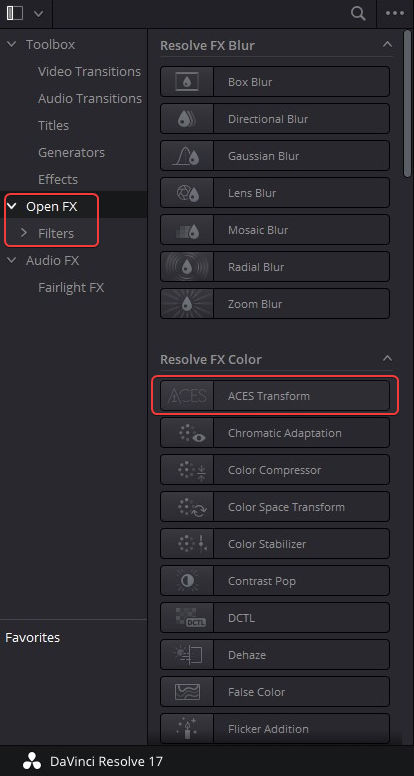
Then add an ACES Transform effect to your footage found under the Open FX > Resolve FX Color section.
Step 3
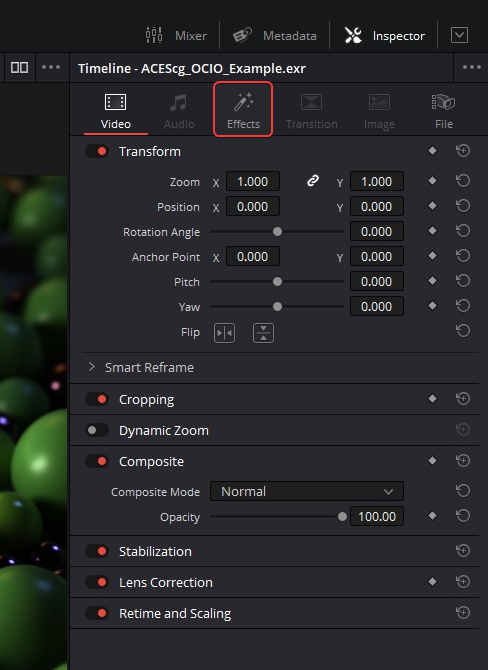
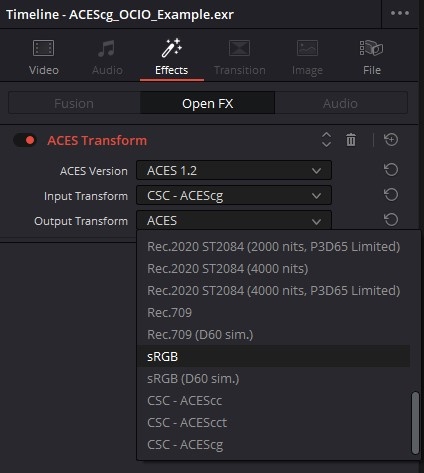
Next switch to the Effects tab so you can access the ACES Transform options.
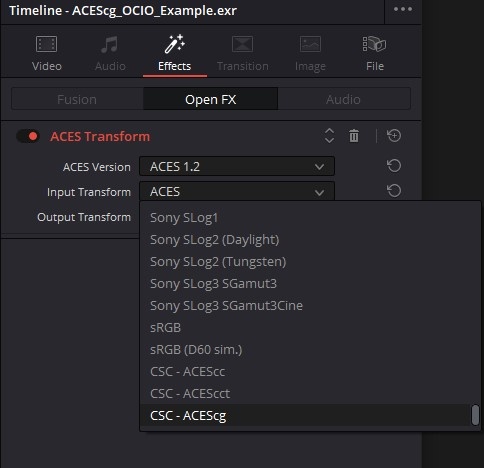
Step 4
Then set your ACES version, Input Transform to " CSC - ACEScg" and Output Transform to the color space corresponding to the monitor you are working on, in most cases sRGB.
|
|
|
Step 5
Now your footage is set up properly.
Note: In the demonstration images below the display being worked on used a color space of P3-D65 so the Output Transform was set to that instead of the more common sRGB.
|
|
|
| Before ACES Transform | After ACES Transform |
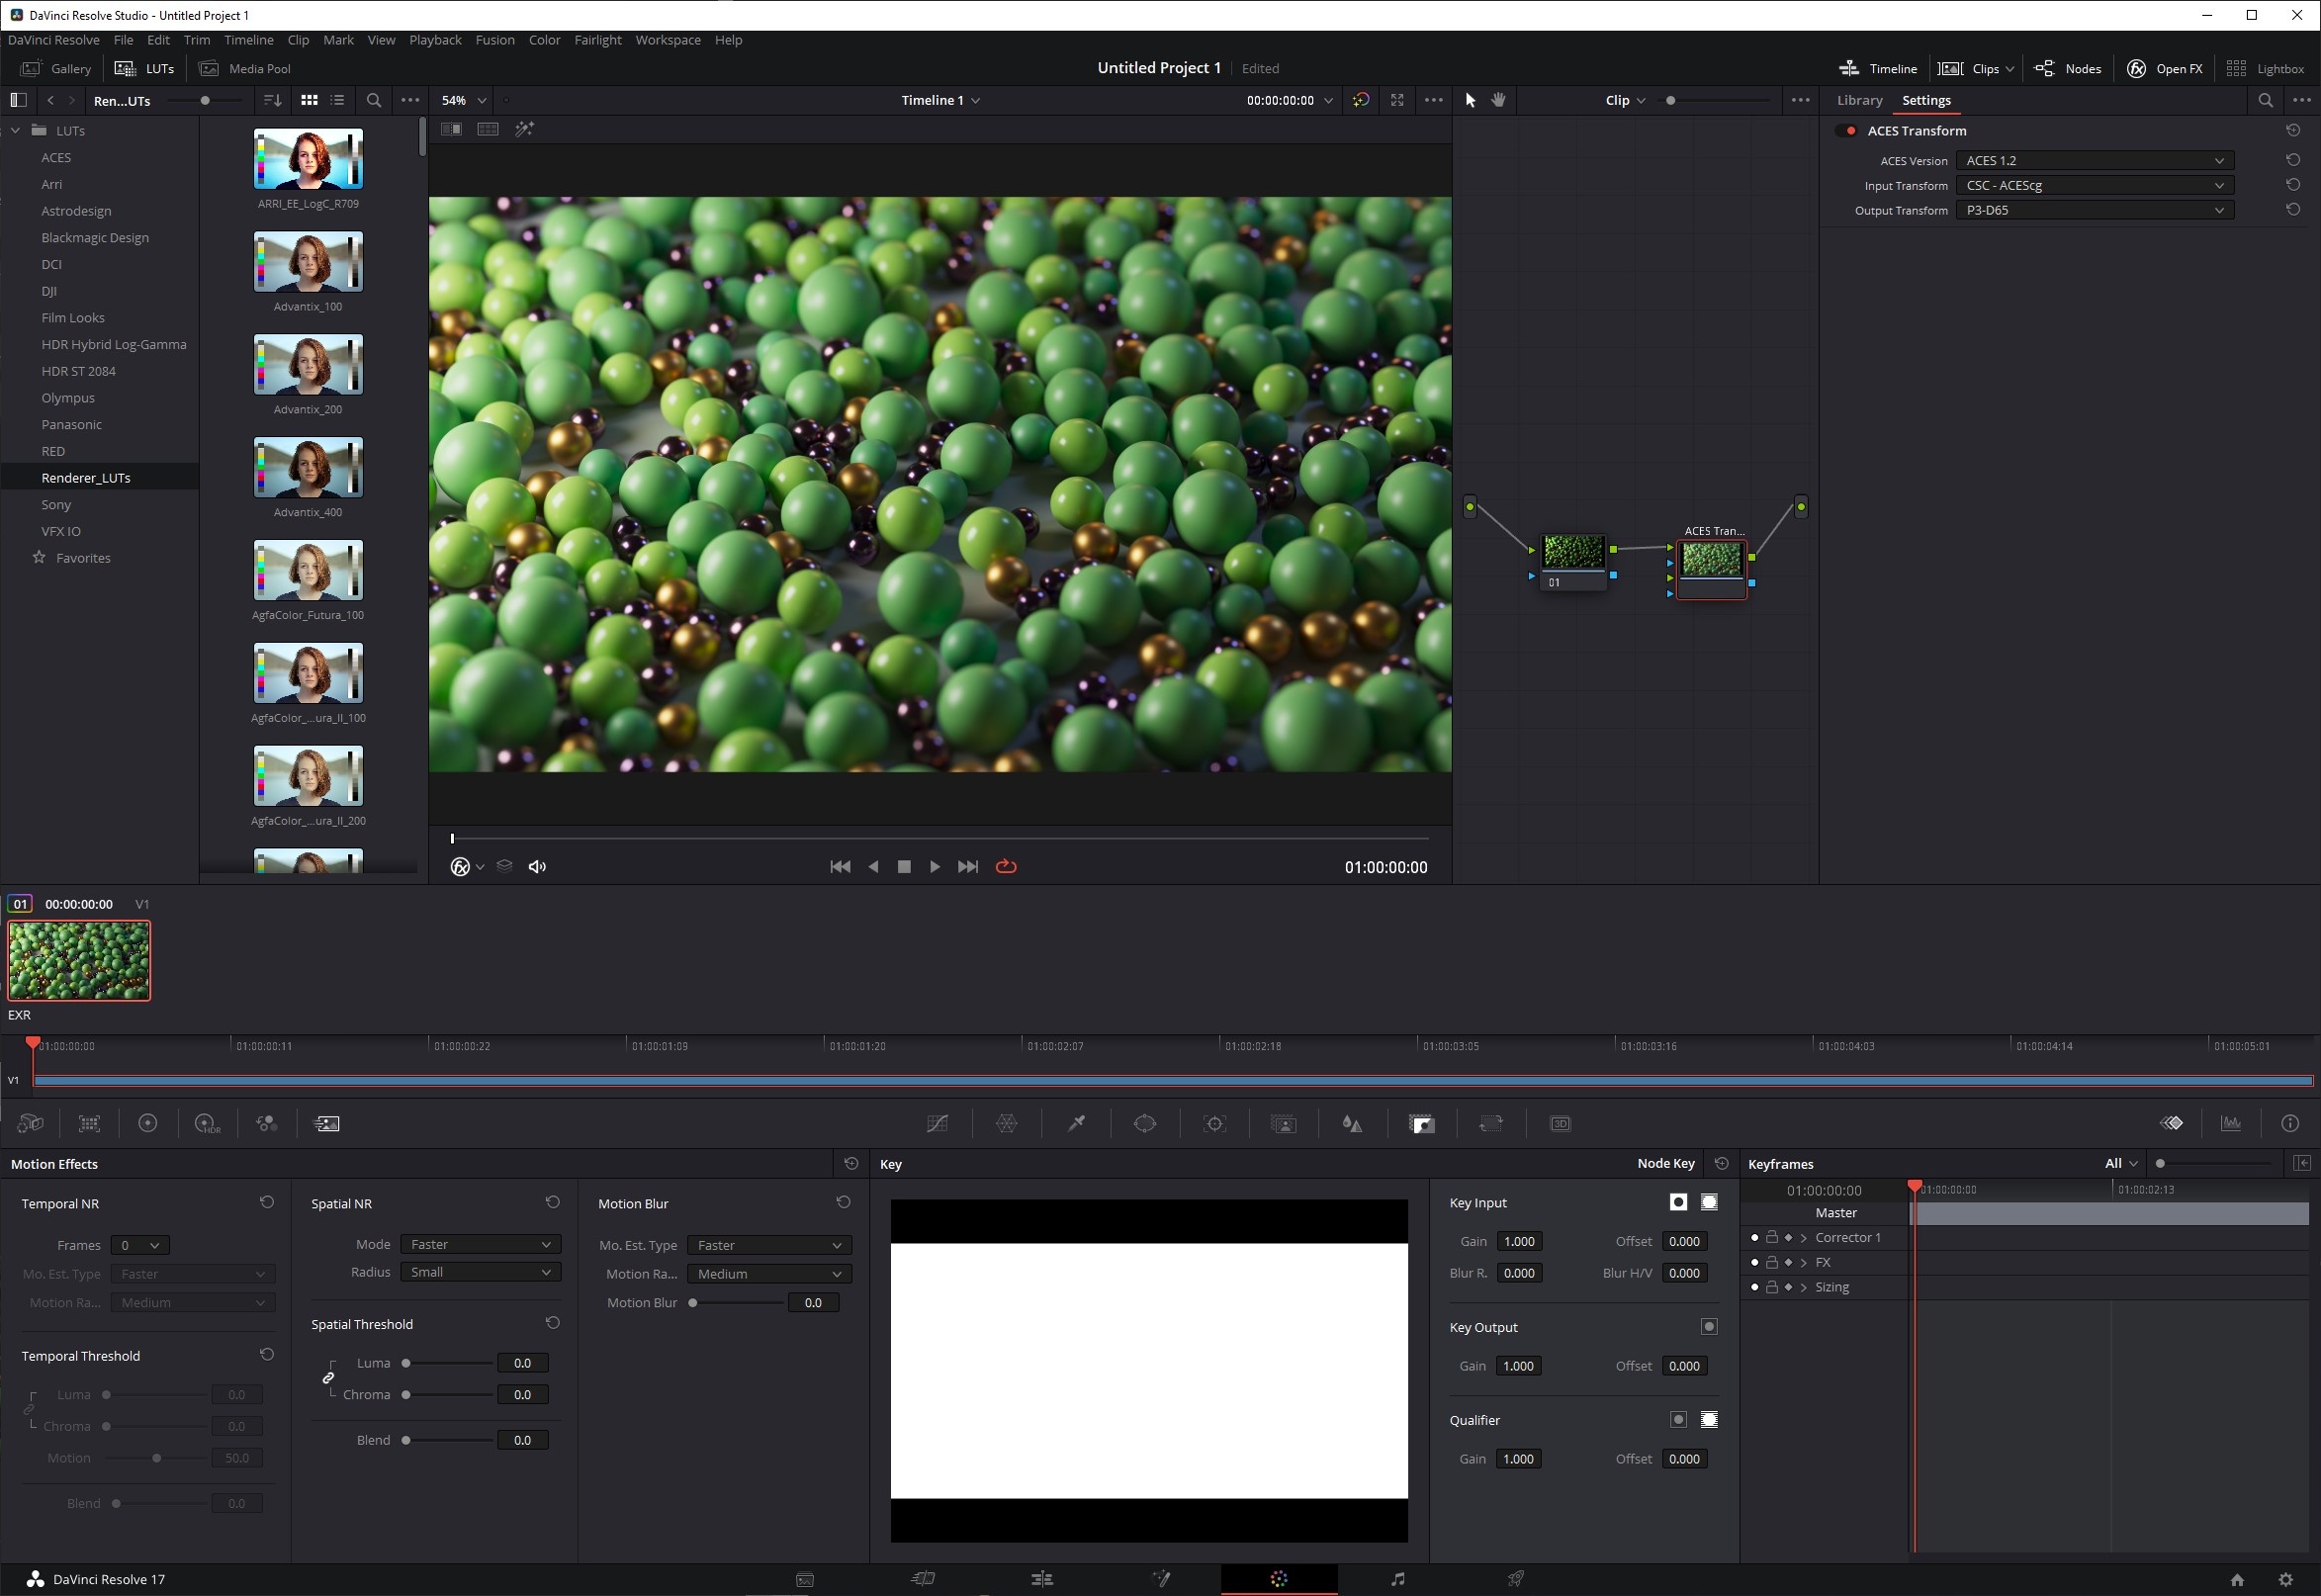
ACES via Color Page in Resolve
Step 1
From the Color page start by adding an ACES Transform node to your color correction graph.
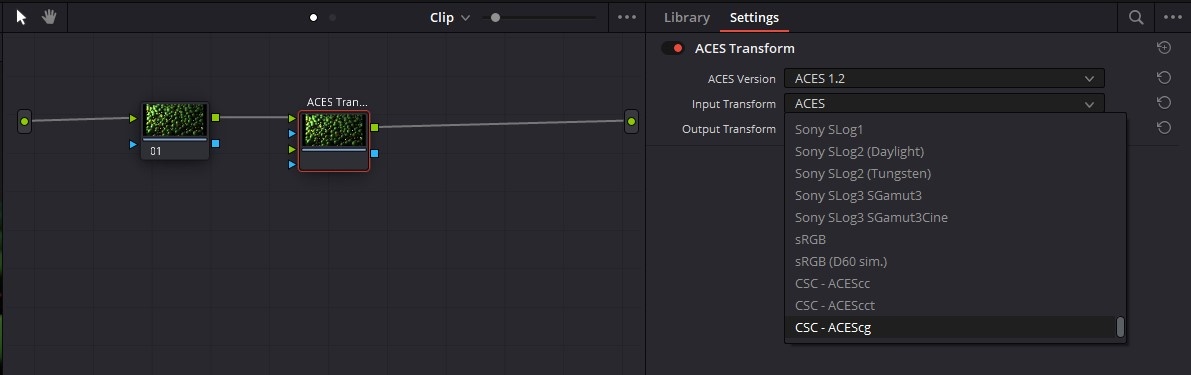
Step 2
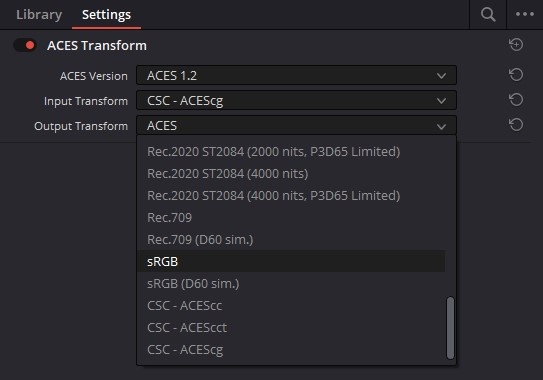
Then set your ACES version, Input Transform to "CSC - ACEScg" and Output Transform to the color space corresponding to the monitor you are working on, in most cases sRGB.
|
|
| Setting Input Transform to ACEScg |
|
|
|
|
| Setting Output Transform to sRGB |
Step 3
Now your footage is set up properly.
Note: In the demonstration images below the display being worked on used a color space of P3-D65 so the Output Transform was set to that instead of the more common sRGB.
|
|
|
| Before ACES Transform | After ACES Transform |
ACES in Fusion
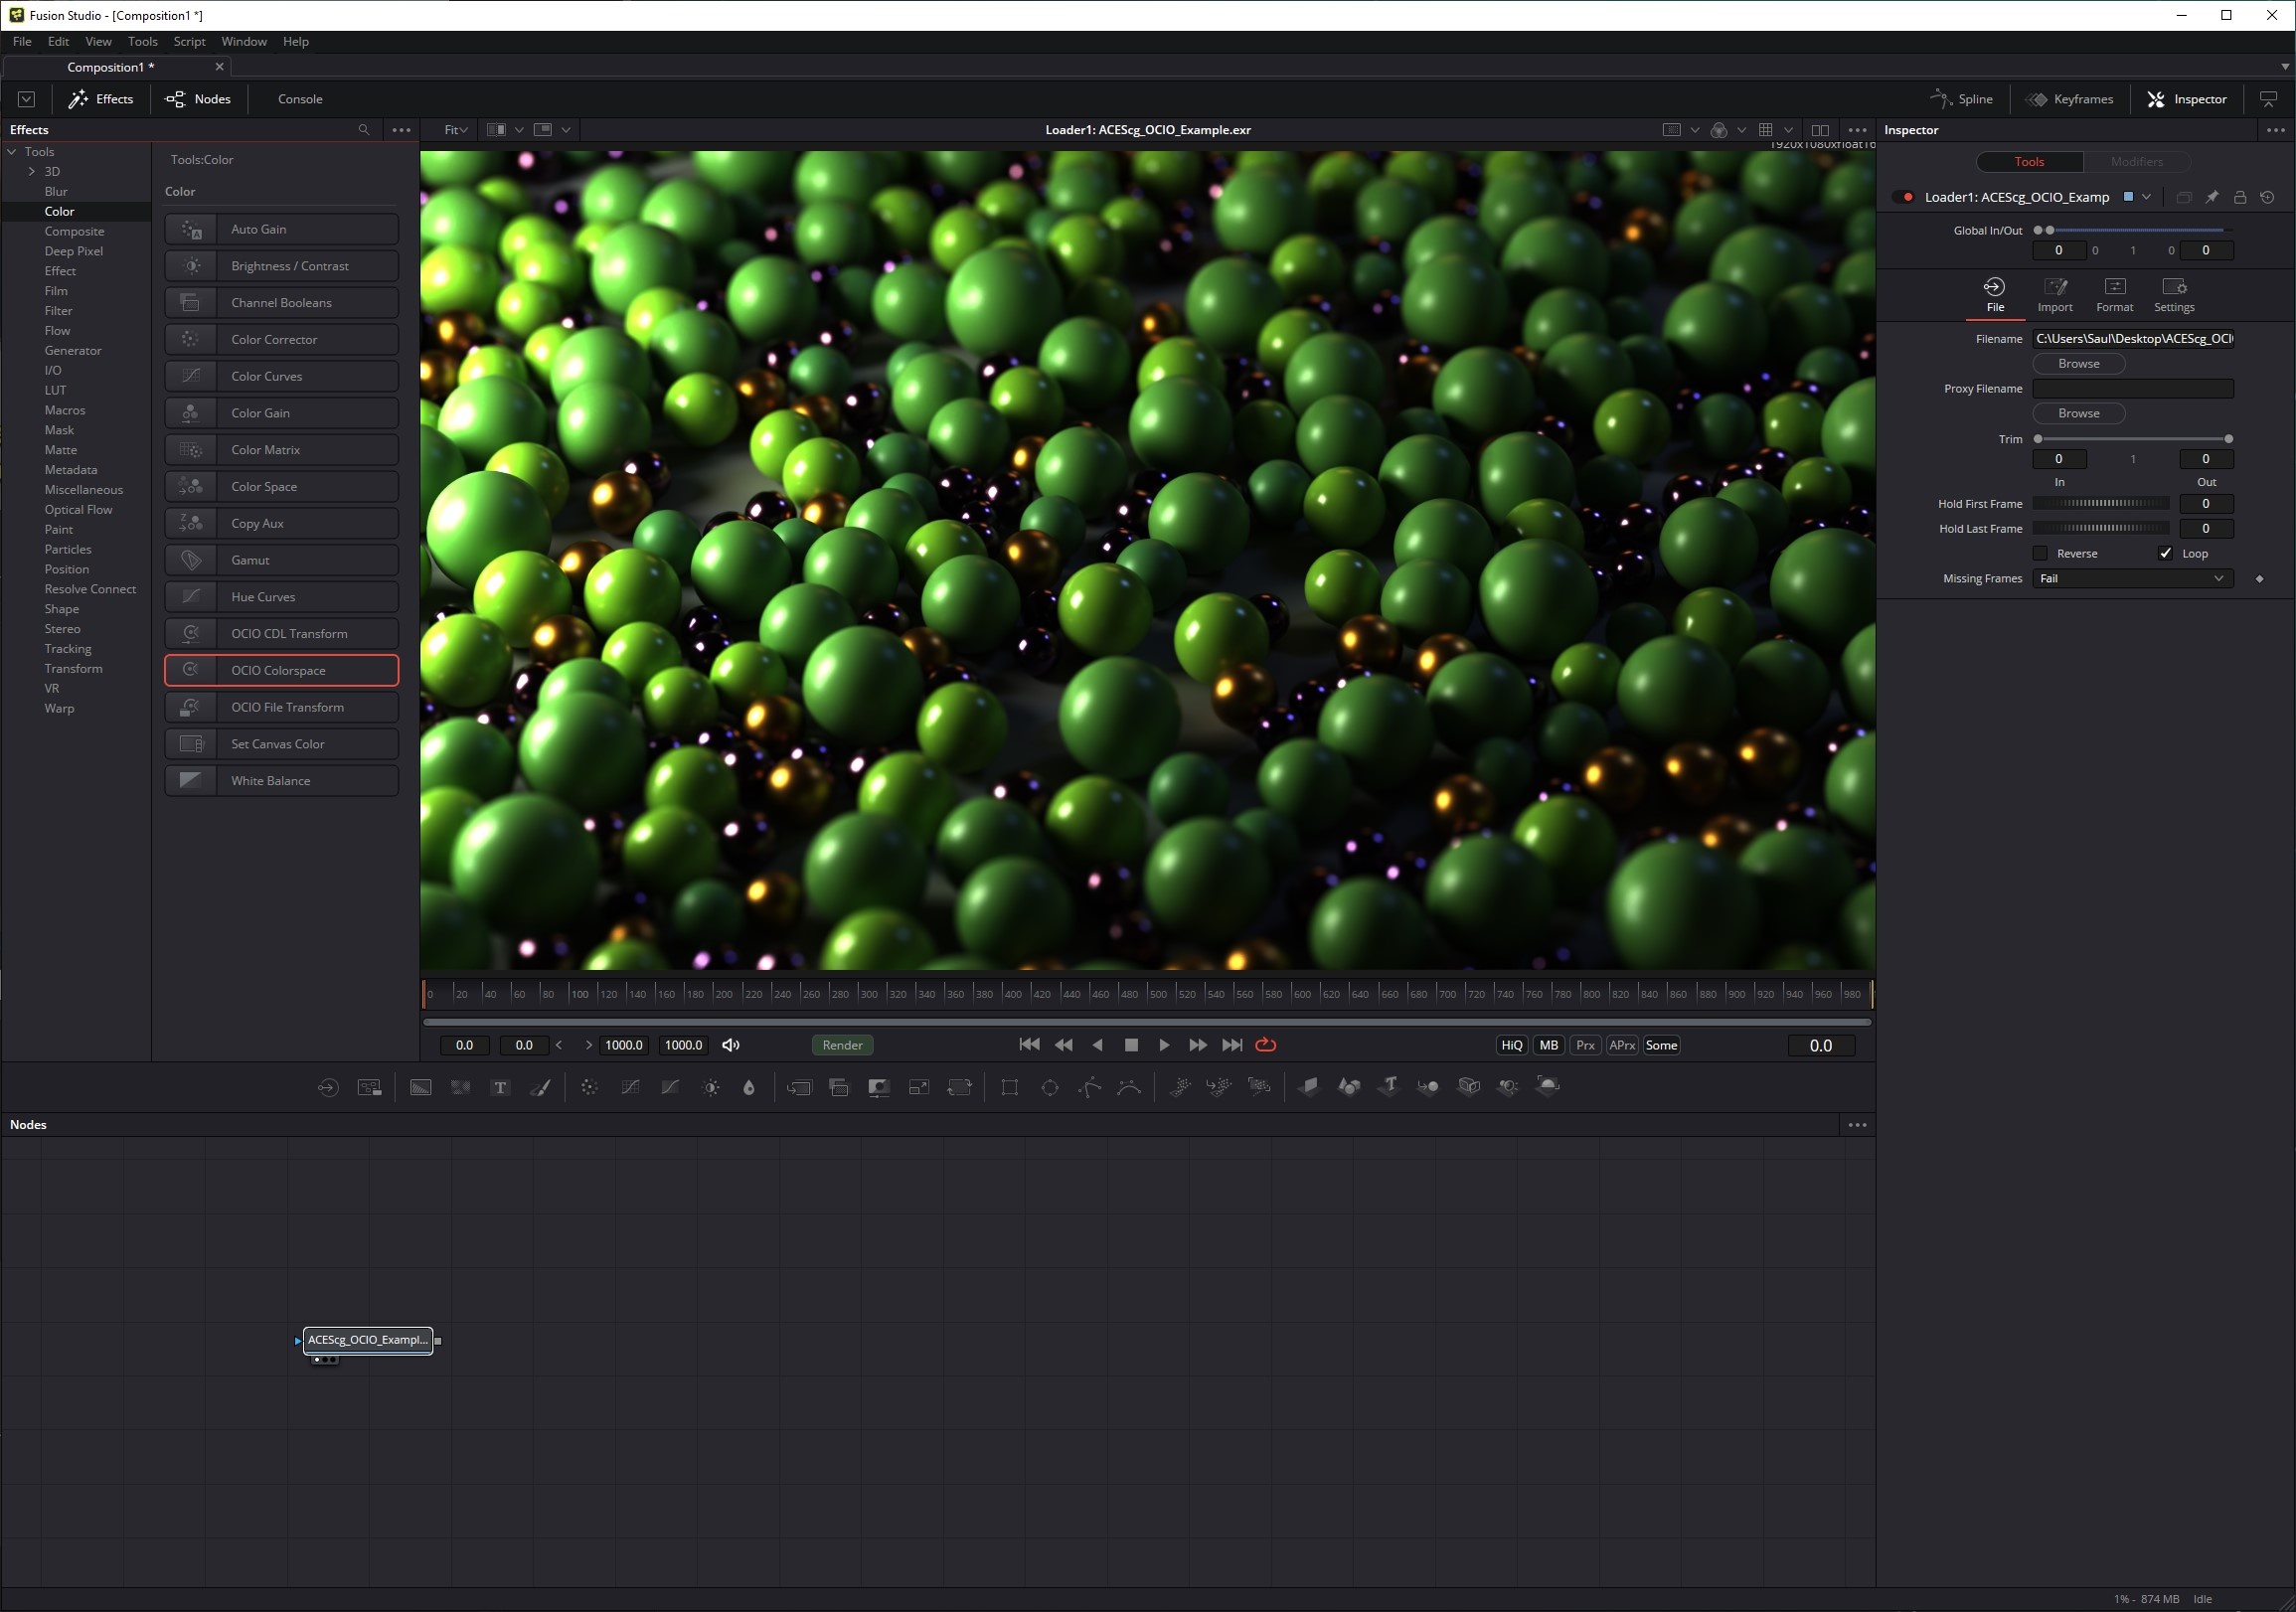
Step 1
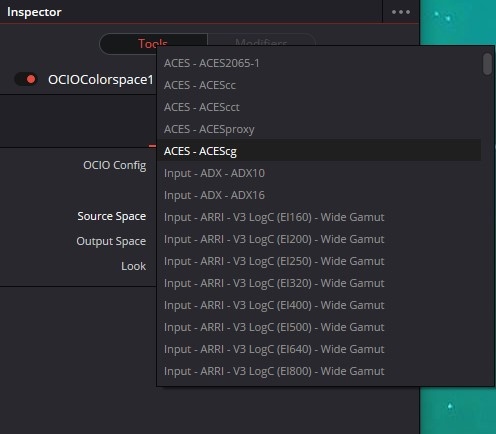
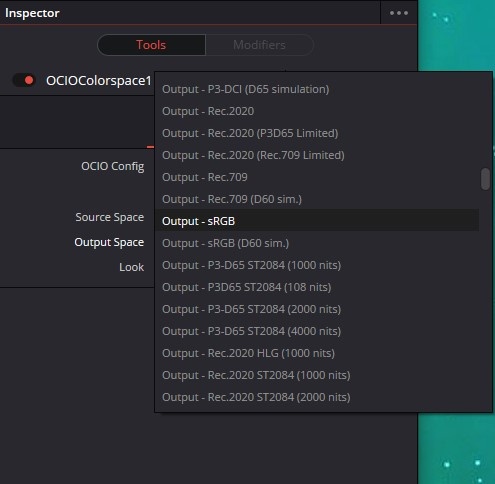
With your footage imported via a Loader create an OCIO Colorspace node downstream from your footage. This effect can be found under the Tools > Color section.
Step 2
First specify the location of your OCIO Config file.
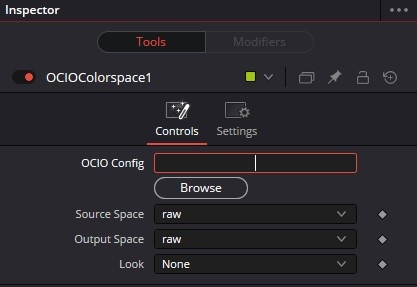
Step 3
Then set your Source Space to "ACEScg" and Output Space to the color space corresponding to the monitor you are working on, in most cases sRGB.
|
|
|
Step 4
Now your footage is set up properly.
Note: In the demonstration images below the display being worked on used a color space of P3-D65 so the Output Transform was set to that instead of the more common sRGB.
|
|
|
| Before ACES Transform | After ACES Transform |

ACES in Affinity Photo / Designer / Publisher
This walkthrough only works with OCIO v1 Configs. OCIO v2 configs currently have issues in Affinity.
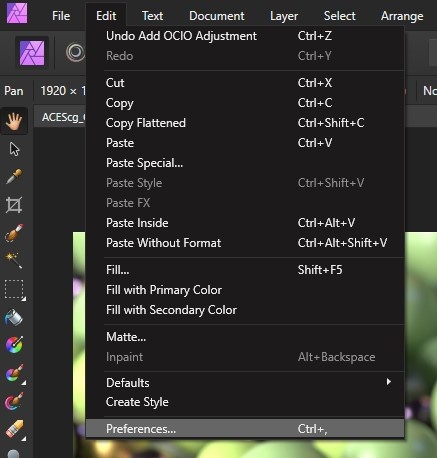
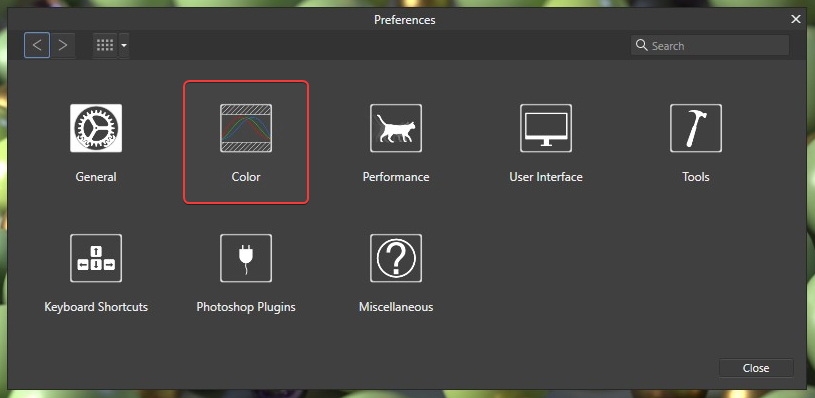
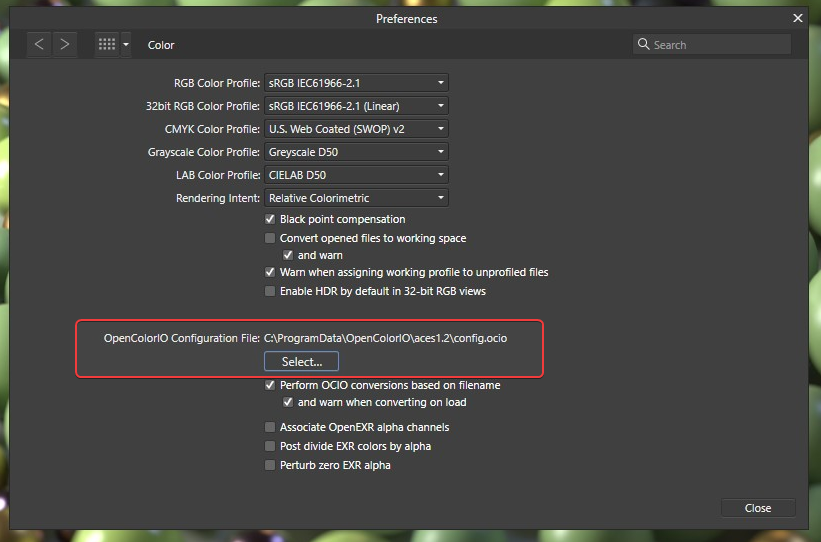
Step 1
Before you begin working you must first specify your OCIO config path by opening the Affinity Preferences > ;Color section.
|
|
|
Step 2
Then press the " Select..." button and navigate to and select your OCIO config file. A restart of the program may be required after this step.
Step 3
Next open your footage and add an Adjustment by clicking the button located at the bottom of the Layers panel circled below...
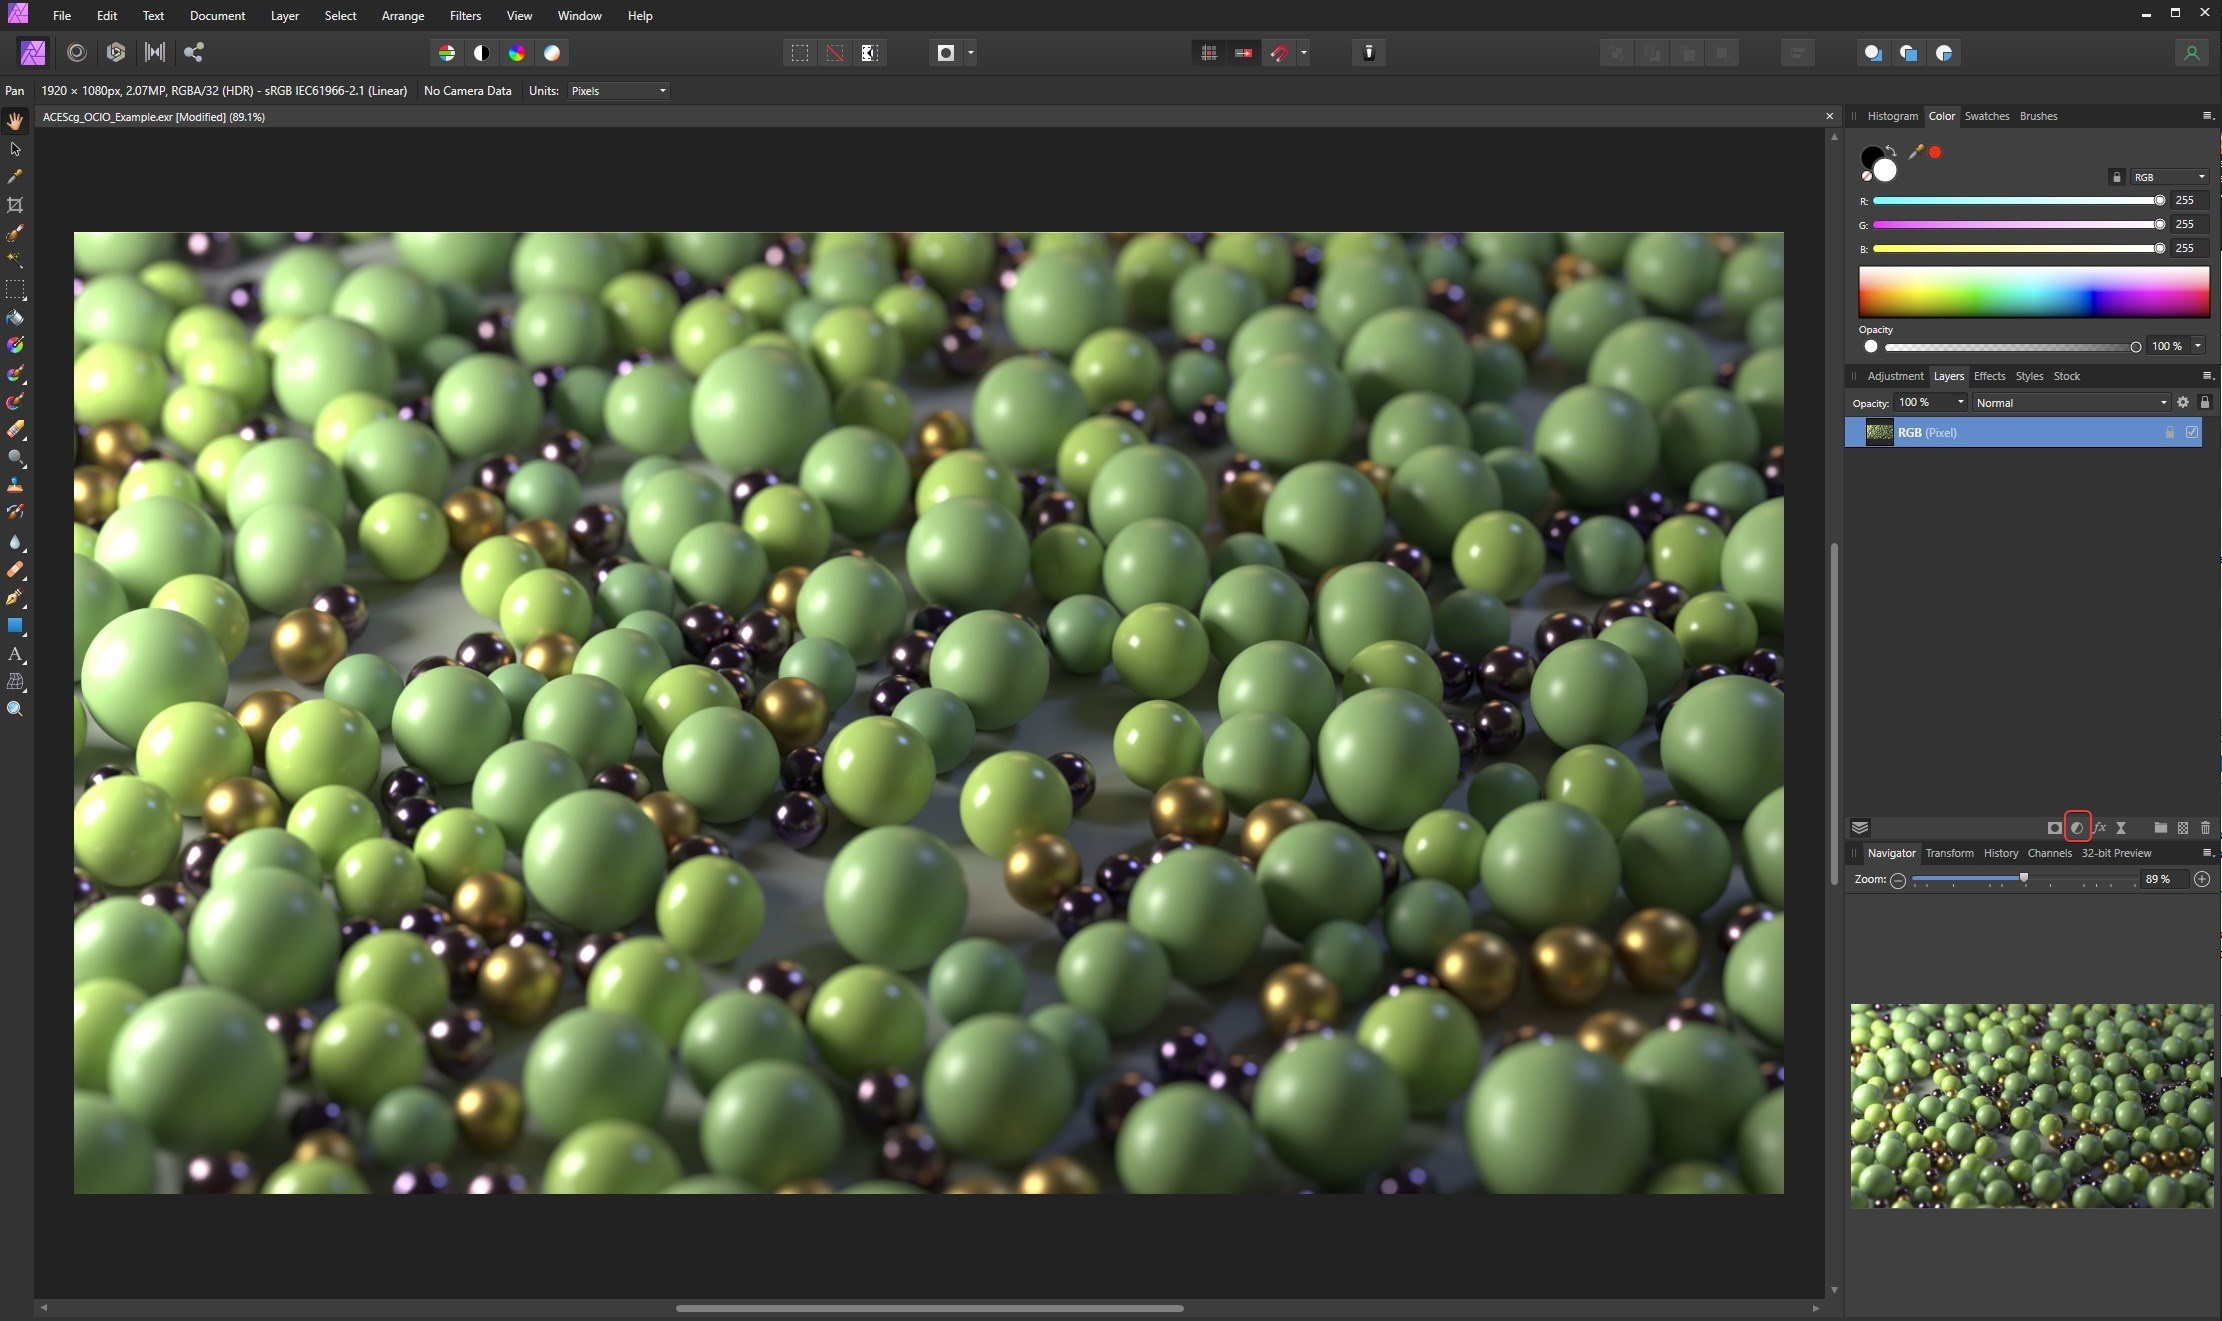
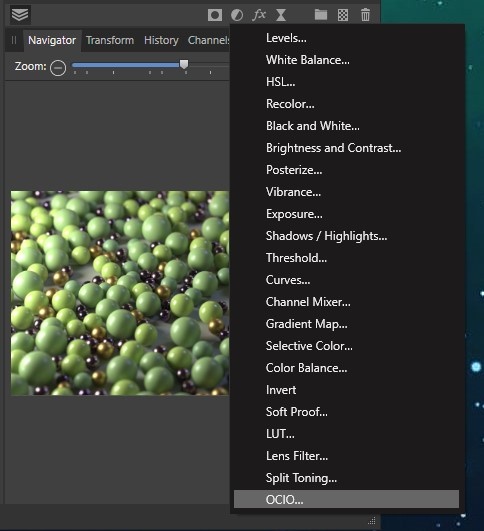
Step 4
...and select the OCIO adjustment.
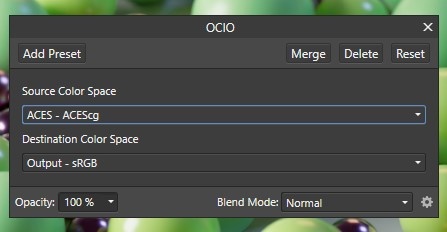
Step 5
Then set your Source Color Space (IDT) to " ACEScg" and Destination Color Space (ODT) to the color space corresponding to the monitor you are working on, in most cases sRGB.
Step 6
Next add a Levels adjustment and apply a Gamma adjustment of 2.
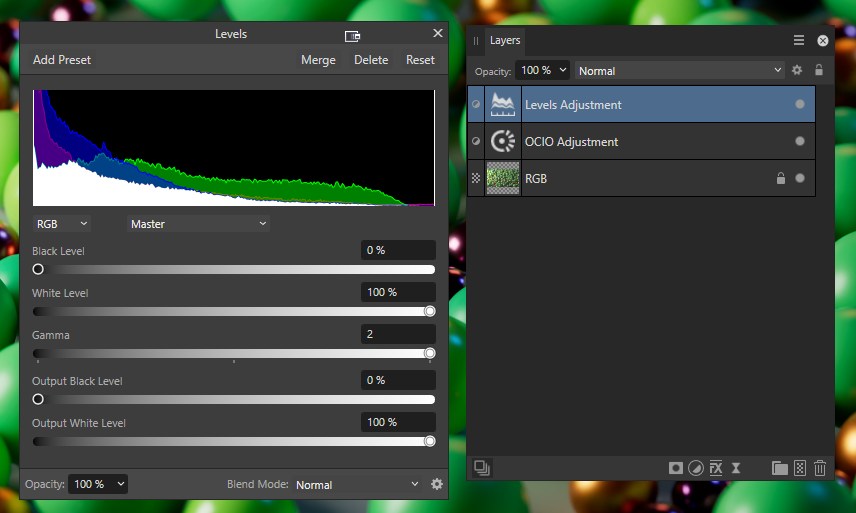
This step is necessary because Affinity applies a double gamma correction. Without this manual gamma adjustment your footage will export incorrectly and not match your view while working inside Affinity.
Step 7
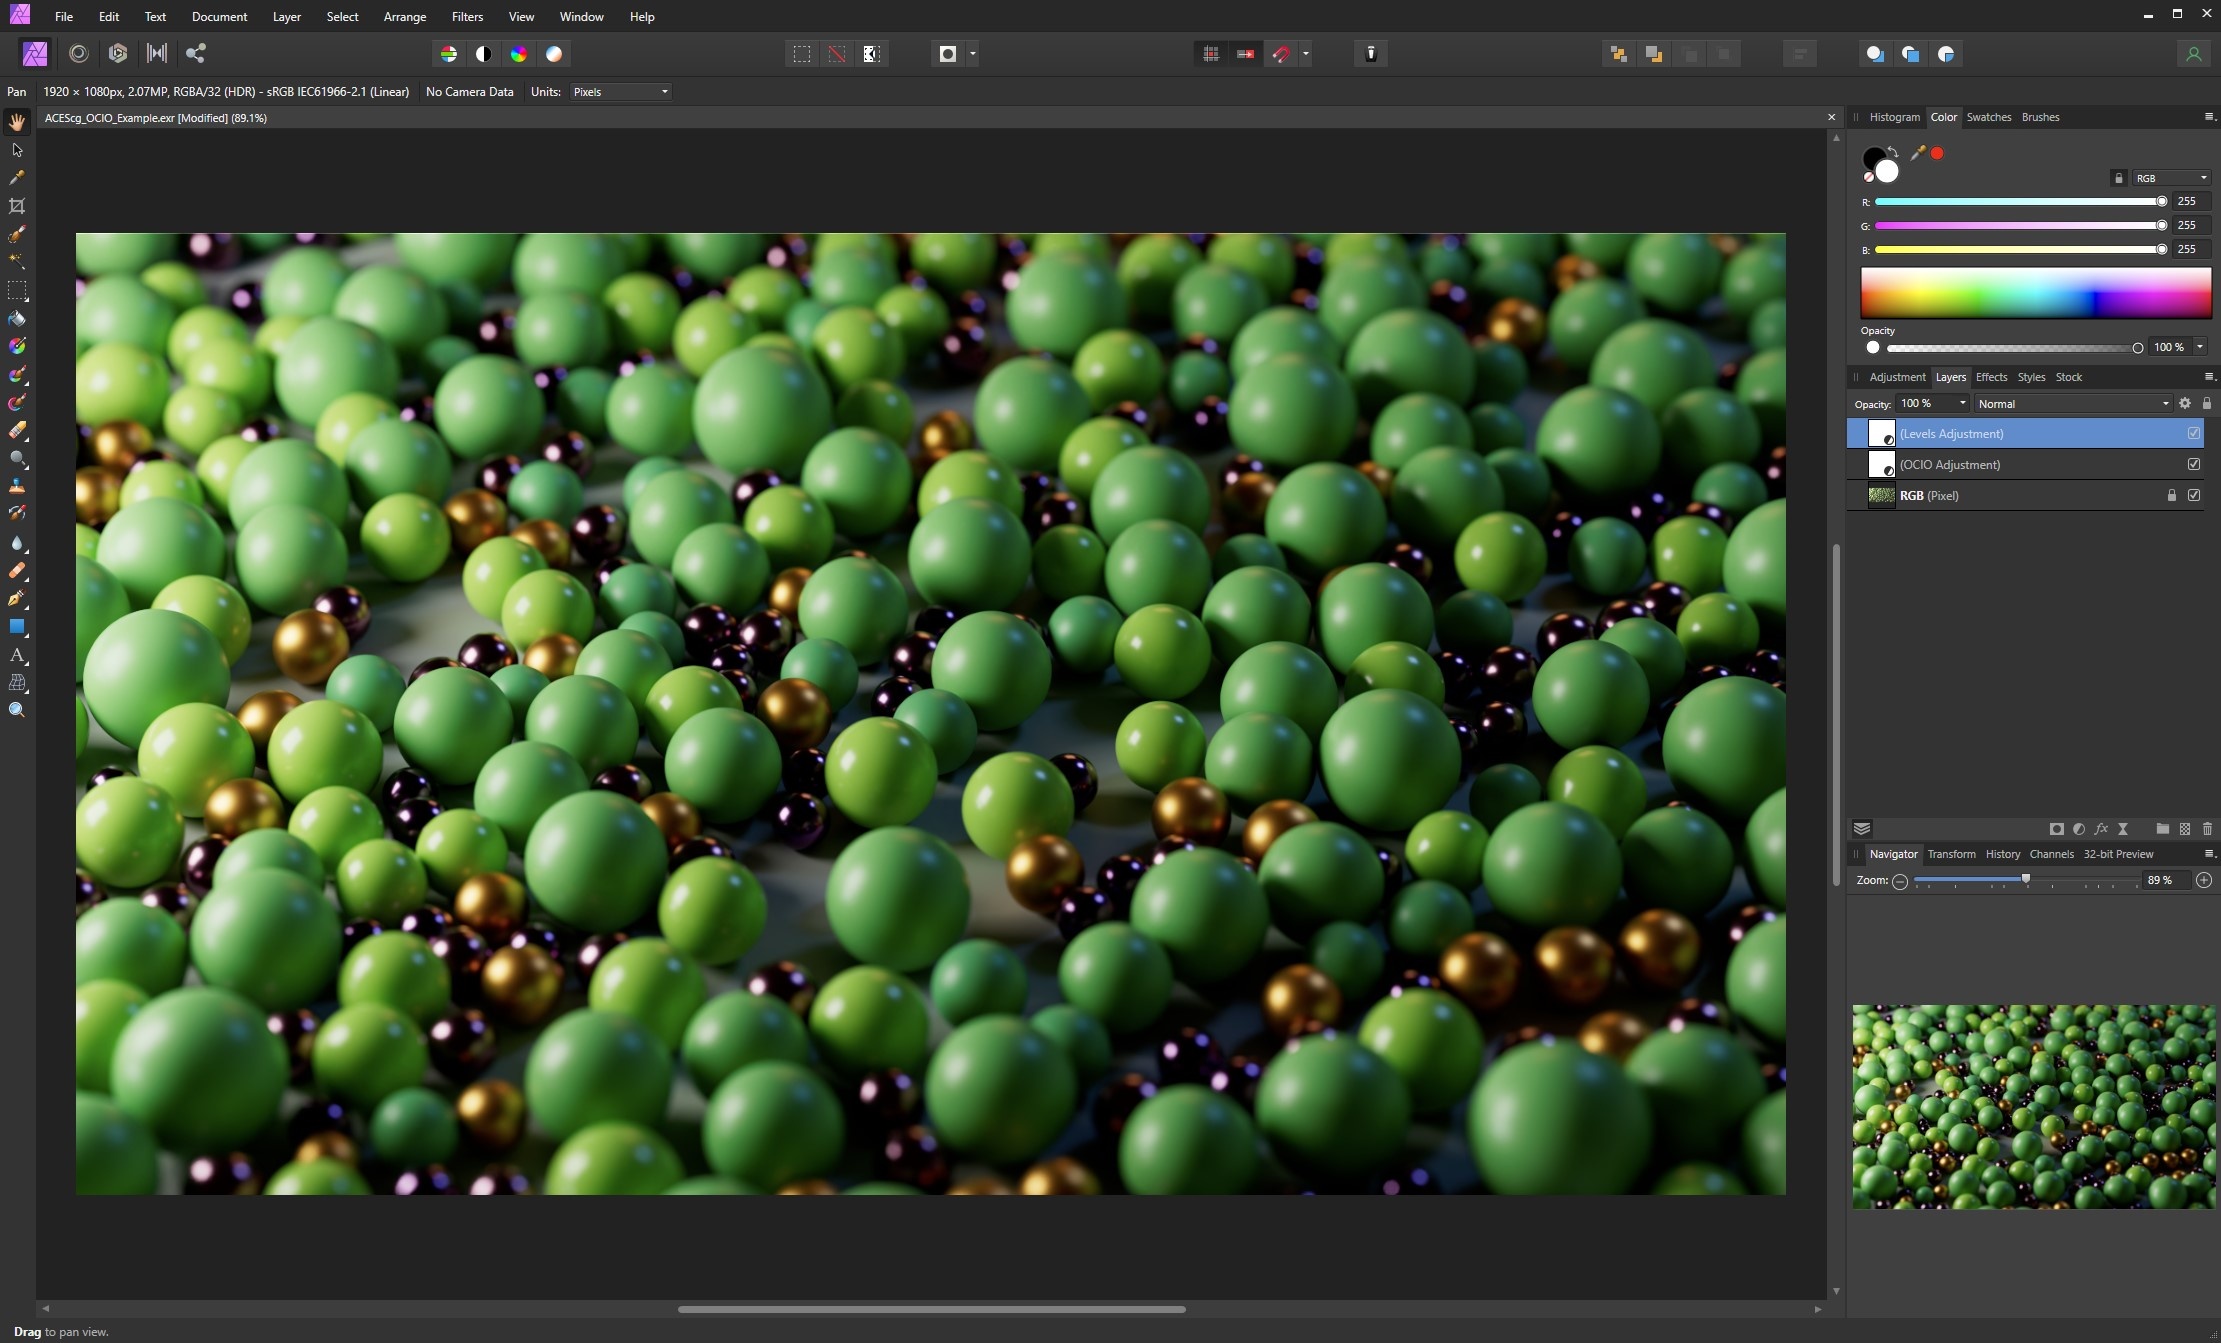
Now your footage is set up properly.
|
|
|
| Before ACES Transform | After ACES Transform |
ACES in Natron
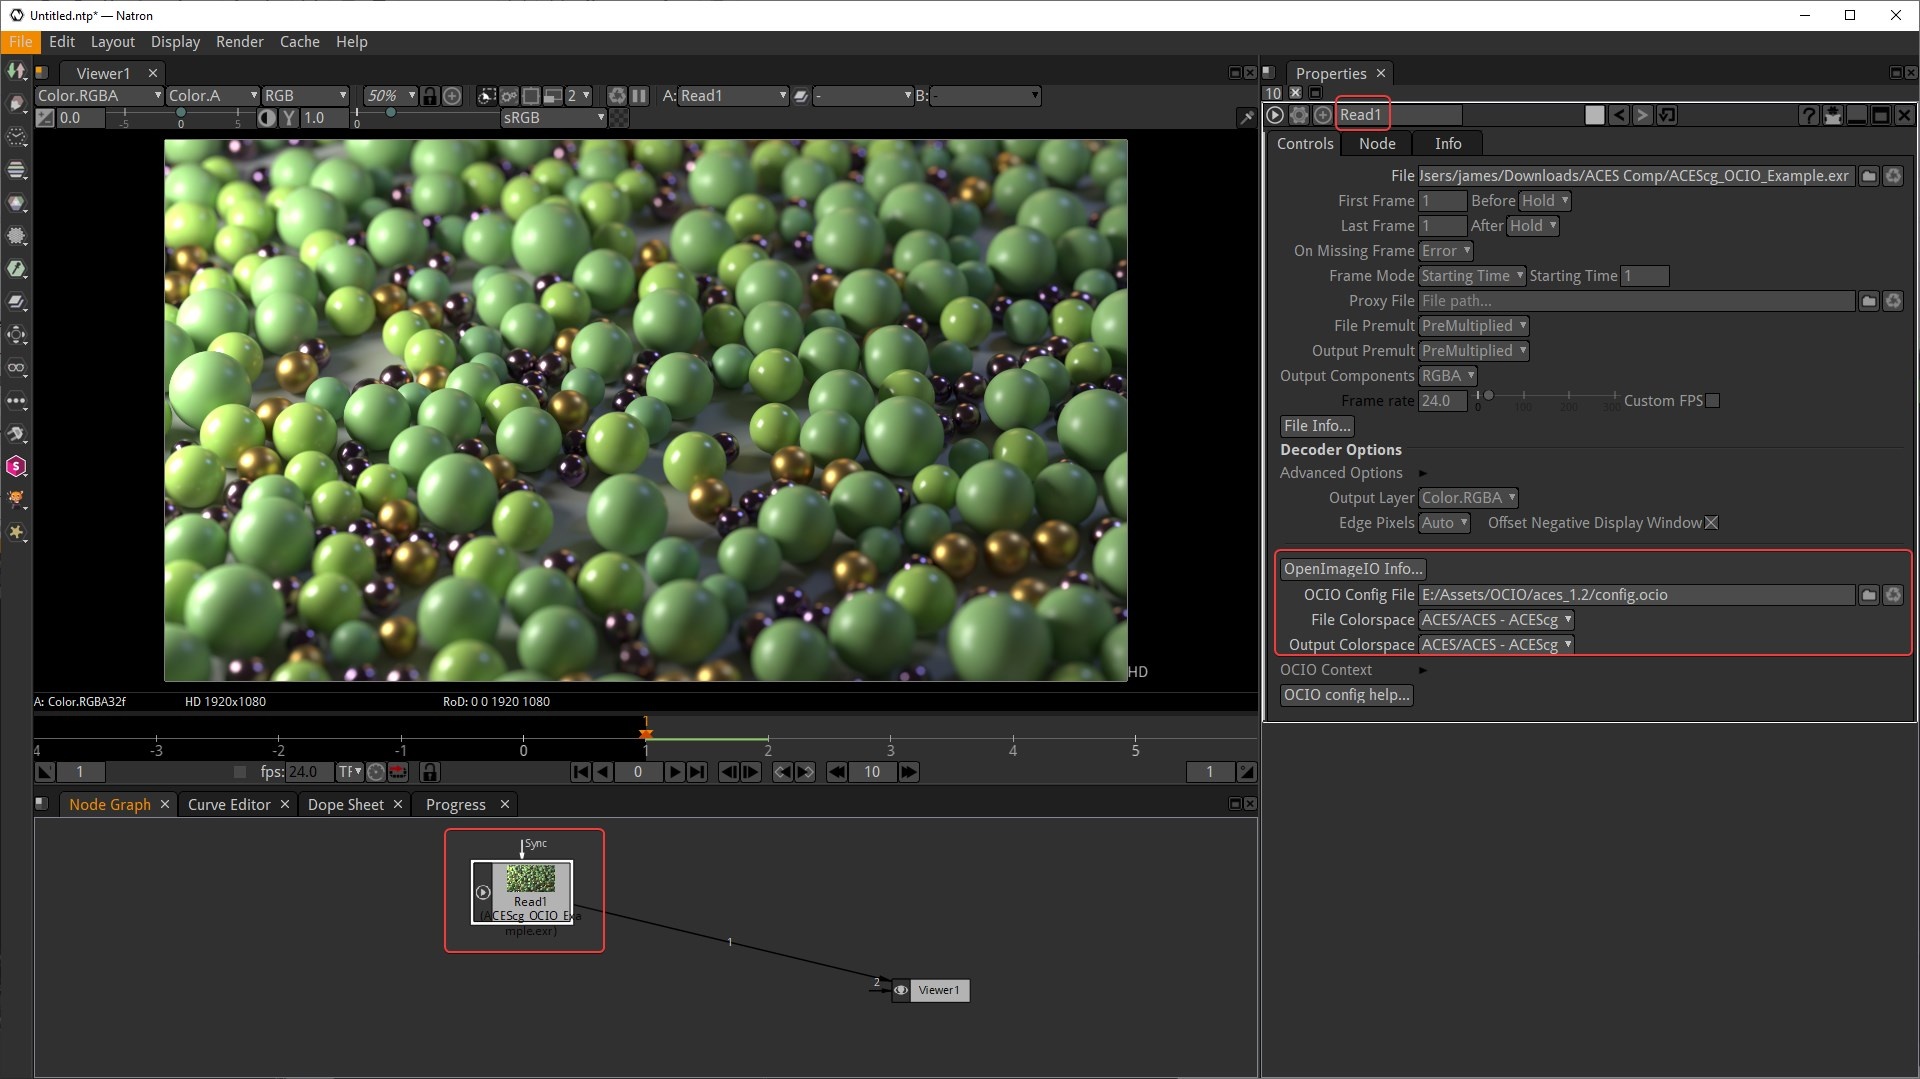
Step 1
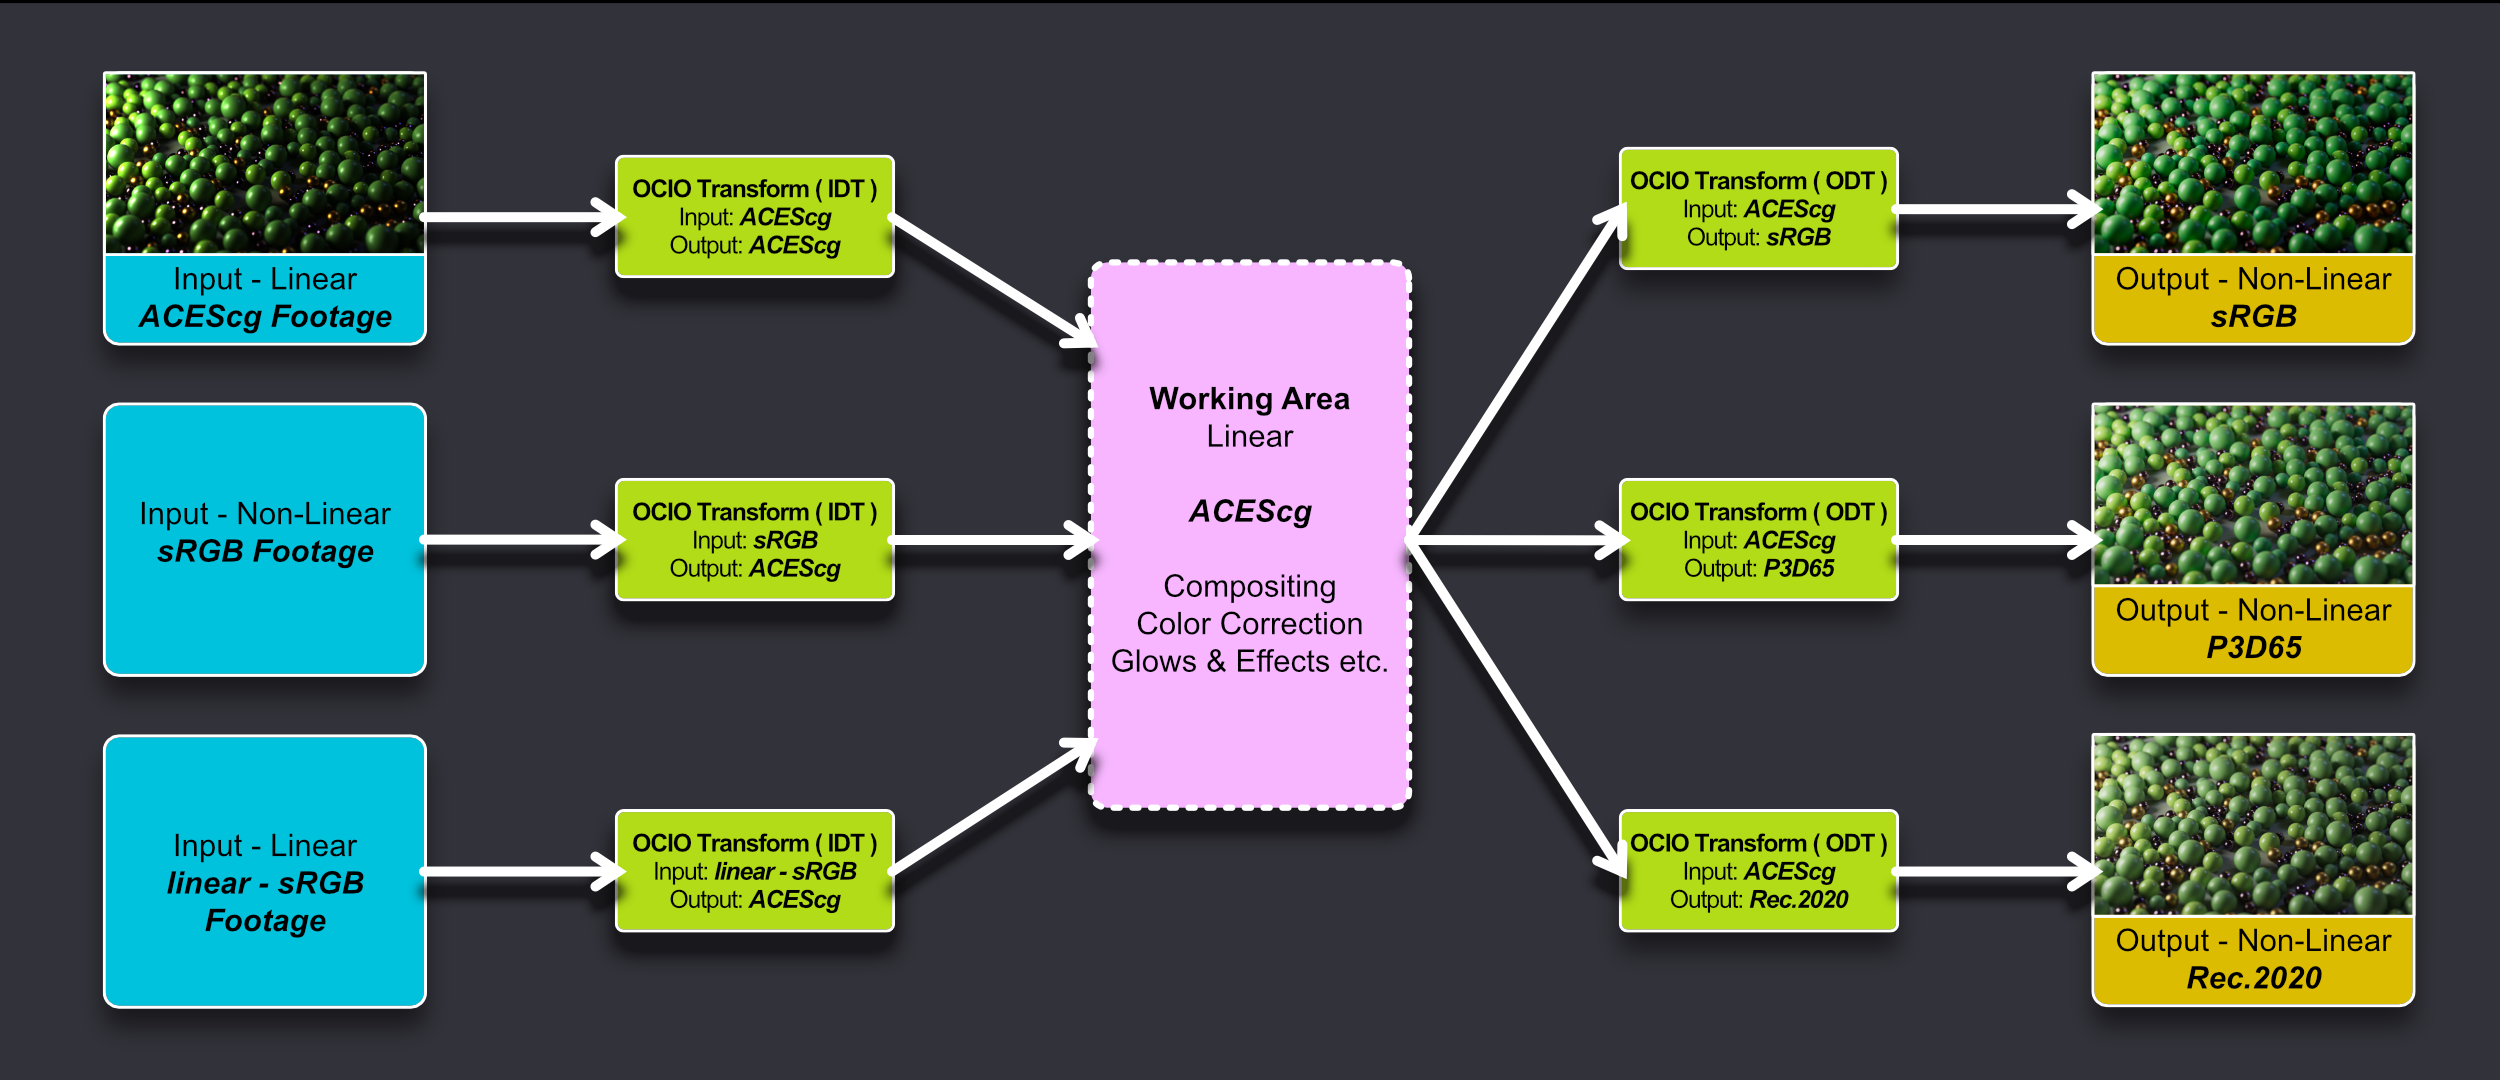
Start by bringing in your footage with a read node. A read node has built in OCIO support but should be left to ACEScg / raw for the input and output transforms so we can work in ACEScg and then transform to sRGB later.
Effectively Natron's read node has the ACES IDT built right in, alternatively you could also use an OCIO colorspace node with the same settings for the same result.
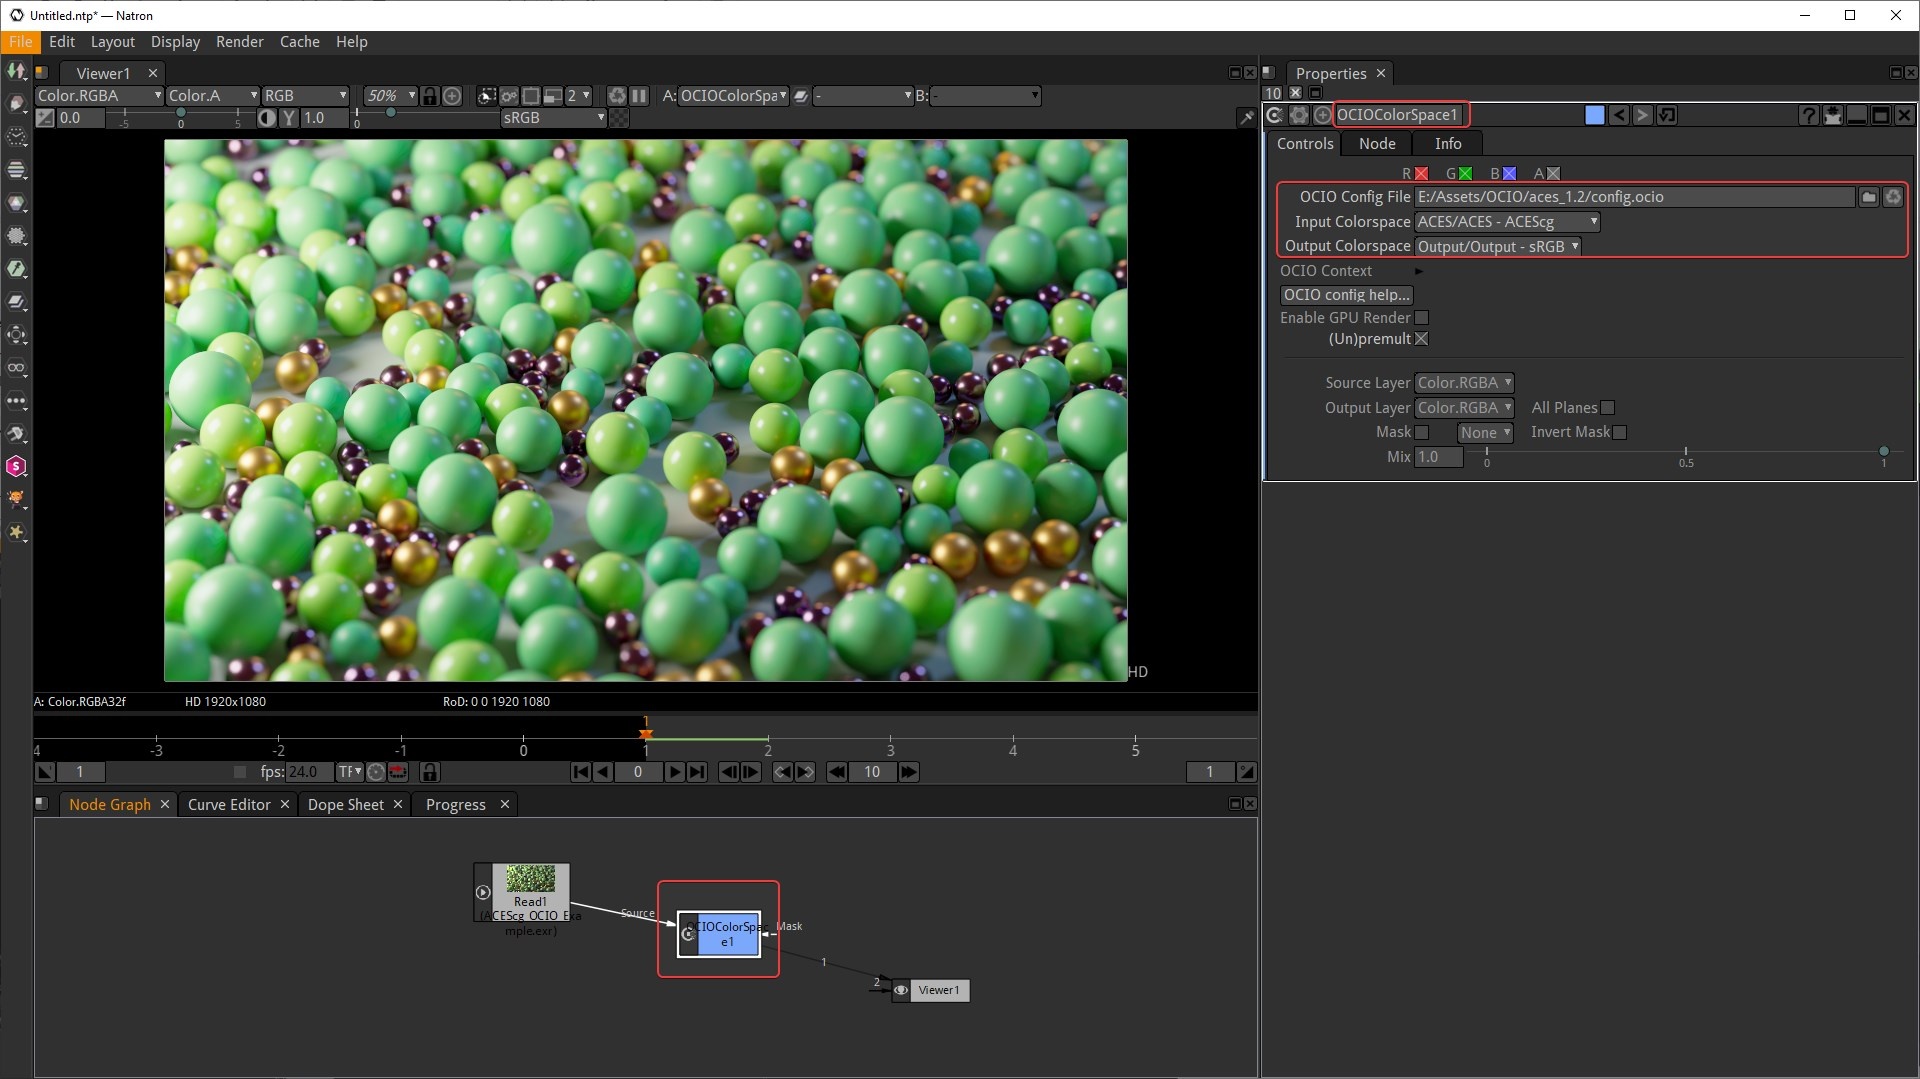
Step 2
Then create an OCIO Colorspace node (this will function as our ACES ODT) and set your OCIO config file. Set your Input Colorspace to ACEScg and your Output Colorspace to sRGB. This color transform should take place before writing out / rendering your footage so the ACES ODT is baked in.
The node graph is now setup properly but by using Natron's default viewer settings we're still incorrectly previewing the footage in the viewer due to an extra sRGB transform being applied and making it far too bright as seen in the example image below. The solution to this is covered in the next step.
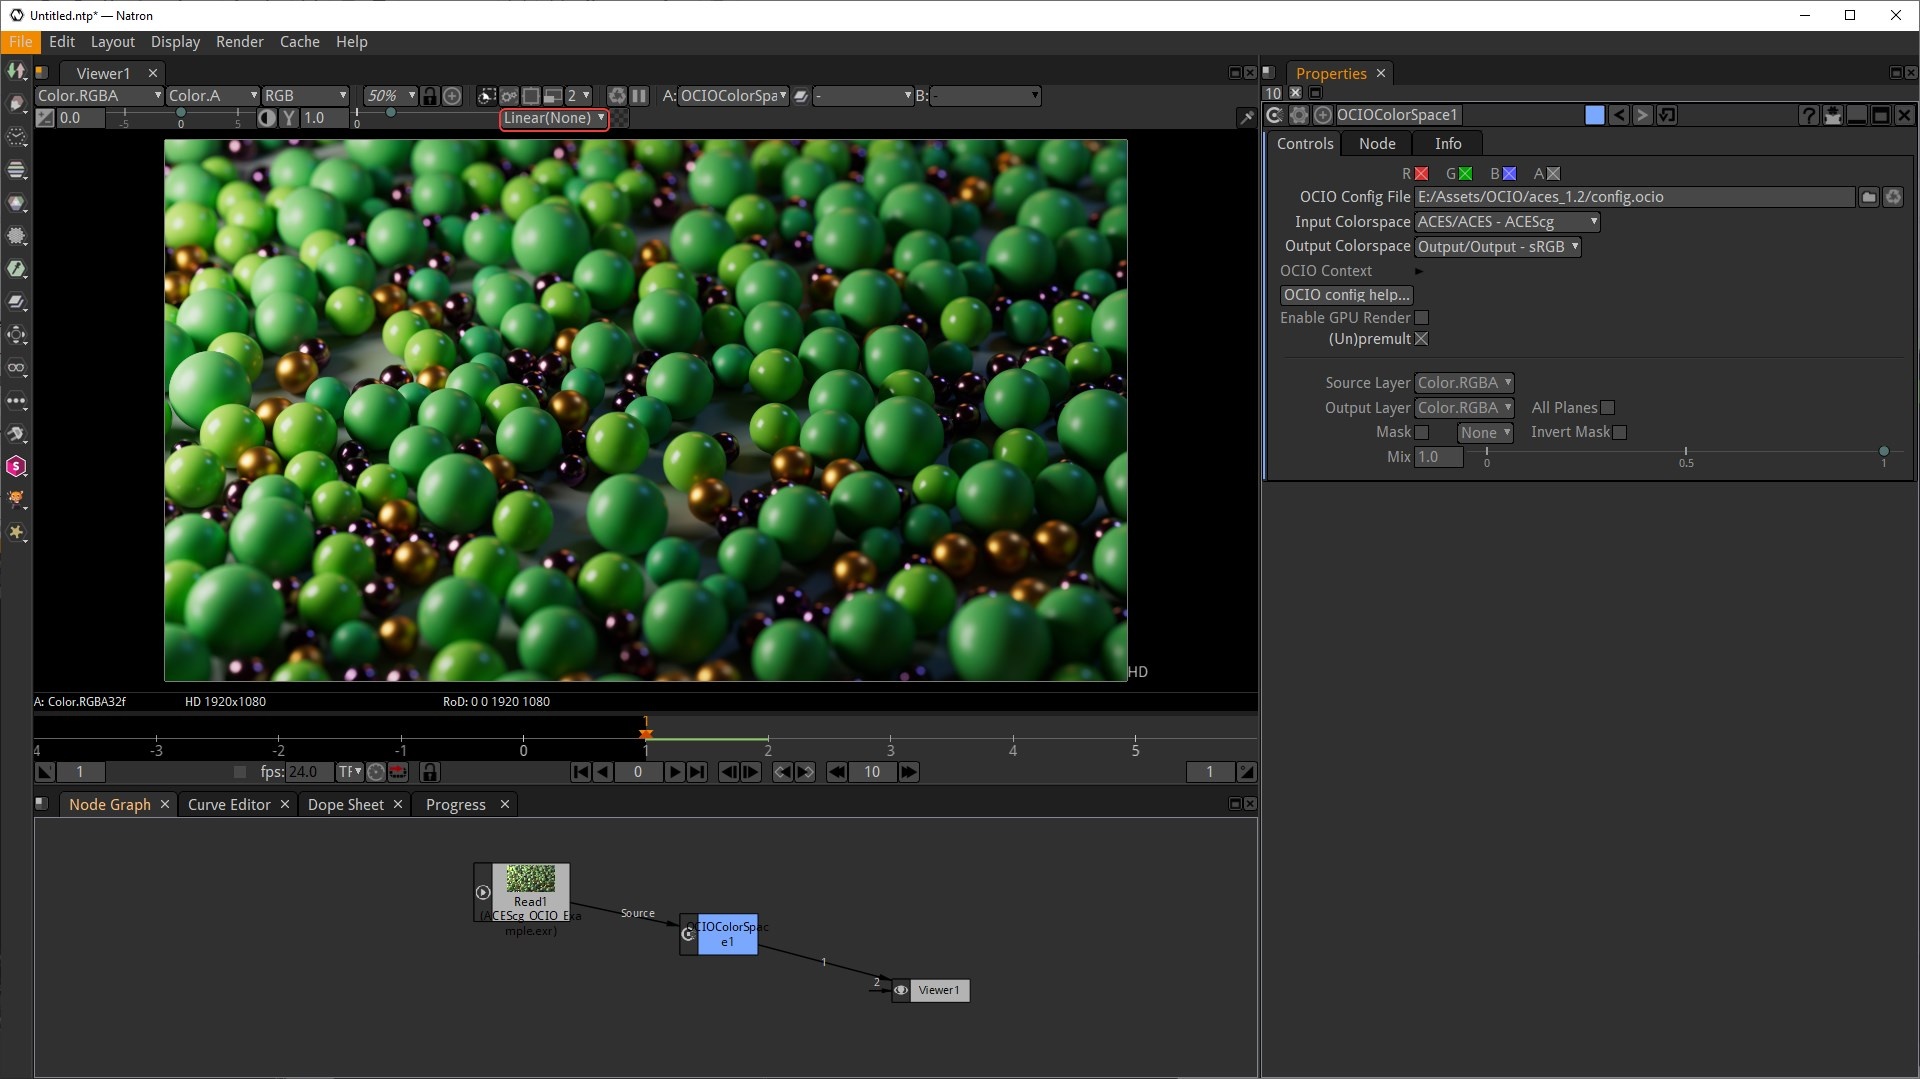
Step 3
To remove the unwanted sRGB transform make certain to set your viewer lut to " Linear (None)" as highlighted in the image below to preview your footage correctly.
With this change now your footage looks correct in the viewer and you can do your compositing work in ACEScg as long as the editing takes place before the ACES ODT.
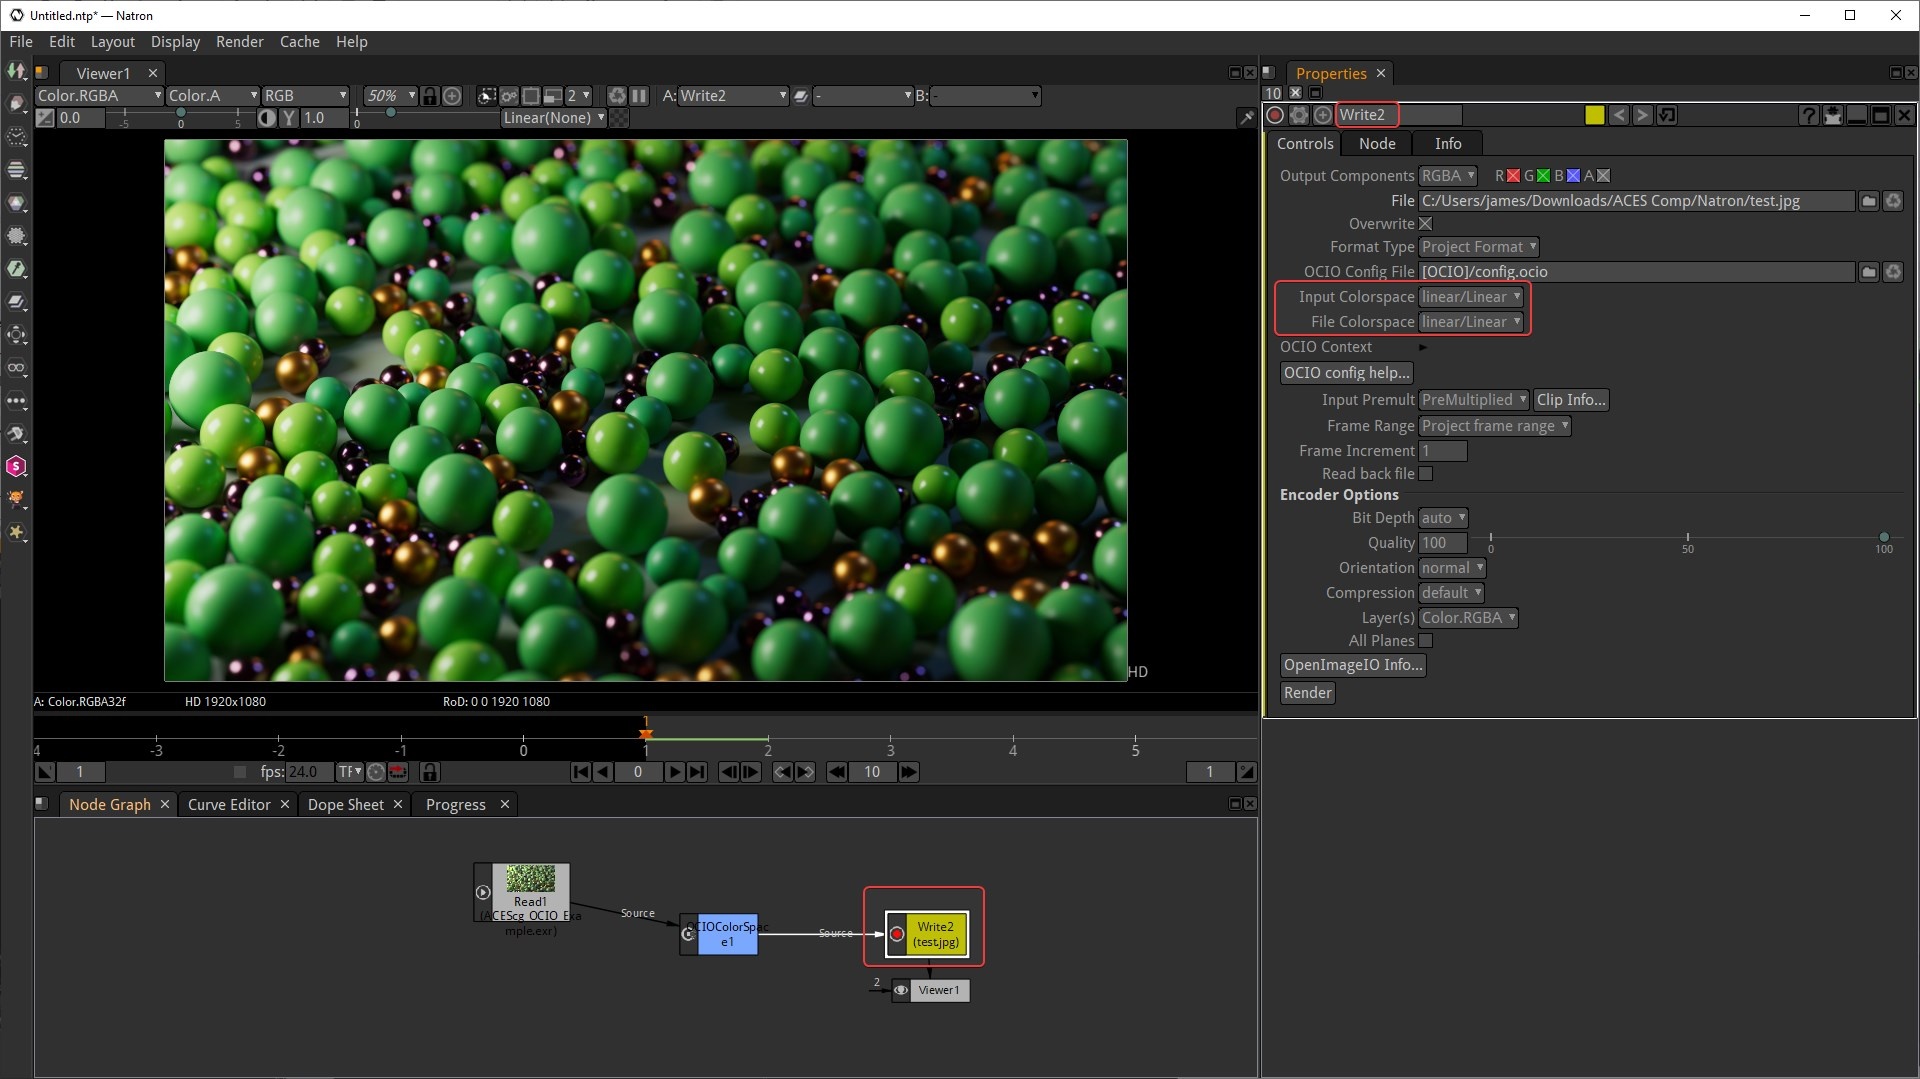
Step 4
Make sure that when exporting your footage with a Write node that you set the Input and File Colorspaces to linear / raw in order to avoid the double sRGB transform as well.
The ACES ODT is already coverting the footage to the appropriate sRGB output.