Photon Mapping for Caustics
Introduction
Photon Mapping works by shooting photons from the lights where as most other effects work by shooting rays from the camera. For effects like caustics this has important quality advantages, the figures below demonstrate how this works.
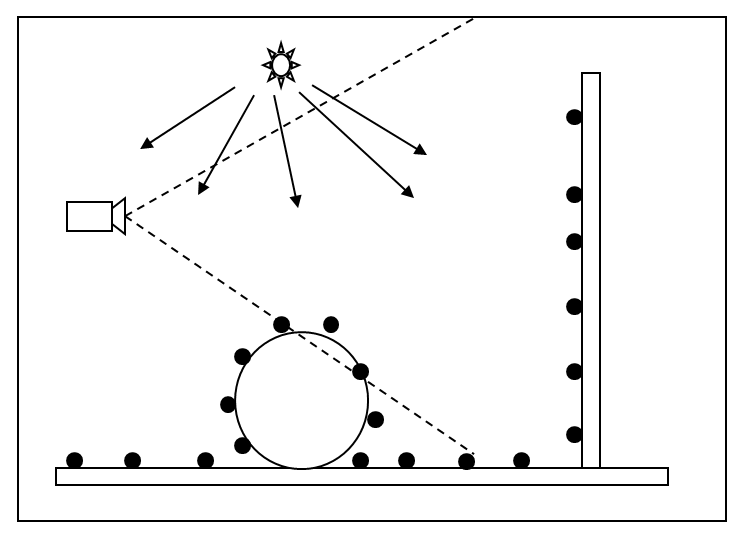
Photons emitted from the light source bounce around the scene and are finally stored on surface
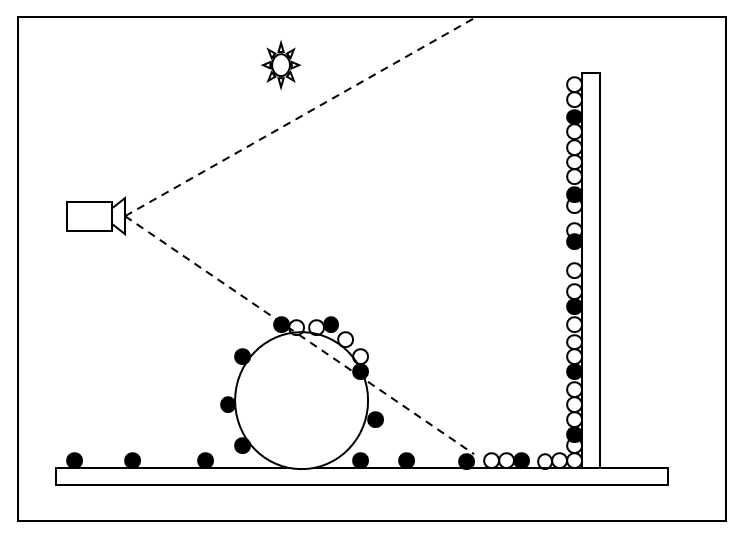
During rendering, final shaded pixels (white) are GI-lit by extrapolating the previously computed photons on the surfaces
The figures also reveal one of the Photon Mapping's weaknesses: it can store photons on parts of the scene that might not be visible to the camera and are, therefore, irrelevant to the final shaded pixels. While certain graphics algorithms exist for improving that situation, Redshift uses the more traditional photon mapping technique which, unfortunately, suffers from this problem. For studio-like scenes (where there is little geometry beyond what the camera can see directly) this might not be an important issue, since most geometry will be visible anyway. But for more complicated scenes (e.g. flythrough through a house containing several rooms and lights), many photons could be required which could be a memory and processing burden.
Photon mapping can recreate both Diffuse GI and Caustics effects. "Diffuse GI" refers to global illumination that is due to rough surfaces while "caustics" are caused by highly reflective or refractive surfaces (like mirrors and glass). All the other GI engines can only capture Diffuse GI. Only Photon Mapping can reproduce caustics.
Photon Mapping Caustics are always enabled! You don't need to set the primary or secondary GI engines to "Photon"!
This is explained in more detail in the relevant section below.
We generally recommend using other GI engines than photon mapping when it comes to achieving diffuse GI as they generally tend to be of higher quality in most cases. And, like mentioned above, you can still use Photon Mapping for caustics – even if you don't have it selected as a primary or secondary GI engine.
Benefits of Photon Mapping:
- Provides a very good degree of control
- For reasonable numbers of photons, it renders fast
Drawbacks of Photon Mapping:
- Photon mapping is an outdated technique
- Photons have to be stored in GPU memory so too many photons can be prohibitive in terms of memory usage
- There are a few settings to tweak and some experimentation might be needed to get a clean result
- Processing time and storage may be wasted for photons that will not end up being visible to the camera
Settings
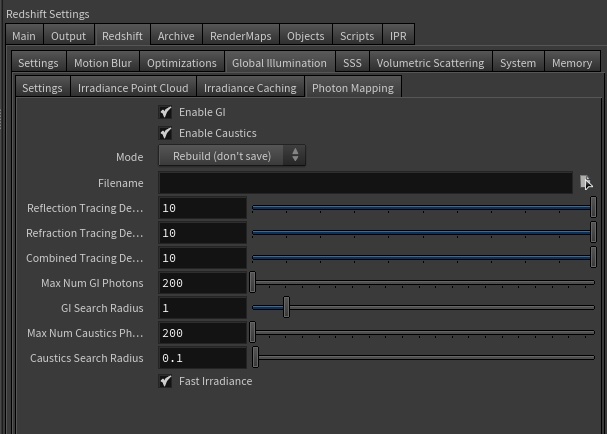
Enable GI / Enable Caustics
These are global switches to enable/disable Diffuse GI and Caustics.
Mode/Filename
When "Mode" is set to "Rebuild (don't save)", new Photon Mapping data will be generated each frame. The data will not be automatically saved to disk.
When "Mode" is set to "Rebuild (prepass only)", new Photon Mapping data will be generated each frame and will save it to the user-specified file. The final rendering pass will be skipped.
When "Mode" is set to "Rebuild", new Photon Mapping data will be generated each frame. After the Photon Mapping processing stage is complete, the results are written to the user-specified file.
Setting "Mode" to "Load" will skip the processing stage and, instead, load the data from the user-specified file.
Because light-emitted photons are independent from the camera settings, fly-through animations can get away with generating the photon map once (on the first frame) and re-using it for all other frames. If, however, photon-emitting lights move or material settings are animated, a new photon map will have to be generated.
Reflection/Refraction/Combined Tracing Depth
These three settings control the number of times that photons may bounce around the geometry. The defaults should work fine for most scenes.
If you are rendering caustics and don't want reflective caustics but only want refractive caustics, you can try limiting the reflection trace depth to zero.
Max Num GI Photons / GI Search Radius / Max Num Caustics Photons / Caustics Search Radius
During rendering, the photons generated during the Photon Mapping pass are used to shade the final pixels. To get a smooth result, each final shaded pixel needs to find its closest photons and blur them together.
The "Search Radius" setting controls the distance around each shaded pixel that will be used to find photons. This number is scene-dependent and is in world units. Larger values mean smoother but blurrier results while smaller values mean sharper but, sometimes, splotchy results. This setting is very closely tied to the number of photons shot from the lights. If lights have been configured to shoot many photons, then usually the search radius can be shrunk without artifacts. If too few photons were shot from lights, the search radius has to be large in order to not be splotchy.
The "Max Num Photons" controls the upper limit of photons that can be stored in the "Search Radius". Larger numbers will allow the photon shooting algorithm store many photons per unit area which means a larger memory requirement and not necessarily an improved image quality! We recommend leaving this setting at the default value.
Fast Irradiance
Searching for photons during final rendering can be time-consuming and might slow the rendering down. "Fast Irradiance" allows blurry effects to use a faster, pre-processed approximation that needs less searching and is, thus, faster. The preprocessing step happens after the photons have been computed and might take a few seconds – but the savings during rendering are worth it, so it is recommended that you leave this option enabled.
How To Use Photon Mapping For Caustics
While Photon Mapping might not be as great of a choice for secondary Diffuse GI, it works very well for caustics.
Setting up Photon Mapping for caustics is similar to using it for diffuse GI, except for the following:
- You can get photon caustics without setting Photon Mapping as a primary or secondary GI engine. In other words, photon caustics can be combined with the Irradiance Cache, Brute Force and the Irradiance point cloud, which are better suited for diffuse GI anyway.
- The object has to be able to cast caustic photons. Please read this doc for instructions on how to do that.
- The object has to be assigned a material that has reflection and/or refraction enabled. If the object is diffuse-only, it won't bounce any caustic photons.
The caustic "Search Radius" is set to 0.1. To get sharp caustics, this setting often has to be fairly small. That also explains why we had to shoot so many photons too. Fewer photons with a larger search radius would have worked too, but the caustics would be blurrier. That might be desirable in some cases.
The caustic "Max Num Photons" was reduced to 30 (from the default 200). Reducing this value forces the renderer to merge photons that are close to each other. This works like follows: if the renderer find more than "Max Num Photons" within "Search Radius", it will keep merging photons together until there are exactly "Max Num Photons" within "Search Radius". Since caustics tends to 'focus' photons in small areas, this can be an important memory optimization: merging photons means fewer photons to be stored in the GPU. And the quality is often not affected. Numbers such as 30-60 typically work well.
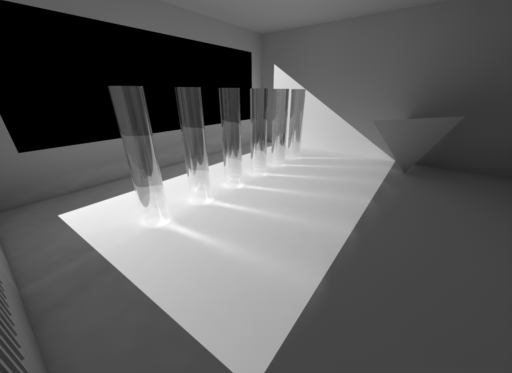
1,000,000 caustic photons. Both reflecting and refracting.
When photons are shot from the lights, some of them will reflect and some of them will refract. The glass cylinders are both reflective and refractive so the image above does both. The strong line patterns you see behind each cylinder are due to refraction. The slight line patterns you see on the wall and on the left part of the image are mostly due to refraction.
When you specify a number of photons (1,000,000) in this case, these photons get distributed between reflection and refraction. Sometimes, though, people only care only about reflection or refraction (not both), for aesthetic reasons. Additionally, disabling either means that the entire 1,000,000 photon budget will go entirely to reflection or entirely to refraction – so each one of these will be cleaner than if both were enabled.
You can force caustics to be refractive or reflective by adjusting the trace depths, as shown in the examples below:

|

|
| Making the photon refraction trace depth 0 means no refractions. Only reflective caustics are generated. | On the other hand, making the photon reflection trace depth 0 disables reflections so only refractive caustics are generated |
Deprecated
Click here for deprecated Photon Mapping for GI:Deprecated - How To Use Photon Mapping For Diffuse GI
Like mentioned earlier, Photon Mapping can be used for Diffuse GI and Caustics.
To enable Photon Mapping for Diffuse GI you first have to select it as a primary or secondary GI engine. Using Photon Mapping as a primary GI engine is typically not recommended because there are often splotchy interpolation artifacts and darkening near corners. These artifacts, though, are much less important to secondary GI bounces, so Photon Mapping can still work nicely as a secondary GI engine and combined with primary GI engines like the Irradiance Cache or Brute-Force. Having said that, setting Photon Mapping as the primary GI engine has one benefit: it can be useful for debugging photon mapping issues. For example, you can use it to see if the scene has enough photons for some other primary Gi engine (e.g. Irradiance Cache) to work with.
After selecting Photon Mapping in the GI engines, the second order of business is making sure some photons are shot by lights! You do that by going to the light options under the "Photon" section. There separate controls for Caustic and Global Illumination (i.e. Diffuse GI). In this case we care about "Global Illumination".
So how many photons are needed per light? This depends on several things:
- How far away is the light from the geometry
- How bright the light is
- How 'hidden' it is from the geometry
Typically, if a light is far away, very bright or hidden behind other objects, its number of photons has to be increased. Not shooting enough photons means that parts of the geometry will not receive enough of them and the final GI results will be splotchy.
The images below show a simple test scene with a fairly distant point light emitting photons. In these images, photon mapping was selected as the primary GI engine in order to visualize the photon density. To give you an impression of the scene scale, the sphere has a radius of 1.0 world unit. Also, please note that the photon mapping reflection trace depth was set to 1. I.e. the photons are allowed to bounce only once. Setting it to zero would produce no photons.
Below we show how shooting different numbers of photons from the light and adjusting "Search Radius" affects the final result.
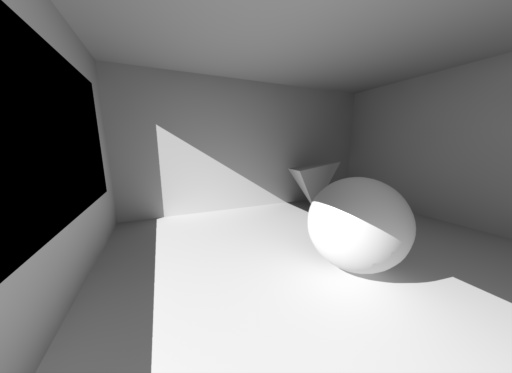
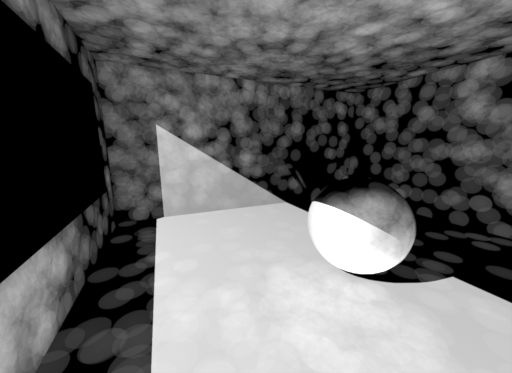 | 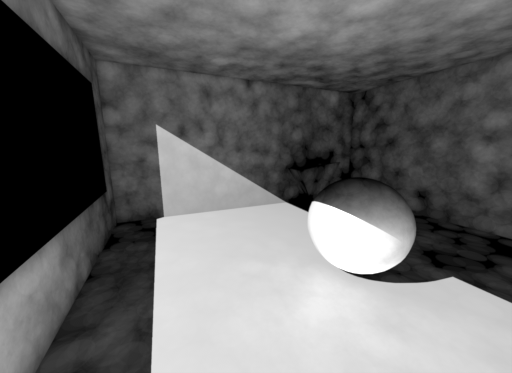 |
| 10,000 Photons. Search Radius set to 0.2. The density is extremely low - individual photons can be seen! | 100,000 Photons. Search Radius set to 0.2. An improvement over the last image, but still the results are very splotchy. |
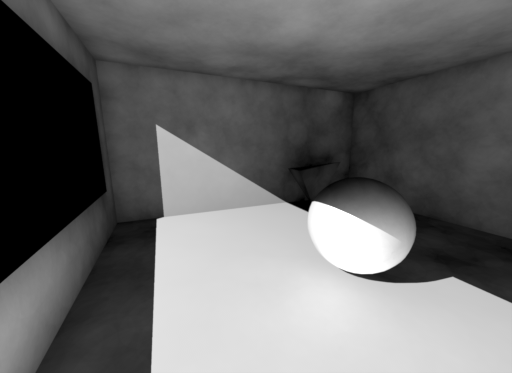 | 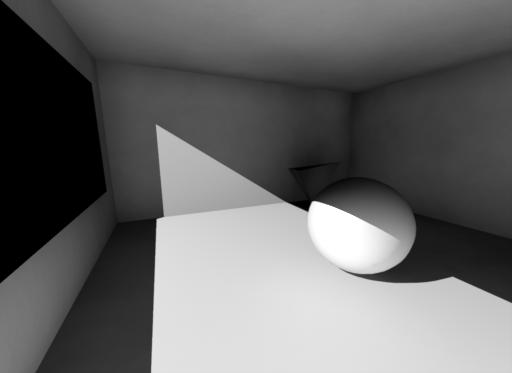 |
| 100,000 Photons. Search Radius was now increased to 0.4. Increasing the search radius blurs the results | 100,000 Photons. Search Radius increased again to 0.8. The result is now much smoother. |
The last image is an improvement over the previous images but is still pretty splotchy. It also has other artifacts too. For example, there is darkening in the corners. Also, smaller objects (like the upside-down pyramid behind the sphere) seem to not receive enough lighting and look too dark. These are problems inherent to the traditional photon mapping technique. If we wanted a more accurate result we would have to shoot more photons and shrink the search radius.
However, for this particular tutorial, we don't intend to use photon mapping as a primary GI engine but as a secondary GI engine. A thing to remember regarding secondary GI is that it doesn't have to be perfect. When combined with a primary GI engine such as the irradiance cache, it can still produce clean results. Below we show what happens if we use Irradiance Cache as the primary GI engine and Photon Mapping as the secondary GI engine.
The photons are now used as the secondary engine and Irradiance cache is used as the primary engine.
Why is the image brighter? Remember that, in this example, the photon mapping reflection trace depth was set to 1. This means that the secondary GI already contains 1 bounce of GI. If we weren't using photons for the secondary GI but used Brute-Force instead, we could get an equivalent image by setting "Num GI Bounces" to 1, as shown below:

Irradiance Cache selected as primary GI engine and Brute-Force selected as secondary GI engine. Num GI Bounces set to 1. The results are very close to the previous image
There are some differences between the two images. For example the lighting between the wall and floor on the left part of the image is a bit darker with Brute-Force. The same applies to the lighting under the sphere. The main reason photon mapping looks brighter in these places is because we blurred its results by increasing the photon search radius and this cases some lighting to leak over parts of the scenery that should be darker. Using more photons and a smaller search radius could improve the situation. Try to keep in mind, though, that Brute-Force and the Irradiance Point Cloud are both more accurate techniques for secondary GI than photon mapping so, when using Photon Mapping issues like that might sometimes not be easily fixable.
For reasons like these, we recommend that users don't actually use photon mapping for secondary Diffuse GI, but use the Irradiance Point Cloud or Brute Force instead.