The Irradiance Point Cloud GI Engine
Introduction
When multiple GI bounces are needed, each ray has to bounce a few times around until it reaches a light. Because the ray bouncing happens randomly finding lighting, in some ways, is left to chance. Using more rays improves these chances, which is why increasing the ray counts always produces cleaner results.
The Irradiance Point Cloud attempts to improve the situation by computing a coarse GI approximation on random points around the scene. In some ways it's similar to the Irradiance Cache except:
- It creates points in places that might not be visible to the camera. This necessary because multiple GI ray bounces will very often land on out-of-camera-frustum locations.
- The points don't care too much about creases and detail. This is done to conserve memory and improve computation time.
The figures below show how the Irradiance Point Cloud works
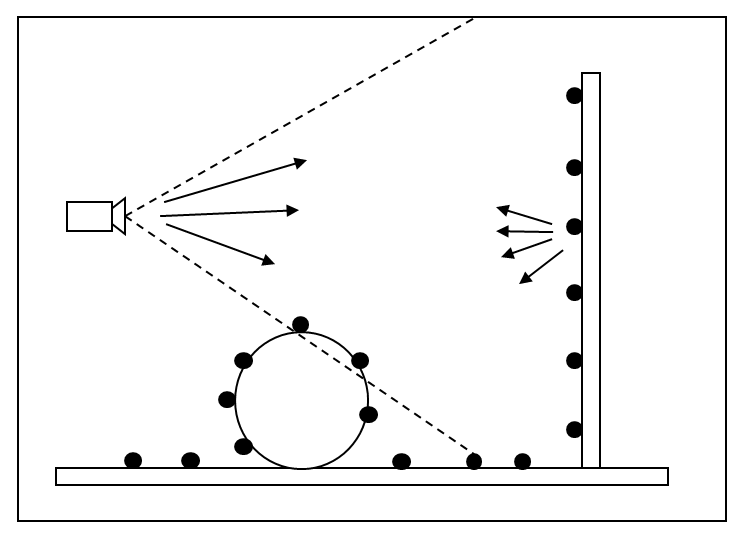
During the irradiance point cloud computation pass, rays are shot from the camera, create points on intersections and are bounced around. That creates a 'blanket' of points around the scene. A coarse GI solution is incrementally computed on each of these points.
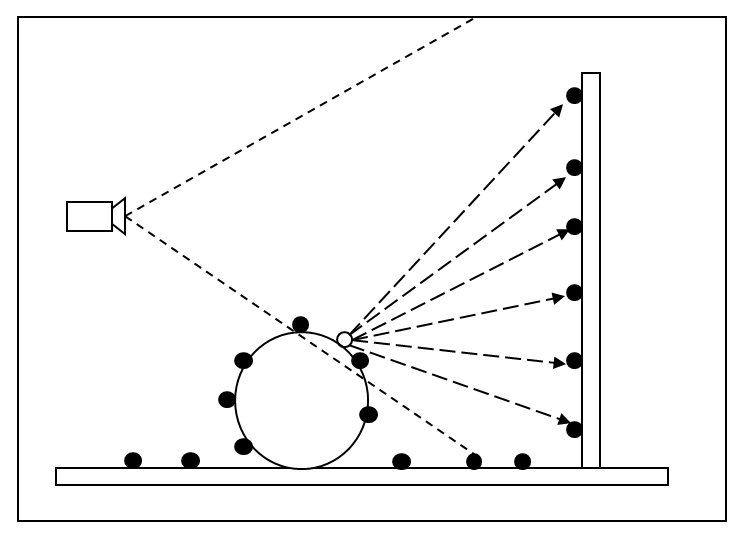
During Irradiance Caching or Brute-Force primary GI, these points are used to compute a smoother GI result. Here, the lighting of an irradiance cache point (shown in white) is computed using the irradiance point cloud.
Looking at the second figure, if we didn't have the point cloud enabled, the irradiance cache point (white point) would have to shoot the rays shown as dashed arrows and then bounce those rays off the wall. Finding lighting this way would be hard. Using the irradiance point cloud, instead, each of these dashed array rays gets back lighting that is of higher quality.
Even though each one of these points contains a coarse lighting solution (meaning it can be fairly noisy), that is often not a big issue with secondary GI lighting. The same applies to the Photon Map when it's used as a secondary GI engine: it might be a bit splotchy, but the final result can still be clean.
Later in this document there are pictures that shown the kind of visual benefit you can expect from the Irradiance Point Cloud.
Pros
- Helps make Brute-Force and Irradiance Caching faster and cleaner
- Certain very difficult lighting scenarios can only be rendered with this technique! (i.e. they would take an extremely long time with purely brute force techniques)
Cons
- Requires some storage (but, typically, not much)
- There are a few settings to tweak so a bit of experimentation is required.
- Only provides a benefit when multiple bounces are needed, if the scene contains lots of lights or when the lighting conditions are difficult
Settings
Mode/Filename
When "Mode" is set to "Rebuild (don't save)", Redshift will compute a new irradiance point cloud from scratch (for each frame) but will not save it to disk. The frame will be rendered to completion.
When "Mode" is set to "Rebuild (prepass only)", Redshift will compute a new irradiance point cloud from scratch (for each frame) and will save it to the user-specified file. The final rendering pass will be skipped.
When "Mode" is set to "Rebuild", Redshift will compute a new irradiance point cloud from scratch (for each frame) and will save it to the user-specified file. The frame will be rendered to completion.
When "Mode" is set to "Load", the computation stage is skipped and the data is loaded from the user-specified file. The frame will be rendered to completion.
Number of frames to blend
The "Number of frames to blend" parameter is only enabled when the "Mode" is set to "Load". It allows averaging the results of multiple irradiance point cloud files (one for each frame) together in order to improve any flickering effects that might be present because of insufficient quality settings and/or difficult lighting situations. Please refer to this section below for more information on how to use the "Rebuild (prepass)" and "Load" modes. Since this mode has to do with loading and blending multiple frames before rendering, it's only available for the "Load" mode and is grayed out for the "Rebuild" modes.
Irradiance Point Cloud data is view-dependant which means that it has to be re-generated when either the camera or any objects move. It also has to be regenerated if lights change (position or intensity) and if materials are adjusted.
Show Calculation
Due to the way the irradiance point cloud works, it can be very hard to directly visualize it, unfortunately. So what this option does is show the color results of the rays shot from the camera. For this reason, it looks like progressive rendering.
The overhead of this option can be significant on some very simple scenes so disabling "Show Calculation" can make the computation a bit faster.
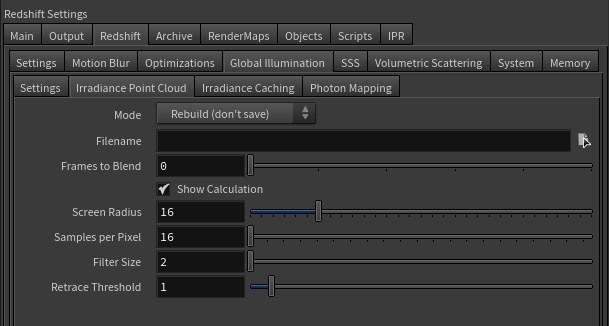
Screen Radius
As mentioned, Irradiance Point Cloud stores points around the scene. It can't store a point for each ray that was shot from the camera because doing so would generate an extremely large number of points for high-resolution images. Instead, it uses a screen-space metric to space out these points and the "Screen Radius" parameter refers to this spacing in pixels.
This parameter affects two things:
- The used videocard memory. Setting "Screen Radius" to larger values means that fewer points will be created and, therefore, less videocard memory will be used.
- How often the results can be used by the primary GI engines. If the points are very far apart (because of a large screen radius), then the primary GI engines (Irradiance Cache, Brute-Force) will not use them as often (and depending on the "Retrace Threshold" parameter). So this can effect the performance of these two primary GI engines. Therefore, lower screen radius values can translate into better rendering performance.
Often a setting of 8 or 16 works fine, if your render is of a high resolution (2K or larger) you can try higher values like 32 or 64.
If your videocard has enough VRAM (4GB or more), we strongly suggest using relatively low screen radius values, such as 8 for the performance reason explained above.
Samples Per Pixel
This parameter controls the quality of each point. In some ways, this works like "Num Rays" for Brute-Force or the Irradiance Cache, i.e. larger values produce smoother results. Scenes that are fairly well-lit (large light sources or several of them covering most surfaces) can use values such as 8 or 16. Harder lighting scenarios (small bright light sources or lighting coming through small openings) will need higher settings such as 32 or 64.
The "Screen Radius" can also play a role in the final point quality. If you increase "Screen Radius" there are fewer points so each point will receive more rays and, hence, be smoother.
Filter Size
As shown in the figures near the top of this document, the Irradiance Point Cloud is used by Brute-Force or the Irradiance Cache. When rays shot by Brute-Force or an Irradiance Cache point hit a surface, the closest Irradiaince Point Cloud points are found and used. The "Filter Size" controls how many of these "closest points" the algorithm should use.
Larger numbers smooth out the points but take longer to render. The default 2 value should work for most cases. We generally recommend smoothing out the Irradiance Point Cloud using more "Samples Per Pixel" instead of increasing "Filter Size".
Retrace Threshold
The Irradiance Point Cloud is constructed without much attention to scene detail (creases, corners, etc). This is done to conserve memory. Not doing so would mean creating a very large number of points around corners – like the Irradiance Cache does.
For this reason, using the Irradiance Point Cloud as a secondary GI engine can sometimes create splotchy artifacts near corners or cause light leaks. The "Retrace Threshold" parameter prevents Brute-Force or Irradiance Cache from using points in these places. The larger the "Retrace Threshold" is, the more these points will not be used around corners and creases.
When using Irradiance Cache as the primary GI engine, values such as 1 or 2 as usually sufficient.
When using Brute-Force as the primary GI engine, values such as 2 or 3 are usually sufficient. Brute-Force is a more accurate technique than Irradiance Cache so any artifacts would be more visible. This is why this value has to be higher for Brute-Force than the Irradiance Cache.
How To Use
Using the Irradiance Point Cloud is very easy. All you have to do is select it as a secondary GI engine and (typically) only tweak "Screen Radius" and "Samples Per Pixel".
First, we demonstrate the benefits of the Irradiance Point Cloud.
Both of the scenes shown below were rendered with the primary GI engine set to Brute-Force. "Num Rays" was set to a high number: 4000. There is 1 GI bounce in these scene.
The first image used Brute-Force for the secondary GI engine while the second image used Irradiance Point Cloud for the secondary GI engine. The second image was rendered approximately twice as fast and is cleaner, too!
|
|
|
|
Using Brute-Force as the secondary GI engine. Even with 4000 rays, there is noise everywhere. |
Using the Irradiance Point Cloud as the secondary GI engine. The results are much cleaner and the frame was completed in nearly half the time. |


We will now demonstrate the effect of the Irradiance Point Cloud parameters.
The image below is using "Screen radius" of 4, "Samples per pixel" 8, "Filter Size" 3 and "Retrace Threshold 0". We intentionally made the retrace threshold 0 to demonstrate the splotchy effects near corners. These artifacts exist because the Irradiance Point Cloud was created with a fairly low number of samples per pixel (8), so the points are noisy. The recommended way to fix this issue is to use a larger retrace threshold. For Brute-Force values such as 3 or 4 work fine. For Irradiance Caching, you can use values like 1 or 2. Of course, there might be scenes that might not exhibit such issues – for these scenes you can lower the retrace threshold.
Increasing "Retrace Threshold" means that the primary GI engine will not use the points near corners so, instead, it will have to shoot rays. Shooting rays is slower than simply using points, so increasing "Retrace Threshold" can make the rendering a bit slower during the Irradiance Cache computation stage (if Irradiance Cache is selected as the primary GI engine) or during final rendering (if Brute-Force is selected as the primary GI engine).
|
|
|
|
|
Retrace Threshold set to 0. With 8 samples per pixel, the |
Now the samples per pixel was raised to 64 which make |
Using 8 samples per pixel but a retrace threshold of 3. |

The corner artifacts will typically be as large as "Screen Radius". This means that reducing "Screen Radius" will shrink the artifacts. Smaller artifacts also mean faster rendering times because "Retrace Threshold" will not have to work as hard.
Because the Irradiance Cache can also generate corner artifacts (if its "Num Rays" is low or "Adaptive Error Threshold" is too high) it can sometimes be a bit confusing understanding which GI engine is responsible for these artifacts. There is a fairly simple rule of thumb: if you set your "Retrace Threshold" properly (i.e. 1 or 2 for the Irradiance Cache) and you are seeing corner artifacts then it's most likely that it's the Irradiance Cache itself that is responsible – and not the Irradiance Point Cloud.
The pictures below use the Irradiance Cache as the primary GI engine. "Retrace Threshold" was set to 1.
|
|
|
|
Using Irradiance Cache as the primary GI engine. "Num Rays" set to 1000 and "Adaptive Threshold" set to 0.001.
|
The Irradiance Cache "Num Rays" was raised to 4000 and the artifacts are now gone. |


How to use "Rebuild (prepass)" and "Load" modes to improve/eliminate flickering artifacts
Irradiance point cloud prepass/load modes are mostly useful when combining it with brute-force GI. If you are using the irradiance cache for your primary GI engine, then you should use the irradiance cache's own prepass/load modes. While it would be possible to do multiple passes (create irradiance point cloud files with prepass, then set them to load/blend and then create the irradiance cache files, etc), this would be too elaborate and, in most cases, will provide minimal benefits.
When combining the irradiance point cloud with brute-force GI, slight flickering artifacts might appear during animations. These artifacts are quite rare and mostly happen if the lighting conditions are very hard and not enough "Samples per pixel" have been used.
If you encounter any such artifacts, you can try the following procedure:
- First, select "Rebuild (prepass)" and select an appropriate filename – or use the default filename.
- Render your animation. During rendering, one irradiance point cloud file for each frame will be generated but the final rendering pass will be skipped.
- Then, select the "Load" mode and adjust the "number of frames to blend" parameter. Render your animation. For each frame, Redshift will now load a number of 'neighboring frame' irradiance point cloud files, blend them together and use the blended result to render the final frame. Because of this inter-frame blending, any temporal artifacts (flickering) will be reduced or even eliminated.
The "number of frames to blend" parameter controls how many 'neighboring' irradiance point cloud files will be loaded and blended together. For example, a setting of 2 means "load the previous two and next two frames". So, for this example, the algorithm will blend 4 neighboring frames plus the current frame, i.e. 5 frames together. A setting of 1 means "load the previous and next frames", so 3 frames will be blended together.
Larger numbers of blended frames means less flickering. However, blending too many frames together can create a light 'ghosting' or 'lagging' effect in scenes with fast moving objects or lights. If your irradiance point cloud settings are properly adjusted, a setting between 2 and 4 should be sufficient to improve artifacts to the point of either being completely eliminated or barely visible.
Irradiance point cloud files can be large so be sure to select a folder/drive that has enough free space.
Memory Considerations
If you are rendering very high-resolution images and "Screen Radius" is low, you might get an error regarding the points not fitting in the allotted GPU memory space. The message will read like this:
Irradiance point cloud doesn't fit in VRAM. Frame aborted. Please either increase the 'Screen Radius' parameter or the irradiance point cloud memory budget in the memory options
Like the message suggests, you have two options:
- Increase "Screen Radius". This should drastically reduce the memory requirements and, for high resolution images, will not affect image quality.
- Increase the Irradiance Point Cloud memory in the options. If your GPU has enough memory, you can try increasing the 64MB to something like 80MB or 120MB
To edit the Irradiance Point Cloud memory budget, go to Redshift options, Memory Tab and modify the parameter called "Irradiance point cloud working tree reserved memory". The parameter units are in megabytes.