Table Of Contents
|
|
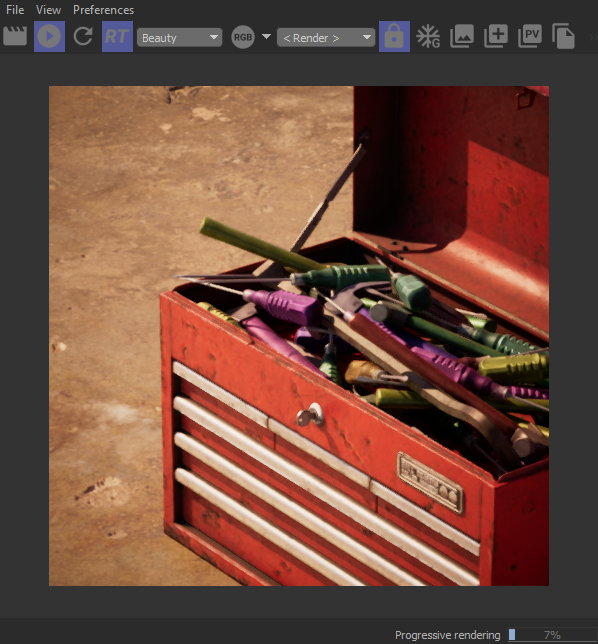
When enabled, Redshift RT will present your scene in a temporary state without waiting for all shaders and textures to finish processing, this allows you to get visual feedback more quickly at the expense of visual accuracy. The scene will update automatically as each remaining shader and texture finishes processing in the background until the entire scene is fully processed and up to date. During this time, you can still navigate through and interact with your scene. While in the Asynchronous Asset Streaming phase, the status bar shows "Preview Rendering" instead of "Progressive Rendering."
Asynchronous Asset Streaming accomplished this in two ways, by temporarily using a clay shader for any material that has yet to be compiled and by temporarily using a low resolution dummy texture until the high resolution texture is compressed and displayed.
When disabled, Redshift RT will wait until all shaders and textures are processed before updating the render view.
The examples below illustrate the process of Asynchronous Asset Streaming with the progress overlay enabled. First your scene will start with a generic clay shader look. Then, as shaders finish compiling, the scene will start to take on an approximate look of the final render and textures will finish being compressed until everything can be presented in its complete state. The progress of Asynchronous Asset Streaming can be seen in the bottom left on top of the image in the Progress Overlay window as well as in the bottom right status bar of the render view.

|

|

|
|
| Async. Asset Streaming Stage: Start , clay render | Processing shaders and textures | Shaders finished, compressing textures | Finished, Progressive Rendering |
IPR Preview Rendering must be enabled.
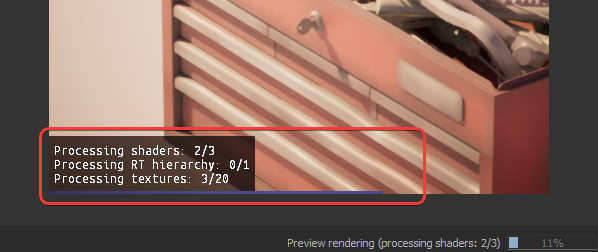
When enabled, a window is displayed on top of the rendered image showing the current progress of preview rendering, as processes are completed they will disappear from the progress overlay.
Processing shaders: The number of shaders that have been compiled out of the total number of shaders that need to be completed for this scene refresh.
Processing textures: The number of shaders that have been compressed out of the total number of textures that need to be compressed for this scene refresh.
|
| The Progress Overlay window and the blue progress bar |
When rendering Redshift will print out a multitude of useful messages in your 3d app's script/console window. In order to avoid clutter, Redshift's default behavior is to only print out a subset of all the messages it generates.
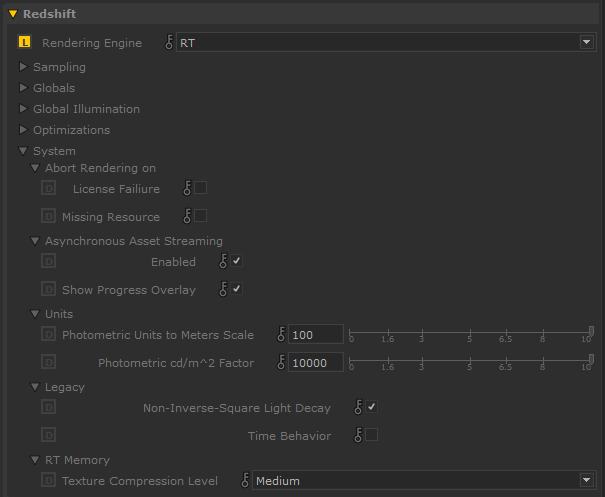
If you want to view all the messages in the script window, the user can set Redshift's verbosity level to "Debug". This option can be found in the System tab.
Apart from the 3d app's script/console window, Redshift stores all messages in log files.
When enabled, it aborts rendering when Redshift licensing fails.
When enabled, it aborts rendering when the scene is missing resources like textures and other external references.
Only available when "Scene Distance Units" is disabled. When enabled, light intensity is handled automatically in a physically correct way based on the selected Distance Units.
Certain features of Redshift such as photographic exposure, physical sun/sky and IES light support require knowledge of the "units to meter" and "candela to square meter" settings. It's important to set these values correctly, otherwise lighting coming from physical light sources might appear too dim or too bright.
If you're working with centimeters (i.e. 1 world unit is 1 centimeter), the units to meter scale should be set to 100. That's because, in this case, 100 world units means 100cm, which means 1 meter. If you're working with meters, then it should be set to 1, because 1 world unit means 1 meter.
Only available when "Scene Distance Units" is disabled. When enabled, light intensity is handled automatically in a physically correct way based on the selected Distance Units.
Photographic exposure, IES lights and the physical sky/sun use the cd/m^2 (candela to square meter) setting. Please make sure to attach a photographic exposure lens shader when using IES lights and physical sun/sky, otherwise your lighting will appear too bright or too dim.
The legacy options this section are mostly provided for backwards compatibility or in some cases unique global options that are generally no longer recommended as best practice. The legacy options allow you to more closely match the rendered results of older versions of Redshift while using a newer version of Redshift.
For example, you might want to take advantage of new Redshift features and enhancements but you still need to match the look of a scene that was created using the old Black-Body and Dispersion Technique. Instead of being forced to use a version of Redshift prior to version 3.0.50 you could use the latest version of Redshift but with the legacy option "Black-Body and Dispersion Technique" enabled.
Introduced in Redshift version 2.5.55
When enabled - by default, it forces Redshift to employ a hack exclusively for lights that have linear or no decay ( non-physically correct decay) in order to make this kind of decay look ‘nicer’ when the surface that is being lit is very close to the light source, but it is not actually correct.
When this hack is disabled, the fall-off can get darker when the distance from the light is less than 1 unit, which is actually mathematically correct.
Introduced in Redshift version 3.5.15
When enabled, Redshift uses an old version of time management.
When disabled - by default, Redshift uses a new version of time management that enables new features like the looping functionality in a Maxon Noise shader.
When set to a value other than "none," reduces VRAM by compressing textures when rendering in Redshift RT. After a texture is compressed it is cached so that it can be reused again without the need to go through the compression process once again.
All Texture Compression levels reduce VRAM by the same amount! The only difference is how long compression takes and how much the texture quality is compromised.
Texture Compression occurs on the CPU and high quality levels can lead to very long compression times.
Quality levels:
None: Textures are not compressed and no additional processing time is added, however, textures will use more VRAM.
Low: Textures are compressed with the fastest method but may lead to artifacts in the texture.
Medium (Default): Textures are compressed with a fast method that balances processing time with texture quality.
High: Textures are compressed with a slower method that increases texture quality but can add considerable processing time.
Very High: Textures are compressed with the slowest method resulting in textures that look almost as good as no compression but comes at the cost of a great amount of processing time.