Caustics - Production
Overview

|
|
|
| Glassware by Viz-People | Fork and knife model by Pavel Zoch | |
| Scenes by Saul Espinosa | ||
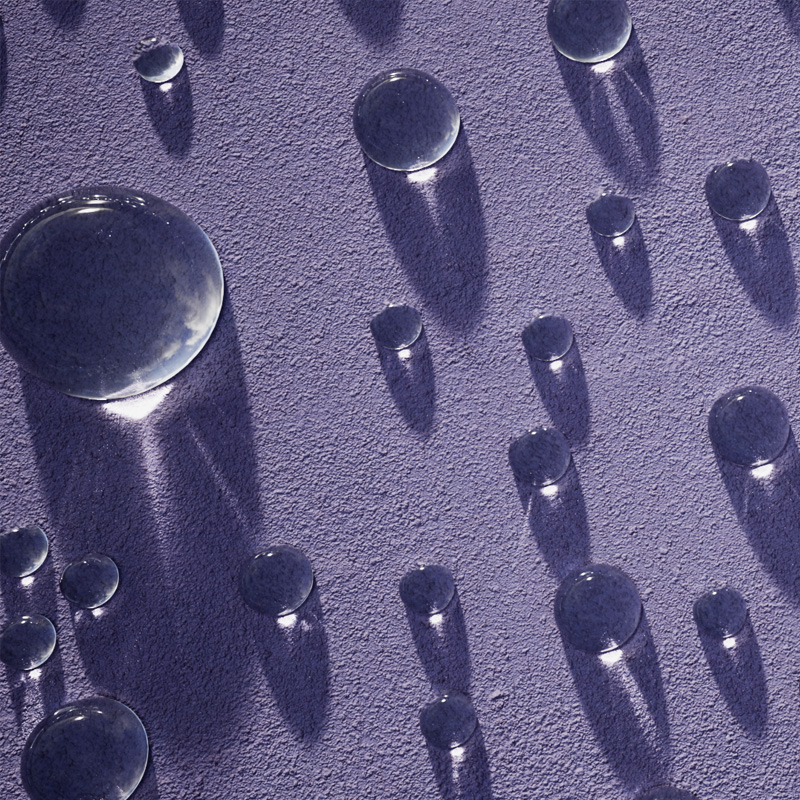
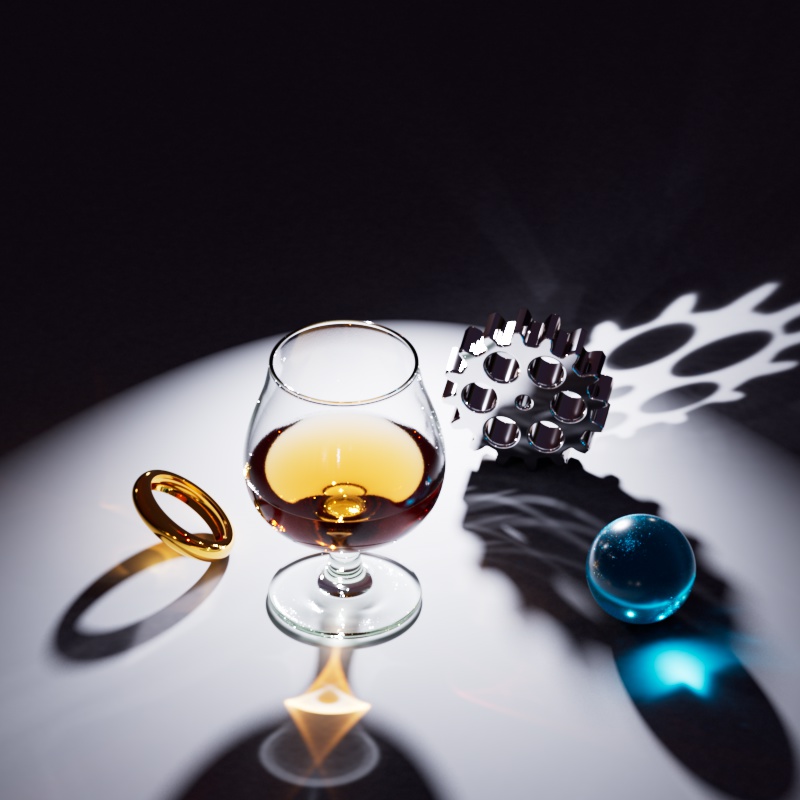
Caustics refers to the highly concentrated light patterns that are the result of light rays that reflect off of or refract through surfaces. Often caustics are loosely approximated with less accurate but more performant techniques, though for realistic glass, water, and other shiny materials there's no substitute but rendering real caustics. Redshift offers Brute Force or Photon caustics and both can be set up extremely easily with 1 click — enabling the "Global Caustics" option covered here on the page below. Enabling caustics can greatly impact render times, and may add high intensity noise that is difficult to clean up, since Brute Force Caustics are essentially extremely bright specular fireflies that are so tightly packed they result in a bright beautiful pattern defined by the objects they interact with. Fortunately, there are many tools that can help manage caustic noise.
Examples
Light types and Noise
Choosing the right type of light can make all the difference when rendering with caustics. Brute Force (BF) caustics work best with large light sources because BF caustics are shot from the camera out into the scene. This is great because you know what's in camera is going to be hit with plenty of samples but you will only see defined caustics if enough of those rays find their way to a light source. So large light sources, like a dome light or a big area light, are more likely to be hit and result in nice soft caustics. Naturally, this means that BF caustics don't work well with small lights like point, spot, and infinite lights — these are lights with no actual size, so a BF caustic ray has very little chance of finding them and producing satisfying results.
This is where Photon Caustics provide a balanced alternative. Instead of shooting from the camera, photon caustics are shot from each light source. So now the challenge is the photons finding the objects that benefit most from caustics, though in some ways this is an easier problem to control. There are ways to focus photons and improve the likelihood that caustics look nice and sharp without wasting photons on parts of the scene that don't need them.
Note: In these examples the intention is to illustrate the difference between BF Caustics and Photon caustics, not to render without noise. Here the noise is the point, the best way to demonstrate how each Caustic Engine performs with different scenarios is to use settings that aren't optimal. Later we will discuss options to reduce noise.
All examples were rendered with the same render settings unless otherwise noted and Caustic Intensity was increased to make caustics more easily readable.
First let's take a look at an area light that scales from 1cm to 20cm (0.5in to 8in). To begin with we see how Brute Force caustics don't perform well when the light is very small, there is a bunch of noise at the start but it doesn't take long for the noise to resolve as the light grows. On the other hand Photon caustics perform quite well, though there is a consistent splotchiness that is present throughout, and the caustics are very defined and less noisy when the light is small.
| Caustics Engine: BF Caustics Area light scale: 1cm -20cm |
Photons |
| Brandy Glass by Pavel Zoch from the C4D Asset Library | |
In general, it's easier to resolve sharp caustics with Photons because you can guarantee, with a focused light, that the photons are going to go exactly where you want them. This is a guarantee you don't have with BF caustics and the only way to improve quality is to increase the number of samples in the scene, like decreasing the Threshold when using Automatic Sampling or increasing the number of Brute Force Rays when Manually Sampling.
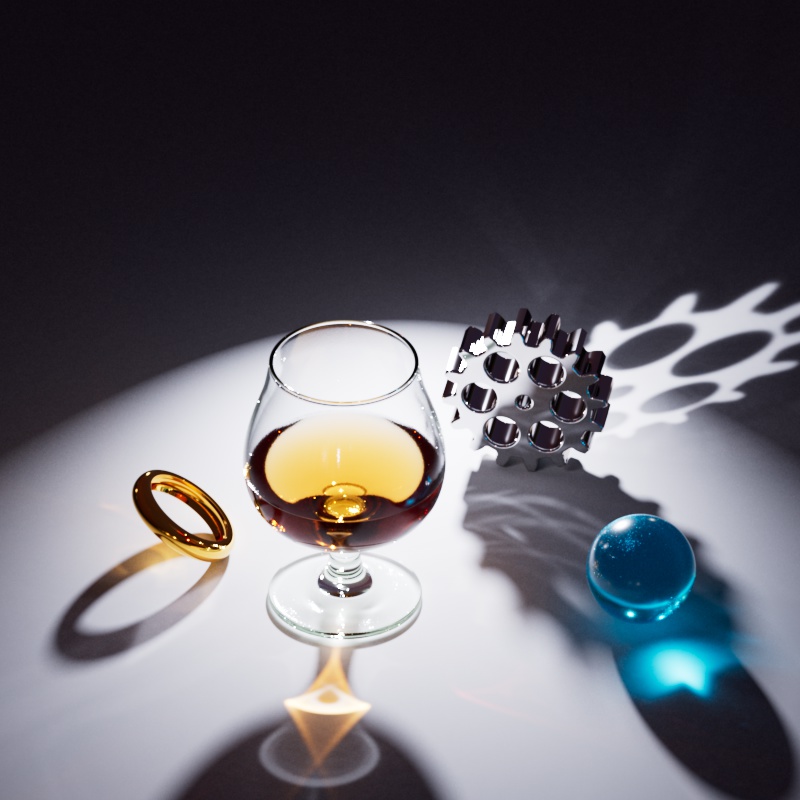
Now let's try a light with no real area at all, a spot light that we can use to focus all the photons right where want them. Here the difference really becomes apparent, BF caustics have no chance at adequately resolving this scenario because they can't find the light enough of the time, even with 32,000 BF rays it is very noisy. However the Photons are fairing much better, still splotchy, but so much sharper and you can actually appreciate the beautiful patterns cast through the scene. Take note that you can see the photon pattern actually crawl across the ground as the cone angle widens because the same number of photons is shot from the light regardless of the spread. Naturally, a light with a narrow spread concentrates more photons in one area — increasing detail — than a light with a wide spread. This is what makes spot lights incredibly powerful for Photon caustics.
| Caustics Engine: BF Caustics Spot light Cone Angle: 0 - 150 |
Photons |
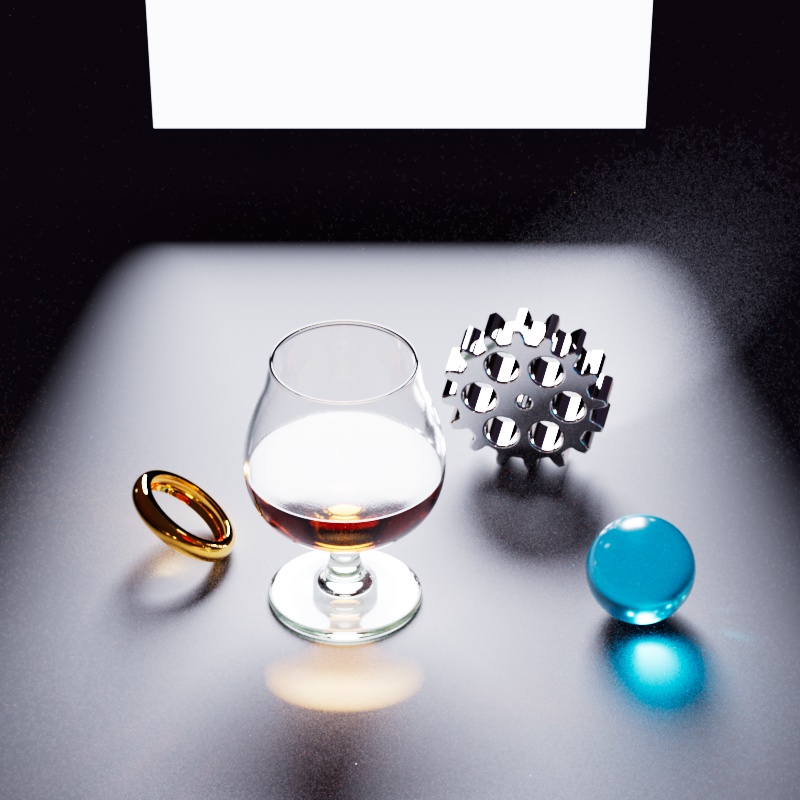
We still haven't seen Photons fail to quite the same degree as BF Caustics so let's take a look at that now. In the first area light example the light was scaled up but it was still relatively small, only about 20cm (8in), something in the range of an indoor lamp. In the next example, the area light is scaled from 6cm (2in) all the way up to 120cm (47in) to approximate a light source like a window. Now the limitation of Photons becomes more evident, the photons spend most of their time as a splotchy mess because they are spread too thin over such a large area. On the other hand, the soft BF Caustics look great with a light at this scale — only looking noisy when the light is very small.
| Caustics Engine: BF Caustics Area light scale: 6cm - 120cm |
Photons |
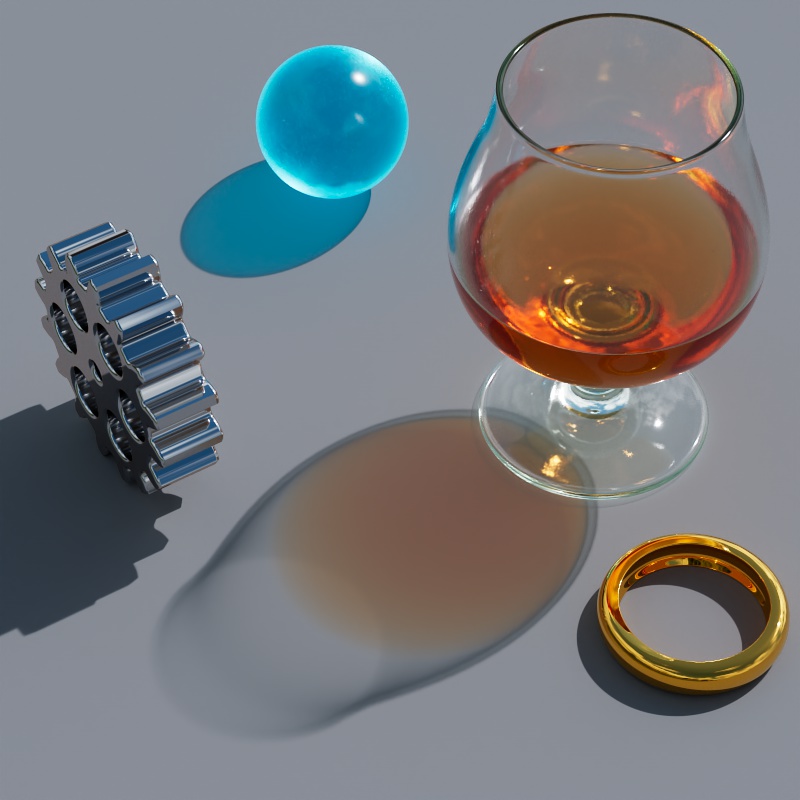
Finally, it's time for the Photon's worst case scenario — a dome light, the biggest light source we can provide. Here BF caustics really shine, almost any direction a BF ray is sent it finds the dome light and this results in a nice mixture of soft and sharp caustics. Unfortunately, photons just fall apart here, it makes little difference even with 10 million photons as they are spread in every direction and not enough of them end up where we need them — in front of the camera.

|

|
| Caustics Engine: BF Caustics Dome light |
Photons |
Reducing noise - Photon Caustics
Number of Photons
In the previous examples Photon Caustics frequently appeared splotchy, this is mainly due to the relatively low number of photons used. The number of photons required for a smooth result is frequently much higher than common sampling values used in other parts of Redshift. The examples in this section were rendered with 1,000,000 photons which seems like an absurdly high number but is practical for photons.
In the examples below, the same scene is rendered with 5 million and 50 million photons. You may expect massive increases in render time for each jump but the difference usually isn't so severe so feel free to experiment by drastically increasing the number of photons.

|

|
| Num Photons: 5,000,000 Render Time: 27 seconds Caustics Engine: Photons |
50,000,000 1 minute 3 seconds |
Blur Radius
The Photon Blur Radius parameter (measured in scene units) is also helpful with managing splotchiness. When the Blur Radius is high sharpness is sacrificed and photons blend together. High numbers of photons render more slowly but can get away with lower radius values before the photon dots become apparent. For example, whether shooting 50 million photons is enough depends on the Blur Radius used. In the example below, a Blur Radius of 0.01 still looks very noisy, a value of 0.2 looks much better, 0.5 looks very smooth but may sacrifice too much sharpness, and a value of 1 looks very blurry. In general, the highest quality for Photon Caustics is achieved through a balance of the lowest viable Blur Radius and the highest number of photons cast.

|

|

|

|
| Photon Blur Radius: 0.01 Num Photons: 50,000,000 Caustics Engine: Photons |
0.2 |
0.5 | 1 |
A light that only casts caustics
Photon Caustics might not perform well with large lights like the dome light but that doesn't mean we can't use them alongside a dome light. A key technique when using Photon Caustics is creating a light that only casts caustics. Since photon casting is not intertwined with other types of sampling it has a sort of unique super power, you can control it without affecting anything else.
The general idea is to create narrow angle spot lights that only cast photons exactly where you want them and disabling all other types of contribution on that light — setting diffuse, reflection, transmission, single scattering, multiple scattering, volume, and global illumination all to a value of 0. Because photon caustics are isolated from these rays, rendering this light by itself only results in reflection and refraction caustics.
In the example below, a spot light is set up in the same direction as the dome light's sun so the caustics appear in all the right places. The result is effectively the best of both worlds, we easily achieve sharp caustics with the use of a spot light and photons but rely on the dome light for overall scene lighting.

|

|
| Caustics only Spot light Caustics Engine: Photons |
Dome light with caustics Spot light |
In a setup like this, when mixing caustic and non-caustic casting lights, there are some important things to consider. By default a caustic casting light sets any transmissive Standard Material's Shadow Opacity to 1 which is necessary for the most realistic results. However, when a light has Casts Caustics set to "Off" it will no longer provide this override and that light will cast refraction shadows using the Shadow Opacity set by the material. There are several ways around this, you could manually set each material's Shadow Opacity to 1 but if you have a lot of material's you may be better off with a workaround. If a light casts caustics but you set the Caustic Intensity to 0 then it will still override each material's Shadow Opacity but caustics are skipped for that light.
In the example below, note the drastic difference between the dome light when Casts Caustics is set to "Off" versus leaving them "On" and setting the Caustic Intensity to 0. The opaque shadows on the right serve as the necessary canvas to cast photon caustics into from the spot light.
|

|
| Dome light with caustics disabled Override Refraction Shadows: Off Caustic Intensity: N/A Caustics Engine: Photons |
Dome light with caustics enabled Override Refraction Shadows: On Caustic Intensity: 0 |
Reducing noise - Brute Force Caustics
Increasing Samples
With Brute Force Caustics you don't have quite so many options to clean noise. The main thing you can do is use lights that work well with BF caustics and increase your sample counts. The examples below were rendered using Manual Sampling so that Brute Force Rays could be manually defined. When using Automatic Sampling, the only way to improve BF caustic noise is to decrease the Unified Sampling Threshold. Keep in mind, when using Auto Sampling, decreasing the Threshold also means increasing the number of samples for all other types of rays which can have a massive impact on performance.

|
|

|
| Brute Force Rays: 512 Render Time: 23 seconds Caustics Engine: Brute Force |
2,048 29 seconds Enabled |
16,384 47 seconds |
Clamping Caustics
Brute Force Caustics are best suited to soft caustics and some scenarios may be impossible to eliminate noise — even at maximum sample counts. However, there is another angle we can approach this problem from — caustic noise is the result of high frequency differences in brightness per-pixel and we have tools that can manage this brightness. By default, with Disable Intensity Clamps enabled, caustics are not clamped by the Max Subsample and Max Secondary Ray intensity limiters that other rays are bound by. This allows caustics to reach extremely bright values and is generally necessary for proper reproduction of caustics as BF Caustics are basically a concentration of extremely bright specular fireflies. But if caustics are more of a nice accent for your scene, rather than a focal point, it may be acceptable to sacrifice a loss in energy in exchange for less noisy caustics.
This can be accomplished by disabling the Disable Intensity Clamps parameter and setting your own Max Subsample and Max Secondary Ray clamps. In the example below, both of these limiters are animated from a value of 1 to 60. The caustic brightness gradually increases as the clamp is raised but so does the likelihood for fireflies and excess noise. When the clamps are low the number of samples needed for smooth caustics is lower and they render faster too. Denoising can be quite effective with cleaning up the last bit of noise with BF caustics, but it needs a clean enough starting point or artifacts will become prominent. Finding the right balance between caustic brightness, noise, and acceptable render times is the key.
| Max Sample Clamps: 1 - 60 Disable Intensity Clamps: Disabled Denoising: Disabled Caustics Engine: Brute Force |
Enabled |
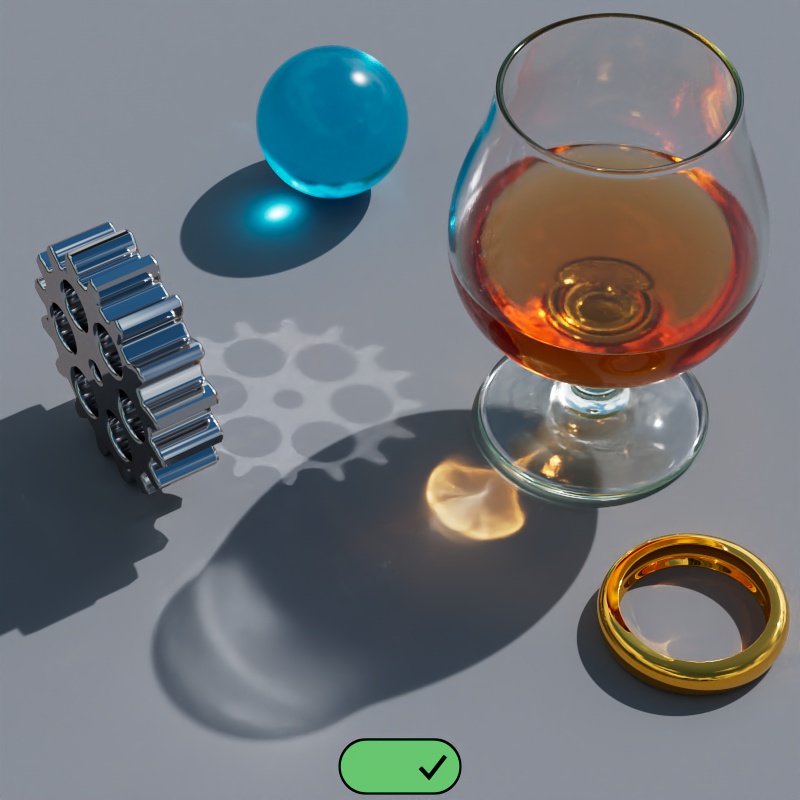
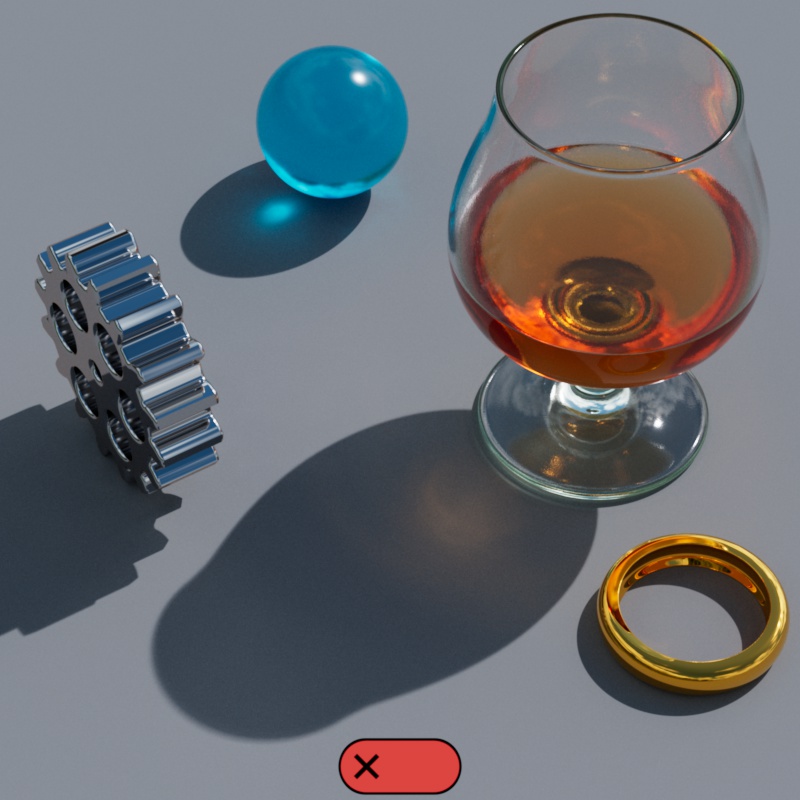
Conserve Reflection Energy
Redshift uses several techniques to approximate the look of caustics without the performance impact that actual caustics have on render times. One of those techniques is a Global Illumination feature called Conserve Reflection Energy (CRE) which simulates very soft bounces of light. When used without caustics, CRE adds a nice pop of bounce lighting with very little performance impact. In the examples below, note the increased brightness and color in the shadows when CRE is enabled.

|

|
| Conserve Reflection Energy: Enabled Caustics: Disabled |
Disabled |
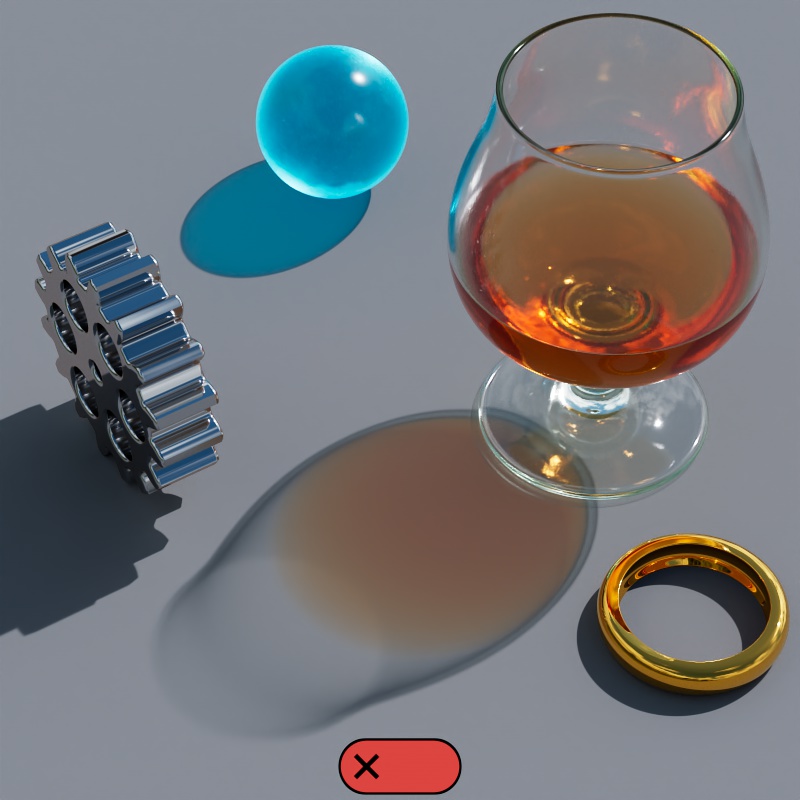
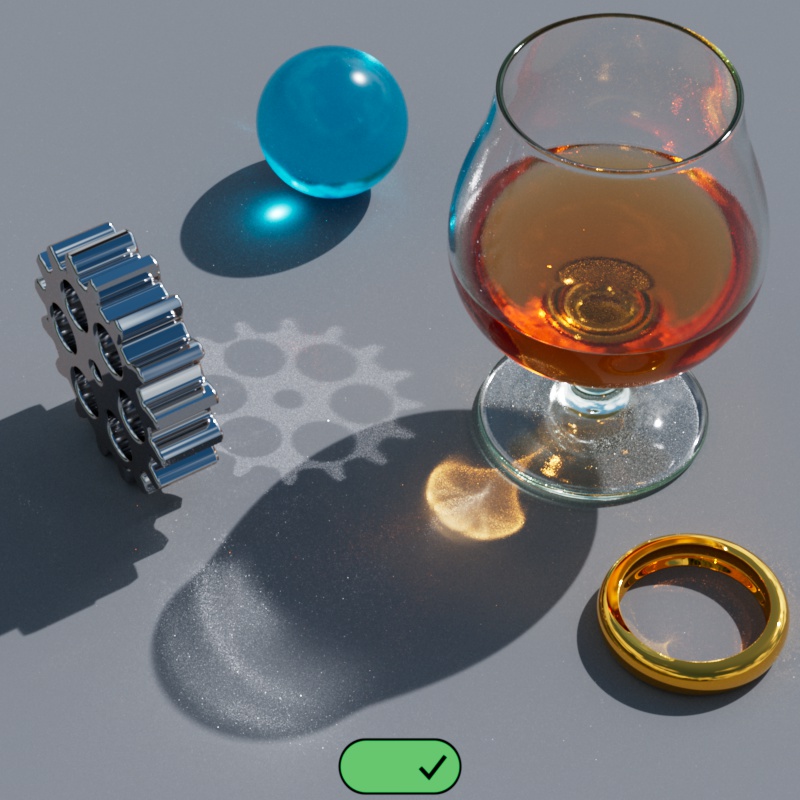
While the CRE effect looks nice without caustics, when rendering with caustics the effect is redundant and decreases the contrast provided by actual caustics. When using Caustics CRE should be disabled automatically, it can be manually controlled in the Render Settings Global Illumination tab..
|
|
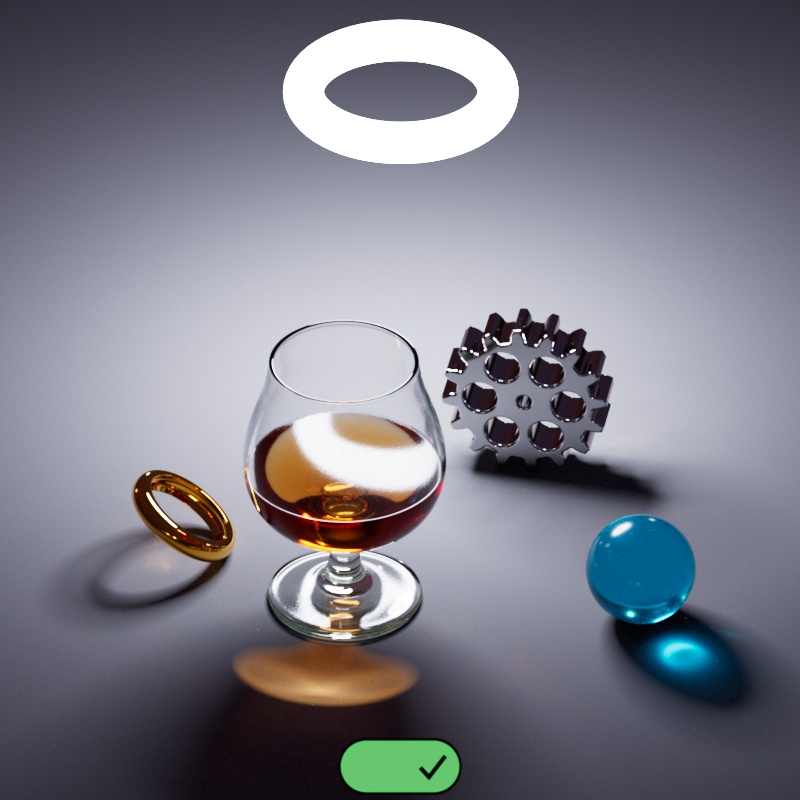
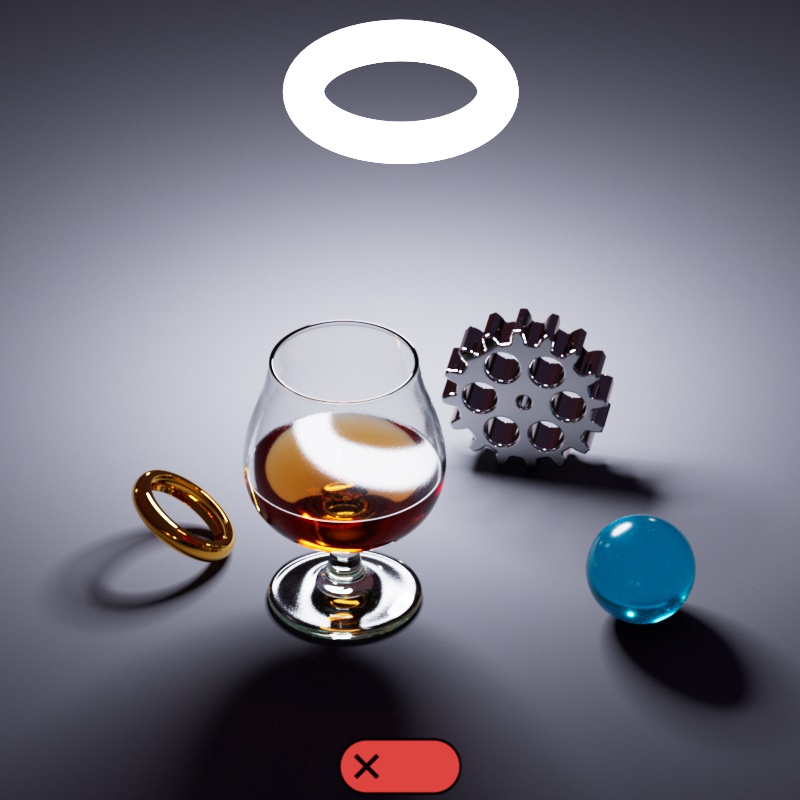
| Conserve Reflection Energy: Enabled Caustics Engine: Photons |
Disabled |
Trace Depths
The Trace Depth parameters control how many times a ray can bounce around the scene. Brute Force caustics are bound by the same Global Reflection and Refraction Trace Depth controls that also affect non-caustic reflection and refraction rays. Photon caustics, however, have their own Trace Depth controls that do not affect non-caustic rays but they are limited at a maximum of 10 bounces. For both methods, it is important to set the Trace Depths high enough so caustics can appropriately traverse the scene — the difference between properly set Trace Depths can be massive.
| Global Trace Depths: Combined: 0 - 32 | Photon Combined Trace Depths: 0 - 10 |
Caustics
|
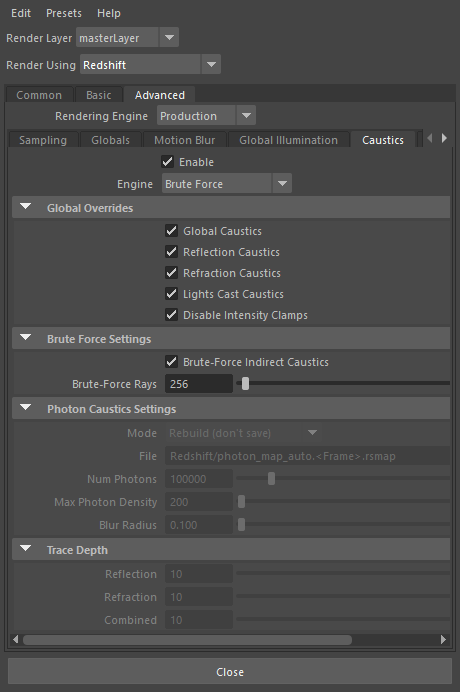
Enabled
Enables or disables the rendering of Caustics.
Caustics Engine
Selects the engine used to render caustics from the following options:
- Brute Force
- Photon

|
|
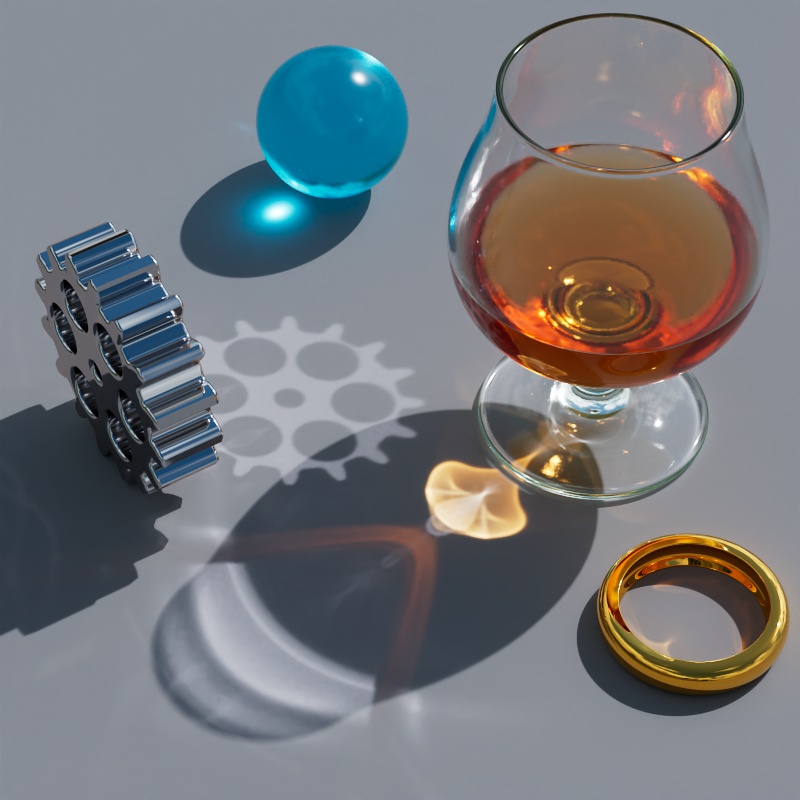
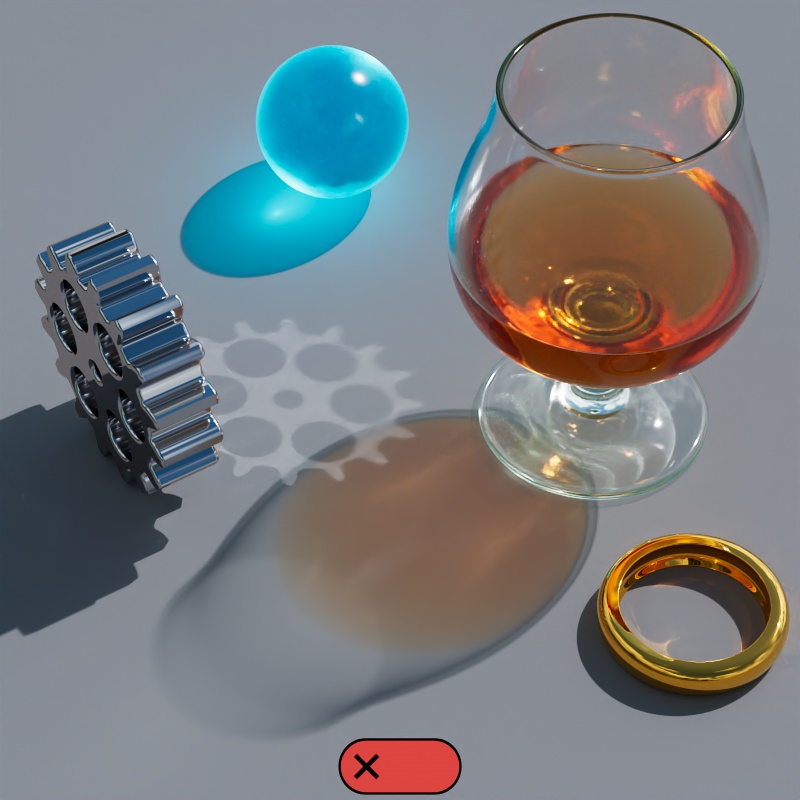
| Caustics Engine: Brute Force | Photon |
When Caustics are enabled, Brute Force caustics are always used during IPR rendering because Photon Caustics are not compatible with progressive rendering. This enables you to get a preview of caustics in your scene but be aware that the final result will likely differ greatly if you are using Photon Caustics for final rendering.
Brute Force Caustics vs Photon Caustics
Brute Force Caustics
- Pros
- Works great with dome lights
- More realistic
- Supports indirect lighting caustics (emissive materials and GI)
- Cons
- Softer caustics
- Doesn't work with infinite lights (including Physical Sun) and delta lights (point, spot)
- Not good with small lights
- May introduce noise that is hard to clean
- Doesn't have its own AOV (BF Caustics are included with Global Illumination)
Photon Caustics
- Pros
- Sharp caustics
- Works best with narrow angle spot lights
- More controllable
- Has its own Caustics AOV
- Has its own Trace Depths
- Cons
- Not good with dome lights and wide angle lights
- Best results require custom light setup
- Does not support indirect caustics
- Less realistic
Global Caustics
When enabled, Global Caustics provides an easy 1-click option that automatically prepares all objects and lights in the scene for caustic rendering by enabling the Global Overrides covered in the section below.
When disabled, each object and light needs to be manually set up for caustic rendering. The following settings are necessary to enable caustics:
- Objects must have the following Visibility options enabled:
- Casts Reflection Caustics (disabled by default)
- Casts Refraction Caustics (disabled by default)
- Receives Caustic Photons (enabled by default)
- Lights must have the following traits:
- Casts Caustics: On
- Caustics Intensity: Greater than 0 (required for Brute Force and Photon Caustics - default 1)
- Photon Multiplier: Greater than 0 (only required for Photon Caustics - default 1)
- For best results, Override Refraction Shadows should be enabled.
Global Overrides
Reflection Caustics
When enabled, all objects are automatically able to cast reflection caustics.
When disabled, all objects do not automatically cast reflection caustics.
Under both conditions this behavior can be manually overridden per object by enabling or disabling the Visibility option "Casts Reflection Caustics". For example, if you have many objects in the scene that need to cast reflection caustics then consider leaving the Global Override enabled and manually disabling "Casts Reflection Caustics" on the few objects that don't. If the opposite is true, you only need a few objects to cast reflection caustics, then consider leaving this Global Override disabled and only manually enabling "Casts Reflection Caustics" on those objects.

|

|
| Reflection Caustics : Enabled | Disabled |
Refraction Caustics
When enabled, all objects are automatically able to cast refraction caustics.
When disabled, all objects do not automatically cast refraction caustics.
Under both conditions this behavior can be manually overridden per object by enabling or disabling the Visibility option "Casts Refraction Caustics". For example, if you have many transmissive objects in the scene that need to cast refraction caustics then consider leaving the Global Override enabled and manually disabling "Casts Refraction Caustics" on the few objects that don't. If the opposite is true, you only need a few objects to cast refraction caustics, then consider leaving this Global Override disabled and only manually enabling "Casts Refraction Caustics" on those objects.
|
|
|
| Refraction Caustics: Enalbed | Disabled |
Light Casts Caustics
By default, all Redshift lights start in a Casts Caustics mode called "Render Settings". In this mode, a light's caustic capabilities are controlled by the "Light Casts Caustics" parameter.
When enabled, all lights in the Render Settings mode:
- Automatically cast caustics
- All transmissive Standard Materials with Casts Refraction Caustics enabled have their Shadow Opacity set to 1.
- This ensures that a transmissive object's shadow is appropriately dark so that it can be lit up by the more realistic caustics.
When disabled, all lights in the Render Settings mode:
- Do not cast caustics
- The Shadow Opacity of Standard Materials is not changed.
- This results in transmissive object shadows that attempt to loosely approximate a basic caustic look.
Under both conditions this behavior can be manually overridden per light by setting the Cast Caustics mode to "On" or "Off". For example, if you have many lights in the scene that need to cast caustics then consider leaving the Global Override enabled and manually setting the Casts Caustics mode to "Off" on the few lights that don't. If the opposite is true, you only need a few lights to cast caustics, then consider leaving this Global Override disabled and only manually setting the Casts Caustics mode to "On" for those lights.
|
|
| Light Casts Caustics: Enabled | Disabled |
Disable Intensity Clamp
When enabled, caustics are not limited by the Max Subsample and Max Secondary Ray Intensity clamps. This allows caustics to reach their appropriate intensity without being clamped like other rays in the scene.
When disabled, caustics are limited to the same values as the Max Subsample and Max Secondary Ray Intensity clamps. This can give you more control over the maximum brightness of caustics and help limit caustic fireflies, however, when intensity clamps are low this can result in caustics that are unrealistically dim. Increasing these clamps allow caustics to get brighter but you run the risk of introducing noise from other features that were previously clamped much lower and now require more samples. The familiar caustic patterns are the result of highly concentrated light and very high values like 20 may be needed to appropriately capture their intensity.
|
|

|
| Disable Intensity Clamp: Enabled Max Subsample / Secondary Ray Intensity: 4 |
Disabled 4 |
Disabled 10 |
Brute Force Caustics
Brute Force Rays
Has no effect when Automatic Sampling is enabled.
Controls the number of rays used for Brute Force caustic casting and Brute Force Global Illumination. Higher values result in sharper and less noisy caustics but take longer to render. Values as high as 32,000 to 64,000 may be required for smooth caustics and in some situations using max samples will never be enough to fully clean caustic noise. If you still see fireflies and noise consider disabling the "Disable Intensity Clamp" override and control the maximum ray values manually. You will sacrifice some light energy but may be able to clear up most of the noise.
Note, the number of Brute Force Caustic Rays is shared with the Brute Force Global Illumination Rays. In general, to clear up noise, you will always need more BF Rays for BF Caustics compared to the number of rays needed for BF GI.
| Brute Force Rays: 0 - 32,000 |
Indirect Caustics
Enables or disables caustic casting from indirect global illumination rays. When enabled, caustics can be cast by emissive materials and other global illumination rays that bounce around the scene. In the example below, the torus uses an incandescent material to light the scene.
|
|
| Indirect Caustics: Enabled | Disabled |
Photon Caustics
|
For more information please see the Photon Mapping for Caustics page.
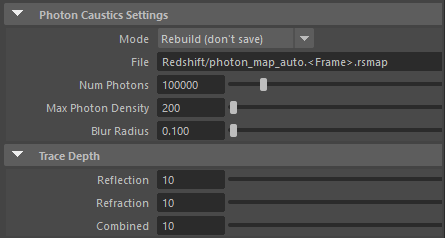
Mode
Specifies the caustics Mode to be used from the following options:
- Rebuild (don't save) - Redshift computes new caustic photons from scratch (for each frame) but does not save it to disk. Then the frame is rendered to completion.
- Rebuild (prepass only) - Redshift computes new caustic photons from scratch (for each frame) and saves it to the user-specified file. Final rendering is skipped.
- Rebuild - Redshift computes new caustic photons from scratch (for each frame) and saves it to the user-specified file. Then the frame is rendered to completion.
- Load - Redshift skips the caustic computation stage and the caustic data is loaded from the user-specified file in the parameter below. Then the frame is rendered to completion.
Light-emitted photons are independent from the camera settings, so fly-through animations can get away with generating the photon map once (on the first frame) and re-using it for all other frames.
However, if photon-emitting lights move or material settings are animated, a new photon map will have to be generated to account for these generations.
File
Specifies where to save or load the caustics data.
Num Photons
Specifies the number of photons shot from each light in the scene. For more granular per-light control, use the Photon Multiplier option found on each light.
| Num Photons: 10,000 - 5,000,000 |
Max Photon Density
Specifies the maximum number of photons that can be stored in the "Blur Radius."
Higher values allow the photon shooting algorithm to store more photons per unit area which requires more memory but not necessarily improved image quality! Therefore we recommend leaving this setting at the default value of 200 because there is frequently little to be gained.
| Max Photon Density: 0 - 100 |
Blur Radius
Controls the distance in world units around each pixel that is used to find photons.
Higher values result in smoother but blurrier results while lower values result in sharper but potentially more splotchy results.
This setting is closely tied to the maximum number of photons shot into the scene. As more photons are shot the Blur Radius can be reduced without resulting splotchy artifacts. If too few photons are shot the Blur Radius has to be increased in order to not be splotchy.
| Blur Radius: 0 - 1.5 |
Photon Trace Depths
Reflection
Specifies the number of times a photon can bounce around the scene for reflections. A value of 0 disables all Reflection Caustics.
| Reflection Trace Depth: 0 - 10 |
Refraction
Specifies the number of times a photon can bounce around the scene for refractions. A value of 0 disables all Refraction Caustics.
| Refraction Trace Depth: 0 - 10 |
Combined
Specifies the maximum number of times a photon can bounce around the scene for both reflections and refractions. This means that if the individual trace depth value for reflections or refractions is higher than the Combined Depth the resulting render will still be capped at the Combined Depth value.
| Combined Trace Depth: 0 - 10 |