Table Of Contents
|
|
Changing this parameter will change the render settings that are available.
Controls which engine is used for rendering from the following options.
Production: Redshift Production, Redshift's primary engine for final frame rendering.
RT: Redshift Real Time, Redshift's fastest interactive engine, offering near real time updates.
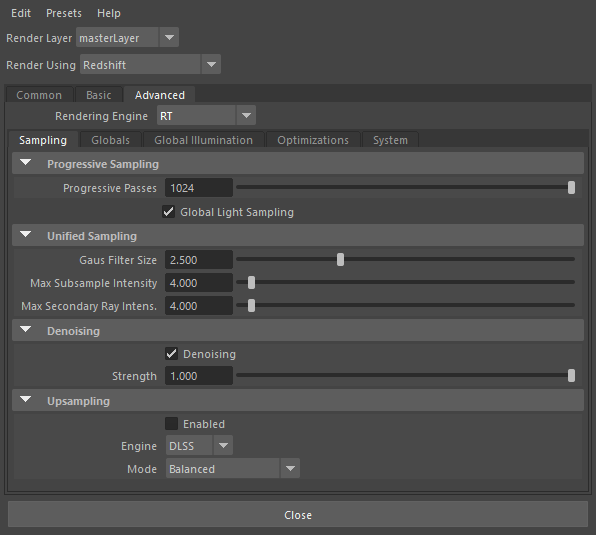
Controls the maximum number of passes that Progressive rendering mode can reach and therefore controls the maximum achievable visual quality of Progressive mode. The higher the number of Progressive Passes the higher the render quality and the less visual noise, default is 1024 passes.
Since Progressive mode can be used in either Interactive Rendering or Final Rendering the behavior of this setting differs depending on the rendering mode and the situation.
Setting only applies to Production Progressive and RT rendering mode.
When enabled, by default, Redshift RT converges faster when many lights are used. This speed boost only applies to lights using quadratic falloff and does not include dome lights or directional lights.
When disabled, scene with many lights may converge slower.
Global Light Sampling may cause noisier renders in some situations, if you experience this try disabling the feature. Some situations where issues may appear:
The Filter Size controls the final "blurriness" of the filter. In general the sharper the filter type the larger the filter size needs to be.
For example, Gaussian filters work fine with values like 2.0, 2.5 and 3.0 while Mitchell typically works best with values like 3.0, 4.0 or 5.0.
Choosing a filter type and filter size highly depends on what you are rendering. For example, still images can often get away with sharpening filters such as Mitchell or Lanczos. Animations, on the other hand, usually work best with blurrier filters, like Gauss. The reason is that 'jaggies' are particularly visible on animations!
On some renderers 'filter size' refers to the filter radius. On Redshift, 'filter size' refers to the filter's diameter ! For this reason, if you're porting a scene from a different renderer, you might have to double the filter size value in order to get similar results.
|
|
|
|
|
|
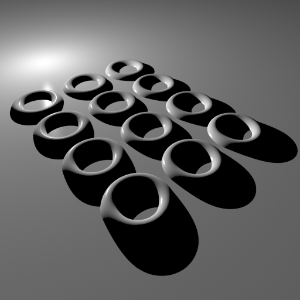
| Filter: Gauss Size 2.0 A bit too sharp around the rings. |
Gauss 2.0 A bit too sharp around the rings. |
Mitchell 2.0 Very sharp features. Almost as if antialiasing is disabled. Mitchell filters require larger sizes! |
Mitchell 3.0 Still a bit aliased but looking better. |
Mitchell 4.0 Sharp and relatively smooth. The Mitchell filter typically works best with sizes like 4.0 and 5.0 |
Limits the maximum value of intensity for each individual sample. The higher the 'Max Subsample Intensity' the harder the renderer has to work to antialias the image.
Usually monitors can show colors ranging from black (0.0, 0.0, 0.0) to white (1.0, 1.0, 1.0). Any color that is brighter than white (like 10.0, for example) will still be rendered as white. But the internal workings of a renderer do care about these "overbright" colors.
Scenes containing very bright lighting and/or strong emissive materials can be very hard to antialias. The reason has to do with sample filtering: say a pixel was rendered with 64 samples. If most of these samples are mid-gray (0.5, 0.5, 0.5) but there is a single sample that is extremely bright (100.0, 100.0, 100.0), that sample will 'dominate' the final pixel color.
|
|
|
|
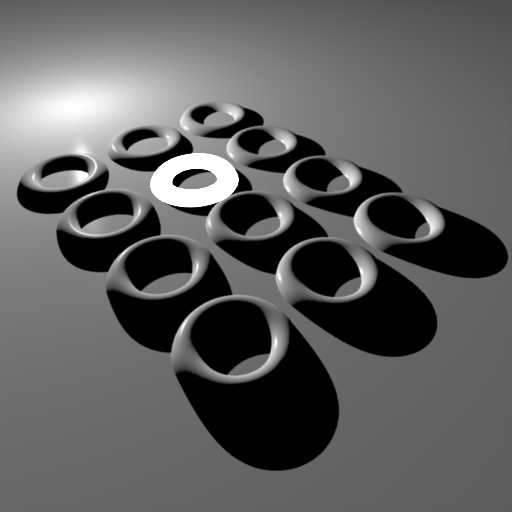
| Max Subsample Intensity: 128 All the rings are smooth except the self- illuminated one. That part of the image looks as if no antialiasing is enabled. |
4.0 While there is a little bit of improvement, the self- illuminating ring still shows aliasing artifacts! |
1.0 The self-illuminating ring now renders smoothly. |
There are a couple of important drawbacks to using 'Max Subsample Intensity':
The only current solution for both cases is raising the 'Max Subsample Intensity' which, unfortunately, will re-introduce harsh edges on strongly illuminated objects.
The images below demonstrate the "energy loss" with an aggressive 'Max Subsample Intensity' setting.
|
|
|
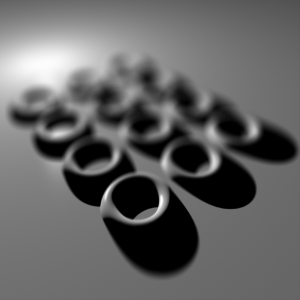
| Max Subsample Intensity: 1.0 Even though some of the specular highlights are strong, the depth-of-field effect is weak on them. |
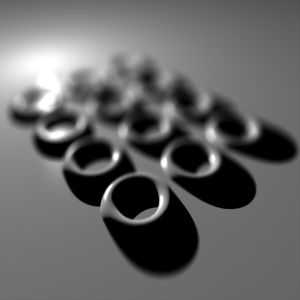
4.0 Notice the stronger blurry specular highlights. |
Limits the maximum intensity value for secondary rays like glossy reflection and global illumination rays.
This feature is useful for reducing fire-flies that may appear in glossy reflections or refractions, which can occur when a small percentage of rays are unlucky enough to sample extremely hot light sources, while most of the rays do not. The ideal solution would be to use as many rays as it takes to clean up the noise caused by fire-flies, but often this is not practical since many thousand, if not infinite, ray samples would be required.
Clamping glossy samples is a simple (though not physically correct) solution, which helps ensure that hot samples are no brighter than a specified maximum amount.
This checkbox toggles denoising on and off. Denoising allows you to render images at a reduced baseline quality (lower sample counts) and increased speed at the expense of some potential accuracy. Denoising can only do so much.
Controls how aggressive denoising is, the default value of 50% is a good balance between quality and speed. Higher denoising strength values get you to a smoother image faster at the expense of blurriness and a loss of detail.
After enough passes the render will converge to a similar result regardless of the denoising strength value, therefore, denoising strength has the greatest impact within the first few passes when interacting with the scene and on high frequency details.
This checkbox toggles upsampling on and off. When enabled, Upsampling allows for faster rendering and interactivity at the expense of image quality.
Controls the upsampling engine.
DLSS
Uses AI to upsample renders from a lower resolution to the final target resolution, this allows for faster rendering and interactivity without losing as much detail as traditional upscaling.
Compatible with NVidia GPUs
Controls the actual render resolution before upsampling to the final target resolution. A lower starting resolution (ultra performance or performance mode) results in faster interactivity and lower quality while a higher starting resolution (balance or quality mode) result in slower interactivity and higher quality.