Table Of Contents
- Introduction
- Settings
- Min/Max Samples
- Adaptive Error Threshold
- Show Samples
- Automatically reduce samples of other effects
- Randomize Pattern On Each Frame
- How to use unified sampling
- How to use Automatic Sampling
- What "Automatically reduce samples of other effects" does
- How to use Redshift when "Automatically reduce samples of other effects" is disabled
Introduction
A renderer achieves effects such as depth-of-field, motion blur and antialiasing by shooting multiple rays at each pixel from the camera. These rays are called 'primary rays'. When not enough primary rays are shot per pixel, the results can be noisy ('grainy') or jaggy. However, not all parts of the image need the same number of primary rays! For example, a fast moving object needs more primary rays for smooth motion blur compared to a stationary one. Similarly, an out-of-focus object needs more rays for accurate/smooth depth of field compared to an in-focus one. This means that shooting the same number of primary rays for all pixels on the screen can be wasteful. Shooting the same number of primary rays per pixel is called 'fixed rate sampling'. Fixed rate sampling is the exact opposite of 'adaptive sampling'.
Unified sampling is an adaptive sampling technique which detects the parts of the image that are noisy/jaggy and automatically adjusts the number of primary rays for each pixel. This can speed up rendering considerably.
Because unified sampling detects noise and stops rendering when a pixel is 'clean enough', a desirable byproduct is that it also benefits the performance and quality of other effects requiring multiple rays ('samples') such as:
- Glossy reflections/refractions
- Brute-force GI
- Area lighting
- Ambient occlusion
In Redshift 3.0.11 'Automatic Sampling' was added as an optional sampling mode meant to simplify setup and automatically optimize the sample counts per-pixel. In this mode the only paramater that has any effect on sampling count is 'Adaptive Error Threshold.'
Settings
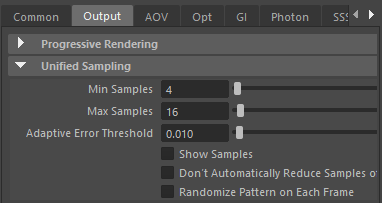
Min/Max Samples
These are the minimum and maximum number of primary rays that will be shot per pixel. Redshift will initially shoot 'min samples' rays at each pixel and then, if it still detects noise around that pixel, it will keep shooting more rays until the pixel is clean enough or if it reaches 'max samples' rays. If you're using depth of field or motion blur, we recommend using at least 8-16 'min samples'. Scenes containing strong depth of field or long motion blur might require a fairly high 'max samples', such as 256 or more.
Adaptive Error Threshold
This setting controls how sensitive the noise detection algorithm will be. Lower numbers will detect noise more aggressively which means that more rays will be shot per pixel and vice-versa. It is recommended that you use the 'show samples' feature to visualize the effect of this setting. The default 0.01 value should work well for a variety of scenes. For production-quality results, we recommend lower settings such as 0.003.
Show Samples
This option enables a debug rendering mode which shows the numbers of rays that were shot for each pixel in a grayscale form. Darker pixels mean that fewer rays were shot while brighter pixels mean that more rays were shot. A pure white color means that 'max samples' rays were shot for that pixel. When this rendering mode is enabled, the noisy parts of the image will typically be brighter because the unified sampler will shoot more rays trying to clean up the noise. We'll demonstrate the effect below.
Automatically reduce samples of other effects
This option is described in more detail below. We do not recommend using this option. Redshift includes it solely for the benefit of users coming from other renderers. This option might be deprecated in the future.
Randomize Pattern On Each Frame
Techniques such as depth of field, motion blur, brute-force GI, glossy reflections/refractions, AO and area lighting share a common sampling pattern which, by default in Redshift, is consistent per-frame. When the sample counts for these effects are not high enough and noise is visible, noise can appear to be 'stuck' on the camera when rendering an animation. This can be visually distracting. Enabling "Randomize Pattern On Each Frame" randomizes the noise pattern on each frame which makes the noise look more like moving TV static or film grain. This, in some cases, can be more visually appealing.
How to use unified sampling
The following instructions should only be used when "Don't automatically reduce samples" is disabled! Near the end of this document there exists a separate section discussing the "don't automatically reduce samples" option.
The optimal way of adjusting the unified sampling settings is this:
- Disable depth of field and motion blur and set min/max samples both to a low number such as 4 or 16.
- Adjust 'num samples' of brute-force GI, area lighting, glossy reflection/refractions and AO etc until you get a visually acceptable frame. Please refer to the 'noise' documentation for more info.
- Re-enable depth of field and motion blur and raise both min/max samples to a level that produces clean results. Typically these two effects require at least 32 samples and then can often require as many as 200 or more.
- Once happy with the result, reduce 'min samples' to 4 or 16
- Make slight adjustments to 'adaptive error threshold' until you see no grain on depth of field or motion blur. The default 0.01 setting should work on a wide variety of scenes but it's possible that, on certain scenes, you might need to reduce it to a value like 0.003. We recommend using 'show samples' to see which pixels require the most rays. Ideally, there should be good parts of the image that are not solid-white. If everything comes back as solid white, this means that either the scene is indeed noisy (due to DOF or motion blur) and needs a high 'max samples' setting or that the 'adaptive error threshold' is too low and could be raised a bit.
We demonstrate the above process on a simple scene that uses both depth of field and motion blur. Even though a bit of noise is usually acceptable, for this particular example we'll attempt to produce a near-flawless image. This will help demonstrate that unified sampling does not mean 'faster but with more noise': with unified sampling it's possible to get frames that are almost 100% identical to fixed-rate sampling and rendered faster!
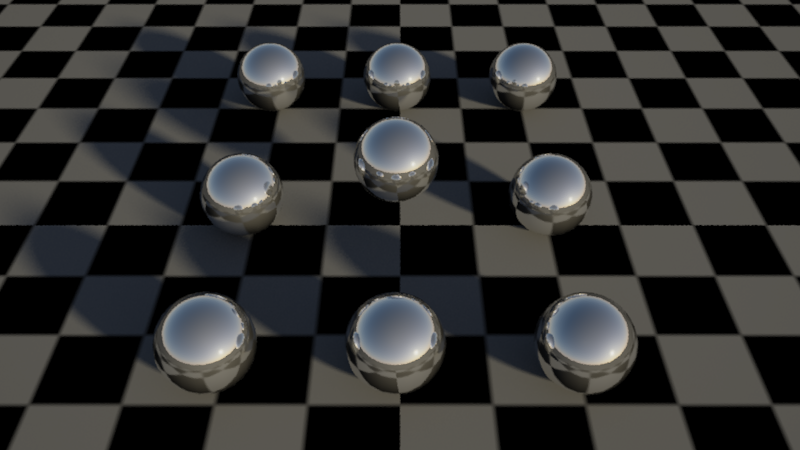
First, let's see the final frame we'd like to produce:

Final Desired Image

Step1: Disable motion blur and depth of field. Set min/max samples to 4 each. We are using defaults for brute-force GI and the physical sun samples. There's evident GI noise in the shadows and the sunlight shadow silhouettes are also noisy

Step2A: Increase the default brute-force GI samples from 16 to 256. This clears GI noise which is especially visible in the shadows (and a little bit in the white tiles too)
Step2B: Increase the physical sun shadow samples from 8 to 128. This clears the noise on the shadow silhouettes
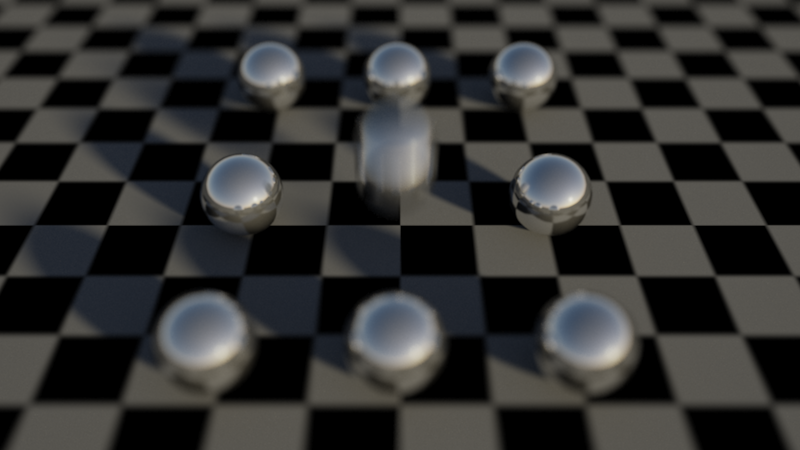
Step 3: Enable depth of field and motion blur. Increase both min/max samples until depth of field and motion blur look clean. For this example, 256 samples were enough. This frame rendered in about 11 seconds on a GTX470.
Step 4: Reduce min samples to 16. Leave the 'adaptive error threshold' to 0.01. Frame looks nearly as good as with fixed rate and rendered in 8 seconds on a GTX470. Scenes requiring even more 'max samples' (because of, say, bright-but-noisy motion blurred reflections) would have benefited even more.
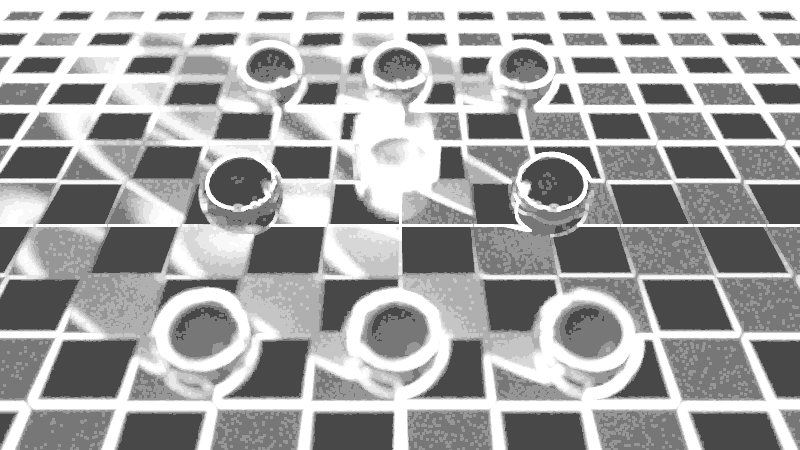
And this is what 'show samples' tells us about how much effort was spent per-pixel. The out-of-focus or heavily motion blurred parts of the image required more work to clean up.
If a deadline is looming and you cannot afford to go around your scene adjusting area light samples, material gloss samples, AO samples, etc, you can simply increase unified sampling's 'max samples' to a high number and reduce 'adaptive error threshold' a bit. Doing so will produce a nearly identical frame as with the method described above - but it could take longer to render! This is because you skipped the part of 'helping' the renderer by telling it where to focus the effort - so it will have to blindly keep shooting primary rays until the noise is gone.
How much slower the result will be (compared to the suggested method) depends on how noisy the scene is. If the scene contains very-difficult-to-clean GI which would normally need 2000-4000 brute-force GI rays but the user, instead, left the default 16 brute-force rays setting, unified sampling's 'max samples' would have to be raised into the thousands in order to compensate!
For optimal performance, it is recommended that you tweak the individual 'num samples' settings, like suggested, instead of simply raising the unified 'max samples'.
How to use Automatic Sampling
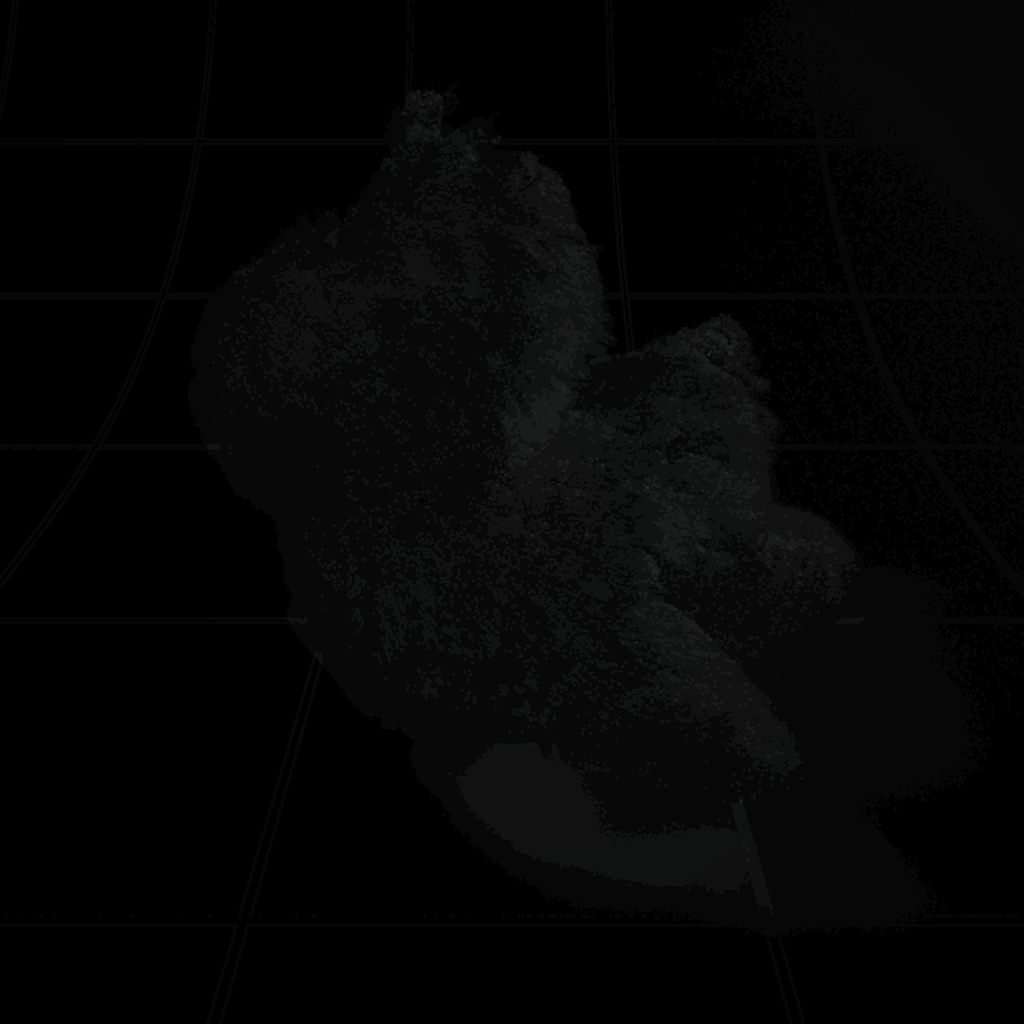
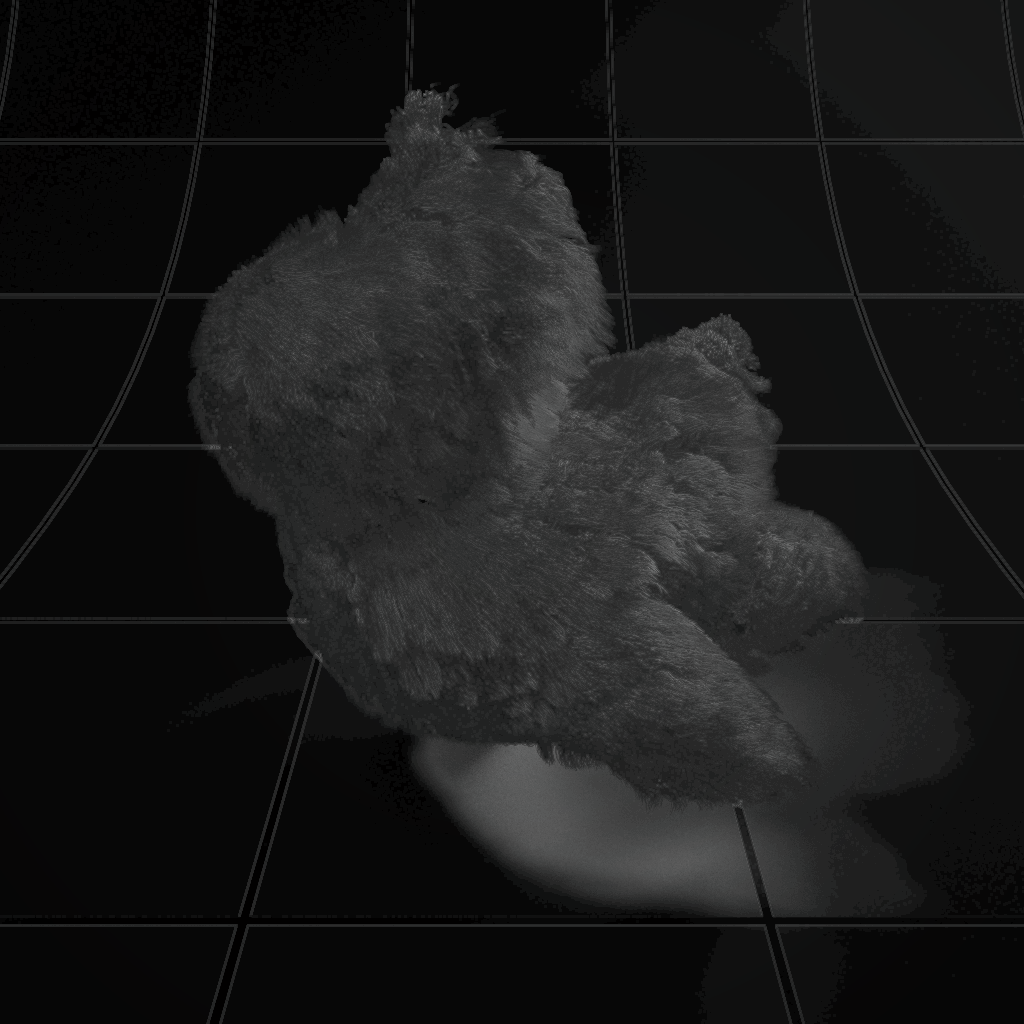
Automatic Sampling is a per-pixel sampling technique that simplifies sampling setup and tries to decide optimal raytraced sample counts based on shader and scene parameters solely using Adaptive Error Threshold for control. Decreasing the 'adaptive error threshold' value improves render quality and reduces noise at the cost of render time, increasing the 'adaptive error threshold' value reduces render times at the cost of noise and render quality. In the example images below you can see how decreasing the 'adaptive error threshold' automatically increases the cocentration of samples counts where necessary resulting in a much cleaner image.
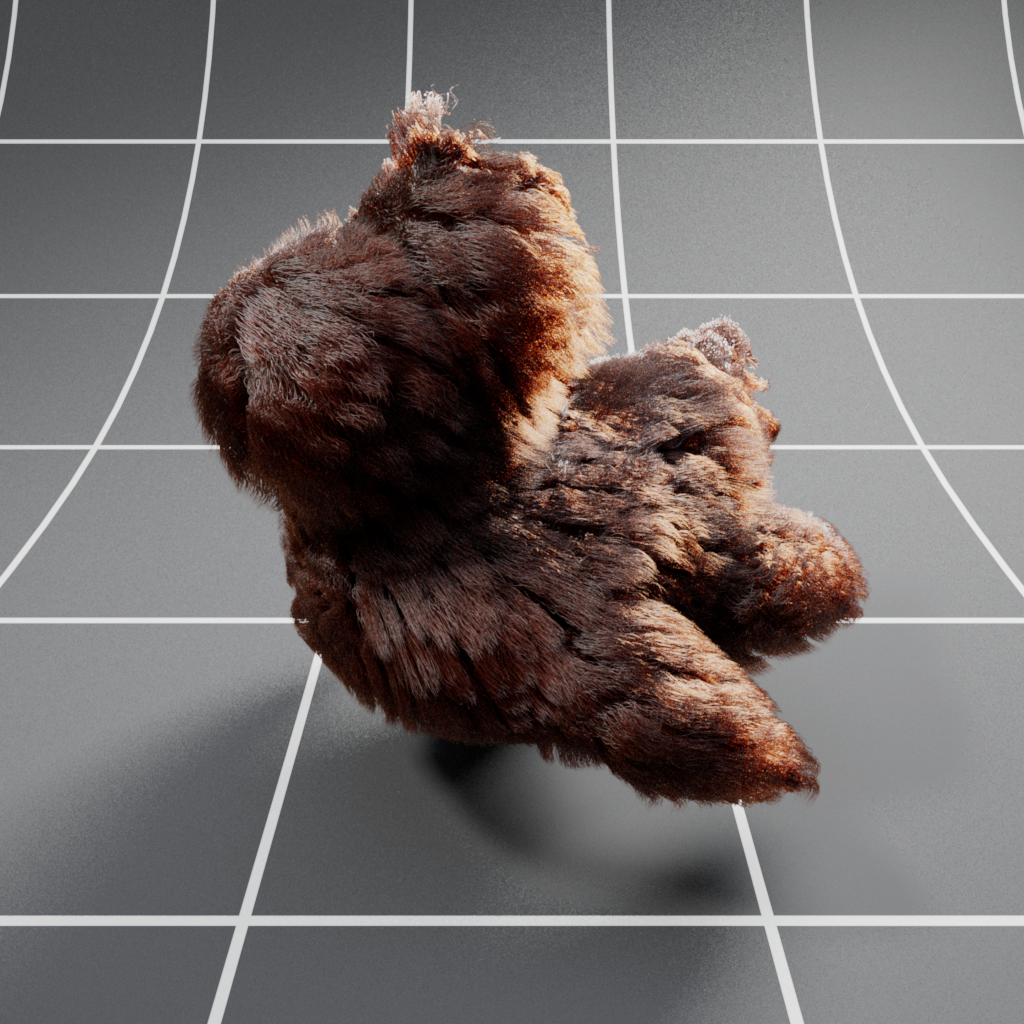
|
|
| Beauty - Adaptive Error Threshold: 0.1 | Samples view - 0.1 |

|
|
| Beauty - Adaptive Error Threshold: 0.01 | Samples view - 0.01 |
Automatic Sampling has no impact on point cloud render elements or any other non-raytraced techique.
What "Automatically reduce samples of other effects" does
By default, Redshift distributes samples across effects. It only does that when "Automatically reduce samples of other effects" option is enabled.
To demonstrate what this 'sample distribution' (or 'sample reduction') means, let's consider a simple example.
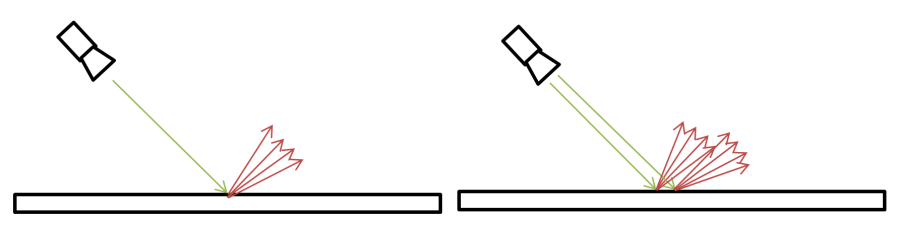
In the pictures below, unified sampling has been configured with "min samples" and "max samples" to both be either 1 (on the left) or 2 (on the right). This tells Redshift to shoot exactly 1 or 2 primary rays per pixel. The primary (camera) rays are colored green. Now, let's assume that these primary rays are hitting a glossy reflective material which is using 4 reflection samples. The reflection rays are colored red.
When 'Automatically reduce samples' is enabled, Redshift will attempt to shoot the user-desired number of reflection/refraction/GI/etc rays per pixel. It does that by dividing the number of reflection/refraction/GI/etc rays by the number of primary (unified) rays.
For the example below It does that by dividing the number of reflection rays by the number of primary (unified) rays.
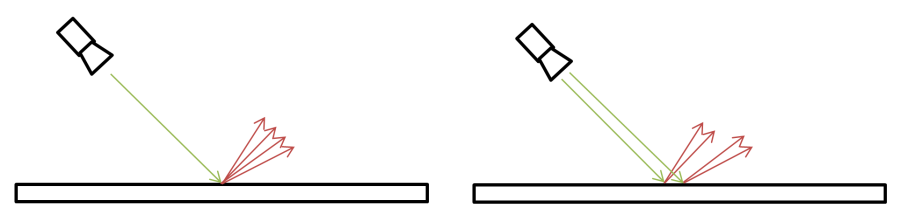
Redshift distributes reflection samples when "Automatically reduce samples of other effects" is enabled
When 'Automatically reduce samples' is disabled, this division no longer happens which makes Redshift shoot more reflection rays!
On the other hand, when "Automatically reduce samples of other effects" is disabled, no sample distribution/reduction happens
Even though the above example mentions reflection samples, the same thing happens for all secondary ray types: brute-force GI, ambient occlusion, area lighting, reflection, refraction, etc.
Why is the sample distribution useful? Well, think of the following scenario: you've already tweaked your settings to perfection and all surfaces look nice and clean. Then the director walks in and asks for longer motion blurs or a stronger depth-of-field effect. Doing either of these two and maintaining the same visual quality means having to increase your primary rays. If Redshift didn't divide the samples, increasing the primary rays (to clean DOF or motion blur noise) would make the entire frame considerably slower to render!
How to use Redshift when "Automatically reduce samples of other effects" is disabled
There are two ways of doing unified sampling when "Automatically reduce samples of other effects" is disabled.
The first, easy, way is to set all 'num samples' to 1 (for everything, including GI, glossy, area lights, etc) and let unified sampling take care of noise by simply shooting more rays per pixel. Some Mental Ray users refer to this technique as "brute-force unified sampling".
This technique is easy and can work in wide variety of scenes. In certain ways, it emulates what some 'unbiased' renderers do.
However, if a particular effect (say, area lighting), is producing an excessive amount of noise, the unified sampling 'max samples' will have to be raised to a high value such as 500 or even more. This, combined with a fairly low adaptive error threshold might force excessive pixel sampling which can be bad for performance, especially if the scene contains a lot of reflections of refractions.
So, the next best option is to start with very low samples for everything (maybe even use only 1 sample) but slightly increase 'num samples' of particularly noisy effects. For example, if your glossy reflections are clean but brute force GI is still noisy, you can try slightly increasing its 'num rays' from 1 sample to 2 or 4 samples. The cleaner the glossy, GI and lighting results are, the less work the unified sampling will have to do.
However, it's a bit hard to suggest a solid workflow with the "Automatically reduce samples of other effects" option disabled as the results are dependent on the scene setup, both performance-wise and visual-quality-wise. Sometimes it'll make more sense to render with 1 sample for all effects while, other times, a bit of per-effect tweaking might be necessary.