The classic Magic Bullet MisFire plugin for creating film damage effects now runs on the GPU within Universe! MisFire adds scratches, dust, flicker, noise, and more, giving your footage a stylized, aged look. Check out Universe's Retrograde tool for even more authentic aged film effects.
Presets
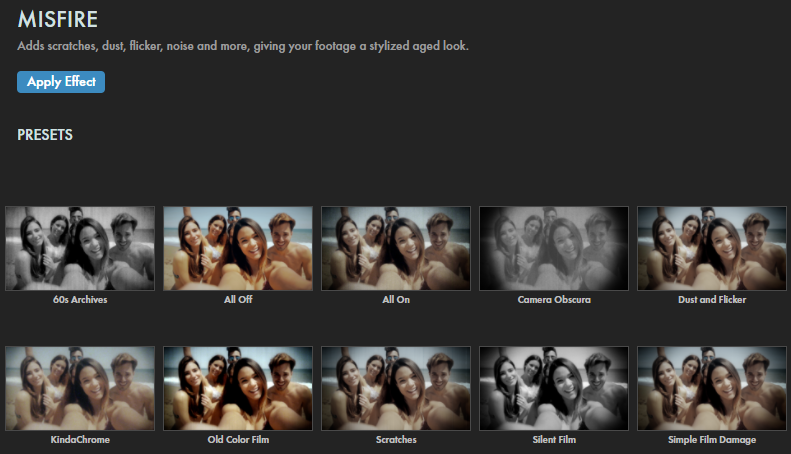
Apply pre-styled MisFire film damage to your compositions with only a few clicks. Find these presets via the blue Open Dashboard... button or the Choose a Preset... button below it.
As with all other Universe tools, you can modify or create a MisFire look and then save it under its own name by pressing the Save Preset... button.
Overall Controls
Damage Amount
controls the amount of damage applied to your footage. The higher the number, the more effects apply.
Color Amount
affects the amount of color change applied to your footage. At a value of 0.0, the original footage color remains untouched. At 100.0, the color is entirely controlled by the effects applied.
Random Seed is useful for adding uniqueness and variety into MisFire effects. Changing this control will change the effects' initial starting points, giving them a slightly new appearance.
Example: The All On preset defaults to setting Damage Amount and Color Amount to their 100 maximums.
Effects
MisFire includes 16 effects that can be applied either individually or as a part of a selected preset. Click the checkbox next to any effect to apply it, then use the settings below it to modify each one.
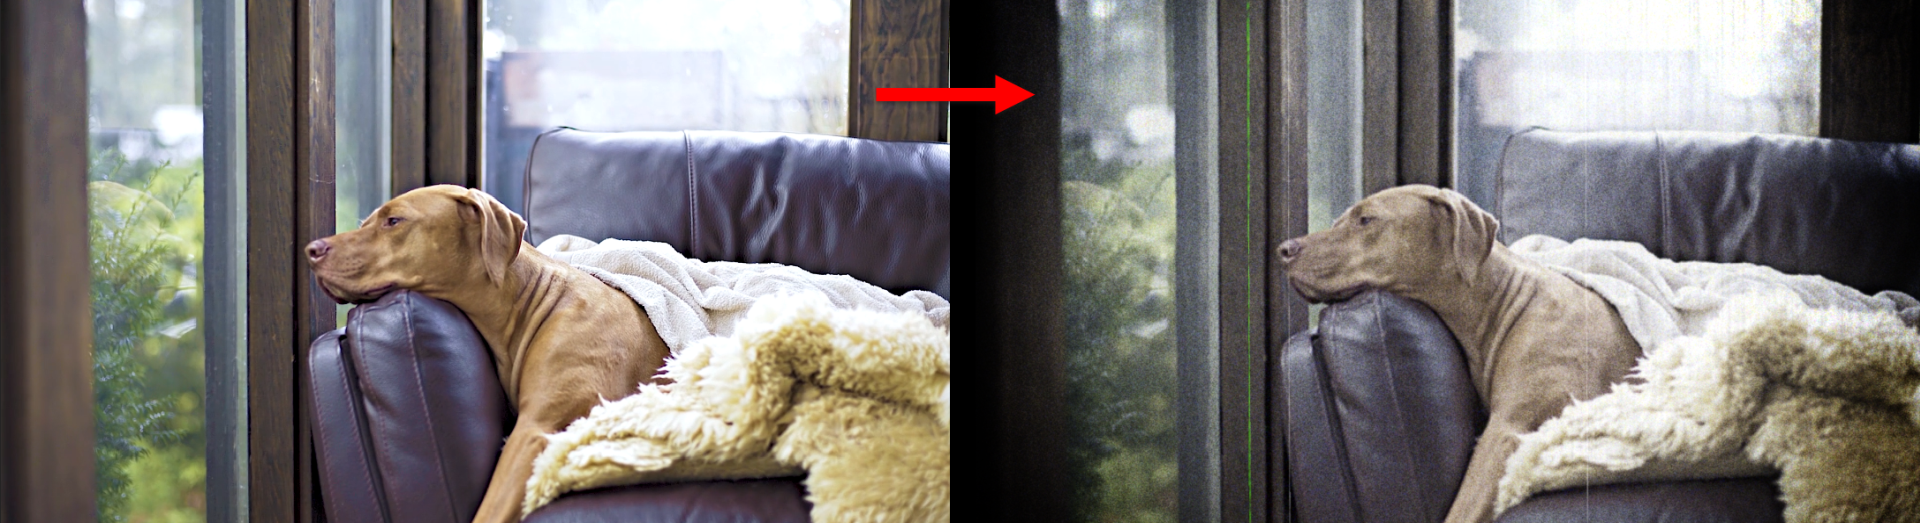
Softness
blurs the applied grain. Smaller values mean harder edges; larger values add a more diffuse look. When in doubt, lean toward lower values. The comparison below shows the impact of even a 1.0 value (right) under a 200% zoom.
Saturation
controls the amount of image saturation, from completely desaturated at 0.0 to highly saturated at 200.
A 100 value is essentially neutral and reflects your original image.
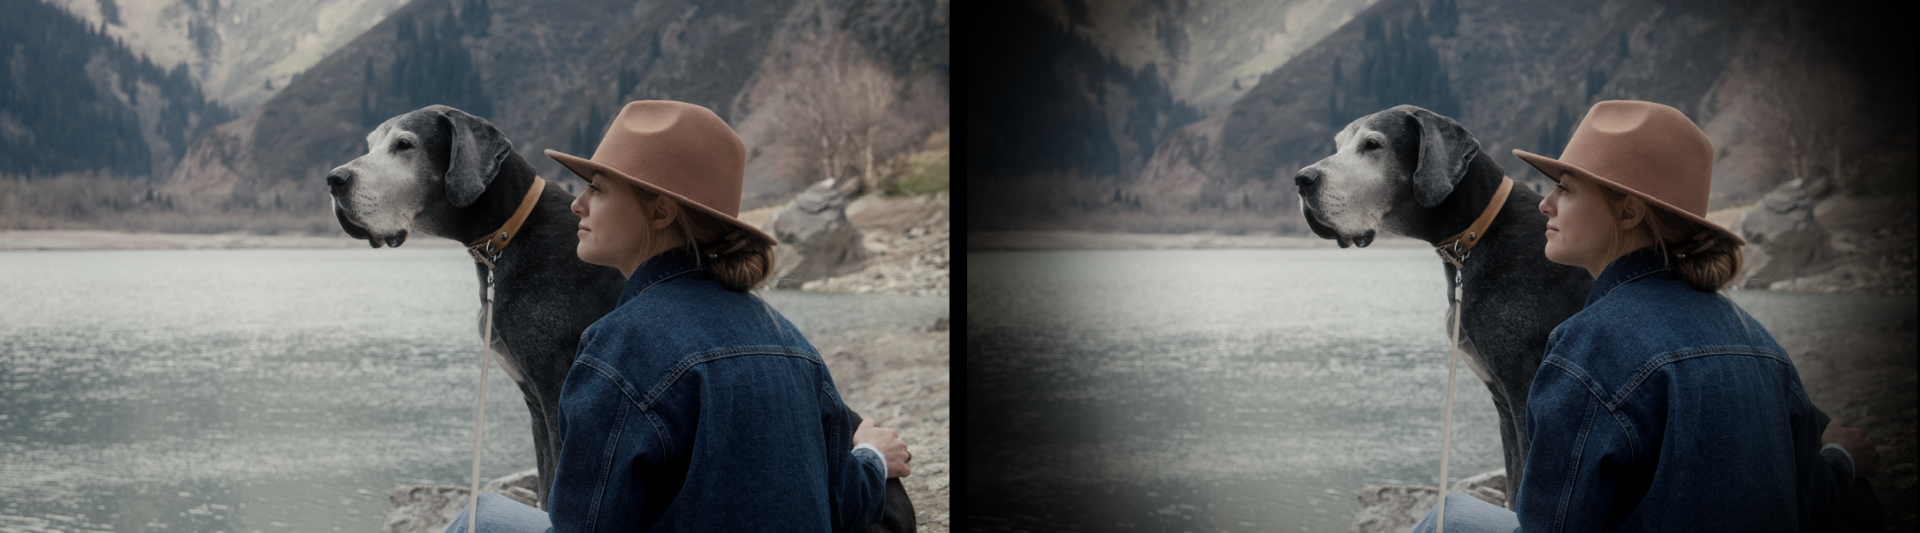
Fading
causes an overall lightening of your image that is exhibited as lower contrast. The default value is 100. Lower values will lessen the effect, increasing the contrast and even boosting contrast beyond the original image as you go into negative values. The triptych below illustrates values of -200, 0, and 200.
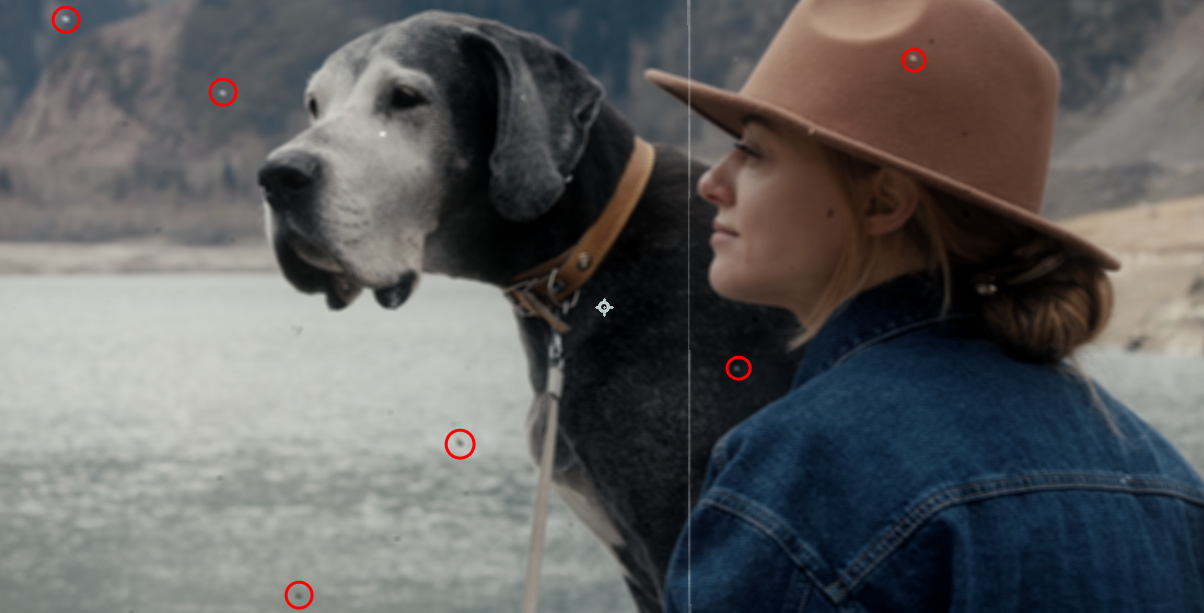
Funk
provides for tone variation across the frame. This simulates a film negative with lightness variation across the entire frame that may be caused by improper storage or an environment where fungus or mildew could form. This is similar to Splotches but occurs throughout the frame and will persist from frame to frame.
Funk Opacity:
The default is 15 percent. High values may look unnatural, so feel free to adjust to taste.
That said, Funk can be hard to spot at first glance, especially in live action content. We've circled a few funky areas (set to 100%) in the following image to spotlight subtle changes relative to the original (left).
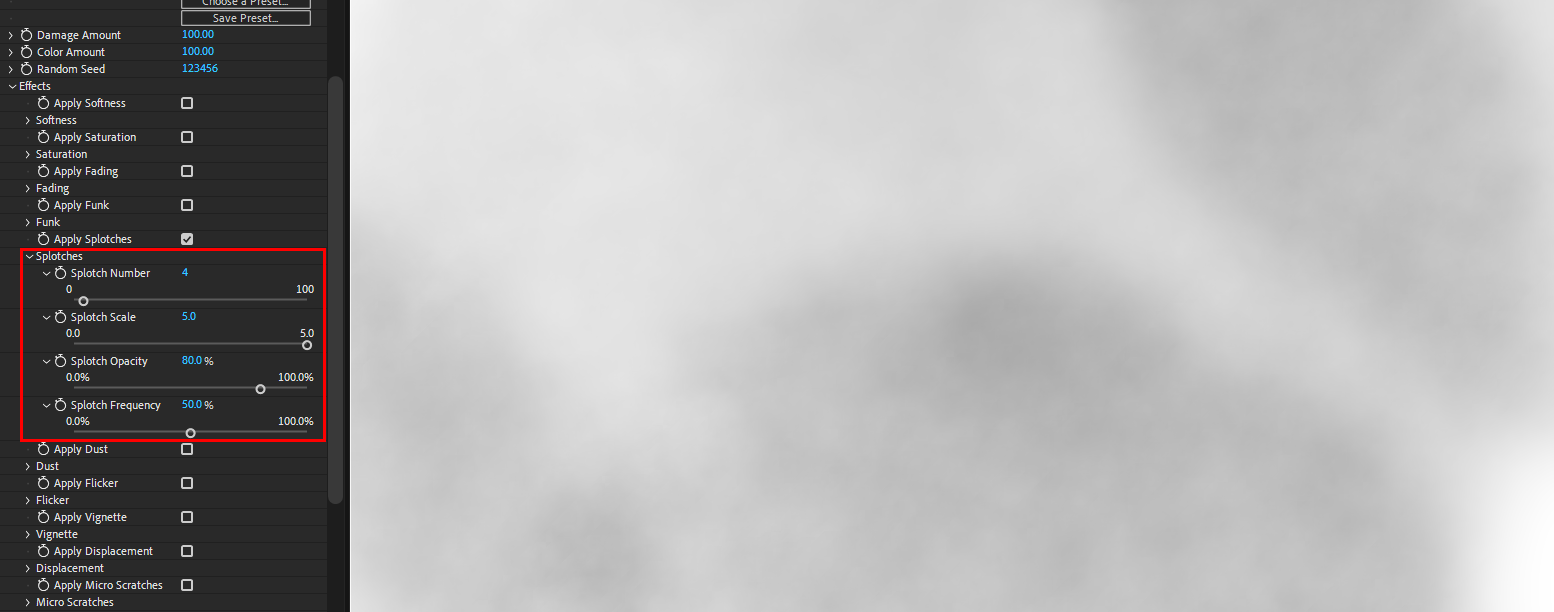
Splotches
manifest as a local dirtiness or discoloration of the frame. This can happen on any frame and will usually only persist for a frame or two at a time.
Again, splotches may be tough to spot (no pun intended), so we selected some high Splotches settings and applied them to a solid white background to illustrate.
Splotch Number
controls the splotch count on any given frame where the scale controls the size.
Splotch Scale
sets the approximate size of splotches, which can overlap.
A value of 1.0 will cover about 40% of a standard DV-size frame or about 16% of a 2K film frame.
Splotch Opacity
determines the darkness of discolored areas. You may need to lower the value on very bright footage (to make the splotch less prominent) or raise the value for very dark footage to bring out the effect.
Splotch Frequency
establishes how often a splotch appears in a sequence. The default value of 50 causes a splotch to appear on half of the frames. Try lowering this value if you want splotches to occur less frequently.
Dust essentially draws bits of black and white material onto the frame. This effect is similar to the small particles that appear on film that has been run through a projector numerous times.
The defaults are meant to generate a small amount of both black and white dust that is noticeable but not obtrusive. Of course, examples can benefit from being obtrusive, so we cranked up the dust amounts and bumped the
Dust Opacity to 40% to show what we're discussing.
Note: While a number of categories include a Frequency control, each category determines its frequency separately. Thus, splotches won’t necessarily appear in the same frame as dust or any other category of effect.
Black/White Dust Amount sets the maximum number of black or white dust particles appearing in any one frame. For large frame sizes, you may want to make this value much larger to increase the "dustiness."
Dust Opacity specifies dust particle transparency. The default is 100%, which makes particles quite noticeable. If you want the dust to look smaller in the frame, try lowering this value to between 40 and 60 percent.
Dust Frequency determines how often a dust particle appears in a sequence. The default value of 50 will cause dust particles to appear on half of the frames. Try lowering this value if you want dust to occur less frequently.
Flicker causes image brightness to change from frame to frame. This is similar to the uneven brightness caused by the degradation of an old print.
Flicker Frequency operates just like the Dust or Splotches categories, where the value specifies the percentage of frames in a sequence that will have change. The default value of 50 means half of the frames in a sequence will change in brightness.
Flicker Amount controls the degree of brightness change. The default of 10 will cause only a small variation. A value of 70 almost looks like strobing.
Vignette emulates how old film tends to exhibit darkening around frame edges, which often results from the lens and camera used to shoot the film. Unlike other MisFire effects, Vignette does not animate or change from frame to frame.
Vignette Size controls the overall darkening width. A value of 0 will darken all the way to the center while 100 will not darken the frame at all.
Vignette Intensity changes the amount of darkening. The image below compares intensity values of 20 (left) and 100 (right).
Displacement reflects how old or mishandled film prints can exhibit image warping caused by a physical bend in the film frame. Displacement offers a simple control for warping images.
Displacement Amount determines the level of image warping. With this control, a little goes a long way. This category of effect does not auto-animate, so you may want to keyframe this value.
Displacement Scale specifies the warping size within the image.
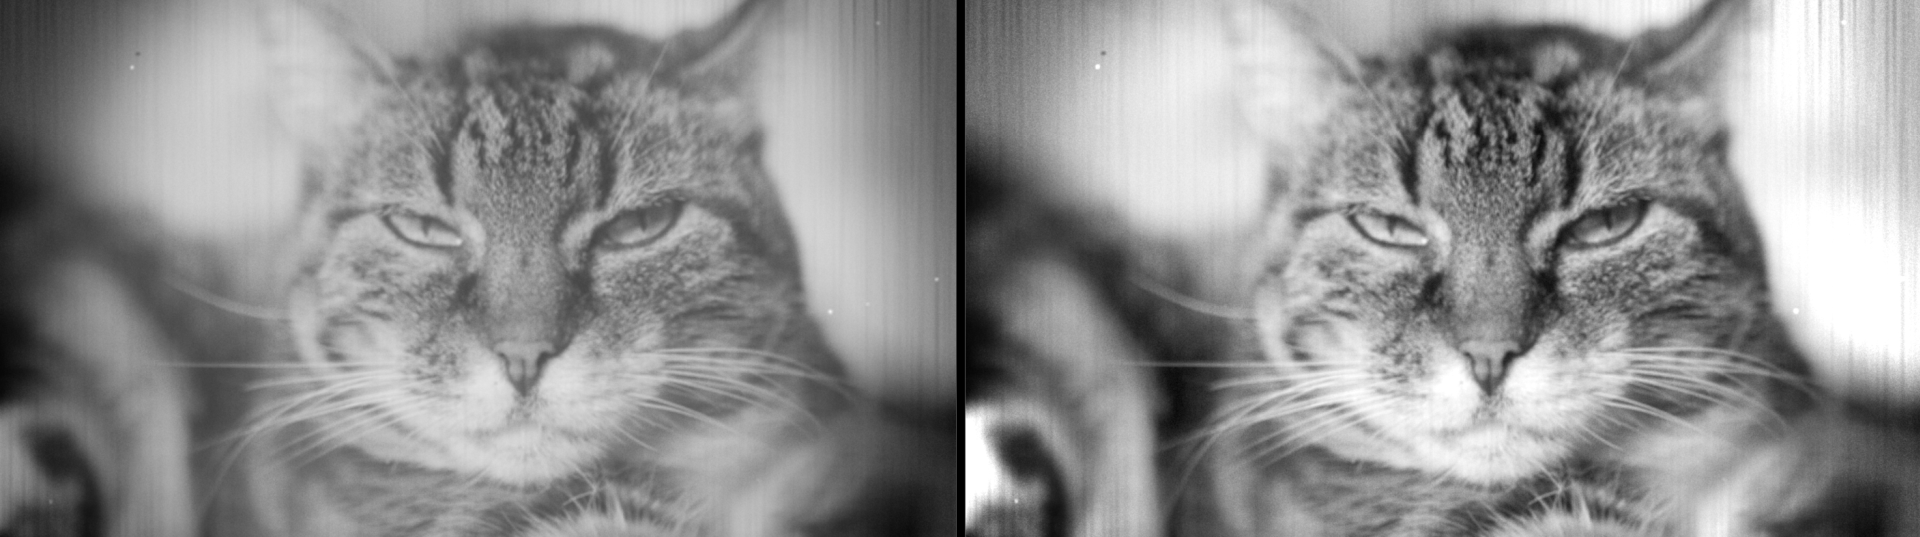
Micro Scratches. MisFire offers three different scratch styles. Micro Scratches are very thin, faint, black lines across the entire image. Film is often scraped as it run through a projector, creating faint black lines on frames.
Micro Scratches replicates this damage. The following comparison shows an image with MisFire default settings (left) and then Micro Scratches enabled with both effect controls maxed out.
Number Micro Scratches does not correspond to the number of scratches, but instead measures scratch density. Higher numbers yield a denser field of black lines.
Micro Scratches Opacity changes scratch line transparency. The Number and Opacity controls should be adjusted in tandem. If you raise the Number control, you may want to lower Opacity or vice versa.
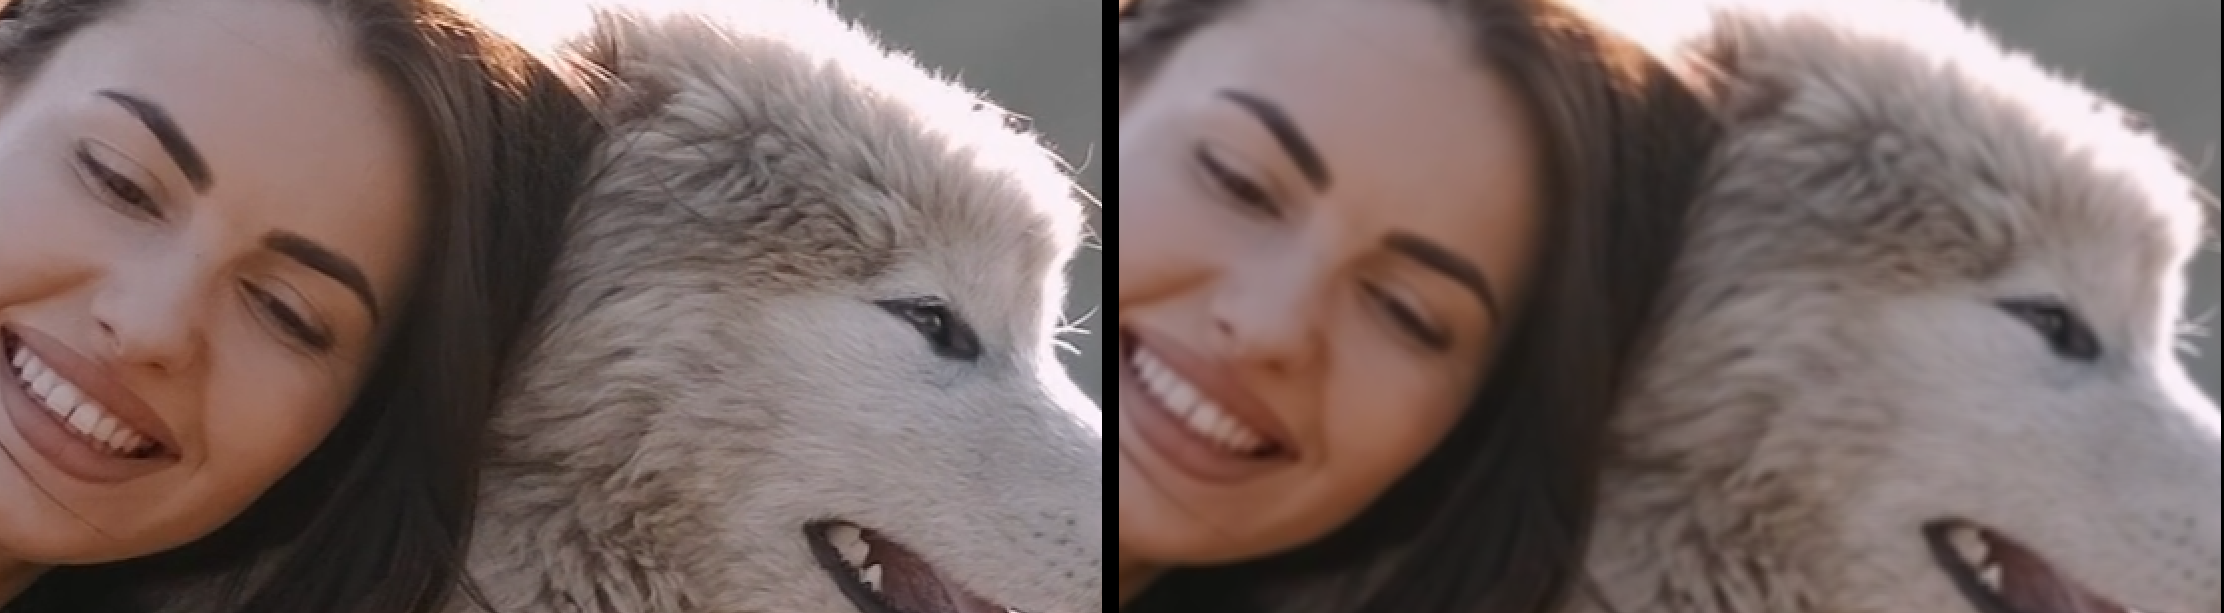
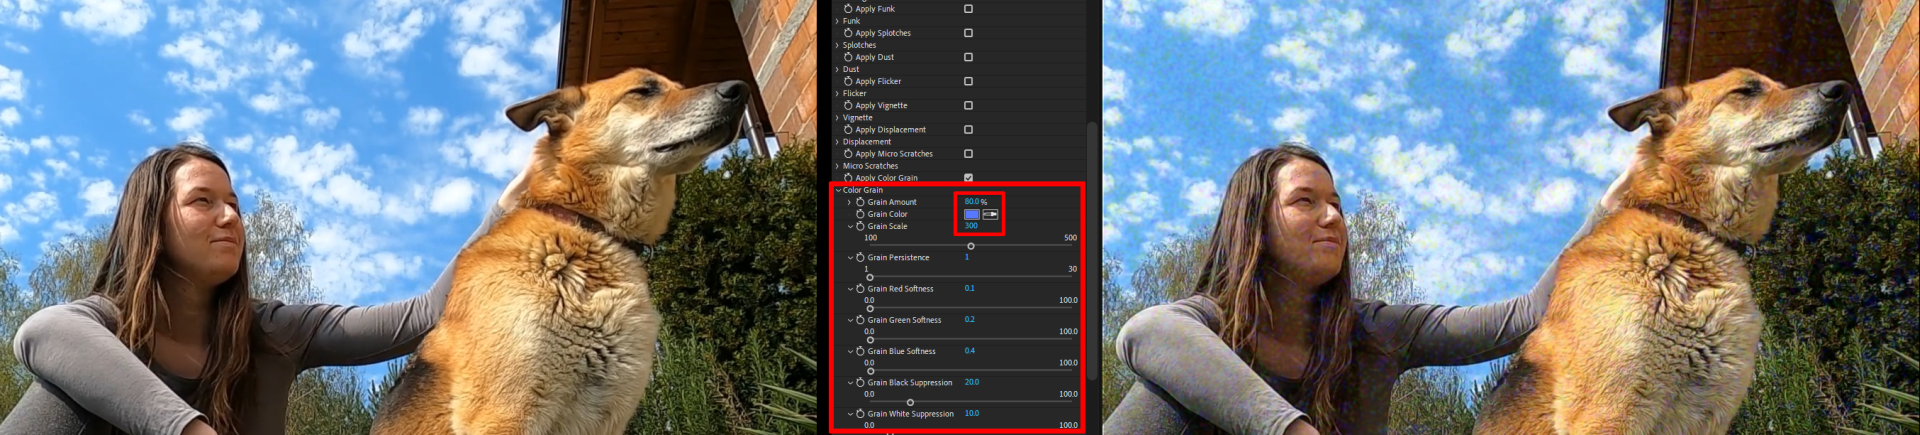
Color Grain. When most creatives think of film, they think of grain. While some film stocks do exhibit noticeable grain, this effect type is best used sparingly. The Color Grain category generates more than just random noise.
If all you want is random noise, a simple noise filter applied on top would suffice. Color Grain controls go beyond this by letting you create the multi-colored clumps associated with true film grain.
To see an (admittedly exaggerated) example of color grain in practice, we suggest zooming in on the following image duo, which began with the All Off preset to eliminate all other effects.
We boosted Grain Amount and Grain Scale parameters to make the grain obvious, and even still it can be difficult to pick it out against complex textures like good boi fur and foliage.
The grain becomes much more evident against plain textures, such as the sleeve and sky. Grain offers nine different controls for specifying the amount of grain and where grain appears on your image.
Grain Amount determines the grain density.
Grain Color lets you simply specify whether the grain is the same on all color channels (red, green, and blue). This control is on by default. If you turn it off, you will notice that the colored grain disappears
and is replaced by a tinted noise, based on the red, green, and blue percentages.
Grain Scale controls grain size.
Grain Persistance gives you the power to control how much the noise changes on the layer from frame to frame. The default is 1, which changes the noise randomly from one frame to the next.
Shifting this slider to 30 will increase how long the noise pattern remains the same from frame to frame.
Grain Red, Green and Blue Softness blurs the grain on each color channel. Smaller values give harder edges; larger values add a more diffuse look. It is best to stick with small values in these controls.
They are interrelated and related to the Color controls.
Grain Black/White Suppression parameters determine whether the grain is drawn in purely white or black areas. The percentages specify the percentage of brightness or darkness in the frame where the grain will NOT appear.
For example, 10% Suppression White means that the grain will not draw in the very brightest pixels in the image and will only appear fully in areas that are 10% or less of fully white pixels.
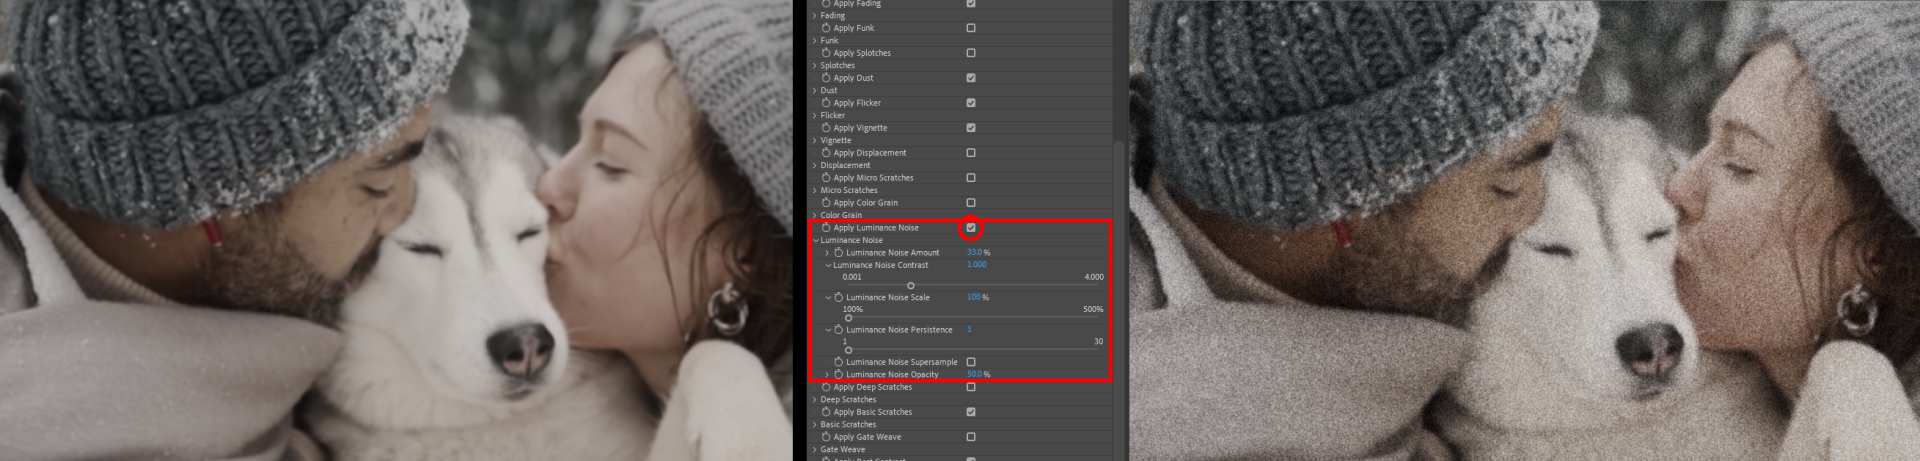
Luminance Noise adds quick rendering noise and grain to your footage's luminance channel of your footage. This tool self-animates by frame and is highly useful for mimicking the look of 35mm film grain.
Luminance Noise Amount can increase or decrease the amount of noise in the layer.
Luminance Noise Contrast either compounds or reduces the difference between darkness and lightness in the noise.
Luminance Noise Scale makes the noise size larger or smaller.
Luminance Noise Persistence gives you the power to control how much the noise changes on the layer from frame to frame. The default is 1, which changes the noise randomly from one frame to the next.
Increasing this slider to 30 will increase how long the noise pattern persists from frame to frame.
Luminance Noise Supersample creates a finer noise pattern when this checkbox is enabled.
Luminance Noise Opacity makes the effect more subtle and transparent over the original image.
Deep Scratches generates a colored scratch that appears to have depth and wiggles or move from frame to frame. This colored scratch mimics a physical scratch on the film that has removed some of the film resist,
letting light through that is pure in color. The scratches can shift left or right by a random amount that varies from zero to seven pixels, depending on the image size. In the image below, you can see the two clearly defined
green scratches that arrive with the All On preset's default values.
Number of Deep Scratches specifies the number of scratches drawn on the image.
Deep Scratches Duration controls the maximum length that any one scratch will appear on the image. The duration is determined randomly for each scratch and can be between 1 frame and the maximum specified number of frames.
Deep Scratches Tint determines scratch color. The default color is close to pure green, which is the color of real scratched film.
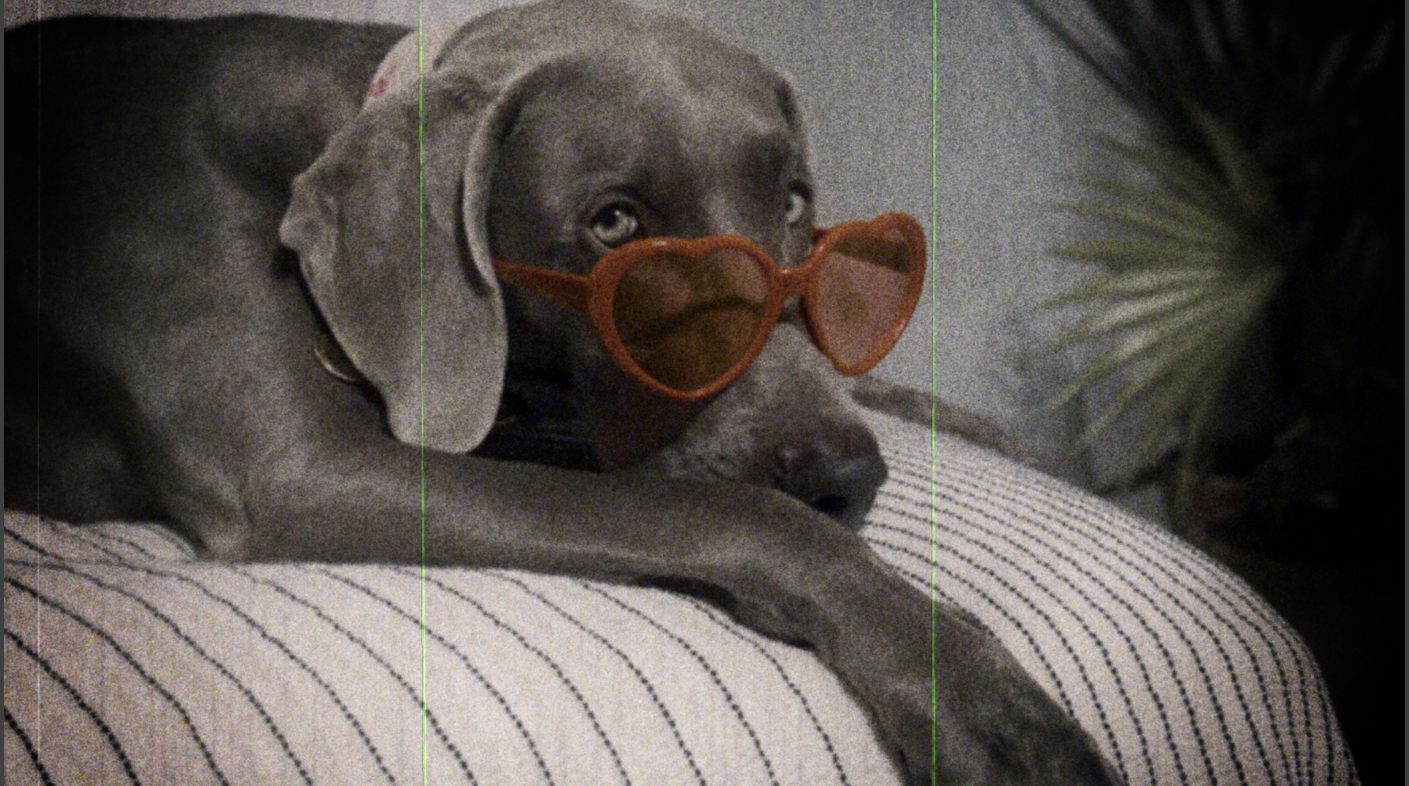
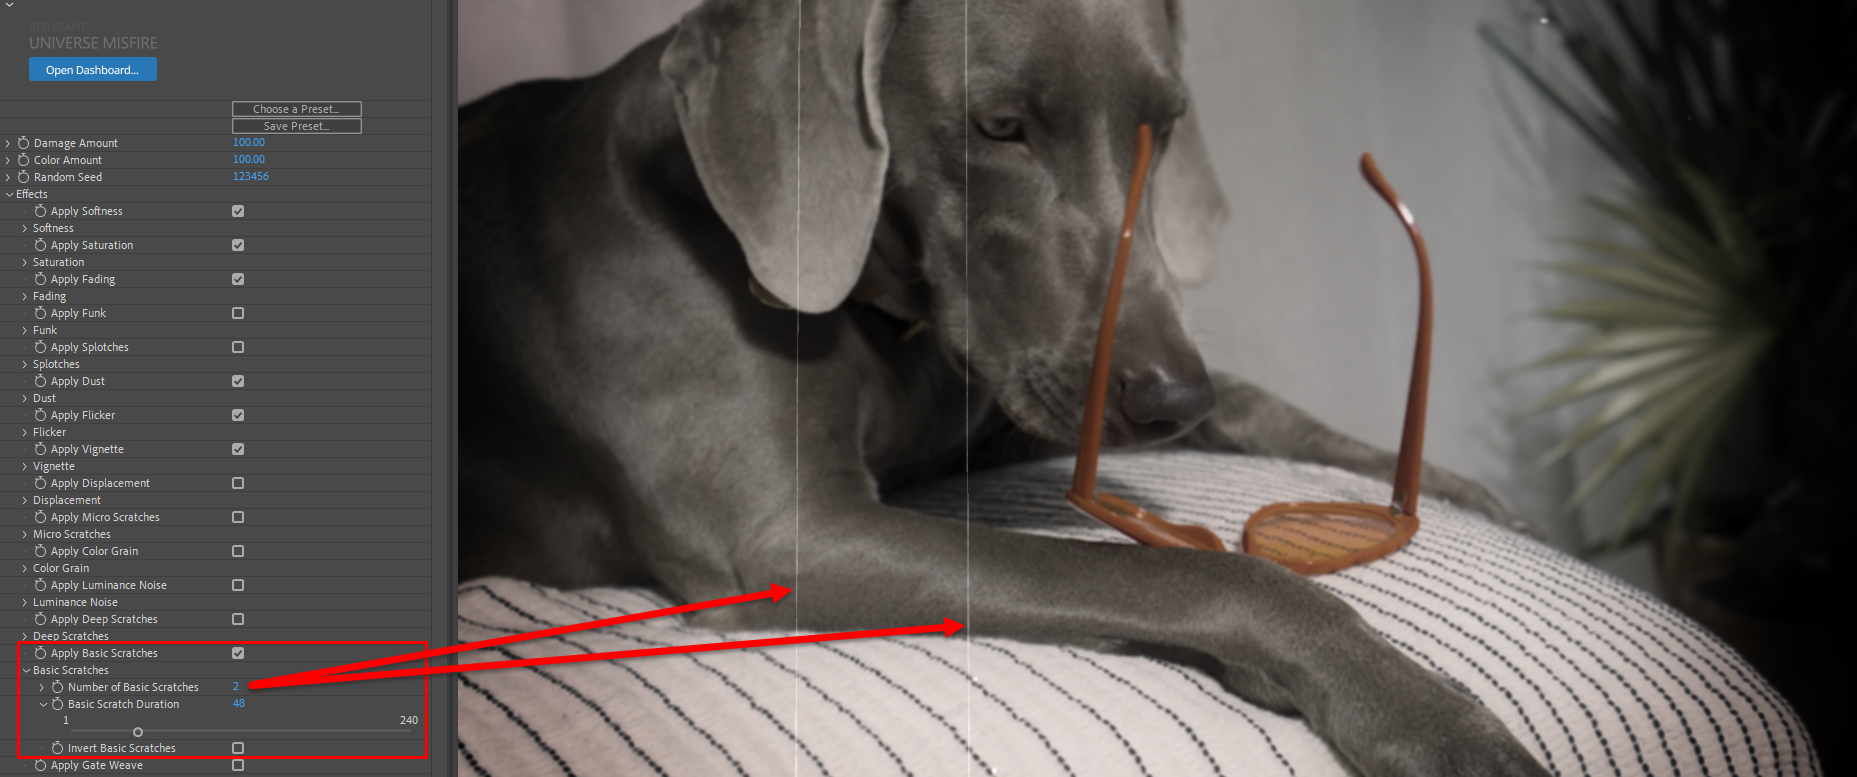
Basic Scratches create thin bright or dark lines that wiggle or move from frame to frame. Unlike the Micro Scratches or Deep Scratches effects, Basic Scratches will not cover the entire frame. Rather, it will gently fade toward the top or bottom of the frame.
Check out the two basic scratch lines from the Simple Film Damage preset below.
Number of Basic Scratches defines the number of scratches drawn on the image.
Basic Scratch Duration controls the maximum length that any one scratch will appear on the image. The duration is determined randomly for each scratch and can be between 1 frame and the maximum specified number of frames.
Invert Basic Scratcheslets you specify either dark lines (when it is on) or light lines (when off).
Gate Weave. When a film frame passes through a projector, sprockets outside the image area control the frames' vertical motion through the projector. Over time, a film can warp or the sprockets can wear,
causing the frame to appear to move side to side. This kind of motion is called gate weave, and this effect mimics it.
Weave Frequency controls the speed of the left-right motion of the frame. Small values cause the frame to move slowly. High values cause the frame to move quickly from side to side.
Weave Amplitude is measured in pixels. Thus, the default of 5 causes the frame to move left or right 5 pixels, then return to center.
Weave Noise Frequency varies the motion by a percentage you choose. Small values cause a slight variation in the motion, while large values cause the frame to appear to jitter.
Post Contrast. Film often exhibits higher contrast than video. Over time, the darkening or contrast change can be quite pronounced. Post Contrast lets you quickly add this effect. It applies a darkened, high-contrast effect.
The default value (50, shown on the Silent Film preset below in the right image) is fine in most cases. Values beyond 50 will likely look unrealistic. Negative values can cause the image to appear to wash out.
A wealth of information, advice, and how-to content exists for Maxon plugins beyond our user guides. Think of sources like @RedGiantNews on X/Twitter as must-see bonus content. The linked Tip Tuesday post above offers a great example. In it, Maxon's Michael Szalapski takes a two-minute tour through modifying Misfire defaults to achieve a desired look. He touches on ideas like keyframing scratches, comparing deep vs. micro scratches, and not doubling up on effects already covered by Magic Bullet Looks. Resources like this offer advanced tactics to execute alongside your winning workflow strategy. Don't miss them!